A Comprehensive Guide to Immunocytochemistry: From Basic Protocol to Advanced Troubleshooting for Cell Culture Research
This article provides a complete guide to immunocytochemistry (ICC) for researchers, scientists, and drug development professionals.
A Comprehensive Guide to Immunocytochemistry: From Basic Protocol to Advanced Troubleshooting for Cell Culture Research
Abstract
This article provides a complete guide to immunocytochemistry (ICC) for researchers, scientists, and drug development professionals. It covers the foundational principles of ICC, a detailed step-by-step protocol for adherent and suspension cells, advanced troubleshooting for common issues like weak staining and high background, and essential validation techniques to ensure reproducible, publication-quality results. The content synthesizes current best practices to empower users in visualizing protein localization and function within cultured cells.
Understanding Immunocytochemistry: Core Principles and Preparatory Steps for Cell Culture
What is ICC? Defining Immunocytochemistry and Its Relation to Immunofluorescence
Immunocytochemistry (ICC) is a common laboratory technique used to anatomically visualize the localization of a specific protein or antigen in cells by using a specific primary antibody that binds to it [1]. This method allows researchers to evaluate whether cells in a particular sample express the antigen in question and, when an immunopositive signal is found, to determine which sub-cellular compartments are expressing the antigen [1] [2]. The technique has become fundamental in biomedical research, particularly for diagnosing and classifying various cancers, including lymphomas, leukemias, and breast cancer, by identifying specific antigens that help determine the origin of undifferentiated tumors [3].
The development of immunocytochemistry dates back to 1941 when Albert Coons pioneered the use of fluorescent antibodies to visualize antigens in tissues, which is considered the birth of immunofluorescence [4]. This breakthrough paved the way for subsequent innovations, including the development of monoclonal antibody production using hybridoma technology in 1975 by Georges Köhler, César Milstein, and Niels K. Jerne, which revolutionized the field by providing a consistent supply of highly specific antibodies [4].
Table 1: Key Comparisons Between Protein Detection Techniques
| Parameter | ICC/IHC | Western Blot | ELISA |
|---|---|---|---|
| Sample Preparation | Fixed cells on coverslip (ICC); Fixed tissue section (IHC) [4] | Lysed and denatured protein [4] | Lysed cells or biological fluids [4] |
| Protein State | In situ, but fixed [4] | Denatured [4] | Native, unfixed [4] |
| Multiplexing Capability | Easily up to 4 targets [4] | Possible with fluorescent multiplexing [4] | Typically requires bead-based immunoassays [4] |
| Sensitivity | Medium [4] | High [4] | High [4] |
| Subcellular Compartmentalization | Highly suitable [4] | Limited to subcellular fractionation [4] | Limited to subcellular fractionation [4] |
ICC vs. IHC vs. IF: Critical Distinctions
While the terms immunocytochemistry (ICC), immunohistochemistry (IHC), and immunofluorescence (IF) are sometimes used interchangeably, they represent distinct techniques with important differences [5].
Immunocytochemistry (ICC) specifically refers to the immunostaining of cultured cell lines or primary cells, including smears, swabs, and aspirates [5]. In ICC, samples consist of intact cells that have had most of their surrounding extracellular matrix removed [1]. This includes individual cells that have been isolated from a block of solid tissue, cells grown within a culture, cells deposited from suspension, or cells taken from a smear [1].
Immunohistochemistry (IHC), in contrast, involves tissue immunostaining of either formalin-fixed paraffin-embedded (FFPE) or frozen tissue [5]. In IHC, samples are sections of biological tissue where each cell is surrounded by tissue architecture and other cells normally found in the intact tissue [1]. This preservation of tissue context makes IHC particularly valuable for understanding the physiological context of protein expression.
Immunofluorescence (IF) describes the detection method rather than the sample type. IF uses fluorophore-conjugated antibodies for detection, as opposed to chromogenic detection methods that use enzymes to produce colored precipitates [5]. From a conceptual scope, immunofluorescence has a broader range of coverage and includes both immunohistochemistry and immunocytochemistry [2]. In other words, IHC and ICC can both utilize IF as their detection methodology.
Table 2: Comparison of ICC, IHC, and IF Techniques
| Aspect | Immunocytochemistry (ICC) | Immunohistochemistry (IHC) | Immunofluorescence (IF) |
|---|---|---|---|
| Sample Type | Cultured cells, cell suspensions, smears, aspirates [5] | Tissue sections (FFPE or frozen) [5] | Detection method, not a sample type [2] [5] |
| Cellular Context | Isolated cells without native extracellular matrix [1] | Cells in their native tissue architecture [1] | Applicable to both cells and tissues [2] |
| Primary Applications | Subcellular localization, co-localization studies, expression profiles [4] | Diagnostic pathology, tumor classification, tissue distribution [3] | Protein distribution, multi-target visualization, high-resolution imaging [4] |
| Common Detection Methods | Both chromogenic and fluorescent [5] | Both chromogenic and fluorescent [5] | Exclusive use of fluorophores [5] |
Relationship Between ICC, IHC, and IF
Core Principles and Methodologies
Antibody-Antigen Interaction in ICC
The fundamental principle underlying ICC is the specific binding between an antibody and its target antigen [6]. Antibodies are immunoglobulin proteins with a variable region (Fab portion) that binds the epitope part of the antigen and a constant region (Fc portion) that is specific to the animal in which the antibody was raised [7]. For example, a rabbit anti-tubulin antibody binds the protein tubulin with its variable region and can be bound on its constant region by an anti-rabbit secondary antibody [7].
This specific binding allows researchers to target virtually any cellular protein with high precision. The location of fluorescence will vary according to the target molecule, appearing externally for membrane proteins and internally for cytoplasmic proteins [1]. When combined with confocal microscopy, immunofluorescence becomes a powerful technique for studying the location of proteins and dynamic processes such as exocytosis and endocytosis [1].
Detection Methods: Direct vs. Indirect
ICC detection can be performed using either direct or indirect methods, each with distinct advantages [6]:
Direct ICC involves the use of a primary antibody directly conjugated to a detectable tag, such as a fluorescent molecule or gold particles [1] [6]. This method is rapid, requiring only a single incubation step, and minimizes potential cross-reactivity in multiplex experiments [8]. However, it typically offers lower sensitivity as there is no signal amplification [5].
Indirect ICC utilizes an unlabeled primary antibody followed by a labeled secondary antibody that recognizes the primary antibody [1] [6]. This method provides signal amplification since multiple secondary antibodies can bind to a single primary antibody, significantly enhancing sensitivity [5]. While it requires an additional incubation step and careful selection of host species to avoid cross-reactivity, the extensive commercial availability of labeled secondary antibodies makes this approach highly accessible and versatile [8].
ICC Detection Methodologies
Comprehensive ICC Protocol
Sample Preparation and Fixation
Proper sample preparation is critical for successful ICC. Cells are typically cultured directly on glass coverslips, which may be coated with substances like poly-L-lysine, poly-D-lysine, or gelatin to enhance cell adhesion [6] [9]. For suspension cells, alternative methods such as cytospin centrifugation can be used to concentrate cells onto glass slides [1].
Fixation preserves cell morphology and antigenicity by immobilizing cellular components. The choice of fixative depends on the target antigen and its cellular localization:
- Aldehyde-based fixatives (e.g., 2-4% paraformaldehyde): Cross-link proteins, preserving structure well but potentially masking some epitopes; requires 10-20 minutes incubation at room temperature [6] [9].
- Organic solvents (e.g., methanol, ethanol, acetone): Precipitate proteins and simultaneously permeabilize membranes; typically require 5-10 minutes incubation at -20°C [6].
Optimal fixation time must be determined empirically, as over-fixation can mask epitopes while under-fixation may lead to poor epitope preservation [6].
Permeabilization and Blocking
Permeabilization is essential when using aldehyde fixatives to allow antibody access to intracellular targets by partially solubilizing cell membranes [6]. This step is often unnecessary when using organic solvents as they simultaneously fix and permeabilize cells [6].
Common permeabilization agents include:
- Harsh detergents (e.g., Triton X-100, NP-40 at 0.1-0.2%): Effective for most intracellular targets but may damage membrane-associated antigens [6].
- Mild detergents (e.g., Tween-20, saponin, digitonin at 0.2-0.5%): Better for preserving membrane integrity [6] [8].
Blocking reduces non-specific antibody binding using protein solutions such as 2-10% normal serum from the secondary antibody host species or bovine serum albumin (BSA) [6] [9]. Blocking typically requires 1-2 hours at room temperature [6]. The blocking solution should not contain serum from the host animal of the primary antibody, as this would increase background staining [6].
Antibody Incubation and Detection
Primary antibody incubation is performed using antibodies diluted in appropriate buffers, often containing BSA and small amounts of detergent [6] [9]. Incubation conditions vary:
- 1 hour at room temperature for strong, abundant antigens [9].
- Overnight at 2-8°C for weak or scarce antigens [9].
Secondary antibody incubation uses species-specific antibodies conjugated to fluorophores, typically incubated for 1 hour at room temperature in the dark [6] [9]. From this step forward, samples must be protected from light to prevent fluorophore photobleaching [9].
Counterstaining and mounting are final steps where nuclear stains like DAPI (4',6-diamidino-2-phenylindole) are applied for 2-5 minutes to visualize cell nuclei [9]. Samples are then mounted using anti-fade mounting medium to preserve fluorescence during storage and visualization [9].
Complete ICC Workflow
The Scientist's Toolkit: Essential Research Reagents
Table 3: Essential Reagents for ICC Experiments
| Reagent Category | Specific Examples | Function & Application Notes |
|---|---|---|
| Fixatives | 4% Paraformaldehyde (PFA) [6], Methanol [6], Acetone [6] | Preserve cell morphology and immobilize antigens; PFA cross-links proteins, while organic solvents precipitate proteins [6]. |
| Permeabilization Agents | Triton X-100 [6], Tween-20 [6], Saponin [8] | Solubilize membrane lipids to allow antibody access to intracellular targets; concentration and incubation time require optimization [6]. |
| Blocking Agents | Bovine Serum Albumin (BSA) [6], Normal Serum [6] [9] | Reduce non-specific antibody binding; normal serum should match the host species of secondary antibodies [6]. |
| Detection System | Primary Antibodies [6], Fluorophore-conjugated Secondary Antibodies [9] | Specifically bind target antigens (primary) and amplify signal (secondary); multiple secondary antibodies bind each primary for signal amplification [5]. |
| Counterstains | DAPI [9], Propidium Iodide [10], Hoechst 33342 [10] | Label nuclear DNA for reference; DAPI is most common with absorption maximum at 358 nm and emission at 461 nm [9]. |
| Mounting Media | Anti-fade Mounting Medium [9] | Preserve fluorescence and prevent photobleaching during storage and visualization [9]. |
| E3 Ligase Ligand-linker Conjugate 108 | E3 Ligase Ligand-linker Conjugate 108, MF:C22H26ClN3O4, MW:431.9 g/mol | Chemical Reagent |
| E3 Ligase Ligand-linker Conjugate 151 | E3 Ligase Ligand-linker Conjugate 151, MF:C31H40N6O4S, MW:592.8 g/mol | Chemical Reagent |
Critical Experimental Considerations
Appropriate Controls for ICC
Proper controls are essential for validating ICC results and are required for publication in scientific journals [7]. Three main types of controls should be implemented:
Primary antibody controls demonstrate the specificity of primary antibody binding to the antigen [7]. The most rigorous approach uses genetic manipulation, such as:
- Knockout controls: Tissue or cells from animals lacking the gene encoding the target antigen should show no labeling [7].
- Transfected cell lines: Cells expressing the antigen of interest serve as positive controls, while untransfected cells serve as negative controls [7].
- Alternative methods include immunoblotting to confirm antibody specificity or colocalization with a second independent antibody targeting different epitopes on the same protein [7].
Secondary antibody controls show that labeling is specific to the primary antibody [7]. This is typically done by omitting the primary antibody while including all other steps, which should result in no specific staining [9] [7].
Label controls ensure that observed labeling results from the added label rather than endogenous sources [7]. This is particularly important for fluorescent detection, where some cells may contain endogenous fluorophores that could create false positives.
Optimization and Troubleshooting
Successful ICC often requires optimization of several parameters:
Antibody concentration must be titrated to achieve strong specific signal with minimal background. Commercial antibodies typically provide recommended starting dilutions, but these may require adjustment for specific applications [9].
Fixation conditions need careful optimization, as over-fixation can mask epitopes while under-fixation may lead to poor morphology and antigen preservation [6]. When epitopes are masked by fixation, antigen retrieval techniques may be employed, though these require caution with cell samples as the exposure conditions can be harsh [8].
Multiplex ICC requires careful experimental design when detecting multiple antigens simultaneously:
- Primary antibodies must be raised in different host species to prevent cross-reactivity of secondary antibodies [8].
- Fluorophores with minimal spectral overlap should be selected based on the available microscope filter sets [8].
- Staining intensity should be balanced, as extremely bright signals can bleed into adjacent channels [8].
Advanced Applications and Future Directions
ICC has evolved significantly from its origins in the 1940s, with current applications extending far beyond simple protein localization. Modern implementations include:
Multi-parametric experiments that simultaneously detect several antigens, enabled by the broad availability of fluorophores and advancements in fluorescence microscopy [4]. Current systems can routinely detect 4 or more targets in a single sample, with more possible through techniques like spectral unmixing or sequential probing [4].
Live-cell imaging applications where antibodies or other labeling strategies are used to track dynamic processes in real-time, though this typically requires specialized labeling approaches as traditional ICC uses fixed samples.
Super-resolution techniques that break the diffraction limit of light microscopy, enabling visualization of subcellular structures with unprecedented detail when combined with ICC [4].
The continued development of brighter, more photostable fluorophores, along with advances in microscopy technology and image analysis software, promises to further expand the capabilities and applications of immunocytochemistry in biomedical research and drug development [4] [8].
Immunocytochemistry (ICC) is a cornerstone technique in biomedical research, enabling the visualization and localization of specific proteins within individual cultured cells. This powerful method relies on the specific binding of antibodies to target proteins (antigens), followed by detection using fluorescent labels (fluorophores). The synergy between these two components allows researchers to precisely determine the subcellular distribution, expression levels, and dynamic behavior of proteins in their native cellular context, providing invaluable insights into protein function, cell signaling pathways, and disease mechanisms. For researchers and drug development professionals, mastering these principles is essential for generating reproducible, high-quality data in studies ranging from basic cell biology to preclinical drug evaluation.
The fundamental process involves exploiting the immune system's exquisite specificity, where antibodies recognize and bind to unique three-dimensional structures (epitopes) on target proteins. By conjugating these antibodies to fluorophores—molecules that absorb light at specific wavelengths and emit light at longer wavelengths—researchers can transform invisible molecular interactions into visible signals detectable by fluorescence microscopy. This combination forms the basis for not only single-protein detection but also sophisticated multiplexing experiments where multiple proteins can be visualized simultaneously within the same cell, revealing complex interaction networks and spatial relationships that drive cellular function.
Core Principles of Antibody-Antigen Specificity
Antibody Structure and Epitope Recognition
Antibodies, particularly immunoglobulin G (IgG), are Y-shaped proteins generated by the immune system to recognize foreign molecules with high specificity. In ICC, this natural recognition system is harnessed using antibodies raised against specific protein targets. The tip of each antibody arm contains hypervariable regions that form the antigen-binding site, which recognizes a specific portion of the target protein called an epitope. This precise molecular complementarity enables antibodies to distinguish between even highly similar proteins, providing the foundation for specific detection in complex cellular environments.
- Primary Antibodies: These bind directly to the protein of interest and are typically produced by immunizing host animals (e.g., rabbits, mice, goats) with the target antigen. Monoclonal antibodies originate from a single B-cell clone and recognize a single epitope, ensuring high specificity, while polyclonal antibodies represent a mixture of antibodies recognizing different epitopes on the same antigen, often providing stronger signals.
- Secondary Antibodies: These recognize and bind to the constant region (Fc) of primary antibodies, amplifying the signal and providing a flexible detection system. Since secondary antibodies are conjugated to fluorophores, a single primary antibody can be used with different secondary antibodies to produce different detection signals, making this indirect method highly versatile and sensitive [11] [6].
Key Factors Influencing Antibody Specificity
Several critical factors determine the success and specificity of antibody-antigen interactions in ICC:
- Epitope Availability: The target epitope must be accessible to the antibody after cell fixation and permeabilization. Some fixation methods can mask epitopes by altering protein conformation.
- Antibody Affinity and Avidity: Affinity refers to the strength of interaction between a single antibody binding site and its epitope, while avidity describes the combined strength of multiple binding interactions. High-affinity antibodies provide stronger, more specific signals.
- Species Compatibility: Primary and secondary antibodies must be compatible—secondary antibodies must be raised against the species in which the primary antibody was produced [11] [12].
- Validation: Antibodies must be validated for ICC applications to ensure they recognize the correct target in fixed and permeabilized cells, as performance can vary significantly between techniques like ICC, western blot, and immunohistochemistry [13].
Fluorescence Detection and Signal Generation
Fluorophore Properties and Selection Criteria
Fluorophores are molecules that absorb light at specific wavelengths and then emit light at longer wavelengths (lower energy) through the process of fluorescence. When selected and implemented correctly, they provide the detectable signal that reveals the location and quantity of the target protein. Key optical properties must be considered when choosing fluorophores for ICC:
- Excitation and Emission Spectra: The specific wavelengths at which a fluorophore absorbs (excitation maximum) and emits (emission maximum) light. These determine which microscope filters and light sources are needed.
- Stokes Shift: The difference between the excitation and emission maxima. Larger Stokes shifts reduce background signal by minimizing overlap between excitation and emission wavelengths.
- Quantum Yield: The efficiency with which a fluorophore converts absorbed photons into emitted photons. Higher quantum yields produce brighter signals.
- Photostability: The resistance of a fluorophore to photobleaching (permanent loss of fluorescence) during illumination. More photostable fluorophores allow longer imaging sessions.
Table 1: Common Fluorophores and Their Properties
| Fluorophore | Excitation Max (nm) | Emission Max (nm) | Relative Brightness | Photostability |
|---|---|---|---|---|
| DAPI | 358 | 461 | Medium | High |
| FITC | 495 | 519 | Medium | Low |
| TRITC | 557 | 576 | Medium | Medium |
| Cy3 | 554 | 568 | High | Medium |
| Alexa Fluor 488 | 495 | 519 | High | High |
| Alexa Fluor 555 | 555 | 565 | High | High |
| Texas Red | 595 | 615 | High | Medium |
Signal Amplification and Detection Sensitivity
The indirect ICC method, using a primary antibody followed by a fluorophore-conjugated secondary antibody, provides significant signal amplification as multiple secondary antibodies can bind to a single primary antibody. This amplification enhances detection sensitivity, enabling visualization of low-abundance proteins. The high specificity of this system, when properly optimized, ensures that the fluorescent signal accurately represents the distribution of the target protein with minimal background noise [11] [6].
Advanced fluorophores such as quantum dots (QDs) offer superior properties for detection, including high quantum yield, exceptional photostability, and narrow, symmetric emission spectra. These properties make QDs particularly valuable for multiplexed experiments detecting multiple proteins simultaneously. However, conjugating antibodies with QDs requires specialized approaches, including site-specific and site-nonspecific conjugation methods, to maintain antibody functionality while exploiting the superior optical properties of nanomaterials [14].
Experimental Protocols for Immunocytochemistry
Sample Preparation and Fixation Protocol
Proper sample preparation is crucial for preserving cellular morphology and antigen integrity while ensuring antibody accessibility:
- Cell Culture: Grow cells on sterile glass coverslips (12-25mm depending on well plate size) to 50-70% confluency. For poorly adherent cells, use poly-D-lysine or other adhesion-coated coverslips to prevent detachment during processing [11] [15].
- Fixation: Aspirate culture media and gently wash cells 3x with PBS (5 minutes per wash, room temperature). Fix cells using one of the following methods:
- 4% Paraformaldehyde (PFA): Incubate for 10 minutes at room temperature or 20 minutes at 4°C. Ideal for most proteins, preserves structure well.
- 100% Methanol: Pre-chill to -20°C, incubate for 5 minutes at room temperature. Simultaneously fixes and permeabilizes cells.
- Methanol/Acetone: 1:1 mixture chilled to -20°C, incubate for 5-10 minutes [11] [6].
- Post-fixation Handling: After fixation, wash cells 3x with PBS (5 minutes per wash). For long-term storage, keep samples in 0.1% sodium azide/PBS at 4°C for 1-2 weeks maximum [6].
Table 2: Fixation Methods and Their Applications
| Fixative | Concentration | Incubation Conditions | Best For | Notes |
|---|---|---|---|---|
| Paraformaldehyde (PFA) | 4% in PBS | 10-20 min, RT or 4°C | Most intracellular proteins; preserves morphology | Requires permeabilization step |
| Methanol | 100% | 5-10 min, -20°C | Cytoskeletal proteins; nuclear antigens | Fixes and permeabilizes simultaneously; may destroy some epitopes |
| Acetone | 100% | 5-10 min, -20°C | Membrane proteins; viral antigens | Excellent penetration; may shrink cells |
| Ethanol | 95-100% | 5-10 min, -20°C | Selected nuclear antigens | Mild fixative; good for DNA/RNA detection |
Permeabilization and Blocking
- Permeabilization: Required when using PFA fixation to allow antibody access to intracellular epitopes. Incubate cells with 0.1-0.5% Triton X-100 in PBS for 5 minutes at 4°C. For membrane-associated proteins, use milder detergents like Tween-20 or saponin to preserve membrane integrity [11]. Note: Permeabilization is unnecessary after methanol or acetone fixation [6].
- Blocking: Critical for reducing non-specific antibody binding and minimizing background. Incubate samples with blocking buffer (e.g., 5% normal serum from the secondary antibody host species, 0.3% Triton X-100 in PBS) for 30 minutes at room temperature. Alternative blocking buffers include 1-5% BSA in PBS. The blocking serum should always match the host species of the secondary antibody [11] [15].
Antibody Incubation and Detection
- Primary Antibody Incubation: Prepare primary antibody at appropriate dilution in blocking buffer (typical range: 5-20 µg/mL). Incubate samples in a humidified chamber either overnight at 4°C or for 2 hours at room temperature. For multiple primary antibodies from different host species, simultaneous incubation is possible [11] [6].
- Washing: Remove unbound primary antibody by washing 3x with PBS containing 0.1% Triton X-100 (PBS-T).
- Secondary Antibody Incubation: Prepare fluorophore-conjugated secondary antibody at appropriate dilution (typically 1:500-1:1000) in blocking buffer. Incubate samples for 1 hour at room temperature in the dark. From this point forward, minimize light exposure to prevent fluorophore photobleaching [11] [15].
- Final Washes: Wash samples 3x with PBS-T (5 minutes per wash) to remove unbound secondary antibody.
Counterstaining, Mounting, and Imaging
- Counterstaining: Incubate samples with 1 µg/mL DAPI or other nuclear stain for 5 minutes at room temperature to visualize cell nuclei [11].
- Mounting: Place a drop of anti-fade mounting medium on a microscope slide. Carefully invert coverslip (cells facing down) onto mounting medium. Gently remove excess medium and seal edges with nail polish if required [15].
- Imaging: Visualize cells under a fluorescence microscope with appropriate excitation sources and filter sets. Acquire images as soon as possible after processing, though slides can be stored at 4°C in the dark for short periods [11].
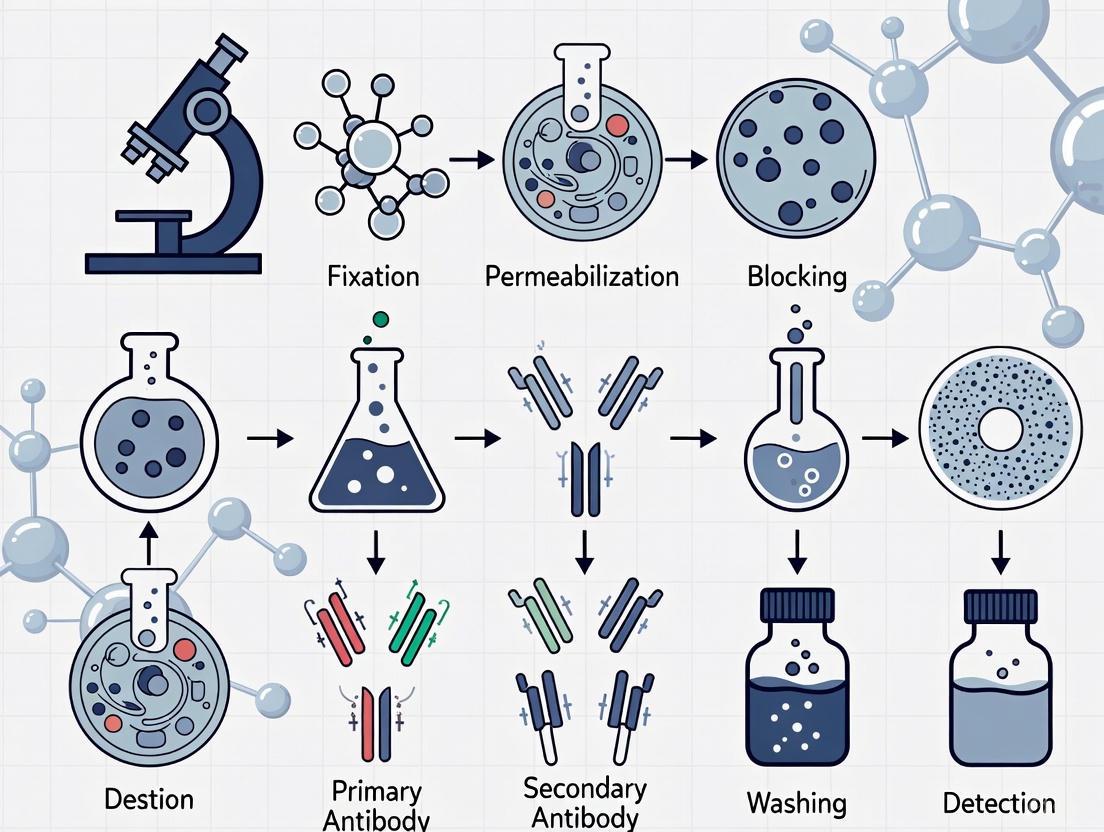
Visualization of ICC Workflow and Principles
The following diagram illustrates the key steps and molecular interactions in the indirect immunocytochemistry workflow:
Immunocytochemistry Workflow and Molecular Interactions
The Scientist's Toolkit: Essential Research Reagents
Successful immunocytochemistry requires carefully selected reagents optimized for each step of the process. The following table details essential materials and their functions in ICC experiments:
Table 3: Essential Research Reagents for Immunocytochemistry
| Reagent Category | Specific Examples | Function | Key Considerations |
|---|---|---|---|
| Cell Adhesion Aids | Poly-D-lysine, Poly-L-lysine, Fibronectin | Promotes cell attachment to coverslips | Critical for poorly adherent cells; concentration and coating time affect performance [11] |
| Fixatives | 4% Paraformaldehyde (PFA), Methanol, Acetone | Preserves cellular structure and antigen integrity | Choice affects epitope availability; PFA requires permeabilization, methanol does not [6] |
| Permeabilization Agents | Triton X-100, Tween-20, Saponin | Creates pores in membranes for antibody access | Triton X-100 is harsh, Tween-20 is mild; select based on target protein localization [11] |
| Blocking Agents | Normal Serum, BSA, Glycine | Reduces non-specific antibody binding | Serum should match secondary antibody host species; BSA is less species-specific [6] |
| Primary Antibodies | Monoclonal, Polyclonal, Recombinant | Specifically binds target protein | Validate for ICC; consider species, clonality, and concentration [12] |
| Secondary Antibodies | Species-specific, cross-adsorbed | Binds primary antibody and carries fluorophore | Must recognize host species of primary antibody; cross-adsorbed reduces background [11] |
| Fluorophores | Organic dyes (FITC, TRITC), Alexa Fluor series, Quantum Dots | Generates detectable signal | Consider brightness, photostability, and microscope compatibility [14] |
| Mounting Media | Anti-fade reagents with/without DAPI | Preserves samples and reduces photobleaching | Some include counterstains; hardening varieties don't require sealing [15] |
| Thrombin inhibitor 13 | Thrombin inhibitor 13, MF:C16H17ClN6OS, MW:376.9 g/mol | Chemical Reagent | Bench Chemicals |
| Antibacterial agent 166 | Antibacterial agent 166, MF:C11H8ClN3O4, MW:281.65 g/mol | Chemical Reagent | Bench Chemicals |
Troubleshooting Common Experimental Challenges
Even with optimized protocols, researchers may encounter challenges that affect data quality. The following table addresses common issues and their solutions:
Table 4: Troubleshooting Common ICC Problems
| Problem | Potential Causes | Solutions | Preventive Measures |
|---|---|---|---|
| Weak or No Staining | Insufficient antibody concentration; Inadequate permeabilization; Epitope masking | Increase primary antibody concentration; Optimize permeabilization; Try alternative fixatives | Validate antibodies for ICC; Include positive controls; Test multiple fixation methods [13] [12] |
| High Background | Excessive antibody concentration; Inadequate blocking; Non-specific secondary binding | Titrate antibodies; Increase blocking time; Use secondary antibody controls | Use cross-adsorbed secondary antibodies; Include no-primary controls; Optimize wash stringency [12] [15] |
| Non-specific Staining | Antibody cross-reactivity; Over-fixation; Endogenous fluorophores | Use pre-adsorbed antibodies; Reduce fixation time; Quench autofluorescence | Validate antibody specificity; Include isotype controls; Use quenching protocols [13] |
| Cell Loss from Coverslips | Harsh washing; Inadequate adhesion; Over-permeabilization | Gentle washing; Use coated coverslips; Optimize detergent concentration | Coat coverslips with poly-lysine; Avoid drying; Minimize mechanical disturbance [13] [15] |
| Photobleaching | Excessive light exposure; Inadequate anti-fade protection | Reduce exposure time; Use anti-fade mounting media | Store slides in dark; Use more photostable fluorophores; Image promptly [11] |
Advanced Applications and Future Directions
The fundamental principles of antibody and fluorophore interactions continue to enable increasingly sophisticated applications in cell biology research and drug development. Recent advances include:
Multiplexed Detection: Using multiple primary antibodies from different host species with spectrally distinct fluorophores enables simultaneous visualization of several proteins within the same cell, revealing functional relationships and protein interactions [6]. New fluorophores with narrow emission spectra, particularly quantum dots, are expanding multiplexing capabilities [14].
Live-Cell Imaging: Specialized techniques allow protein tracking in living cells using fluorescent protein tags or cell-permeable fluorescent dyes, enabling researchers to study protein dynamics in real time.
Super-Resolution Microscopy: Breaking the diffraction limit of light, techniques like STORM and STED microscopy provide unprecedented spatial resolution, revealing subcellular structures at the nanoscale level. These methods often require specialized fluorophores with specific photoswitching properties.
Automated Image Analysis: Artificial intelligence and machine learning approaches are revolutionizing how ICC data is analyzed, enabling high-content screening, automated cell segmentation, and quantitative analysis of protein localization and expression levels [16].
Nanoparticle Conjugates: Antibodies conjugated to specialized nanoparticles, such as gold nanoparticles and quantum dots, are expanding detection capabilities for both imaging and therapeutic applications [14] [17]. These conjugates offer enhanced brightness, photostability, and additional functionalities such as therapeutic payload delivery.
The continued refinement of antibody specificity, fluorophore performance, and detection methodologies ensures that immunocytochemistry will remain an essential tool for understanding cellular function and developing new therapeutic strategies in biomedical research.
Immunocytochemistry (ICC) is a foundational technique in cell biology research and drug development, enabling the visualization and localization of specific proteins or antigens within cultured cells using antibody-based staining and fluorescence detection. The power of this technique lies in its ability to provide high-resolution spatial information about protein expression and distribution within the cellular context, making it indispensable for understanding cellular mechanisms, disease pathology, and drug effects. For researchers and scientists working with cell cultures, mastering ICC requires not only procedural knowledge but also a deep understanding of the essential reagents that enable specific labeling and the specialized equipment necessary for detection and analysis. The critical importance of this methodology is reflected in its widespread adoption and continuous refinement within the scientific community, with leading antibody suppliers and research institutions providing detailed protocols to ensure reproducible and high-quality results [6] [18] [11].
This application note provides a comprehensive framework for implementing a robust immunocytochemistry protocol, detailing the necessary reagents, equipment, and step-by-step methodologies required for successful protein localization studies in fixed cells. By framing these technical elements within the broader context of cell culture research, we aim to equip researchers with the practical knowledge needed to obtain reliable, publication-quality data while troubleshooting common challenges encountered in the ICC workflow.
Experimental Workflow
The successful execution of an immunocytochemistry experiment follows a logical sequence of steps from sample preparation through final imaging. Each stage must be carefully optimized to preserve cellular architecture, maintain antigen integrity, and minimize non-specific background staining while maximizing specific signal detection.
The following workflow diagram outlines the critical path for a standard indirect immunocytochemistry protocol:
Diagram 1: ICC experimental workflow showing key procedural steps with typical time requirements.
Workflow Stage Details
Cell Seeding and Preparation: Cells are cultured on glass coverslips, often coated with adhesion-promoting substances like poly-L-lysine or poly-D-lysine to ensure proper attachment and spreading. Careful attention to cell density and viability (typically >90%) is essential for optimal results [6] [11].
Fixation: This critical step preserves cellular morphology and immobilizes antigens by cross-linking or precipitating cellular components. The choice of fixative depends on the antigen properties and experimental requirements, with 4% paraformaldehyde (PFA) being most common for protein epitope preservation [6] [18].
Permeabilization: For intracellular targets, particularly when using PFA fixation, permeabilization with detergents like Triton X-100 creates pores in the membrane, allowing antibodies to access internal structures. This step is unnecessary when using organic solvents like methanol as fixatives, as they simultaneously fix and permeabilize cells [6] [11].
Blocking: To prevent non-specific antibody binding, samples are incubated with protein-rich solutions such as bovine serum albumin (BSA) or serum from the host species of the secondary antibody. This crucial step significantly reduces background fluorescence [6] [18].
Antibody Incubation: The core detection phase involves sequential incubation with primary antibodies specific to the target antigen, followed by fluorophore-conjugated secondary antibodies that recognize the primary antibody host species. Optimal antibody concentrations and incubation times must be determined empirically for each target [18] [11].
Mounting and Imaging: After staining, samples are mounted with anti-fade medium, often containing DNA counterstains like DAPI, and sealed for preservation. Imaging is performed using fluorescence microscopy with appropriate filter sets for each fluorophore [18] [11].
Research Reagent Solutions
A successful immunocytochemistry experiment requires careful selection and optimization of reagents at each stage of the protocol. The table below details the essential reagents, their specific functions, and considerations for their use in the ICC workflow.
Table 1: Essential reagents for immunocytochemistry protocols
| Reagent Category | Specific Examples | Function | Usage Considerations |
|---|---|---|---|
| Fixatives | 4% Paraformaldehyde (PFA) [6] [18] [11] | Preserves cellular structure and immobilizes antigens | 10-20 min at room temperature; requires permeabilization for intracellular targets |
| Cold Methanol (-20°C) [6] [18] [11] | Precipitates proteins; simultaneously fixes and permeabilizes | 5-10 min at -20°C; no additional permeabilization needed | |
| Cold Acetone (-20°C) [6] | Excellent for cytoskeletal preservation | 5-10 min at -20°C; can make cells brittle | |
| Permeabilization Agents | Triton X-100 (0.1-0.5%) [6] [18] [11] | Non-ionic detergent that solubilizes membranes | 0.1-0.2% for 2-5 min; may disrupt some membrane proteins |
| Tween-20 (0.1-0.5%) [6] [11] | Milder detergent alternative | Better for preserving membrane protein epitopes | |
| Saponin (0.1-0.5%) [6] [11] | Cholesterol-binding detergent; creates reversible pores | Preferred for membrane-associated antigens | |
| Blocking Agents | Bovine Serum Albumin (BSA; 1-5%) [6] [18] [11] | Non-specific protein blocker | Compatible with most antibodies; less species-specific |
| Normal Serum (1-5%) [6] [18] [11] | Serum from secondary antibody host species | Highly effective; must match secondary antibody host | |
| Detection Reagents | Primary Antibodies [18] [11] | Binds specifically to target antigen | Must be validated for ICC; concentration typically 5-20 µg/mL |
| Fluorophore-conjugated Secondary Antibodies [18] [11] | Binds primary antibody; provides fluorescence signal | Must target host species of primary antibody; typically used at 1:500-1:1000 dilution | |
| DAPI (1 µg/mL) [18] [11] | DNA intercalating dye; nuclear counterstain | 5 min incubation; compatible with most fluorophores |
Reagent Selection and Optimization
The choice of specific reagents within each category significantly impacts ICC results. Fixative selection represents a critical decision point: cross-linking fixatives like PFA provide superior morphological preservation but may mask some epitopes, while precipitating fixatives like methanol can better preserve some antigenic sites but may disrupt cellular structures [6]. For researchers studying phosphorylated proteins, all buffers should include protein phosphatase inhibitors according to manufacturer's instructions to maintain phosphorylation states during processing [11].
Blocking agent selection depends on the detection strategy. When using secondary antibodies, normal serum from the same species as the secondary antibody provides the most effective blocking, while BSA offers a compatible alternative with less species specificity [6]. Blocking solutions typically also include low concentrations of detergents (0.1-0.3% Triton X-100) to further reduce non-specific binding throughout the antibody incubation steps [11].
Essential Equipment
The transition from experimental preparation to detection and analysis requires specialized instrumentation designed to handle the unique demands of fluorescence-based cellular imaging. The equipment portfolio for immunocytochemistry spans from basic cell culture needs to advanced imaging platforms.
Table 2: Essential equipment for immunocytochemistry and fluorescence microscopy
| Equipment Category | Specific Examples | Key Applications in ICC | Performance Considerations |
|---|---|---|---|
| Cell Culture Systems | COâ‚‚ Incubators [6] [18] | Maintain optimal pH, temperature, and humidity for cell growth | Stability and uniformity of temperature and COâ‚‚ critical |
| Biological Safety Cabinets [6] [18] | Provide sterile environment for cell culture procedures | Proper airflow and certification essential for contamination control | |
| Sample Preparation Equipment | Centrifuges [6] | Pellet cells for processing; ~200 × g for 5 minutes | Refrigerated models preferred for temperature-sensitive protocols |
| Aspiration/Vacuum Systems [18] [11] | Gentle removal of solutions without disturbing cells | Precision control to avoid damaging cell monolayers | |
| Microscopy Systems | Widefield Fluorescence Microscopes [6] [18] | Standard imaging of fluorescently labeled samples | Filter sets must match fluorophore excitation/emission spectra |
| Confocal Microscopes | Optical sectioning to reduce out-of-focus light | Enhanced resolution and signal-to-noise for 3D reconstruction | |
| Spectral Imaging Systems [19] | Unmixing overlapping fluorophores | Enable higher multiplexing with minimal spectral spillover | |
| Detection and Analysis Instruments | Flow Cytometers [19] | Quantitative analysis of cell populations | High-parameter systems (e.g., spectral) enable complex panels |
| High-Content Imaging Systems | Automated acquisition and analysis of cell phenotypes | Ideal for screening applications and quantitative cell biology | |
| Specialized Accessories | Humidified Chambers [11] | Prevent evaporation during antibody incubations | Critical for overnight incubations to maintain sample integrity |
| Coverslips (#1.5 thickness) [18] [11] | Optimal for high-resolution oil immersion objectives | Must match microscope objective specifications |
Equipment Selection Criteria
Choosing appropriate equipment requires careful consideration of experimental goals and technical requirements. For standard immunofluorescence applications, a widefield epifluorescence microscope equipped with high-quality objectives and appropriate filter sets typically suffices. However, for experiments requiring precise optical sectioning, reduced background, or three-dimensional reconstruction, laser scanning confocal microscopy provides significant advantages despite higher complexity and cost.
The growing field of high-content screening has driven development of automated imaging systems that combine fluorescence microscopy with automated sample handling and sophisticated image analysis algorithms. These systems enable quantitative analysis of thousands of cells across multiple parameters, providing statistical power for drug discovery and systems biology applications [20].
Recent technological advances have also improved flow cytometry capabilities, with spectral flow cytometry emerging as a powerful alternative to conventional flow cytometry. These systems use full spectrum detection and computational unmixing to resolve fluorescent labels with overlapping emission spectra, enabling higher-parameter experiments without compensation challenges [19]. The global flow cytometry market reflects these advancements, projected to grow from $5.2 billion in 2023 to $8.3 billion by 2029, driven by increasing demand for advanced cell analysis solutions in research and clinical applications [20].
Detailed Protocols
Standard Immunocytochemistry Protocol
This protocol outlines the complete procedure for indirect immunofluorescence staining of adherent cells cultured on glass coverslips, including critical steps for fixation, permeabilization, blocking, and antibody incubation.
Materials Required:
- Sterile glass coverslips (#1.5 thickness)
- Poly-L-lysine or poly-D-lysine coating solution
- Cell culture medium and PBS
- Fixative (4% PFA in PBS or cold methanol)
- Permeabilization solution (0.1-0.5% Triton X-100 in PBS)
- Blocking solution (1-5% BSA or normal serum in PBS)
- Primary antibody specific to target antigen
- Fluorophore-conjugated secondary antibody
- DAPI solution (1 µg/mL in PBS)
- Antifade mounting medium
- Microscope slides and nail polish
Procedure:
Coverslip Preparation and Cell Seeding
- Place sterile coverslips in tissue culture plates and coat with poly-L-lysine solution for 1 hour at room temperature [6].
- Rinse coated coverslips three times with sterile PBS and allow to dry completely [6].
- Seed cells at appropriate density (dependent on cell type and experimental requirements) and culture until 60-80% confluent [18] [11].
Fixation
- Aspirate culture medium and gently wash cells three times with PBS at room temperature [18] [11].
- Fix cells with freshly prepared 4% PFA for 10-20 minutes at room temperature [6] [18].
- Alternatively, for methanol fixation, incubate with chilled (-20°C) 100% methanol for 5-10 minutes at room temperature [6] [11].
- Wash fixed cells three times with PBS for 5 minutes each [18].
Permeabilization (if using PFA fixation)
Blocking
Primary Antibody Incubation
- Prepare primary antibody dilution in blocking solution (typical range 5-20 µg/mL) [18].
- Incubate cells with primary antibody solution for 1 hour at room temperature or overnight at 4°C in a humidified chamber [18] [11].
- Wash cells three times with PBS containing 0.1% Triton X-100 for 5 minutes each [11].
Secondary Antibody Incubation
- Prepare fluorophore-conjugated secondary antibody dilution in blocking solution (typically 1:500 to 1:1000) [11].
- Incubate cells with secondary antibody solution for 1 hour at room temperature in the dark [18] [11].
- Wash cells three times with PBS containing 0.1% Triton X-100 for 5 minutes each [11].
Counterstaining and Mounting
- Incubate cells with DAPI solution (1 µg/mL) for 5 minutes at room temperature [18] [11].
- Rinse briefly with PBS to remove excess DAPI [18].
- Place a drop of antifade mounting medium on a clean microscope slide [18] [11].
- Carefully invert coverslip (cell side down) onto mounting medium, avoiding air bubbles [18].
- Seal coverslip edges with clear nail polish if required by mounting medium [18] [11].
- Store slides flat in the dark at 4°C until imaging [11].
Imaging
Troubleshooting Common Issues
Even with careful execution, ICC experiments can encounter challenges that affect result quality. The following diagram illustrates a systematic approach to diagnosing and resolving common problems in immunocytochemistry:
Diagram 2: ICC troubleshooting guide showing common problems and their solutions.
Specific Troubleshooting Recommendations:
Excessive Background Fluorescence: Increase blocking time to 2 hours or use higher concentration (5-10%) of blocking agent [6] [18]. Include 0.1M glycine in blocking buffer to quench free aldehyde groups from PFA fixation [6]. Increase number and duration of washes after antibody incubations, and titrate antibody concentrations to optimal levels [18].
Weak or No Specific Signal: Verify antibody specificity and confirm it is validated for ICC. Test a range of primary antibody concentrations (5-20 µg/mL) and consider longer incubation times (overnight at 4°C) [18] [11]. Ensure fluorophore is compatible with microscope filter sets and check for photobleaching during processing.
Poor Cellular Morphology: Optimize fixation conditions - reduce PFA concentration or fixation time if over-fixed, or increase if under-fixed [6]. For delicate structures, consider alternative fixatives like methanol or acetone at -20°C [6] [11]. Always handle coverslips gently and avoid allowing cells to dry out during processing [18].
Non-specific Staining Patterns: Include appropriate negative controls (no primary antibody, isotype control) to distinguish specific from non-specific signal. For double-labeling experiments, ensure primary antibodies are from different host species to prevent cross-reactivity of secondary antibodies [6] [11].
Within the framework of immunocytochemistry (ICC) research, the foundation for a successful experiment is laid long before the first antibody is applied. The preparation of cell cultures, specifically the coating of coverslips and the subsequent seeding of cells, is a critical initial step that directly influences cell health, morphology, and the ultimate clarity and specificity of fluorescent imaging. Proper adhesion ensures that cells remain securely attached throughout the rigorous processes of fixation, permeabilization, and multiple washing steps, thereby preserving the structural integrity required for accurate protein localization studies. This application note provides a detailed, practical guide to these essential preparatory phases, equipping researchers with the methodologies to achieve robust and reproducible results in their cell-based assays.
Coating Coverslips for Enhanced Cell Adhesion
Many cultured cell types, particularly those grown on glass coverslips, require a coating substrate to promote adequate adhesion. An untreated glass surface often does not provide the necessary biological cues for cells to attach and spread effectively. Applying a thin layer of a coating material mimics the extracellular matrix, providing a scaffold that facilitates strong cell attachment.
Coating Material Selection and Preparation
The choice of coating material depends on the specific cell type and research application. The table below summarizes common coating solutions and their typical uses.
Table 1: Common Coverslip Coating Solutions and Protocols
| Coating Solution | Common Concentrations | Incubation Time | Incubation Temperature | Key Considerations |
|---|---|---|---|---|
| Gelatin [9] | 0.1% in deionized Hâ‚‚O | 10 minutes | Room Temperature | Enhances adhesion for many standard cell lines. Simple and cost-effective. |
| Poly-L-Lysine (PLL) [6] | Varies by manufacturer | 1 hour to 24 hours | Room Temperature | Provides a positive charge for strong cell attachment. Suitable for neurons and other fastidious cells. |
| Poly-D-Lysine (PDL) [11] | Varies by manufacturer | 1 hour | Room Temperature | Similar to PLL but more resistant to cellular proteases. |
| Fibronectin [11] | 1-10 µg/mL | 1-2 hours | 37°C | A natural extracellular matrix protein; ideal for studies involving cell migration and differentiation. |
Step-by-Step Coating Protocol
The following generalized protocol, adaptable for the solutions in Table 1, is designed for sterilized glass coverslips placed in a multi-well plate [9] [6].
- Placement: Using fine tweezers, place sterilized coverslips into the wells of a tissue culture plate (e.g., a 24-well plate).
- Application: Add enough coating solution to completely cover the coverslip (e.g., 400 µL for a 24-well plate) [9].
- Incubation: Incubate for the recommended time and temperature (see Table 1).
- Rinsing: After incubation, carefully aspirate or pour off the coating solution. Rinse the coverslips three times with sterile phosphate-buffered saline (PBS) to remove any unbound coating material [6].
- Drying: Allow the rinsed coverslips to air-dry completely inside the sterile tissue culture hood. Dried coverslips can be stored at room temperature until ready for use [9]. For long-term storage, ensure the plate is sealed to maintain sterility.
Seeding Cells onto Coated Coverslips
Once the coverslips are prepared, cells are seeded onto them. The goal is to achieve an appropriate density and distribution for the specific experimental aims, typically semi-confluency to confluency by the time of fixation.
Cell Seeding Workflow
The diagram below illustrates the logical sequence from coating to the point of fixation for ICC.
Detailed Seeding and Culture Protocol
- Harvest and Count Cells: Gently harvest cells using standard trypsinization or non-enzymatic methods. Determine the total cell number and concentration. A cell viability of 90–95% is generally recommended for optimal results [6].
- Prepare Cell Suspension: Dilute the cell stock to the desired concentration in pre-warmed, complete culture medium. The appropriate density is highly dependent on the cell type and its growth rate, as well as the desired confluence at the time of fixation. A typical starting point for a 24-well plate is 5000 - 50,000 cells in 500 µL of medium per well [9] [6].
- Seed Cells: Gently add the cell suspension to the well, aiming for the center of the coated coverslip. Avoid dropping the solution directly onto the coverslip with force, as this can displace the coating or create uneven cell distribution [21].
- Distribute Cells: To ensure an even distribution of cells across the coverslip, gently rock the plate back and forth and side-to-side.
- Incubate: Carefully transfer the culture plate to a 37°C, 5% CO₂ incubator. Allow the cells to adhere and grow until they reach the desired density or age for the experiment. This typically ranges from semi-confluency to full confluency [21] [11].
- Treat (Optional): If the experimental design requires it, administer drug treatments or other stimuli to the cells according to your specific protocol.
The Scientist's Toolkit: Research Reagent Solutions
Table 2: Essential Materials for Coverslip Preparation and Cell Seeding
| Item | Function / Application |
|---|---|
| Glass Coverslips (#1.5) [11] | Optimal thickness for high-resolution fluorescence microscopy. |
| Gelatin, Poly-L-Lysine, Fibronectin [9] [6] [11] | Coating substrates to promote cell adhesion to glass surfaces. |
| Sterile PBS [9] [6] | For rinsing coated coverslips and washing cells; maintains a physiologically compatible pH and osmolarity. |
| Tissue Culture Plates (e.g., 24-well) [9] | Provides a sterile, multi-well format for processing multiple coverslips simultaneously. |
| Fine Tweezers [9] [21] | For the careful handling of sterile coverslips without damage. |
| Cell Culture Medium [9] | Provides essential nutrients for cell health and growth after seeding. |
| Serum (e.g., FBS) | A common supplement to culture medium that contains adhesion factors and growth promoters. |
| Hemocytometer or Automated Cell Counter | For accurate determination of cell concentration and viability prior to seeding. |
| 2-Fluoro-1,3-bis(methyl)benzene-d6 | 2-Fluoro-1,3-bis(methyl)benzene-d6, MF:C8H9F, MW:130.19 g/mol |
| Telomeric G4s ligand 1 | Telomeric G4s ligand 1, MF:C31H37F3N6, MW:550.7 g/mol |
Troubleshooting and Key Considerations for Optimal Adherence
- Insufficient Adhesion: If cells detach during washes, consider testing a different or more concentrated coating agent. Ensure the coating solution is properly prepared and the coverslips are rinsed thoroughly to prevent a toxic or non-adhesive residue. Verify that the cell viability at seeding is high [6] [21].
- Optimization is Critical: The optimal coating material, cell seeding density, and growth time are empirically determined. Researchers should consult the literature for their specific cell type and be prepared to optimize these parameters.
- Gentle Handling: Throughout the process, treat the coverslips and cells gently. Never let the coverslips dry out after seeding, and always pipet solutions against the side of the well, not directly onto the cells [21].
Meticulous preparation of coverslips and careful cell seeding are non-negotiable prerequisites for high-quality immunocytochemistry. By selecting an appropriate coating substrate, following a sterile and consistent coating protocol, and seeding cells at an optimal density, researchers can ensure strong cell adherence and preservation of native morphology. This foundational work directly contributes to the generation of reliable, high-resolution imaging data, forming the cornerstone of valid and impactful scientific conclusions in cell biology and drug development research.
Step-by-Step ICC Protocol: Fixation, Staining, and Imaging for Cultured Cells
Cell Fixation: Comparing Paraformaldehyde, Methanol, and Acetone for Morphology and Antigen Preservation
In immunocytochemistry (ICC) research, fixation is a critical first step that profoundly influences all subsequent results. This process aims to preserve cellular morphology and maintain the antigenicity of target molecules, providing a "snapshot" of the cell's state [22]. For researchers and drug development professionals, selecting the appropriate fixative represents a fundamental compromise between structural preservation and epitope accessibility. The choice is not trivial, as incomplete fixation can permit proteolytic degradation of targets, while excessive fixation may mask epitopes or create strong non-specific background staining [23].
This application note systematically compares three widely used fixatives—paraformaldehyde, methanol, and acetone—within the context of optimizing immunocytochemistry protocols for cell culture research. We provide a detailed comparative analysis based on empirical evidence, alongside standardized protocols to ensure experimental reproducibility and reliability in both basic research and drug development applications.
Mechanism of Action and Cellular Effects
Understanding how each fixative operates at the molecular level is crucial for predicting its effects on cellular components and selecting the most appropriate agent for specific research goals.
Paraformaldehyde (PFA) is a cross-linking fixative that creates covalent methylene bridges (-CHâ‚‚-) between protein-protein and protein-nucleic acid groups, primarily involving the residues of the basic amino acid lysine [24] [23]. This cross-linking network effectively stabilizes soluble proteins by anchoring them to the cytoskeleton, preserving cellular ultrastructure with high fidelity [25] [24]. However, this same mechanism can potentially mask antigenic epitopes through chemical modification or steric hindrance, sometimes necessitating antigen retrieval techniques to restore antibody binding [23].
Methanol and Acetone are both precipitating fixatives that operate through dehydration and protein precipitation. They act by displacing water molecules in tissues, disrupting hydrogen bonds, and causing proteins to denature and precipitate in-situ [24] [22]. This precipitation mechanism generally does not mask epitopes but can significantly alter protein conformation and tertiary structure through hydrophobic bond breakage [23]. A critical distinction is that both solvents simultaneously fix and permeabilize cells in a single step, eliminating the need for separate permeabilization protocols when used alone [6] [26].
The following diagram illustrates the fundamental mechanisms through which each fixative type stabilizes cellular components:
Visualization of cellular structures reveals profound differences between these mechanisms. Studies utilizing reflection contrast and electron microscopy demonstrate that acetone or methanol fixation alone results in complete loss of integrity of intracellular structures and poor preservation of plasma membrane integrity [27]. In contrast, aldehyde-based fixatives like paraformaldehyde show significantly superior preservation of both intracellular and plasma membranes [27] [25].
Comparative Analysis of Fixative Performance
The choice between paraformaldehyde, methanol, and acetone involves trade-offs between morphological preservation, antigen accessibility, and practical handling considerations. The table below summarizes key performance characteristics based on empirical studies:
Table 1: Comprehensive Comparison of Fixative Properties and Performance
| Parameter | Paraformaldehyde (PFA) | Methanol | Acetone |
|---|---|---|---|
| Mechanism of Action | Cross-linking via methylene bridges [23] | Protein precipitation & dehydration [24] [22] | Protein precipitation & dehydration [22] [26] |
| Morphology Preservation | Excellent [27] [25] | Moderate to Poor [27] [22] | Poor [22] [26] |
| Membrane Integrity | Well-preserved [27] | Poorly preserved [27] | Poorly preserved [22] |
| Antigen Masking | Moderate to High (due to cross-linking) [23] | Low [22] [26] | Low [22] [26] |
| Permeabilization | Required as separate step [6] | Simultaneous with fixation [6] | Simultaneous with fixation [26] |
| Typical Concentration | 2-4% in PBS [28] [6] | 95-100% (chilled) [6] | 100% (chilled) [6] |
| Fixation Time | 10-20 min at RT [28] [6] | 5-10 min at -20°C [6] | 5-10 min at -20°C [6] |
| Compatible Applications | Standard ICC/IHC, EM, multiplex staining [28] [25] | scRNA-seq, microtubule staining [29] [26] | Frozen sections, nuclear antigens [22] [26] |
| Impact on Fluorescent Proteins | Moderate (can be preserved with mild fixation) | High (often denatured) [22] | High (often denatured) [22] |
| RNA Preservation | Moderate (for crosslinking-based protocols) [24] | Excellent (for scRNA-seq) [29] [24] | Not typically used for RNA work |
| Storage After Fixation | Stable in azide/PBS for 1-2 weeks at 4°C [6] | Long-term at -80°C possible [29] | Immediate processing recommended |
The structural consequences of these differences are significant. Aldehyde fixatives like PFA show an altered biochemical content attributed to adduct formation, but this can be minimized by optimizing fixation temperature or through detergent-based permeabilization treatments [25]. Organic solvents, in contrast, lead to a severe loss of cell content attributed to the loss of membrane integrity after lipid removal [25]. For researchers focusing on membrane proteins, this represents a critical consideration, as alcohol-based fixatives may compromise the detection of these targets [22].
Application-Specific Recommendations
Optimal Fixative Selection by Research Goal
The appropriate fixative choice depends heavily on the primary research objective, whether it's ultrastructural analysis, antigen detection, or specific molecular profiling. The following decision pathway provides a systematic approach to selection:
Specialized Applications
Single-Cell RNA Sequencing: Recent systematic comparisons demonstrate that methanol fixation provides a compelling option for droplet-based single-cell transcriptomics of neural cells [29]. Methanol-fixed samples display cellular composition similar to fresh samples with good cell quality and minimal expression biases [29]. While DMSO cryopreservation provides higher library complexity in terms of RNA molecules and genes detected per cell, it strongly affects cellular composition and induces stress and apoptosis gene expression [29]. For sequencing applications, methanol fixation largely preserves RNA integrity, enabling high-quality cDNA synthesis without severe degradation [24].
Membrane and Lipid-Associated Targets: For experiments focusing on membrane proteins or lipid domains, PFA is generally preferable as it better preserves membrane integrity [22] [23]. Alcohol-based fixatives dissolve membranes during the fixation process, potentially compromising the detection of membrane-associated antigens [22].
Fluorescent Protein Detection: When detecting endogenously expressed fluorescent proteins (e.g., GFP), PFA is strongly recommended as alcohol-based fixatives typically denature these proteins, resulting in loss of signal [22].
Standardized Experimental Protocols
Paraformaldehyde Fixation Protocol for ICC
This protocol is suitable for most immunocytochemistry applications requiring optimal morphological preservation [28] [6].
Materials Required:
- Phosphate-buffered saline (PBS), pH 7.4
- Fixation solution: 4% formaldehyde/PFA in PBS (with 4% sucrose optional)
- Permeabilization solution: 0.1-0.5% Triton X-100 in PBS
- Blocking buffer: 2-10% normal serum or BSA in PBS
Procedure:
- Culture cells on appropriately coated coverslips or multi-well plates until desired confluence is reached.
- Wash cells briefly with room temperature PBS to remove culture medium and serum components.
- Fix cells with 4% PFA solution for 10-20 minutes at room temperature [28] [6].
- Wash three times with PBS for 5 minutes each to thoroughly remove residual fixative.
- Permeabilize with 0.1-0.5% Triton X-100 in PBS for 2-5 minutes at room temperature (optional for membrane antigens) [6].
- Wash three times with PBS for 5 minutes each.
- Proceed with blocking and antibody incubation steps.
Technical Notes: For sensitive antigens, reduce fixation time to 10 minutes or consider lower PFA concentrations (2%). For thick structures, extend fixation time up to 30 minutes. Fixed samples can be stored in PBS with 0.1% sodium azide at 4°C for 1-2 weeks [6].
Methanol Fixation Protocol for ICC
This protocol is recommended for intracellular antigens sensitive to cross-linking or for specific applications like microtubule visualization [6] [26].
Materials Required:
- Phosphate-buffered saline (PBS), pH 7.4
- Methanol (95-100%), pre-chilled to -20°C
- Blocking buffer: 2-10% normal serum or BSA in PBS
Procedure:
- Culture cells on appropriately coated coverslips or multi-well plates.
- Remove culture medium and briefly rinse with PBS.
- Fix cells with ice-cold methanol (-20°C) for 5-10 minutes at -20°C [6].
- Remove methanol and wash three times with PBS for 5 minutes each.
- Rehydrate and block with appropriate blocking buffer for 1-2 hours.
- Proceed directly with antibody incubation (no separate permeabilization required).
Technical Notes: Methanol fixation is typically performed at -20°C to slow the fixation rate and improve lipid preservation [26]. The fixed samples can be stored in PBS at 4°C for short periods or at -80°C for long-term preservation [29].
Acetone Fixation Protocol for ICC
This protocol is suitable for frozen sections, nuclear antigens, or when maximum epitope exposure is critical [6] [26].
Materials Required:
- Phosphate-buffered saline (PBS), pH 7.4
- Acetone (100%), pre-chilled to -20°C
- Blocking buffer: 2-10% normal serum or BSA in PBS
Procedure:
- Culture cells on appropriately coated coverslips or multi-well plates.
- Remove culture medium and briefly rinse with PBS.
- Fix cells with ice-cold acetone (-20°C) for 5-10 minutes at -20°C [6].
- Air dry cells briefly (30-60 seconds) to allow acetone evaporation.
- Rehydrate with PBS for 5-10 minutes.
- Block with appropriate blocking buffer for 1-2 hours.
- Proceed with antibody incubation (no separate permeabilization required).
Technical Notes: Acetone fixation is particularly harsh and can extract significant cellular components, but it provides excellent epitope exposure for certain antigens [26]. Avoid extended fixation times as they may increase cellular damage.
The Scientist's Toolkit: Essential Research Reagents
Table 2: Key Research Reagent Solutions for Immunocytochemistry
| Reagent | Function | Application Notes |
|---|---|---|
| Paraformaldehyde (4% in PBS) | Cross-linking fixative that preserves cellular structure | Ideal for most ICC applications; may require antigen retrieval for some epitopes [28] [23] |
| Methanol (100%, chilled) | Precipitating fixative and permeabilizing agent | Use for epitopes sensitive to cross-linking; denatures fluorescent proteins [6] [22] |
| Acetone (100%, chilled) | Strong dehydrating fixative and permeabilizing agent | Excellent for nuclear antigens and frozen sections; very harsh on morphology [22] [26] |
| Triton X-100 (0.1-0.5%) | Non-ionic detergent for membrane permeabilization | Required after PFA fixation; use milder concentrations (0.1%) for membrane proteins [6] |
| Tween-20 (0.1-0.5%) | Mild non-ionic detergent for permeabilization | Alternative to Triton X-100; less disruptive to membrane structures [6] |
| Normal Serum (2-10%) | Blocking agent to reduce non-specific binding | Use serum from secondary antibody host species for optimal blocking [28] [6] |
| BSA (1-5%) | Protein-based blocking agent | Less species-specific than serum; compatible with wide antibody range [6] |
| Glycine (0.1 M) | Quenching agent for aldehyde groups | Neutralizes unreacted aldehyde groups after PFA fixation to reduce background [6] |
| SARS-CoV-2 Mpro-IN-19 | SARS-CoV-2 Mpro-IN-19, MF:C29H33N3O5, MW:503.6 g/mol | Chemical Reagent |
| Megovalicin H | Megovalicin H, MF:C35H63NO7, MW:609.9 g/mol | Chemical Reagent |
The selection of an appropriate fixative represents a critical decision point in immunocytochemistry experimental design that directly influences data quality and interpretability. Paraformaldehyde excels in morphological preservation and is the preferred choice for most general applications, membrane protein detection, and fluorescent protein preservation. Methanol offers distinct advantages for specific applications including single-cell RNA sequencing, detection of cross-linking-sensitive epitopes, and microtubule visualization. Acetone, while harsh on cellular structure, provides excellent epitope exposure for challenging nuclear antigens and frozen sections.
A comprehensive understanding of the mechanisms, trade-offs, and optimized protocols for each fixative type enables researchers to make informed decisions that align with their specific research objectives. By standardizing fixation protocols according to these evidence-based guidelines, the reliability and reproducibility of immunocytochemistry research in both basic science and drug development contexts can be significantly enhanced.
Permeabilization is a critical laboratory technique in immunocytochemistry (ICC) used to create pores in the cell membrane, allowing antibodies to access intracellular targets. This process is essential after using cross-linking fixatives like paraformaldehyde (PFA), which preserve cell structure but leave the membrane intact and impermeable to antibodies. Without effective permeabilization, antibodies cannot reach their intracellular antigens, resulting in false-negative results or weak staining. The selection of appropriate permeabilization agents and protocols directly impacts experimental outcomes, making it crucial for researchers to understand the mechanisms, advantages, and limitations of different permeabilization strategies.
The fundamental principle behind permeabilization involves the disruption of lipid bilayers through chemical agents that solubilize membrane components. These agents work through different mechanisms: some dissolve lipids organically, while others interact with specific membrane components like cholesterol to create temporary pores. The choice of permeabilization method depends on multiple factors, including the subcellular localization of the target antigen, the need to preserve other cellular structures, and compatibility with downstream detection methods. As research in cell biology advances, the strategic selection of permeabilization protocols has become increasingly important for accurate visualization of intracellular protein distribution, localization, and interactions.
Mechanism of Action of Common Permeabilization Detergents
Chemical Properties and Mechanisms
Permeabilization detergents function through distinct biochemical mechanisms that determine their applications and limitations in immunocytochemistry. Triton X-100, a non-ionic detergent, operates by inserting detergent monomers into the lipid membrane, ultimately solubilizing both lipids and proteins in a non-selective manner. This action creates pores in all cellular membranes, including the nuclear envelope, providing access to antigens throughout the cell. Its non-selective nature makes it highly effective for many intracellular targets but can damage membrane-associated antigens and alter cell morphology if used at high concentrations or for extended periods [30] [31].
In contrast, saponin functions through a more selective mechanism by interacting with membrane cholesterol to form porous complexes. Unlike Triton X-100, saponin does not solubilize membrane proteins and creates reversible pores that can reseal if saponin is removed from the buffer. This reversible action requires researchers to maintain saponin in all subsequent wash and antibody incubation buffers following permeabilization. Additionally, saponin typically does not permeabilize the nuclear membrane effectively, making it less suitable for nuclear targets without additional processing steps [31] [32].
Tween-20, another non-ionic detergent, shares similarities with Triton X-100 but is considered a milder alternative. While it also permeabilizes membranes through non-selective interaction with lipids and proteins, it has a more renaturing effect on proteins that might improve antibody-antigen binding in some cases. However, like Triton X-100, it can extract proteins along with lipids and may not be ideal for preserving membrane-associated antigens [30] [31].
Comparative Analysis of Detergent Properties
Table 1: Comparison of Key Permeabilization Detergents and Their Properties
| Detergent | Mechanism of Action | Membrane Selectivity | Nuclear Membrane Permeabilization | Reversibility | Impact on Protein Antigens |
|---|---|---|---|---|---|
| Triton X-100 | Inserts monomers into lipid membrane; solubilizes lipids and proteins | Non-selective | Yes | Irreversible | May extract or denature membrane proteins |
| Saponin | Interacts with cholesterol to form pores | Selective for cholesterol-rich membranes | No | Reversible | Preserves membrane protein integrity |
| Tween-20 | Solubilizes lipids and proteins through non-ionic interactions | Non-selective | Yes | Irreversible | Has renaturing effect; may preserve some epitopes |
Strategic Selection of Permeabilization Agents
Target-Specific Considerations
The subcellular localization of the target antigen is the primary consideration when selecting a permeabilization agent. For intracellular soluble proteins in the cytoplasm, Triton X-100 at concentrations of 0.1-0.2% with incubation times of 2-5 minutes is generally effective [6]. For cytoskeletal targets such as tubulin or actin, methanol fixation and permeabilization often yield superior results, as demonstrated by the improved performance of Keratin 8/18 and ß-Actin antibodies with methanol permeabilization compared to Triton X-100 [33].
When studying membrane-associated proteins, particularly cell surface receptors, careful consideration is required. Research has demonstrated that Triton X-100 can disrupt cell surface receptors, leading to false observations. A study on Notch 1 surface receptor found that cells treated with Triton X-100 gave false protein expression due to disruption of the cellular membrane, while cells without surfactant treatment exhibited fluorescence proportional to the true presence of Notch 1 receptors [34]. In such cases, saponin is the preferred choice as it better preserves membrane protein integrity.
For nuclear antigens, stronger permeabilization agents like Triton X-100 or Tween-20 are typically necessary as saponin does not effectively permeabilize the nuclear membrane [31]. When working with phosphorylated epitopes or other post-translational modifications, crosslinking fixatives like PFA followed by Triton X-100 permeabilization are generally recommended over alcohol-based methods, which can destroy these sensitive epitopes [33] [32].
Application-Based Selection Criteria
Table 2: Permeabilization Agent Selection Guide Based on Experimental Requirements
| Experimental Requirement | Recommended Agent | Concentration | Incubation Time | Key Considerations |
|---|---|---|---|---|
| General intracellular staining | Triton X-100 | 0.1-0.2% in PBS | 2-5 min at room temperature | Optimal balance of effectiveness and preservation [6] |
| Membrane-associated proteins | Saponin | 0.1-0.5% in PBS | 10 min at room temperature | Preserves membrane integrity; must include in all buffers [31] [32] |
| Nuclear antigens | Triton X-100 or Tween-20 | 0.1-0.3% in PBS | 5-10 min at room temperature | Required for nuclear membrane penetration [31] |
| Flow cytometry with surface markers | Saponin | 0.1% in PBS with BSA | 10 min at room temperature | Preserves surface epitopes and light scatter properties [32] |
| Phospho-epitope detection | Triton X-100 (after PFA) | 0.1-0.3% in PBS | 10 min at room temperature | Crosslinking fixatives preserve modification states [33] |
Workflow for Permeabilization Strategy Selection
The following diagram illustrates the decision-making process for selecting an appropriate permeabilization strategy based on experimental requirements:
Detailed Experimental Protocols
Standard Triton X-100 Permeabilization Protocol
The following protocol outlines the steps for effective permeabilization using Triton X-100 after formaldehyde fixation, compatible with most general immunocytochemistry applications [6] [11]:
Following fixation in 4% PFA for 10-20 minutes at room temperature, wash cells three times with PBS to remove residual fixative.
Prepare permeabilization solution by diluting Triton X-100 in PBS to a final concentration of 0.1-0.3%. For most applications, 0.1% is sufficient, but higher concentrations may be needed for difficult-to-access targets or nuclear antigens.
Apply permeabilization solution to cover the cells completely. For cells on coverslips in a 24-well plate, 300-400 µL per well is typically adequate.
Incubate for 5-10 minutes at room temperature. Longer incubation times (up to 20 minutes) may be necessary for thicker samples or nuclear targets, but optimization is recommended as over-permeabilization can damage cell morphology.
Wash cells three times with PBS to remove residual detergent before proceeding to blocking and antibody incubation steps.
For sensitive applications or when preserving membrane structure is important, researchers can consider shorter incubation times (2-5 minutes) with lower concentrations (0.1%) of Triton X-100 [6]. It's important to note that Triton X-100 absorption in the UV range due to its phenyl ring may interfere with certain fluorescent stains, so alternative detergents should be considered for UV-excited fluorophores [31].
Saponin-Based Permeabilization Protocol
The reversible nature of saponin permeabilization requires specific handling to maintain membrane permeability throughout the staining procedure [31] [32]:
After fixation with 4% PFA and washing with PBS, prepare saponin working solution at 0.1-0.5% in PBS. Higher concentrations may be needed for certain cell types with high cholesterol content.
Apply saponin solution to cells and incubate for 10 minutes at room temperature. Unlike Triton X-100, saponin permeabilization is reversible, so do not wash with saponin-free buffers after this step.
Prepare antibody dilutions in buffers containing 0.1% saponin to maintain permeability during subsequent staining steps.
Perform all washes with PBS containing 0.1% saponin to prevent resealing of membranes during the procedure.
Complete immunostaining without saponin-free wash steps until the final wash before mounting.
This protocol is particularly valuable for flow cytometry applications where surface marker preservation is essential or when studying membrane-associated proteins that might be extracted by stronger detergents [32]. The reversible action of saponin also makes it suitable for experiments where temporary permeability is desired.
Integrated Permeabilization and Staining Workflow
The following diagram illustrates the complete experimental workflow integrating permeabilization with the overall immunocytochemistry procedure:
Research Reagent Solutions
Essential Materials for Permeabilization Protocols
Table 3: Key Research Reagents for Permeabilization Protocols
| Reagent | Function | Example Formulation | Storage Conditions |
|---|---|---|---|
| Triton X-100 | Non-ionic detergent for general permeabilization; solubilizes membranes | 0.1-0.3% in PBS; prepare fresh or store at 4°C | Room temperature; protect from light |
| Saponin | Cholesterol-binding detergent for selective membrane permeabilization | 0.1-0.5% in PBS; must include in all subsequent buffers | 4°C; prepare fresh before use |
| Tween-20 | Mild non-ionic detergent alternative to Triton X-100 | 0.2-0.5% in PBS for 2-5 minutes | Room temperature |
| Phosphate-Buffered Saline (PBS) | Isotonic buffer for reagent preparation and washing | 137 mM NaCl, 2.7 mM KCl, 10 mM Na₂HPO₄, 1.8 mM KH₂PO₄ | Room temperature or 4°C |
| Paraformaldehyde (PFA) | Crosslinking fixative for structural preservation | 4% in PBS, pH 7.4 | Aliquot and store at -20°C; avoid freeze-thaw cycles |
| Normal Serum | Blocking agent to reduce non-specific antibody binding | 2-10% in PBS from secondary antibody host species | Store at -20°C; avoid repeated freeze-thaw |
| Bovine Serum Albumin (BSA) | Protein blocking agent alternative to serum | 1-5% in PBS; often used with detergents | 4°C for solutions; -20°C for powder |
Troubleshooting and Optimization Guidelines
Common Challenges and Solutions
Excessive background staining often results from insufficient blocking or over-permeabilization. If using Triton X-100, reduce concentration to 0.1% or decrease incubation time to 2-5 minutes [6] [35]. Increase the percentage of blocking agents (serum or BSA) to 5-10% and extend blocking time to 2 hours. For saponin-based protocols, ensure that the detergent is included in all wash and antibody buffers to maintain consistent permeability and prevent resealing artifacts [32].
Weak or absent signal may indicate inadequate permeabilization. For Triton X-100, increase concentration to 0.2-0.3% or extend incubation time to 10-20 minutes, particularly for nuclear targets [30]. When using saponin, confirm that the nuclear membrane penetration is sufficient for your target; if not, consider switching to Triton X-100 or Tween-20. For methanol-fixed cells, permeabilization is not required as the fixation process simultaneously permeabilizes cells [6] [35].
Altered cell morphology can occur with harsh permeabilization conditions. When using Triton X-100, high concentrations (>0.5%) or extended incubation times (>30 minutes) can extract excessive cellular material, leading to poor morphology [30] [31]. Optimize by using the mildest effective concentration and duration. For delicate samples, consider switching to milder detergents like Tween-20 or saponin, which better preserve cellular structure.
Validation and Optimization Strategies
Systematic optimization is essential for developing robust permeabilization protocols. Begin by testing a range of detergent concentrations (e.g., 0.1%, 0.2%, 0.3% for Triton X-100) with fixed incubation times, then optimize incubation duration using the most promising concentration. Include controls without permeabilization to confirm that signal specificity depends on permeabilization, and use known antibodies with established localization patterns as positive controls [33].
When designing multiplex experiments with multiple targets, prioritize permeabilization conditions for the most critical or challenging antibody. If antibodies require incompatible protocols, consider sequential staining approaches or test alternative antibodies validated with common permeabilization methods [33]. For critical applications, consult manufacturer recommendations for specific antibodies, as extensive validation may have established optimal permeabilization conditions during antibody development [33].
For specialized applications like flow cytometry with simultaneous surface and intracellular staining, consider sequential staining protocols where surface markers are labeled before permeabilization, followed by fixation, permeabilization, and intracellular staining. This approach preserves surface epitopes that might be damaged by permeabilization while allowing access to intracellular targets [32].
In immunocytochemistry (ICC), the specific detection of target antigens is paramount. However, antibodies can bind to sites not related to specific antibody–antigen reactivity through simple adsorption, charge-based, hydrophobic, and other interactions [36]. The crucial step to mitigate this background staining is effective blocking, which significantly improves the signal-to-noise ratio of the assay [37]. The choice of blocking agent is a critical experimental design decision, with bovine serum albumin (BSA) and normal serum being among the most common options. This application note, framed within a broader thesis on ICC protocols for cell culture research, provides a detailed comparison of these two reagents. We summarize quantitative data, present optimized protocols, and offer guidance to enable researchers and drug development professionals to make an informed choice for their specific experimental conditions.
Principles and Comparison of Blocking Reagents
Blocking is performed after sample fixation and permeabilization but immediately prior to incubation with the primary antibody [37]. The principle is to incubate the sample with a solution containing proteins or other molecules that occupy nonspecific binding sites on the tissue and glass surfaces [36]. This prevents the subsequent primary and secondary antibodies from binding to these sites, thereby reducing background staining.
While any protein that does not bind specifically to the target antigen or the assay antibodies could, in principle, be used, certain agents have proven more effective [36] [37]. The two most prevalent categories are solutions of single proteins, like BSA, and complex mixtures of proteins, such as normal serum. The table below provides a direct comparison of these two key reagents.
Table 1: Quantitative Comparison of BSA and Normal Serum as Blocking Reagents
| Feature | Bovine Serum Albumin (BSA) | Normal Serum |
|---|---|---|
| Typical Working Concentration | 1 - 5% (w/v) [36] [15] | 2 - 10% (v/v) [6] [15] [38] |
| Blocking Mechanism | Competes with antibodies for nonspecific protein-binding sites via mass action [36] | Contains antibodies that bind to reactive sites; rich in albumin and other proteins that block nonspecific sites [36] [37] |
| Key Advantage | Economical; less species-dependent; good for blocking hydrophobic interactions [6] | Considered a "gold standard"; particularly effective for blocking Fc receptors and when using polyclonal antibodies [37] [39] |
| Key Consideration/Limitation | May be less efficient at blocking some specific interactions compared to serum [6] | Must be from the same species as the secondary antibody (not the primary) to avoid increased background [37] [6] [15] |
| Cost Consideration | Low cost [37] | More expensive [37] |
A critical factor when using normal serum is the source. The serum must be from the same species in which the secondary antibody was raised [37] [15]. Using serum from the primary antibody species would lead to the secondary antibody recognizing the nonspecifically-bound serum antibodies, dramatically increasing background staining [36] [37].
Furthermore, the optimal blocking buffer is not universal. Empirical testing is critical, as the best performer depends on the specific combination of antibodies, target antigen, and sample type [36] [37]. The ultimate goal is to select the blocking buffer that yields the highest signal-to-noise ratio [36].
Detailed Experimental Protocols
The following protocols have been compiled and adapted from established ICC methodologies [6] [15] [40]. They assume that cell cultures (adherent or non-adherent) have already been prepared, fixed, and, if required, permeabilized.
General Blocking and Staining Procedure
The core workflow for ICC, from blocking to imaging, is outlined in the diagram below. This general procedure is applicable regardless of the specific blocking agent chosen.
Diagram 1: General ICC Staining Workflow
Materials:
- Blocking Buffer: Prepare either BSA or normal serum buffer as detailed in sections 2.2 and 2.3.
- Dilution Buffer: PBS containing 1% BSA or 1% normal serum [6] [15] [40].
- Wash Buffer: Phosphate-buffered saline (PBS) or PBS with 0.1% BSA [40].
- Primary Antibody: Specific to the target antigen.
- Fluorophore-conjugated Secondary Antibody: Raised against the species of the primary antibody.
- Nuclear Counterstain: e.g., DAPI.
- Antifade Mounting Medium.
Protocol:
- Blocking: Incubate the fixed and permeabilized samples with the chosen blocking buffer for 1 to 2 hours at room temperature [6]. For some applications, incubation times can range from 30 minutes to overnight at 4°C [36].
- Primary Antibody Incubation: Without washing after the blocking step (if the primary antibody is to be diluted in the same buffer as used for blocking), incubate the samples with the primary antibody diluted in an appropriate dilution buffer (e.g., 1% BSA or 1% normal serum in PBS) [36] [15]. Incubate for 1 hour at room temperature or overnight at 4°C [15].
- Wash: Wash the samples three times with wash buffer, for approximately 5 minutes each wash [15].
- Secondary Antibody Incubation: Incubate with the fluorophore-conjugated secondary antibody, diluted in the same dilution buffer as the primary antibody, for 1 hour at room temperature in the dark [15].
- Wash: Wash the samples three times with wash buffer in the dark [15].
- Counterstaining and Mounting: Incubate with a nuclear counterstain like DAPI for 2-5 minutes [40]. Perform a final rinse in PBS and then water, apply antifade mounting medium, and seal under a coverslip [15] [40].
- Visualization: Image the samples using a fluorescence microscope with appropriate filter sets [40].
Protocol A: Blocking with BSA
This protocol is ideal for routine staining and is often sufficient, especially for monoclonal antibodies [37].
BSA Blocking Buffer Recipe:
- BSA: 1-5% (w/v) in PBS [36] [15].
- Optional Additives: 0.1% Triton X-100 (if additional permeabilization is desired) [40], 0.1 M Glycine (to quench free aldehyde groups from fixation) [6].
Procedure:
- Prepare the BSA blocking buffer fresh or from a filtered, aliquoted stock solution.
- Follow the general blocking and staining procedure (Section 2.1).
- It is highly recommended to dilute the primary and secondary antibodies in a buffer containing 1% BSA to maintain blocking throughout the incubation steps [36] [15].
Protocol B: Blocking with Normal Serum
This protocol is often considered the "gold standard" and is particularly effective when using polyclonal antibodies or when high background is encountered [37].
Normal Serum Blocking Buffer Recipe:
- Normal Serum: 2-10% (v/v) in PBS [6] [15] [38].
- Critical Note: The serum must be from the same species as the host of the secondary antibody (e.g., use Normal Goat Serum if your secondary antibody is goat anti-rabbit) [37] [15].
- Optional Additives: 0.1-0.3% Triton X-100 [40].
Procedure:
- Prepare the normal serum blocking buffer.
- Follow the general blocking and staining procedure (Section 2.1).
- Dilute the primary and secondary antibodies in a buffer containing 1% of the same normal serum to maintain consistency [15].
The Scientist's Toolkit: Essential Research Reagents
The following table lists key reagents and materials required for the blocking and staining procedures described in this note.
Table 2: Essential Reagents for ICC Blocking and Staining
| Reagent/Material | Function/Description | Example |
|---|---|---|
| Bovine Serum Albumin (BSA) | A single-component protein used to block nonspecific binding sites by mass action [36]. | Fraction V BSA |
| Normal Serum | A complex mixture of proteins and antibodies used for comprehensive blocking, especially of Fc receptors [36] [37]. | Normal Goat Serum, Normal Donkey Serum |
| Triton X-100 | Non-ionic detergent used for permeabilizing cell membranes to allow antibody access to intracellular targets [6] [38]. | Laboratory-grade detergent |
| Phosphate-Buffered Saline (PBS) | Isotonic buffer used for washing cells and as a base for preparing blocking and antibody dilution buffers [6]. | 1X PBS, pH 7.4 |
| Hydrophobic Barrier Pen | Used to draw a barrier around samples on slides to minimize reagent volumes and prevent evaporation [6] [40]. | PAP pen |
| Fluorophore-conjugated Secondary Antibody | An antibody that recognizes and binds to the primary antibody, carrying the fluorescent signal for detection [15] [38]. | Alexa Fluor conjugates |
| DAPI | A fluorescent dye that binds strongly to DNA, used as a nuclear counterstain to visualize cell nuclei [40]. | 4',6-diamidino-2-phenylindole |
| Antifade Mounting Medium | A medium used to mount coverslips that reduces photobleaching of fluorophores during microscopy and storage [15]. | ProLong Gold, SlowFade Gold |
| Antibacterial agent 234 | Antibacterial agent 234, MF:C20H18N2O2, MW:318.4 g/mol | Chemical Reagent |
| Carbaprostacyclin-biotin | Carbaprostacyclin-biotin, MF:C36H60N4O5S, MW:661.0 g/mol | Chemical Reagent |
Optimization and Troubleshooting Guide
Despite standardized protocols, optimization is often necessary. The decision-making process for selecting and optimizing a blocking strategy can be visualized as a flowchart.
Diagram 2: Blocking Strategy Optimization Workflow
Common Issues and Solutions:
- High Background Staining:
- Cause: Inadequate blocking or overly concentrated antibodies.
- Solution: Increase the concentration of your blocking agent (e.g., to 5-10%) and/or the blocking time [15]. Titrate both primary and secondary antibodies to find the minimum concentration that gives a strong specific signal [15]. Ensure the normal serum is from the correct species (secondary antibody host) [37].
- Weak or No Specific Signal:
- Cause: Over-blocking, antigen inaccessibility, or low antibody affinity.
- Solution: Try a milder blocking agent (e.g., switch from serum to 1-2% BSA) or reduce blocking time. Optimize fixation and permeabilization steps to ensure the epitope is exposed [38]. Verify antibody functionality.
- Inconsistent Results:
The choice between BSA and normal serum for blocking non-specific binding in ICC is not a matter of one being universally superior. BSA offers an economical, less species-dependent option that is often sufficient for many applications. In contrast, normal serum, when sourced correctly from the secondary antibody host, provides a robust, comprehensive block that is particularly valuable for challenging experiments with high background or when using polyclonal antibodies. The most reliable path to success is empirical optimization, where researchers systematically test both agents and associated parameters to identify the protocol that delivers the highest signal-to-noise ratio for their specific experimental system. By applying the detailed protocols and troubleshooting guidance contained in this note, researchers can effectively minimize background staining and generate high-quality, reliable ICC data.
Immunostaining is a cornerstone technique in biological research and clinical diagnostics, enabling the visualization and localization of specific target antigens within cells or tissues through the principle of antigen-antibody interaction [42]. To be detectable via microscopy, antibodies are conjugated with detectable probes, such as fluorescent dyes or enzymes [42]. The choice between direct and indirect immunostaining is one of the most critical initial decisions in designing an immunocytochemistry (ICC) experiment, as it profoundly impacts the sensitivity, flexibility, time, and cost of the procedure. ICC specifically applies these principles to visualize the presence and location of specific antigens in cultured cells [42]. This application note provides a detailed comparison of these two fundamental methods and offers optimized protocols for researchers and drug development professionals working with cell culture systems.
Principles and Comparison of Direct vs. Indirect Staining
Core Methodologies
The fundamental difference between direct and indirect staining lies in the number of antibody layers used for detection.
- Direct Staining: This method uses a single incubation step with a primary antibody that is directly conjugated to a detectable marker, such as a fluorescent dye or an enzyme [42] [43]. The labeled primary antibody binds specifically to the target antigen, and the signal is visualized immediately after washing away unbound antibodies [44].
- Indirect Staining: This two-step method first uses an unlabeled primary antibody to bind the antigen [42] [43]. Following a wash step, a labeled secondary antibody is introduced. This secondary antibody is raised against the immunoglobulin of the host species of the primary antibody (e.g., goat anti-mouse IgG) and is conjugated with the detectable marker [42] [44]. Multiple secondary antibodies can bind to a single primary antibody, leading to signal amplification [42].
Comparative Analysis
The table below summarizes the key characteristics, advantages, and limitations of each method to guide your selection.
Table 1: Comprehensive comparison of direct and indirect immunostaining methods.
| Factor | Direct Staining | Indirect Staining | Key Implications for Experimental Design |
|---|---|---|---|
| Protocol Steps | One antibody incubation step [42] | Two separate antibody incubation steps [42] | Direct staining is faster and has a simpler workflow [44]. |
| Processing Time | Shorter [42] [44] | Longer [42] [44] | Direct methods are advantageous for high-throughput or rapid assays. |
| Sensitivity | Lower sensitivity [42] [43] | Higher sensitivity due to signal amplification [42] [43] | Indirect is superior for detecting low-abundance antigens. |
| Signal Amplification | No [42] | Yes [42] | Each primary antibody can be bound by multiple secondary antibodies, enhancing the signal. |
| Background / Non-specific Signal | Reduced potential for background [44] [43] | Higher potential for background [44] | Direct staining avoids background from secondary antibody cross-reactivity. |
| Species Cross-reactivity | Minimized [44] | Potential for cross-reactivity [44] | Using cross-adsorbed secondary antibodies in indirect staining can mitigate this risk [44]. |
| Multiplexing Flexibility | High flexibility for same-species antibodies [45] | Limited by host species of primary antibodies [44] | Direct labeling allows easy co-staining with multiple primary antibodies from the same host. |
| Cost & Availability | Higher cost per test; limited commercial options [42] [44] | Lower cost; wide availability of secondary antibodies [42] [44] | Indirect staining is more economical and offers more choices, as one secondary can be used with many primaries. |
The following workflow diagram illustrates the fundamental procedural differences between the two staining methods, highlighting the additional amplification step in the indirect approach.
Optimization Strategies for Antibody Concentrations
Optimizing antibody concentrations is critical for achieving a strong specific signal while minimizing background noise. Under-concentration can lead to weak or false-negative results, while over-concentration often causes high background and non-specific binding [42] [46].
General Titration Protocol
A standard checkerboard titration is the most reliable method for determining the optimal working concentration for both primary and secondary antibodies.
- Sample Preparation: Prepare multiple identical samples of fixed and permeabilized cells on coverslips or in a multi-well plate [6] [11].
- Primary Antibody Dilution: Prepare a series of dilutions of the primary antibody in an appropriate buffer (e.g., PBS with 1% BSA). A typical starting range is from 0.1 to 20 µg/mL [46]. For example, test 1:100, 1:500, 1:1000, and 1:2000 dilutions if the stock concentration is known.
- Incubation and Wash: Apply the different dilutions to the samples and incubate as per your standard protocol (e.g., 1 hour at room temperature or overnight at 4°C) [46]. Wash thoroughly with PBS [11].
- Secondary Antibody Dilution (for indirect staining): If performing indirect staining, prepare a series of dilutions for the fluorophore-conjugated secondary antibody (typical starting range 1:500 to 1:2000, or 1-2 µg/µL) [46]. Apply to the samples, incubate in the dark, and wash thoroughly [6] [46].
- Imaging and Analysis: Mount the samples and image under a fluorescence microscope. The optimal concentration is the highest dilution that provides a strong specific signal with the lowest background.
Troubleshooting Suboptimal Staining
- Excessive Background: Increase the concentration of blocking agents (e.g., serum or BSA) or the blocking time [46]. Titrate down the concentration of the primary and/or secondary antibody. Ensure washing steps are sufficient; additional or longer washes may be required [42] [46]. For aldehyde-based fixation, quenching with 0.1M glycine may reduce background [46].
- Weak or No Signal: Confirm that your tissue expresses the protein of interest via a Western blot before troubleshooting the ICC protocol [47]. Titrate up the primary and/or secondary antibody concentration. Check for epitope masking due to over-fixation and consider antigen retrieval [47]. For indirect staining, ensure the secondary antibody is raised against the host species of the primary antibody.
- Photobleaching: Minimize light exposure during and after secondary antibody incubation [42]. Use an antifade mounting medium to protect fluorophores [42] [11]. For tandem dyes, which are highly sensitive, always protect from light and avoid freezing conjugates [44].
Advanced Application: Sequential Staining for Same-Species Antibodies
A powerful advanced technique allows for combining indirect and direct staining to visualize multiple targets using primary antibodies from the same host species. This method overcomes a major limitation of standard indirect staining [45].
Protocol:
- First Round (Indirect): After standard blocking, incubate the sample with the first unconjugated primary antibody (e.g., from mouse). Wash and detect it with an appropriate fluorescent secondary antibody (e.g., anti-mouse). Wash thoroughly [45].
- Second Round (Direct): Without stripping the first set of antibodies, incubate the sample with the second primary antibody, which is directly conjugated to a fluorophore and also from the same species (e.g., directly labeled mouse antibody). Use a higher concentration than usual for direct staining [45].
- Rationale: The secondary antibody from the first round cannot bind to the directly conjugated primary antibody in the second round, as its epitopes are already occupied by the fluorophores. This prevents cross-reactivity and allows for specific labeling of both targets [45].
The Scientist's Toolkit: Essential Research Reagent Solutions
Successful immunostaining relies on a suite of carefully selected reagents. The following table details key materials and their functions for a typical ICC experiment.
Table 2: Essential reagents for immunocytochemistry protocols.
| Reagent Category | Specific Examples | Function & Application Notes |
|---|---|---|
| Fixatives | 4% Paraformaldehyde (PFA), Methanol, Acetone [6] [11] | Preserves cell morphology and immobilizes antigens. PFA cross-links; organic solvents like methanol precipitate proteins and permeabilize [47]. |
| Permeabilization Agents | Triton X-100, Tween-20, Saponin [6] [11] | Solubilizes cell membranes to allow antibody access to intracellular epitopes. Required after PFA fixation [6]. |
| Blocking Agents | Normal Serum, Bovine Serum Albumin (BSA) [6] [11] | Reduces nonspecific antibody binding to minimize background. Use serum from the secondary antibody host species for best results [6] [46]. |
| Primary Antibodies | Monoclonal or polyclonal, unconjugated or directly conjugated [42] | Specifically bind to the target antigen. Require optimization of concentration and incubation time [46]. |
| Secondary Antibodies | Cross-adsorbed anti-IgG conjugates (e.g., Alexa Fluor 488, Cy3) [44] [43] | Bind to primary antibodies for detection/amplification. Cross-adsorption minimizes cross-reactivity in multiplexing [44]. |
| Fluorophores | Alexa Fluor dyes, FITC, PE, Cy dyes [44] [43] | Detectable labels excited by specific light wavelengths. Choose based on brightness, photostability, and filter availability [44]. |
| Mounting Media | Antifade mounting media (e.g., VECTASHIELD, EverBrite) [42] [45] | Preserves samples, reduces photobleaching, and often contains DAPI for nuclear counterstaining [42] [11]. |
| N-Acetyl mesalazine-13C6 | N-Acetyl mesalazine-13C6, MF:C9H9NO4, MW:201.13 g/mol | Chemical Reagent |
| Ac-AAVALLPAVLLALLAP-DEVD-CHO | Ac-AAVALLPAVLLALLAP-DEVD-CHO, MF:C94H158N20O27, MW:2000.4 g/mol | Chemical Reagent |
Multicolor immunofluorescence (IF) is a powerful immunocytochemistry technique that enables the simultaneous detection and localization of multiple target antigens within a single cell sample. By employing antibodies conjugated to fluorochromes with distinct emission spectra, researchers can investigate complex biological questions related to protein co-localization, cellular heterogeneity, and spatial relationships between biomarkers. This application note provides a comprehensive framework for designing and executing robust multicolor IF experiments, detailing methodological approaches, critical optimization parameters, and reagent selection criteria to ensure high-quality, reproducible results for research and drug development applications.
Methodological Approaches for Multicolor Staining
Multicolor IF can be performed using several methodological approaches, each with distinct advantages and limitations. The choice of method depends primarily on the host species of the primary antibodies and the specific requirements of the experiment regarding sensitivity, specificity, and time.
Direct Detection Method
The direct method involves using primary antibodies that are directly conjugated to fluorophores, allowing for a single incubation step.
- Workflow: After fixation, permeabilization, and blocking, all fluorescently-labeled primary antibodies are applied to the sample simultaneously in a cocktail, followed by washing and mounting [48] [49].
- Best For: Situations where primary antibodies are from the same host species (e.g., two mouse monoclonal antibodies) [48] [49]. It is also ideal for rapid protocols and for minimizing potential cross-reactivity.
- Pros: The protocol is fast and straightforward with no secondary antibody steps [48] [50]. It eliminates cross-reactivity concerns from secondary antibodies and allows for easy multiplexing of antibodies from the same host.
- Cons: Signal intensity is generally lower due to the lack of signal amplification from secondary antibodies [48]. There is also less flexibility, as each primary antibody must be individually conjugated, and the choice of fluorophores may be limited.
Indirect Simultaneous Detection Method
The indirect simultaneous method uses unlabeled primary antibodies from different host species, which are detected with a mixture of species-specific secondary antibodies.
- Workflow: A cocktail of unlabeled primary antibodies (e.g., mouse monoclonal and rabbit polyclonal) is applied first. After washing, a cocktail of fluorophore-conjugated secondary antibodies (e.g., goat anti-mouse and goat anti-rabbit) is applied [48] [50] [11].
- Best For: Most routine multicolor experiments where primary antibodies are raised in different host species.
- Pros: It offers high sensitivity due to signal amplification from multiple secondary antibodies binding to each primary [50]. This method is more flexible than the direct method and is relatively efficient.
- Cons: There is a risk of cross-reactivity if secondary antibodies are not thoroughly cross-adsorbed. For example, an anti-mouse secondary could weakly bind to a rabbit primary antibody, leading to non-specific signal [48]. Careful validation of secondary antibodies is crucial.
Indirect Sequential Detection Method
The indirect sequential method involves staining for one antigen completely before starting the staining process for the next antigen.
- Workflow: The sample is incubated with the first primary antibody, followed by its corresponding secondary antibody and thorough washing. This cycle is then repeated for the second (and subsequent) antigen-antibody pair [48] [51] [49]. Some protocols include an additional blocking step with serum from the host species of the next secondary antibody to minimize cross-reactivity [48].
- Best For: Complex experiments involving three or more targets, when primary antibodies are from the same species, or when antibodies are known to aggregate in cocktails [48] [51]. It is also the method of choice when using non-cross-adsorbed secondary antibodies.
- Pros: It provides the highest specificity and the cleanest staining by physically separating antibody incubation steps, which minimizes the potential for cross-reactivity and antibody aggregation [48].
- Cons: The protocol is significantly more time-consuming due to the multiple rounds of incubation and washing [48]. The extended processing can also increase the risk of sample degradation or detachment.
Table 1: Comparison of Multicolor Immunofluorescence Methodologies
| Method | Sensitivity | Assay Time | Multiplexing Complexity | Key Application |
|---|---|---|---|---|
| Direct Detection | Lower (no signal amplification) [48] | Least time-consuming [48] | Easiest (same host species primaries) [48] | Rapid staining; same-host species antibodies [49] |
| Indirect Simultaneous | High (signal amplification) [50] | Less time-consuming [48] | Complex (risk of secondary cross-reactivity) [48] | Standard for primaries from different host species [48] |
| Indirect Sequential | Highest (signal amplification + reduced background) [48] | Most time-consuming [48] | Less complex (separate incubations prevent cross-talk) [48] | Complex multiplexing (3+ targets); problematic antibodies [48] [51] |
The following workflow diagram illustrates the key decision points and steps involved in a standard multicolor immunofluorescence experiment:
Experimental Protocol: Indirect Simultaneous Staining
The following is a detailed step-by-step protocol for the indirect simultaneous method, which is the most common approach for dual-color staining with primary antibodies from different host species [48] [11].
Sample Preparation and Fixation
- Cell Culture: Seed cells onto sterile, poly-L-lysine-coated glass coverslips placed in a multi-well plate. Grow cells to semi-confluency [48] [6]. Using coated coverslips is critical for proper cell adhesion and to prevent sample loss during subsequent washes.
- Fixation:
- Aspirate the culture medium and gently wash cells three times with room-temperature phosphate-buffered saline (PBS) [11].
- Fix cells by incubating in freshly prepared 4% Paraformaldehyde (PFA) in PBS for 10 minutes at room temperature. Alternatively, for certain targets, ice-cold methanol can be used for 10 minutes, which also permeabilizes the cells [48] [6] [11].
- Wash coverslips with PBS for 2 minutes to remove residual fixative [48].
Permeabilization and Blocking
- Permeabilization: Incubate coverslips in 0.1–0.5% Triton X-100 in PBS for 5 minutes at room temperature. Note: This step is not required if methanol fixation was used [48] [11]. Wash coverslips with PBS for 5 minutes.
- Blocking: Incubate coverslips in a blocking buffer (e.g., 5% normal serum from the host species of the secondary antibodies or 1-5% BSA in PBS) for 1 hour at room temperature [48] [52] [6]. Blocking is essential to prevent non-specific binding of antibodies to "sticky" sites on the cells, thereby reducing background fluorescence [48].
Primary and Secondary Antibody Incubation
- Primary Antibody Incubation:
- Prepare a cocktail of the primary antibodies in blocking buffer at their optimal dilutions [50] [11].
- Aspirate the blocking buffer from the coverslips and incubate with the primary antibody cocktail. Use a humidified chamber to prevent evaporation. Incubate for 1 hour at room temperature or overnight at 4°C for increased sensitivity [48] [11].
- Wash the coverslips three times with PBS containing a mild detergent like 0.1% Triton X-100 (PBS-T) for 5 minutes per wash [48] [11].
- Secondary Antibody Incubation:
- Prepare a cocktail of fluorophore-conjugated secondary antibodies in blocking buffer. Each secondary must be raised against the host species of the corresponding primary antibody and must be conjugated to a fluorophore with minimal spectral overlap [50] [53].
- Incubate coverslips with the secondary antibody cocktail for 1 hour at room temperature in the dark to protect the fluorophores from light [48] [11].
- Wash the coverslips three times with PBS-T in the dark for 5 minutes each [48].
Mounting and Imaging
- Counterstaining and Mounting:
- Incubate coverslips with a nuclear counterstain such as DAPI (1-10 µg/mL) for 5 minutes at room temperature [11].
- Place a drop of anti-fade mounting medium onto a microscope slide. Carefully invert the coverslip (cell-side down) onto the mounting medium, avoiding air bubbles [48] [11].
- Gently remove excess mounting medium and, if required, seal the edges of the coverslip with clear nail polish [48].
- Imaging: Examine the cells under a fluorescence microscope equipped with appropriate filter sets for the fluorophores used. To prevent photobleaching, minimize light exposure and store slides in the dark at 4°C or -20°C [48].
Antibody and Fluorochrome Selection Criteria
The success of a multicolor IF experiment critically depends on the careful selection of antibodies and fluorochromes.
Primary Antibody Selection and Validation
- Host Species: For indirect simultaneous staining, select primary antibodies raised in different host species (e.g., mouse monoclonal, rabbit polyclonal, chicken polyclonal) to enable species-specific detection by secondary antibodies [50] [51].
- Validation: Prioritize antibodies that have been previously validated for IF. Include essential controls to ensure specificity:
- Negative Control: Omit the primary antibody to check for non-specific binding of the secondary antibody [48] [51].
- Specificity Control: Use siRNA knockdown or knockout tissue to confirm the absence of signal [51].
- Single-Stain Controls: Stain samples with each primary antibody individually to confirm the expected staining pattern and to check for cross-reactivity in the multiplexed setup [51].
Secondary Antibody Considerations
- Cross-Adsorption: Use secondary antibodies that have been cross-adsorbed against the serum proteins of other species present in the experiment. This minimizes the chance that, for example, a goat anti-mouse secondary antibody will bind to a rabbit primary antibody, which would cause false-positive co-localization [53].
- Fragment Use: For intracellular targets, F(ab')2 fragments can be advantageous. Their smaller size improves tissue penetration, and the lack of an Fc region reduces non-specific binding to Fc receptors [53].
Fluorochrome Selection Rules
Choosing the right combination of fluorophores is paramount to minimizing bleed-through (or crosstalk), where the signal from one fluorophore is detected in the filter channel of another.
Table 2: Key Rules for Fluorochrome Selection in Multicolor IF
| Rule | Technical Rationale | Practical Application Guidance |
|---|---|---|
| Check Microscope Compatibility | Each microscope has specific lasers and filter sets for excitation (Ex) and emission (Em) [54]. | Confirm that the Ex/Em maxima of your chosen fluorophores are compatible with your microscope's available lasers and filters [54]. |
| Match Fluorophore Brightness to Antigen Abundance | Brightness is proportional to the extinction coefficient (ε) [54]. | Use the brightest fluorophores (e.g., Alexa Fluor 555, DyLight 650) for the least abundant antigens. Use dimmer fluorophores (e.g., DyLight 350) for highly abundant antigens [54]. |
| Minimize Spectral Overlap | Fluorophores with overlapping Em spectra cause bleed-through, making co-localization studies unreliable [54] [55]. | Select fluorophores with well-separated Em spectra. Use online spectrum viewers to plan your panel and ensure clear spectral separation [54]. |
| Prioritize Photostability | Photobleaching during imaging leads to signal loss [54]. | Choose modern, photostable dyes like Alexa Fluor or DyLight dyes over traditional dyes like FITC. Use anti-fade mounting media [54]. |
The following diagram illustrates the logical decision process for selecting the appropriate staining method based on experimental parameters:
The Scientist's Toolkit: Essential Research Reagents
A successful multicolor IF experiment relies on a suite of carefully selected reagents. The following table details key solutions and their specific functions in the protocol.
Table 3: Essential Reagents for Multicolor Immunofluorescence
| Reagent Category | Specific Examples | Function & Application Note |
|---|---|---|
| Fixatives | 4% Paraformaldehyde (PFA) [6] [11]; Ice-cold Methanol [6] [11] | PFA: Cross-links proteins, preserving cell structure. Methanol: Precipitates proteins and permeabilizes. Choice depends on epitope preservation [55]. |
| Permeabilization Agents | Triton X-100 [48] [11]; Tween-20; Saponin [6] | Triton X-100: A strong detergent for general intracellular targets. Saponin: A mild detergent better for preserving membrane structures [6]. |
| Blocking Agents | Normal Serum [48] [6]; Bovine Serum Albumin (BSA) [52] [6] | Normal Serum: Blocks non-specific sites with irrelevant immunoglobulins. Should match the host species of the secondary antibody [48]. BSA: A non-species-specific protein blocker. |
| Antibody Diluent | 1% BSA or 1% Serum in PBS [48] | A protein-rich buffer for diluting antibodies, which reduces non-specific binding and stabilizes the antibodies during incubation. |
| Fluorophore-Conjugated Secondary Antibodies | Cross-adsorbed antibodies conjugated to Alexa Fluor dyes [53] | Species-specific antibodies that bind to the primary antibody. Cross-adsorption minimizes cross-reactivity. Alexa Fluor dyes are bright and photostable [54] [53]. |
| Mounting Media | Anti-fade mounting media (with or without DAPI) [48] [11] | Preserves fluorescence and prevents photobleaching during storage and imaging. Media with DAPI included simplifies the counterstaining step [48]. |
| Wash Buffers | PBS; PBS with 0.1% Triton X-100 (PBS-T) [11] | PBS: Used for general washing steps. PBS-T: The mild detergent helps remove unbound antibody more effectively, reducing background [11]. |
| Cytarabine triphosphate trisodium | Cytarabine triphosphate trisodium, MF:C9H13N3Na3O14P3, MW:549.10 g/mol | Chemical Reagent |
| 6-Aldehydoisoophiopogonone A | 6-Aldehydoisoophiopogonone A, MF:C19H14O7, MW:354.3 g/mol | Chemical Reagent |
Mastering multicolor immunofluorescence requires a strategic approach grounded in a clear understanding of methodological trade-offs, rigorous antibody validation, and careful spectral planning. By adhering to the detailed protocols and selection criteria outlined in this application note, researchers can design robust, high-quality multiplexed experiments that yield reliable and interpretable data. The ability to visualize multiple proteins within their native cellular context is indispensable for advancing our understanding of complex biological systems and accelerating drug discovery pipelines.
In the realm of immunocytochemistry (ICC) and immunofluorescence (IF), the final steps of mounting and counterstaining are critical for generating high-quality, reliable, and publication-ready images. These steps preserve the structural integrity of the sample, provide crucial contextual information for the primary signal, and ensure that the valuable fluorescence data is retained over time. Within the context of a broader thesis on immunocytochemistry protocols for cell culture research, this application note details the essential procedures for using the nuclear counterstain 4′,6-diamidino-2-phenylindole (DAPI) in conjunction with anti-fade mounting media. Proper execution of these techniques is indispensable for researchers, scientists, and drug development professionals aiming to accurately visualize protein localization and cellular structures, thereby generating robust and reproducible data.
The Scientist's Toolkit: Essential Reagents and Their Functions
Successful mounting and counterstaining require a set of specific reagents, each serving a distinct purpose in sample preparation and preservation. The table below outlines the key materials required for these procedures.
Table 1: Key Research Reagent Solutions for Mounting and Counterstaining
| Reagent | Function | Key Characteristics & Examples |
|---|---|---|
| DAPI (Counterstain) | A fluorescent nucleic acid stain that binds preferentially to double-stranded DNA, labeling cell nuclei [56]. | - Excitation/Emission: ~360/460 nm (blue fluorescence) [56] [57].- Stains nuclei specifically with little cytoplasmic labeling [56]. |
| Anti-fade Mounting Medium | A solution that preserves fluorescence by reducing photobleaching caused by exposure to excitation light [58]. | - Contains free-radical scavengers (e.g., DABCO, PPD) [58].- Matches refractive index of glass and tissue for image clarity [58] [59].- Examples: SlowFade Gold, ProLong Gold, VECTASHIELD [56] [60] [59]. |
| Phosphate-Buffered Saline (PBS) | A balanced salt solution used for washing and diluting reagents to maintain a stable pH and osmotic balance [56] [6]. | - Used for rinsing samples and diluting staining solutions [56]. |
| Fixative | A chemical that preserves cellular morphology and antigenicity by cross-linking or precipitating macromolecules [6]. | - Common types: 4% Paraformaldehyde (PFA), Methanol, Acetone [6].- Choice affects the need for permeabilization [6]. |
| Permeabilization Agent | A detergent that solubilizes cell membranes, allowing antibodies to access intracellular targets [6]. | - Common agents: Triton X-100, Tween-20, Saponin [6].- Not required if methanol or acetone is used as a fixative [6]. |
| Blocking Agent | A protein solution (e.g., BSA or serum) used to cover non-specific binding sites, reducing background signal [6]. | - Critical for preventing high background staining in ICC [6]. |
| Dihydrooxoepistephamiersine | Dihydrooxoepistephamiersine, MF:C21H27NO7, MW:405.4 g/mol | Chemical Reagent |
Principles of DAPI Staining and Anti-fade Mounting Media
DAPI: A Nuclear Counterstain
DAPI is a blue-fluorescent DNA stain that appears to associate with AT clusters in the minor groove of double-stranded DNA. Its binding to DNA results in a significant (~20-fold) fluorescence enhancement [56]. While it can also bind to RNA, the fluorescence emission of the DAPI/RNA complex is both longer-waved and significantly less bright, making DAPI an effective and specific nuclear stain in most fixed-cell applications [56]. Its blue fluorescence provides vivid contrast against other green, yellow, or red fluorescent labels, enabling clear identification of cellular architecture in multicolor fluorescent techniques [56].
Anti-fade Mounting Media: Combating Photobleaching
Photobleaching, the irreversible loss of fluorescence upon illumination, is a major challenge in fluorescence microscopy. Anti-fade mounting media address this by incorporating compounds that scavenge free radicals generated when fluorophores interact with oxygen during excitation [58]. The choice of mounting medium also impacts image quality through its refractive index (RI). Matching the RI of the mounting medium to that of the glass coverslip (~1.50) and the biological sample (~1.35-1.42) minimizes light scattering and bending, resulting in sharper images with reduced aberration [58] [59]. Mounting media can be broadly categorized as non-setting (liquid) or setting (curing), each with distinct advantages for different experimental needs, as detailed in the table below [58] [60] [59].
Table 2: Comparison of Anti-fade Mounting Medium Types
| Property | Non-Setting Medium (e.g., VECTASHIELD, SlowFade Gold) | Setting Medium (e.g., ProLong Gold, VECTASHIELD HardSet) |
|---|---|---|
| Curing Time | No curing required; ready for immediate viewing [58]. | Requires hours to days to solidify [58]. |
| Best Used For | Immediate imaging and short-term storage [58] [59]. | Long-term archival storage and repeated imaging [58] [59]. |
| Refractive Index | Typically around 1.45 [60]. | Increases upon curing (e.g., to ~1.46-1.47), providing a better match to immersion oil and glass [60] [59]. |
| Handling | Coverslip edges should be sealed with nail polish to prevent drying [60]. | Sets permanently; sealing is often unnecessary [60]. |
Experimental Protocols
Workflow for Immunocytochemistry and Counterstaining
The following diagram illustrates the comprehensive workflow for processing cell cultures for immunocytochemistry, culminating in the critical steps of DAPI counterstaining and mounting with an anti-fade medium.
Detailed Protocol: DAPI Counterstaining and Mounting for Adherent Cells
This protocol assumes that the cell samples (e.g., grown on coverslips) have already been fixed, permeabilized, and labeled with primary and secondary antibodies, following a standard ICC protocol [6].
Materials Needed:
- Fixed and immunolabeled cell samples on coverslips
- DAPI stock solution (e.g., 5 mg/mL in water or DMF) [56]
- Anti-fade mounting medium (with or without DAPI)
- Phosphate-buffered saline (PBS)
- Coverslips and microscope slides
- Nail polish or sealant (for non-setting media)
Procedure:
- Equilibration: Briefly equilibrate the stained coverslip preparation with PBS [56].
- Prepare DAPI Staining Solution: Dilute the DAPI stock solution to a working concentration of 300 nM in PBS [56].
- Stain with DAPI: Add approximately 300 µL of the dilute DAPI staining solution to the coverslip, ensuring the cells are completely covered. Incubate for 1 to 5 minutes at room temperature [56].
- Rinse: Rinse the sample several times with PBS to remove unbound dye [56].
- Mount the Sample:
- Drain excess PBS from the coverslip.
- For a pre-mixed solution, place a drop (e.g., 3-4 drops for a commercial product like Fluoroshield with DAPI) of anti-fade mounting medium containing DAPI directly onto the slide, then lower the coverslip (cell-side down) onto the medium [57].
- If using a separate mounting medium, first apply the anti-fade medium to a clean slide, then place the coverslip (cell-side down) onto it [56].
- Carefully avoid air bubbles.
- Seal and Store (if required):
- Image the Sample: View the sample using a fluorescence microscope equipped with a DAPI/UV filter set. For optimal results, especially with multiple fluorophores, ensure the mounting medium is compatible with all dyes used [57].
Table 3: DAPI Staining Conditions for Different Applications
| Application | Recommended DAPI Concentration | Incubation Time | Key Steps |
|---|---|---|---|
| Fluorescence Microscopy (Adherent Cells) | 300 nM in PBS [56] | 1 - 5 minutes [56] | Rinse after staining; mount with antifade reagent [56]. |
| Flow Cytometry (Cells in Suspension) | 3 µM in staining buffer [56] | 15 minutes at room temperature [56] | Analyze by flow cytometry in the presence of the dye [56]. |
| Chromosome FISH | 30 nM in PBS [56] | 30 minutes at room temperature [56] | Rinse specimen in dH2O before staining to reduce background [56]. |
Critical Controls and Troubleshooting
To ensure the specificity and reliability of immunocytochemistry data, appropriate controls must be implemented. A modern classification system defines three essential types of controls [7]:
- Primary Antibody Controls: Demonstrate the specificity of the primary antibody binding to its intended antigen (e.g., using knockout cells or absorption controls) [7].
- Secondary Antibody Controls: Show that the fluorescent label is specific to the primary antibody and not due to non-specific binding of the secondary antibody (e.g., by omitting the primary antibody) [7].
- Label Controls: Verify that the observed labeling results from the added fluorescent label and not from endogenous fluorescence or autofluorescence [7].
The mechanism by which anti-fade reagents protect against photobleaching is summarized in the diagram below.
Common Troubleshooting Tips:
- High Background with DAPI: Ensure adequate rinsing after the DAPI staining step to remove unbound dye. For chromosome FISH, a final rinse in dH2O before staining can help reduce salt-based background [56].
- Rapid Photobleaching: Confirm that a fresh, high-quality anti-fade mounting medium was used. Avoid exposing mounted slides to light for extended periods before imaging and store them correctly at 4°C in the dark [57].
- Cell Loss or Poor Morphology: Ensure cells are adequately fixed. When applying mounting medium or sealing coverslips, handle slides gently to avoid disturbing the sample.
The meticulous application of DAPI counterstaining and anti-fade mounting media is not merely a final step, but a fundamental determinant of success in immunocytochemistry. By following the optimized protocols outlined in this application note—selecting the appropriate mounting medium, using correct DAPI concentrations and incubation times, and implementing necessary controls—researchers can significantly enhance the quality, specificity, and longevity of their fluorescence images. Mastering these techniques ensures that high-quality data is preserved for accurate analysis and presentation, thereby reinforcing the integrity and impact of research findings in cell biology and drug development.
Solving Common ICC Problems: A Troubleshooting Guide for Weak Staining and High Background
In the critical field of cell biology and drug development, immunocytochemistry (ICC) serves as an indispensable technique for visualizing protein localization and expression within cultured cells. However, researchers frequently encounter the frustrating problem of no or weak signal, which can compromise experimental validity and lead to significant delays in research timelines. This challenge often stems from three primary technical issues: antibody-related problems, inadequate cell permeabilization, and epitope masking from fixation. This application note provides a systematic framework for diagnosing and resolving these common issues, offering detailed protocols and quantitative data to enable researchers to optimize their ICC procedures for robust, reproducible results. The guidance is framed within the broader context of methodological rigor required for high-quality cell culture research, ensuring that findings accurately represent underlying biological phenomena.
Diagnostic Framework: Identifying the Source of Signal Problems
Before attempting to resolve weak signal issues, researchers must first accurately diagnose the root cause. The table below outlines common problems, their characteristic indicators, and recommended verification experiments.
Table 1: Diagnostic Framework for Weak or No Signal Issues
| Problem Category | Specific Issue | Characteristic Indicators | Verification Experiments |
|---|---|---|---|
| Antibody Issues | Low antibody concentration or titer [61] | Faint signal across all cells; poor signal-to-noise ratio | Perform an antibody titration series [61] [6] |
| Antibody specificity or validation failure [61] | No signal despite confirmed antigen presence | Test antibody in Western blot; use a validated positive control [61] | |
| Antibody degradation [61] | Previously working antibody now shows no signal | Test a new aliquot; avoid repeated freeze-thaw cycles [61] | |
| Permeabilization Problems | Incomplete permeabilization [61] | Signal absence for intracellular targets; surface targets visible | Increase detergent concentration or incubation time [61] |
| Wrong detergent type [6] | Poor signal for specific compartments | Switch detergents (e.g., Triton X-100 for general, saponin for membrane preservation) [6] | |
| Epitope Masking | Over-fixation [61] | Signal loss with longer fixation times | Reduce fixation time; try different fixatives [61] |
| Aldehyde cross-linking [61] | Epitopes inaccessible despite antibody validation | Implement antigen retrieval methods [61] |
Quantitative Data for Troubleshooting
Optimization of ICC requires careful consideration of reagent concentrations and incubation parameters. The following tables summarize evidence-based ranges for key experimental variables.
Table 2: Fixation and Permeabilization Parameters for Optimal Signal
| Reagent | Concentration Range | Incubation Time | Temperature | Key Considerations |
|---|---|---|---|---|
| Paraformaldehyde [6] [62] | 2-4% | 10-20 minutes | Room Temperature | Longer times can mask epitopes [61] |
| Methanol [6] | 95-100% | 5-10 minutes | -20°C | Fixes and permeabilizes simultaneously [6] |
| Triton X-100 [6] [62] | 0.1-0.3% | 2-5 minutes | Room Temperature | Harsh; can extract membrane proteins [6] |
| Tween-20 [6] [63] | 0.1-0.5% | 2-5 minutes | Room Temperature | Mild; better for membrane antigen preservation |
| Saponin [6] [64] | 0.1-0.5% | 10-15 minutes | Room Temperature | Mild; requires presence in all subsequent buffers [64] |
Table 3: Antibody and Blocking Parameters for Signal Optimization
| Solution Component | Concentration Range | Incubation Time | Temperature | Purpose |
|---|---|---|---|---|
| Blocking Serum [6] [62] [9] | 2-10% | 1-2 hours | Room Temperature | Reduce non-specific background |
| BSA [6] [9] | 1-5% | 1-2 hours | Room Temperature | Alternative blocking agent |
| Primary Antibody | Variable (titration needed) [61] [6] | 1 hour to overnight [6] [62] | Room Temp or 4°C | Optimal dilution is antibody-specific |
| Secondary Antibody | Variable (e.g., 1-10 μg/mL) [6] | 1 hour | Room Temperature | Protect from light; dilute in blocking buffer |
| Sodium Borohydride [61] | 1% in PBS | 10-15 minutes | Room Temperature | Quench aldehyde-induced autofluorescence |
Detailed Experimental Protocols
Protocol 1: Standard ICC with Optimization for Weak Signal
This comprehensive protocol integrates specific steps to prevent and address weak signal issues.
Materials:
- Poly-D-lysine coated coverslips [62] [65]
- Cultured cells
- PBS (with calcium and magnesium) [62]
- Fixative (e.g., 4% PFA [6] [62] or cold methanol [6])
- Permeabilization buffer (e.g., 0.3% Triton X-100 in PBS) [62]
- Blocking buffer (e.g., 5% normal serum in PBS) [62]
- Primary antibody specific for target
- Fluorophore-conjugated secondary antibody
- DAPI solution (e.g., 3 ng/mL in PBS) [62]
- Antifade mounting medium [9]
Procedure:
- Cell Culture and Seeding:
- Seed cells onto poly-D-lysine coated coverslips in a multi-well plate at appropriate density (e.g., 1×10ⵠcells per chamber) [62].
- Culture cells until they reach 60-80% confluency.
Fixation:
Permeabilization:
Blocking:
Primary Antibody Incubation:
- Prepare primary antibody dilution in blocking buffer.
- Incubate cells with primary antibody overnight at 2-8°C [62].
- Optimization Note: If signal is weak, perform a titration experiment testing a range of concentrations (e.g., 1:100 to 1:1000) and consider room temperature incubation for 1-2 hours [61] [6].
Secondary Antibody Incubation:
- Rinse cells three times with PBS.
- Incubate with fluorophore-conjugated secondary antibody diluted in blocking buffer for 60 minutes at room temperature, protected from light [62].
- Optimization Note: Increase secondary antibody concentration or extend incubation time to 2 hours for low-abundance targets [61].
Counterstaining and Mounting:
Imaging:
- Visualize using a fluorescence microscope with appropriate filter sets.
- Optimization Note: If signal is weak, increase exposure time but be aware of potential photobleaching [61].
Protocol 2: Antigen Retrieval for Fixed Epitope Masking
This specialized protocol addresses epitope masking caused by aldehyde fixation.
Materials:
- Fixed and permeabilized cells on coverslips
- Antigen retrieval buffer (100 mM Tris, 5% urea, pH 9.5) [61]
- Coplin jars or staining jars
- Water bath or heating block
- PBS
Procedure:
- Prepare antigen retrieval buffer and pre-heat to 95°C using a water bath or heating block [61].
- Place coverslips with fixed and permeabilized cells into staining jars containing pre-heated antigen retrieval buffer.
- Incubate at 95°C for 10 minutes [61].
- Carefully remove jars from heat and allow to cool at room temperature for 20 minutes.
- Transfer coverslips to PBS and wash three times.
- Proceed with standard blocking and antibody incubation steps as described in Protocol 1.
Visualization of Workflows
Troubleshooting Pathway for Weak Signal
The following diagram outlines a systematic decision-making process for diagnosing and resolving weak signal issues in ICC experiments.
ICC Optimization Workflow
This diagram illustrates the complete ICC procedure with integrated optimization steps to prevent signal issues.
The Scientist's Toolkit: Essential Research Reagent Solutions
The following table catalogues critical reagents for successful ICC experiments, with specific notes on their application for overcoming signal challenges.
Table 4: Essential Research Reagents for ICC Optimization
| Reagent Category | Specific Examples | Function | Application Notes |
|---|---|---|---|
| Cell Adhesion Coatings | Poly-D-lysine [62], Poly-L-lysine [6], Gelatin [9] | Enhance cell attachment to coverslips | Prevent cell loss during washes; critical for primary cells [62] |
| Fixatives | 4% Paraformaldehyde [6] [62], Methanol [6], Acetone [6] | Preserve cellular architecture and antigenicity | PFA most common; organic solvents fix and permeabilize simultaneously [6] |
| Permeabilization Agents | Triton X-100 [6] [62], Tween-20 [6] [63], Saponin [6] [64], Digitonin [6] | Solubilize membranes for antibody access | Triton X-100 is harsh; saponin is mild and reversible [6] |
| Blocking Agents | Normal Serum [62] [9], BSA [6] [9] | Reduce non-specific antibody binding | Use serum from secondary antibody host species [62] |
| Signal Amplification | Pre-adsorbed secondaries [6], ABC/LSAB/TSA systems [61] | Enhance weak signals | Critical for low-abundance targets [61] |
| Antigen Retrieval | Urea-based buffer [61], Citrate buffer | Reverse epitope masking from fixation | Heat-induced epitope retrieval most effective for aldehyde fixation [61] |
| Mounting Media | Antifade reagents [62] [9] | Reduce photobleaching | Essential for preserving signal during imaging and storage [9] |
Weak or absent signal in immunocytochemistry represents a multifaceted challenge requiring systematic investigation of antibody performance, permeabilization efficiency, and fixation-induced epitope masking. By implementing the diagnostic framework and optimization protocols outlined in this application note, researchers can methodically address these issues rather than relying on trial-and-error approaches. The integration of quantitative data tables and visual workflows provides immediate guidance for troubleshooting while educating researchers on the underlying principles of successful ICC. As the technique continues to evolve with new detection technologies and amplification methods, the fundamental importance of validating each component of the ICC process remains paramount for generating reliable, reproducible data in cell culture research and drug development.
In the context of immunocytochemistry (ICC) protocol for cell culture research, high background staining presents a significant challenge that can compromise experimental validity and interpretation. Immunocytochemistry relies on the specific binding of antibodies to target proteins within cultured cells, followed by detection using fluorescent labels [6]. However, non-specific binding—where antibodies attach to sites other than the target antigen—creates excessive background noise that obscures true signal detection. This technical note systematically addresses the primary causes of high background staining and provides researchers with optimized, detailed methodologies for its reduction through enhanced blocking and washing strategies, enabling the acquisition of publication-quality images in drug development research.
Understanding the Causes of High Background Staining
High background fluorescence in ICC experiments typically stems from multiple factors, with insufficient blocking and inadequate washing representing the most common technical failures. Non-specific binding occurs when antibodies interact with cellular components through hydrophobic or ionic interactions, bind to Fc receptors on cells, or become trapped in cellular compartments due to improper fixation or permeabilization [6] [66]. Background issues manifest as diffuse, nonspecific staining throughout the cell rather than discrete, localized signal at the antigen's expected subcellular location. Systematic troubleshooting requires identifying the specific cause, which often involves evaluating antibody concentrations, fixation conditions, and the thoroughness of procedural steps. The table below summarizes the primary causes and corresponding solutions for high background staining encountered in ICC experiments.
Table 1: Primary Causes and Solutions for High Background Staining
| Cause of Background | Specific Problem | Recommended Solution | Rationale |
|---|---|---|---|
| Insufficient Blocking | Blocking agent, concentration, or time is inadequate [67] [66] | Increase blocking incubation to 1-2 hours; use 10% normal serum from secondary antibody host species [6] [67] | Saturates non-specific binding sites to prevent antibody attachment |
| Antibody Concentration | Primary or secondary antibody concentration is too high [67] [66] | Titrate antibody to find optimal dilution; further dilute primary and/or secondary antibody [66] | Redoversaturates the sample, leading to non-specific binding |
| Inadequate Washing | Unbound antibodies or residual fixative remain between steps [67] | Increase washing time and volume; wash extensively with buffer (e.g., PBS) between all steps [67] | Removes unbound reagents that contribute to background signal |
| Fixative-induced Fluorescence | Using formalin/PFA fixatives with fluorescent detection [67] | Use fluorophore in red or infrared range to minimize overlap with PFA autofluorescence [67] | Avoids spectral overlap with fixative autofluorescence |
| Endogenous Elements | Active endogenous enzymes or free aldehyde groups [67] [68] | Block endogenous enzymes with inhibitors; quench aldehydes with 0.1M Glycine or 0.1M Tris [67] [68] | Prevents false positives from non-antibody related reactions |
| Secondary Antibody Cross-reactivity | Secondary antibody binding non-specifically [67] | Use pre-adsorbed secondary antibodies; run control without primary antibody [6] [67] | Confirms specificity of secondary antibody binding |
Optimized Reagents and Materials for Background Reduction
The following toolkit enumerates essential reagents and materials specifically selected or formulated to minimize non-specific binding in ICC protocols. Careful selection of these components, particularly blocking sera and washing buffers, is fundamental to achieving clean staining with low background.
Table 2: Research Reagent Solutions for Background Reduction
| Reagent/Material | Recommended Type/Concentration | Primary Function in Background Reduction |
|---|---|---|
| Blocking Serum | 10% normal serum from secondary antibody host species (e.g., goat, donkey) [67] [9] | Provides proteins that occupy non-specific binding sites, preventing unwanted antibody attachment [6] |
| Alternative Blocking Agent | 1-5% Bovine Serum Albumin (BSA) [6] [68] | A less species-dependent blocking agent that can be effective for a wide range of antibodies [6] |
| Wash Buffer | PBS or 0.1% BSA in PBS [9] | Removes unbound antibodies and reagents during washing steps; BSA can help stabilize cells during washes [9] |
| Permeabilization Detergent | 0.1-0.5% Triton X-100, Tween 20, or Saponin [6] | Permeabilizes membranes to allow antibody access; concentration and type affect membrane integrity and background [6] |
| Secondary Antibody | Pre-adsorbed/Secondaries [6] | Antibodies pre-adsorbed against immunoglobulins of other species to minimize cross-reactivity [6] |
| Quenching Solution | 0.1M Glycine or 0.1M Tris buffer [68] | Quenches unreacted aldehyde groups from PFA fixation that could bind antibodies non-specifically [68] |
| Mounting Medium | Anti-fade mounting medium [9] | Preserves fluorescence and reduces photobleaching during imaging, maintaining signal-to-noise ratio [9] |
Detailed Experimental Protocols for Blocking and Washing
Comprehensive ICC Protocol with Enhanced Blocking
This optimized protocol incorporates critical steps specifically designed to minimize background staining, with emphasis on blocking and washing procedures.
Stage 1: Sample Preparation and Fixation
- Cell Culture: Seed cells on sterile, coated (e.g., poly-L-lysine, gelatin) glass coverslips and grow to semi-confluency [68] [9]. Coating enhances cell adhesion, preventing detachment during stringent washes.
- Fixation: Aspirate culture medium and wash cells gently with PBS at room temperature. Incubate coverslips in freshly prepared 4% paraformaldehyde (PFA) in PBS for 10-20 minutes at room temperature [6] [68]. Alternative fixatives like chilled methanol (-20°C) can be used for 5-10 minutes, which simultaneously fixes and permeabilizes cells [6].
- Post-Fixation Handling: Wash cells three times with PBS to remove residual fixative [6]. For PFA fixation, a quenching step with 0.1M Glycine or 0.1M Tris buffer is recommended to neutralize reactive aldehyde groups [68].
Stage 2: Permeabilization (Optional for PFA fixation)
- Solution Preparation: Prepare permeabilization solution using 0.1–0.2% Triton X-100 in PBS [6]. For membrane-associated antigens, consider milder detergents like 0.2–0.5% Tween 20 or saponin to preserve antigenicity [6].
- Incubation: Cover the fixed cells with permeabilization solution and incubate for 2–5 minutes at room temperature [6].
- Washing: Wash cells three times with PBS to remove detergent [6].
Stage 3: Enhanced Blocking Protocol
- Blocking Buffer Preparation: Prepare a blocking buffer containing 10% normal serum from the species in which the secondary antibody was raised (e.g., goat serum for anti-goat secondaries) in PBS [67] [9]. Alternatively, 1-5% BSA in PBS can be used [6] [68]. For additional stringency, include 0.1M Glycine in the blocking buffer [6].
- Blocking Incubation: Incubate the cells in the blocking buffer for 1–2 hours at room temperature [6]. This extended incubation is crucial for saturating non-specific binding sites.
Stage 4: Antibody Incubation and Washes
- Primary Antibody Incubation:
- Dilute the primary antibody in a dilution buffer containing 1% BSA or 1% normal serum in PBS [68] [9].
- Incubate coverslips with the primary antibody dilution for 1 hour at room temperature or overnight at 4°C [68] [9].
- Critical Washes: Wash coverslips gently with wash buffer (e.g., PBS or 0.1% BSA in PBS) three times for 5 minutes each [68]. Increased washing time and volume at this stage are essential for removing unbound primary antibody [67].
- Secondary Antibody Incubation:
- Dilute the fluorochrome-conjugated secondary antibody in the same dilution buffer as used for the primary antibody. Use pre-adsorbed secondary antibodies to minimize cross-reactivity [6].
- Incubate coverslips in the secondary antibody dilution for 1 hour at room temperature in a dark environment [68] [9].
- Critical Washes: Wash coverslips gently with wash buffer three times for 5 minutes each [68]. Additional or longer washes (e.g., 10 minutes each) may be required if excessive background persists [66].
Stage 5: Mounting and Imaging
- Apply a nuclear counterstain such as DAPI (1-10 µg/mL) for 2-5 minutes if desired [68] [9].
- Perform a final rinse with PBS and then deionized water [9].
- Mount coverslips onto glass slides using an anti-fade mounting medium [68] [9].
- Visualize using a fluorescence microscope with appropriate filter sets [9].
Troubleshooting Excessive Background Staining
Despite a standardized protocol, specific issues may require further optimization. The workflow below outlines a logical decision-making process for diagnosing and rectifying persistent background problems.
Diagram 1: Background Troubleshooting Path
High background staining in immunocytochemistry is a solvable problem that primarily requires meticulous optimization of blocking and washing procedures. By implementing the enhanced protocols outlined in this application note—particularly the use of 10% normal serum for blocking, thorough washing steps between all incubations, and careful titration of antibodies—researchers can significantly reduce non-specific binding. The systematic troubleshooting approach and reagent solutions provided herein will empower scientists and drug development professionals to obtain clean, reliable, and interpretable ICC data, thereby advancing their research in understanding protein localization and function within cell cultures.
Within the framework of immunocytochemistry (ICC) research, maintaining impeccable cell morphology and ensuring high adherence rates are not merely technical concerns but are foundational to data integrity. ICC is a powerful technique for visualizing protein localization and distribution within cultured cells, relying on high-quality samples for accurate interpretation [6]. Cell loss and morphology damage during preparation can compromise experimental outcomes, leading to inconclusive or erroneous results. This application note addresses these challenges by presenting optimized protocols and quantitative data designed to empower researchers in the drug development field and beyond to achieve superior sample preservation.
Quantitative Comparison of Sample Handling Methods
The choice of sample handling protocol significantly impacts cell and tissue morphology, which in turn affects the quantification of key biological parameters. The following table summarizes findings from a systematic study on ex vivo colon tissue, which provides a relevant model for understanding the effects of handling on cellular integrity [69].
Table 1: Impact of Sample Handling Methods on Tissue Attenuation and Morphology
| Handling Method | Attenuation Coefficient (mmâ»Â¹) | Effect Size (δ) | Key Morphological Observations |
|---|---|---|---|
| Fresh Tissue (Control) | 2.5 ± 1.0 | (Baseline) | Optimal structural preservation; gold standard for comparison. |
| Formalin-Fixed | 2.5 ± 1.3 | 0.002 | Negligible effect; best preservation of epithelial layer and goblet cells. |
| Snap Frozen | Data Not Specified | -0.09 | Small effect size; a viable alternative when fresh tissue is unavailable. |
| Directly Frozen (-80°C) | 2.0 ± 1.0 | Data Not Specified | Lower attenuation; significant macroscopic structural changes. |
| Slow Frozen (Cryobox) | Data Not Specified | Data Not Specified | General lower attenuation; indications of goblet cell degradation. |
| DMSO Cryopreservation | Data Not Specified | Data Not Specified | General lower attenuation; indications of goblet cell degradation. |
This data underscores that formalin fixation has a negligible impact on tissue attenuation properties and best preserves microscopic morphology, making it the optimal handling method when immediate processing of fresh samples is not feasible [69]. In contrast, various freezing methods, while useful for long-term storage, consistently alter tissue properties and structure.
Experimental Protocols for Improved Cell Adherence and Preservation
The following protocols provide detailed methodologies for gentler cell handling, tailored for both adherent and non-adherent cell types commonly used in ICC.
Protocol 1: Optimized Adherent Cell Culture and Fixation
This protocol is designed to maximize cell adherence and minimize detachment during processing [6] [70].
Key Materials:
- Sterile glass coverslips
- Coating solution (e.g., Poly-L-lysine, Poly-D-lysine)
- Sterile Phosphate-Buffered Saline (PBS)
- Fixative (e.g., 4% Paraformaldehyde (PFA) in PBS or ice-cold Methanol)
Procedure:
- Coverslip Coating:
- Place sterile coverslips in a tissue culture dish.
- Cover with a filter-sterilized coating solution like Poly-L-lysine.
- Incubate for 1 hour to 24 hours at room temperature.
- Aspirate the solution and rinse the coverslips three times with sterile PBS.
- Allow coverslips to dry completely and sterilize under UV light for at least 4 hours [6].
Cell Seeding and Culture:
- Seed cells onto the prepared coverslips.
- Grow cells to semi-confluency, treating all mechanical manipulations gently to avoid disturbing the monolayer [70].
Fixation:
- Gently aspirate the culture medium.
- Wash cells gently with PBS at room temperature.
- Incubate coverslips in freshly prepared 4% PFA for 10-20 minutes at room temperature. Alternatively, for some antigens, incubate in ice-cold methanol for 5-10 minutes at -20°C [6] [70].
- Wash coverslips three times with PBS to remove residual fixative.
Protocol 2: Gentle Handling of Non-Adherent Cells and Sensitive Suspensions
Non-adherent cells, such as leukemias or primary lymphocytes, are particularly susceptible to loss and damage during centrifugation. This protocol utilizes centrifugal filter devices and charged slides to mitigate these issues [71] [72].
Key Materials:
- Centrifugal filter devices with PVDF membrane
- Superfrost Plus or other charged microscopy slides
- Hydrophobic barrier pen (e.g., GnomePen)
- Appropriate cell culture medium
Procedure:
- Cell Preparation:
Slide Preparation (Alternative Method):
Cell Adherence and Fixation:
- Apply 10 µL of cell suspension (at ~1-5 x 10ⶠcells/mL) onto the slide within the barrier.
- Gently smear the cell spot using the side of a pipette tip.
- Place the slide on a hot plate at 55-60°C for 20 minutes (protected from light) for heat fixation. This step evaporates liquid without harsh centrifugation, minimizing cell stress and preserving morphology [72].
- After cooling, fix cells further if required (e.g., with IC Fixation Buffer for 5 minutes at room temperature) [72].
- Proceed to permeabilization, blocking, and immunostaining.
The Scientist's Toolkit: Essential Reagent Solutions
The table below lists key reagents critical for preventing cell loss and preserving morphology during ICC experiments.
Table 2: Essential Research Reagents for Cell Adherence and Morphology Preservation
| Reagent / Material | Function / Application | Key Considerations |
|---|---|---|
| Poly-L-lysine / Poly-D-lysine | Coats glass surfaces to enhance cell adhesion. | Crucial for weakly adherent cell types; requires sterilization [6]. |
| Superfrost Plus Microscope Slides | Charged slides for securing non-adherent cells without centrifugation. | Enables direct cell adhesion for suspension cells; avoids cytospin-induced damage [72]. |
| Hydrophobic Barrier Pen | Creates a liquid containment zone on slides for small-volume incubations. | Prevents reagent loss and sample drying; some brands are detergent-resistant [72]. |
| Bovine Serum Albumin (BSA) / Normal Serum | Blocking agent to reduce non-specific antibody binding and background. | Serum should be from the secondary antibody host species for most effective blocking [6] [70]. |
| Triton X-100 | Detergent for permeabilizing cell membranes after cross-linking fixation. | Standard concentration is 0.1-0.5%; harsher detergents can damage morphology [6] [38]. |
| Formalin (4% PFA) | Cross-linking fixative that preserves cellular structure and antigenicity. | Ideal for structural preservation; requires a subsequent permeabilization step [6] [69]. |
| Methanol | Organic solvent that simultaneously fixes and permeabilizes cells. | Can precipitate proteins and destroy some epitopes; use ice-cold [6] [70]. |
Workflow for Method Selection
The following diagram outlines a decision-making workflow to help researchers select the optimal handling method based on their cell type and experimental needs.
Autofluorescence, the background fluorescence emitted naturally by biological samples and reagents, presents a significant challenge in immunocytochemistry (ICC) by obscuring specific signals and reducing the signal-to-noise ratio critical for accurate imaging [73] [74]. This phenomenon is particularly problematic in fixed cell cultures, where aldehyde-based fixatives can themselves induce fluorescent artifacts by forming Schiff's bases through reactions with amine groups [73]. For researchers in cell culture and drug development, managing these artifacts is not merely an optional optimization but a fundamental prerequisite for obtaining reliable, quantifiable data. The inherent autofluorescence from cellular components such as collagen, riboflavin, NADH, and lipofuscin often overlaps with the emission spectra of commonly used fluorophores like FITC and Alexa Fluor 488, potentially leading to misinterpretation of protein localization and abundance [73] [74]. This application note, framed within a broader thesis on advanced ICC protocols, provides a comprehensive guide to identifying, understanding, and mitigating autofluorescence and fixation artifacts through optimized quenching techniques and fixative selection, thereby enhancing the quality and reliability of cellular imaging data.
Autofluorescence in cell cultures originates from multiple endogenous and exogenous sources. Intrinsic cellular fluorophores include metabolic cofactors such as riboflavin (vitamin B2) and reduced nicotinamide adenine dinucleotide (NADH), which exhibit strong fluorescence in the ultraviolet through green spectral ranges [73] [74]. Structural proteins like collagen and elastin in the extracellular matrix also contribute significantly, particularly in certain co-culture systems [73]. Furthermore, lipofuscin, a pigmented byproduct of intracellular catabolism that accumulates in post-mitotic cells, is a prominent source of autofluorescence with a broad emission spectrum [73].
Exogenous sources introduced during sample preparation are equally critical. Aldehyde fixatives, specifically formaldehyde, paraformaldehyde, and glutaraldehyde, are major contributors as they react with amine groups to form fluorescent Schiff's bases [73]. Additionally, culture media components like phenol red and fetal bovine serum (FBS), along with plastic labware such as microplates and culture flasks, can introduce substantial background fluorescence that interferes with detection [73] [74]. The table below summarizes the primary sources of autofluorescence and their spectral characteristics.
Table 1: Common Sources of Autofluorescence in Cell Cultures
| Source Category | Specific Examples | Spectral Characteristics (Emission) | Notes |
|---|---|---|---|
| Endogenous Biomolecules | Collagen, Elastin [73] | Green channel | Major components of ECM |
| Riboflavins, NADH [73] [74] | UV-Green (375-650 nm) | Metabolic cofactors | |
| Lipofuscin [73] | Broad spectrum | Accumulates in post-mitotic cells | |
| Aromatic Amino Acids [73] | - | Phenylalanine, Tryptophan, Tyrosine | |
| Fixation Reagents | Aldehydes (Formaldehyde, PFA) [73] | - | Form fluorescent Schiff's bases |
| Culture Components | Phenol Red, FBS [73] | - | Media supplements |
| Plastic Labware [73] | - | Microplates, culture flasks |
Fixative Selection and Optimization
The choice of fixative is a critical determinant in preserving cell morphology and antigenicity while minimizing autofluorescence. Fixatives are broadly categorized into cross-linking agents and organic solvents, each with distinct mechanisms and implications for fluorescence imaging.
Cross-linking fixatives, primarily aldehydes like formaldehyde and paraformaldehyde (PFA), work by creating covalent bonds between proteins, thereby stabilizing cellular structure with minimal dislocation of antigens [75] [38]. A typical working concentration is 2-4% PFA, with an incubation time of 10-20 minutes at room temperature [6] [75]. While this method offers superior preservation of cellular architecture, it inevitably generates autofluorescence through the formation of fluorescent cross-links. Prolonged fixation times can exacerbate this issue and may also lead to epitope masking, making antibody binding less efficient [6] [75]. Glutaraldehyde, another cross-linker, typically induces even stronger autofluorescence and is generally not recommended for standard ICC unless essential for ultrastructural preservation [38].
Organic solvent fixatives such as methanol (100%, chilled to -20°C) and acetone precipitate proteins, thereby preserving antigenicity for many targets without creating fluorescent cross-links [6] [75]. These solvents also permeabilize cells during fixation, eliminating the need for a separate permeabilization step [6]. However, this approach can remove lipid-linked proteins, potentially distort membrane-associated antigens, and cause cell flattening, which compromises ultrastructural detail [75].
The following workflow diagram illustrates the decision-making process for selecting and optimizing fixatives to minimize artifacts.
Figure 1: Fixative Selection and Troubleshooting Workflow
Quenching Techniques for Autofluorescence Reduction
When autofluorescence is detected, applying specific chemical quenching agents is an effective strategy to suppress background signal. The efficacy of a quenching agent depends on the chemical nature of the underlying autofluorescent compounds.
Sodium Borohydride (SB) is particularly effective at reducing aldehyde-induced fluorescence by converting fluorescent amine-aldehyde compounds into non-fluorescent salts [73]. A fresh solution of 0.1-1.0 M sodium borohydride in deionized water is recommended, with treatment times of 10-20 minutes at room temperature [76] [73]. Due to its instability in solution and the release of flammable hydrogen gas upon contact with water, this treatment must be conducted in a fume hood with appropriate safety precautions [76].
Copper Sulfate (CS) has proven highly effective for quenching autofluorescence driven by lignin and polyphenols in plant-derived scaffolds, and it is also applicable to mammalian tissues [76]. It functions by altering the electronic states of chromophores. A concentration of 0.01-0.1 M copper sulfate in deionized water, applied for 10-20 minutes, has been shown to reduce autofluorescence more effectively than ammonium chloride or sodium borohydride in some contexts, without significantly altering the mechanical properties of the scaffold [76]. However, its utility in live-cell applications is limited due to scaffold-specific declines in cell viability observed in some models [76].
Ammonium Chloride (AC) is routinely used to reduce aldehyde-based fluorescence in formalin-fixed tissues through a similar quenching mechanism [76]. A 0.02-0.2 M solution in deionized water, applied for 10-20 minutes, is a standard approach [76]. While potentially less effective against some endogenous fluorophores, it is often preferred when preserving cell viability is a priority [76].
Table 2: Quantitative Comparison of Autofluorescence Quenching Agents
| Quenching Agent | Recommended Concentration | Incubation Time | Mechanism of Action | Key Advantages | Key Limitations |
|---|---|---|---|---|---|
| Sodium Borohydride [76] [73] | 0.1 - 1.0 M | 10 - 20 min | Reduces fluorescent Schiff's bases to non-fluorescent salts | Highly effective for aldehyde-induced fluorescence | Unstable in solution; releases flammable gas |
| Copper Sulfate [76] | 0.01 - 0.1 M | 10 - 20 min | Alters electronic states of chromophores | Potent and stable quenching effect; preserves scaffold mechanics | Can reduce cell viability; not for live cells |
| Ammonium Chloride [76] | 0.02 - 0.2 M | 10 - 20 min | Quenches aldehyde-based fluorescence | Suitable when preserving viability is key | May be less effective against some endogenous fluorophores |
| Sudan Black B [73] | 0.1 - 0.3% | 30 - 60 min | Binds to lipophilic autofluorescent compounds | Effective against lipofuscin and other lipophilic fluorophores | Can require optimization for different tissues |
Detailed Experimental Protocols
Protocol 1: Standard ICC with Integrated Quenching
This protocol incorporates a sodium borohydride quenching step for aldehyde-fixed cell cultures.
Cell Seeding and Fixation:
- Culture cells on poly-L-lysine-coated glass coverslips until they reach 60-80% confluency.
- Rinse cells gently with sterile phosphate-buffered saline (PBS).
- Fix cells with 4% paraformaldehyde (PFA) in PBS for 15 minutes at room temperature.
- Wash the fixed cells three times with PBS, for 5 minutes per wash.
Quenching with Sodium Borohydride:
- Prepare fresh: 0.1-0.5 M sodium borohydride (NaBHâ‚„) in deionized water.
- Incubate the fixed samples in the NaBHâ‚„ solution for 20 minutes at room temperature in a fume hood.
- Wash the samples three times with PBS, for 5 minutes per wash, to remove residual quenching agent.
Permeabilization and Blocking:
- Permeabilize cells with 0.1% Triton X-100 in PBS for 10 minutes at room temperature.
- Prepare a blocking buffer of 2-10% bovine serum albumin (BSA) or normal serum from the secondary antibody host species in PBS. Optionally, include 0.1 M glycine.
- Incubate samples in the blocking buffer for 1-2 hours at room temperature to minimize non-specific antibody binding.
Antibody Staining and Imaging:
- Incubate with the primary antibody diluted in blocking buffer for 1 hour at room temperature or overnight at 4°C.
- Wash three times with PBS, for 5 minutes per wash.
- Incubate with fluorophore-conjugated secondary antibodies (e.g., Alexa Fluor dyes) diluted in blocking buffer for 1 hour at room temperature, protected from light.
- Wash three times with PBS, for 5 minutes per wash.
- Perform nuclear counterstaining with DAPI or Hoechst if required.
- Mount the coverslips using an antifade mounting medium (e.g., ProLong Gold) and proceed to image acquisition [38].
Protocol 2: Advanced Imaging with Fluorescence Lifetime Imaging Microscopy (FLIM)
For situations where chemical quenching is insufficient or undesirable, FLIM provides a powerful digital alternative by leveraging the distinct fluorescence decay lifetimes of fluorophores to separate specific signal from autofluorescence [77].
Sample Preparation: Follow standard ICC protocols for fixation and staining, omitting the chemical quenching step.
Data Acquisition:
- Use a time-resolved fluorescence microscope equipped with a pulsed laser and high-speed detection system.
- Acquire fluorescence decay curves for each pixel in the image. High-speed FLIM systems utilizing GPU acceleration can acquire over 500 photons per pixel per second, making the technique viable for routine use [77].
Phasor Analysis for Signal Separation:
- Transform the fluorescence lifetime decays into the phasor domain using Fourier-like transformations (sine and cosine functions) to generate G and S coordinates for each pixel.
- In the 2D phasor plot, the phasor clusters for the pure immunofluorescence signal (measured from antibody solutions) and autofluorescence (measured from unstained control samples) will occupy distinct regions [77].
- The fractional contribution of the specific immunofluorescence signal in each pixel is calculated based on its geometric distance to the reference phasors of the pure immunofluorescence and autofluorescence signals [77].
Figure 2: FLIM-based Autofluorescence Separation Workflow
The Scientist's Toolkit: Research Reagent Solutions
Table 3: Essential Reagents for Managing Autofluorescence
| Reagent/Category | Specific Examples | Function/Purpose | Application Notes |
|---|---|---|---|
| Quenching Agents | Sodium Borohydride, Copper Sulfate, Ammonium Chloride [76] [73] | Chemically suppresses autofluorescence post-fixation | Agent selection depends on fixative used and autofluorescence source. |
| Alternative Fixatives | Methanol, Acetone (chilled to -20°C) [6] [75] | Precipitates proteins without creating fluorescent cross-links | Avoids aldehyde-induced artifacts; permeabilizes simultaneously. |
| Specialized Buffers | PHEM Buffer, CSK Buffer [75] | Optimizes intracellular antigen-antibody binding | Can improve signal-to-noise ratio compared to standard PBS. |
| Blocking Agents | BSA, Normal Goat/Donkey Serum [6] [38] | Reduces non-specific antibody binding | Serum should match the host species of the secondary antibody. |
| Antifade Mountants | ProLong Gold, SlowFade Gold [38] | Presves fluorescence signal and reduces photobleaching | Essential for long-term preservation of fluorescence samples. |
| Advanced Detection Kits | Zenon, APEX Labeling Kits [38] | Enables direct labeling of primary antibodies | Useful for multiplexing and avoiding cross-reactivity. |
Multiplexing Challenges: Preventing Cross-Reactivity with Pre-adsorbed Secondaries
In the field of immunocytochemistry (ICC), the ability to visualize multiple intracellular targets simultaneously—a technique known as multiplexing—is invaluable for understanding complex protein interactions and cellular heterogeneity. However, a significant challenge in multiplexed ICC is antibody cross-reactivity, where secondary antibodies bind non-specifically to off-target immunoglobulins. This non-specific binding leads to high background noise, compromised data, and incorrect conclusions about protein co-localization [78] [79]. Within the context of a broader ICC protocol for cell culture research, the strategic use of pre-adsorbed (cross-adsorbed) secondary antibodies is a critical methodological step to mitigate this risk. This application note details the sources of cross-reactivity and provides a validated protocol for its prevention in multiplexed ICC experiments.
{@ Part 2: Understanding Cross-Reactivity @}
Understanding Cross-Reactivity in Multiplexed Assays
Cross-reactivity occurs when an antibody binds to an epitope that is similar, but not identical, to its intended target. In multiplexed ICC, this primarily manifests in two ways:
- Species Cross-Reactivity: Immunoglobulins from different species can share conserved structural regions. A secondary antibody raised against one species (e.g., mouse IgG) may recognize homologous epitopes on immunoglobulins from a closely related species (e.g., rat IgG) present in the sample or from another primary antibody used in the experiment [80].
- Endogenous Antibody Detection: Secondary antibodies can bind to endogenous immunoglobulins found within the cell culture sample itself, leading to high background staining [79] [80].
Pre-adsorption is an additional purification process that filters out antibodies from the polyclonal mixture that recognize immunoglobulins from specified off-target species. This process increases specificity but may slightly reduce sensitivity as the overall pool of reactive antibodies is narrowed [79]. The following diagram illustrates the key decision points for incorporating pre-adsorbed antibodies into an experimental workflow to prevent cross-reactivity.
{@ Part 3: Key Reagent Solutions @}
The Scientist's Toolkit: Key Research Reagent Solutions
Successful execution of a multiplexed ICC experiment with minimal cross-reactivity relies on a carefully selected set of reagents. The table below outlines the essential materials and their specific functions in this context.
Table 1: Essential Reagents for Multiplexed ICC with Cross-Reactivity Prevention
| Reagent | Function & Importance in Preventing Cross-Reactivity |
|---|---|
| Pre-adsorbed Secondary Antibodies | Secondary antibodies that have been purified against immunoglobulins of specified species to minimize off-target binding. Crucial for multiplexing with primaries from similar species or samples with endogenous Ig [79] [80]. |
| Directly Conjugated Primary Antibodies | Primary antibodies with a fluorophore covalently attached. Eliminates the need for secondary antibodies, thereby entirely avoiding secondary antibody-mediated cross-reactivity. Ideal for complex multiplexing panels [81]. |
| Blocking Serum | A solution of serum proteins (e.g., from donkey, goat) used to occupy non-specific binding sites on the sample. The serum should ideally match the host species of the secondary antibody and not contain serum from the host species of the primary antibody [6]. |
| Species-Specific Primary Antibodies | The foundation of a clean multiplex experiment. Using primary antibodies raised in different host species (e.g., mouse, rabbit, rat) enables the use of species-specific pre-adsorbed secondary antibodies for discrete detection [82]. |
| Fluorophore-Conjugated Secondary Antibodies | When direct conjugation is not feasible, these reagents provide signal amplification. Must be selected for minimal spectral overlap and pre-adsorbed against relevant species to prevent cross-talk [79] [81]. |
{@ Part 4: Application Notes @}
Application Notes: Optimized Protocol for Multiplexed ICC
The following protocol is optimized for labeling two intracellular antigens in cultured cells using primary antibodies from the same host species, a common scenario where cross-reactivity is a major concern.
The sequential staining strategy is critical when using an unconjugated primary antibody with a secondary antibody, followed by a directly conjugated primary antibody from the same species. This workflow prevents the secondary antibody from cross-reacting with the conjugated primary.
Detailed Methodology
Stage 1: Sample Preparation and Fixation
- Culture cells on poly-L-lysine-coated coverslips in a multi-well plate until they reach 60-80% confluency.
- Fixation: Aspirate the culture medium and rinse the cells gently with sterile PBS. Incubate the cells with 4% paraformaldehyde (PFA) in PBS for 10-20 minutes at room temperature [6].
- Wash: Rinse the cells three times with PBS to remove residual fixative.
Stage 2: Permeabilization and Blocking
- Permeabilization: To allow antibody access to intracellular epitopes, incubate the cells with 0.1% Triton X-100 in PBS for 5 minutes at room temperature. Note: Harsher detergents like Triton X-100 are effective for most intracellular targets but may not be suitable for membrane-associated antigens [6].
- Blocking: Incubate the cells with a blocking buffer containing 2-10% normal serum from the host species of your secondary antibodies (e.g., donkey serum) and 0.1 M glycine in PBS for 1-2 hours at room temperature. This step is critical for reducing non-specific background [6].
Stage 3: Sequential Antibody Incubation This stage is designed to prevent cross-reactivity between the two antibodies from the same host species.
- First Primary Antibody: Apply the unconjugated primary antibody diluted in blocking buffer to the cells. Incubate overnight at 4°C in a humidified chamber.
- Wash: Wash the cells three times with PBS for 5 minutes each to remove unbound primary antibody.
- Pre-adsorbed Secondary Antibody: Incubate the cells with the fluorophore-conjugated secondary antibody that is highly cross-adsorbed against the IgG of the second primary antibody's host species and any endogenous immunoglobulins in the sample. Protect from light and incubate for 30-60 minutes at room temperature [79] [81] [80].
- Critical Wash Step: Perform at least three thorough washes with PBS for 5 minutes each. This is essential to remove any trace of the secondary antibody before adding the next primary antibody, thus preventing cross-reactivity [81].
- Directly Conjugated Primary Antibody: Apply the second primary antibody, which is directly conjugated to a fluorophore with a distinct emission spectrum. Incubate for 1 hour at room temperature, protected from light.
- Final Wash: Wash the cells three times with PBS for 5 minutes each.
- Mounting and Imaging: Mount the coverslips using an antifade mounting medium containing DAPI for nuclear counterstaining. Proceed with imaging using a fluorescence microscope with appropriate filter sets [81].
{@ Part 5: Experimental Controls and Validation @}
Experimental Controls and Validation
Rigorous controls are non-negotiable for validating the specificity of your multiplexed ICC results and confirming the absence of cross-reactivity [7]. The following controls are essential:
- Secondary Antibody Control (Specificity Control): Incubate the sample with the pre-adsorbed secondary antibody alone, omitting the primary antibody. This control verifies that the secondary antibody does not bind non-specifically to cellular components or endogenous immunoglobulins. The result should be no signal in the secondary antibody's channel [7].
- Primary Antibody Controls: These demonstrate that the primary antibody binds specifically to its intended antigen. Methods include using tissue or cells from a knockout animal, validating via Western blot, or performing an absorption control where the primary antibody is pre-incubated with its target antigen before application, which should abolish the signal [7].
- Single Labeling Controls: Perform the entire ICC protocol for each primary antibody individually. This helps establish the expected staining pattern and intensity for each target, making it easier to identify anomalous cross-reactivity in the multiplexed experiment.
{@ Part 6: Troubleshooting Guide @}
Troubleshooting Guide
Despite careful planning, issues with cross-reactivity or high background may persist. The table below outlines common problems and their solutions.
Table 2: Troubleshooting Cross-Reactivity and Background Issues
| Problem | Potential Cause | Recommended Solution |
|---|---|---|
| High Background in Multiple Channels | Inadequate blocking or secondary antibody cross-reacting with endogenous immunoglobulins. | Increase blocking serum concentration or duration. Ensure your secondary antibody is cross-adsorbed against the species of your sample [79] [80]. |
| Unexpected Co-localization Signal | Secondary antibody cross-reacting with an off-target primary antibody. | Switch to highly cross-adsorbed secondary antibodies that have been purified against the host species of all other primary antibodies used in the experiment [80]. |
| Weak or No Specific Signal | Over-adsorption of the secondary antibody, leading to reduced sensitivity, or primary antibody failure. | Titrate the secondary antibody to find the optimal concentration. Consider using a secondary antibody with a narrower cross-adsorption profile. Verify primary antibody functionality [79] [80]. |
| Signal in Secondary Antibody-Only Control | Non-specific binding of the secondary antibody. | Include species-appropriate blocking serum. Ensure the secondary antibody is cross-adsorbed against the sample species. Increase the number and duration of washes after secondary antibody incubation [7]. |
{@ Part 7: Conclusion @}
The power of multiplexed immunocytochemistry to reveal the complex spatial relationships of proteins within cells is undeniable. However, this power is contingent upon the specificity of the signal. The challenge of antibody cross-reactivity is a significant but manageable obstacle. By understanding its sources and implementing a robust strategy centered on the use of pre-adsorbed secondary antibodies, directly conjugated primaries, and sequential staining protocols, researchers can generate high-quality, reliable data. Adherence to the detailed protocols and rigorous controls outlined in this application note will empower scientists in drug development and biomedical research to advance their investigations with greater confidence and accuracy.
Ensuring Reliability: Antibody Validation, Controls, and Comparative Methods in ICC
In immunocytochemistry (ICC), the compelling nature of fluorescent micrographs can sometimes obscure the potential for misleading results. Appropriate controls are not merely supplementary; they are fundamental to the scientific process, serving as internal checks that validate the specificity of the antibody-antigen interaction and the overall reliability of the staining protocol [83] [7]. Without them, it is impossible to distinguish a true positive signal from artefacts caused by non-specific antibody binding, endogenous background, or other experimental errors [84] [85]. The consequences of such misinterpretation can ripple through downstream analyses, compromising experimental conclusions and their validity.
This application note focuses on three essential reagent controls—the no-primary antibody control, the isotype control, and the absorption control—providing a detailed framework for their implementation within ICC experiments on cell cultures. These controls are specifically designed to verify that the observed staining pattern is accurate and is the result of the specific binding of the primary antibody to its intended target [86]. By integrating these controls into every experiment, researchers and drug development professionals can significantly strengthen the validity and reproducibility of their findings, forming a robust foundation for a broader research thesis.
The Scientist's Toolkit: Essential Research Reagent Solutions
The successful execution of ICC controls relies on a set of well-defined reagents. The table below details the key materials required for the protocols described in this note.
Table 1: Key Research Reagents for ICC Controls
| Reagent | Function/Description | Key Considerations |
|---|---|---|
| Primary Antibody | A monoclonal or polyclonal antibody that specifically binds to the protein of interest. | Clone, host species, and concentration must be known for selecting appropriate controls [83] [86]. |
| Isotype Control Antibody | An antibody from the same host species and of the same isotype (e.g., IgG1, IgG2a) as the primary antibody, but with no specificity for the target [87] [84]. | Must be used at the same concentration as the primary antibody to ensure a valid comparison [85]. |
| Immunogen | The purified peptide or protein against which the primary antibody was raised. | Peptide immunogens are preferred for absorption controls due to lower risk of non-specific binding [83] [85]. |
| Fluorophore-Conjugated Secondary Antibody | An antibody raised against the immunoglobulins of the primary antibody's host species and conjugated to a fluorescent dye. | Must be highly cross-adsorbed to minimize non-specific binding [6]. |
| Blocking Serum | Normal serum from the host species of the secondary antibody, used to occupy non-specific binding sites [6]. | Do not use serum from the host species of the primary antibody, as this will cause high background [6]. |
| Antibody Diluent | A buffer, often containing a protein base like BSA, used to dilute antibodies to their working concentration. | Serves as the primary antibody substitute in the no-primary control [86] [84]. |
A well-controlled ICC experiment incorporates multiple validation points to deconvolute the source of the final fluorescent signal. The no-primary, isotype, and absorption controls each interrogate a different aspect of the staining procedure, working in concert to build a compelling case for antibody specificity.
The following workflow diagram illustrates the logical relationship between these three essential controls and the information they provide.
Detailed Protocols for Essential Controls
No-Primary Antibody Control
Objective and Principle
The no-primary antibody control is a fundamental secondary antibody control designed to identify non-specific binding or elevated background caused by the secondary antibody and detection system itself [83] [7]. This control confirms that the fluorescent signal in the main experiment is a consequence of primary antibody binding and not an artefact of the secondary reagent interacting directly with cellular components [84].
Step-by-Step Protocol
- Sample Preparation: Following cell culture, fixation, and permeabilization, divide the samples into two groups: the experimental sample and the control sample [6] [88].
- Blocking: Block both samples identically using 1-5% normal serum or BSA in PBS for 1 hour at room temperature [6] [88]. Crucially, the blocking serum should be from the same species as the secondary antibody host [88].
- Primary Antibody Incubation:
- Washing: Wash both samples three times with PBS for 5 minutes each [88].
- Secondary Antibody Incubation: Incubate both samples with the same fluorophore-conjugated secondary antibody, diluted to the same working concentration, for 1 hour at room temperature in the dark [87] [88].
- Washing and Mounting: Wash both samples three times with PBS, counterstain with DAPI if required, and mount for imaging [88].
Data Interpretation and Troubleshooting
- Expected Result: The control sample should exhibit negligible fluorescence that does not resemble the specific staining pattern observed in the experimental sample [83] [86].
- Unexpected Result (High Signal in Control): Significant staining in the control indicates non-specific binding of the secondary antibody.
Isotype Control
Objective and Principle
The isotype control is a primary antibody control used primarily with monoclonal antibodies to determine if observed staining is caused by non-specific interactions of the immunoglobulin molecule with the sample, such as binding to Fc receptors [83] [87]. It validates that the signal is due to the specific antigen-binding region (Fab) of the primary antibody.
Step-by-Step Protocol
- Sample Preparation: Prepare, fix, permeabilize, and block cells as for the main experiment.
- Control Antibody Incubation: Instead of the specific primary antibody, incubate the control sample with a non-immune immunoglobulin. This isotype control antibody must be of the same species, isotype (e.g., IgG1, IgG2A), and clonality, and should be used at the same concentration as the primary antibody [83] [84] [85].
- Secondary Antibody and Detection: Process the control sample in parallel with the experimental sample through all subsequent steps, including incubation with the same secondary antibody, washing, and mounting [87].
Data Interpretation and Troubleshooting
- Expected Result: Background staining in the isotype control should be negligible and clearly distinct from the specific staining pattern [83] [86].
- Unexpected Result (High Signal in Control): Staining that resembles the experimental sample suggests the signal is due to non-specific immunoglobulin binding.
- Solution: Consider further optimization of blocking conditions. The use of Fab fragment antibodies can help circumvent Fc receptor-mediated binding issues.
Absorption Control (Peptide Blocking)
Objective and Principle
The absorption control is the most rigorous primary antibody control, as it directly demonstrates the specificity of the primary antibody for its intended antigen [83] [7]. By pre-saturating the antibody's binding sites with an excess of the purified immunogen, the antibody is "inactivated," and specific staining should be abolished [87].
Step-by-Step Protocol
- Prepare the Pre-absorbed Antibody Solution:
- Sample Preparation: Prepare, fix, permeabilize, and block cells as for the main experiment.
- Control Antibody Incubation:
- Secondary Antibody and Detection: Process both samples identically through all subsequent steps with the secondary antibody, washing, and mounting.
Data Interpretation and Troubleshooting
- Expected Result: Staining in the control sample should be significantly reduced or completely absent compared to the experimental sample, confirming that the immunogen specifically blocks antibody binding [83] [87].
- Unexpected Result (High Signal Persists in Control): If staining is not abolished, it suggests the antibody may be binding non-specifically to an unrelated epitope.
The quantitative parameters and expected outcomes for the three essential controls are summarized in the table below for easy reference and comparison.
Table 2: Summary of Essential ICC Controls: Parameters and Expected Outcomes
| Control Type | Control For | Key Parameter | Expected Result | Indication of Failure |
|---|---|---|---|---|
| No-Primary Antibody | Secondary antibody & detection system [7] | Omit primary antibody; use antibody diluent only [86] | Negligible staining [83] | Significant fluorescence indicates non-specific secondary antibody binding [84] |
| Isotype Control | Non-specific binding of the primary antibody's immunoglobulin structure [83] | Same concentration and isotype as primary antibody [85] | Background staining does not resemble specific pattern [86] | Staining pattern similar to experimental sample indicates Fc-mediated or other non-specific binding [87] |
| Absorption Control | Specificity of primary antibody for its antigen [7] | 10:1 molar ratio of immunogen to antibody; pre-incubate overnight at 4°C [83] | Significant reduction or absence of staining [87] | Staining is not abolished, suggesting non-specific antibody binding to unrelated epitopes [83] |
The consistent implementation of the no-primary, isotype, and absorption controls provides a multi-layered verification system that is indispensable for rigorous ICC research. By systematically ruling out non-specific staining and confirming antibody specificity, researchers can generate high-quality, reliable, and reproducible data. This disciplined approach is especially critical in drug development and preclinical research, where the accuracy of cellular localization data can directly influence program decisions. Integrating these controls forms the bedrock of a credible immunocytochemistry protocol, ensuring that compelling images are also scientifically correct.
Within cell biology research and drug development, immunocytochemistry (ICC) is a foundational technique for visualizing protein localization and abundance within cultured cells. A core challenge, however, lies in ensuring that the antibodies used specifically bind to their native target antigens. Unlike techniques using denatured proteins, ICC requires antibodies to recognize antigens in their native, three-dimensional conformation within a fixed cellular context. Failure to use properly validated antibodies can lead to misleading data, experimental delays, and irreproducible results, with significant financial and scientific costs [89]. This application note details a rigorous framework for antibody validation for ICC, providing researchers with specific methodologies to confirm antibody specificity for native antigens, thereby ensuring reliable and interpretable results.
The Critical Need for Antibody Validation in ICC
Antibody validation is the process of confirming that an antibody is specific, selective, and reproducible for its intended application [89]. In the context of ICC, this means demonstrating that the observed fluorescence signal originates exclusively from the antibody binding to its target protein in its native cellular location. The use of non-validated antibodies is a major contributor to the reported crisis in reproducibility, estimated to cost the life sciences sector hundreds of millions of dollars annually [89]. Non-validated antibodies may produce false positives by binding to off-target proteins or false negatives by failing to bind the target epitope when it is in its native state [89]. Therefore, validation is not a luxury but a necessity for generating scientifically sound and trustworthy data, particularly in preclinical drug development where decisions hinge on accurate cellular localization data.
Key Validation Strategies for ICC
The International Working Group for Antibody Validation (IWGAV) has established conceptual pillars for antibody validation. The following strategies are particularly pertinent for confirming specificity in ICC [89].
Genetic Strategies (Knockout/Knockdown Validation)
Genetic approaches are considered the gold standard for validating antibody specificity.
- Principle: The target gene is knocked out (KO) or knocked down (KD) in the cell line of interest using technologies like CRISPR/Cas9 or RNAi. The antibody is then used to stain both the wild-type and the modified cell lines.
- Interpretation: A specific antibody will show a pronounced reduction or complete absence of signal in the KO/KD cells compared to the wild-type control. The persistence of a signal in the KO/KD line indicates off-target binding and renders the antibody unsuitable for ICC.
- Application: This method is highly suitable for ICC as it directly tests antibody binding in the relevant cellular context [89].
Orthogonal Strategies
This method validates the antibody against an independent, non-antibody-based technique.
- Principle: The abundance or localization of the target protein is quantified using a method such as mass spectrometry (MS) or by expressing a fluorescent protein-tagged version of the target. The results are then correlated with the signal obtained from the antibody-based ICC.
- Interpretation: A strong correlation between the ICC signal and the measurement from the orthogonal method increases confidence in the antibody's specificity and its ability to report on the true levels and location of the native antigen.
- Application: Orthogonal strategies are recommended for antibody validation through ICC and can provide a more comprehensive view [89].
Independent Antibody Strategies
This approach uses multiple antibodies to confirm a single result.
- Principle: Two or more independent antibodies that recognize non-overlapping epitopes on the same target protein are used for ICC.
- Interpretation: If all antibodies produce an identical staining pattern, it provides strong evidence that the observed localization is correct and not an artifact of a single antibody's off-target binding.
- Application: This is a widely accessible and powerful method for ICC, though it requires the availability of well-characterized antibodies against different epitopes [89].
Table 1: Comparison of Antibody Validation Methods for ICC
| Validation Method | Detection Mechanism | Advantages | Disadvantages |
|---|---|---|---|
| Genetic (KO/KD) [89] | Gene deletion/knockdown prevents target expression. | Gold standard for specificity; provides a clear negative control. | KO cell lines may not be available; can be time-consuming to generate. |
| Orthogonal [89] | Correlation with antibody-independent quantification (e.g., MS). | Does not rely on another antibody; can be highly quantitative. | Technically complex; may not be accessible to all labs. |
| Independent Antibodies [89] | Multiple antibodies against different epitopes on the same target. | Strong evidence for correct localization; relatively straightforward. | Requires multiple high-quality antibodies to be available. |
| Expression of Tagged Proteins [89] | Comparison with the signal from a fluorescent protein tag. | Direct visual confirmation of co-localization. | Tagging may alter protein localization or function. |
Detailed ICC Protocol for Antibody Validation
The following protocol is adapted from established guidelines [6] and is designed to be used in conjunction with the validation strategies above.
Stage 1: Sample Preparation and Fixation
Goal: To preserve cell morphology and antigenicity while ensuring antibody accessibility.
Materials:
- Coated coverslips (e.g., with Poly-L-Lysine)
- Cultured cells (adherent or suspension)
- Phosphate-Buffered Saline (PBS), sterile
- Fixative (e.g., 4% Paraformaldehyde (PFA) in PBS)
Methodology:
- Culture cells on coated coverslips until they reach 60-80% confluence.
- Fix cells by incubating with 4% PFA for 10-20 minutes at room temperature.
- Wash cells three times with PBS to remove residual fixative.
- Note: Fixed samples can be stored in PBS with 0.1% sodium azide at 4°C for 1-2 weeks, but immediate processing is ideal [6].
Stage 2: Permeabilization and Blocking
Goal: To allow antibody access to intracellular targets and reduce non-specific background.
Materials:
- Permeabilization buffer (e.g., 0.1-0.5% Triton X-100 in PBS)
- Blocking buffer (e.g., 2-10% Bovine Serum Albumin (BSA) or serum from the secondary antibody host species in PBS)
Methodology:
- Permeabilize cells by covering them with permeabilization buffer for 2-5 minutes at room temperature. Note: This step is crucial for intracellular targets but can be omitted for cell surface antigens [6].
- Wash cells three times with PBS.
- Block cells by incubating in blocking buffer for 1-2 hours at room temperature to minimize non-specific antibody binding [6].
Stage 3: Antibody Incubation and Imaging
Goal: To specifically label the target antigen and visualize the signal.
Materials:
- Validated primary antibody
- Fluorophore-conjugated secondary antibody (raised against the host species of the primary antibody)
- Counterstains (e.g., DAPI for nuclei)
- Mounting medium
Methodology:
- Incubate with primary antibody: Dilute the primary antibody in blocking buffer and apply to the cells. Incubate overnight at 4°C or for 1-2 hours at room temperature.
- Wash three times with PBS to remove unbound antibody.
- Incubate with secondary antibody: Apply the fluorophore-conjugated secondary antibody (diluted in blocking buffer) and incubate for 1 hour at room temperature in the dark.
- Wash three times with PBS.
- Counterstain and mount: Apply DAPI or other counterstains if required, and mount the coverslip onto a glass slide.
- Image using a fluorescence microscope. Compare the staining pattern between wild-type and validation control samples (e.g., KO cells).
Experimental Workflow for Genetic Validation
The following workflow diagram outlines the key steps for validating an antibody using the genetic strategy, which integrates the ICC protocol with knockout controls.
The Scientist's Toolkit: Essential Reagents for ICC Validation
Successful antibody validation for ICC relies on a set of key reagents and materials. The following table details essential items and their functions.
Table 2: Research Reagent Solutions for ICC Antibody Validation
| Item | Function/Application | Examples / Key Considerations |
|---|---|---|
| Validated Primary Antibodies [82] [89] | Binds specifically to the target protein of interest. | Choose antibodies validated for ICC/IF. Monoclonal antibodies offer high specificity, while polyclonals may recognize multiple epitopes [82]. |
| Knockout Cell Lines [89] | Serves as a critical negative control for antibody specificity. | Generated via CRISPR/Cas9. The absence of signal in KO cells confirms antibody specificity [89]. |
| Fluorophore-Conjugated Secondary Antibodies [6] | Amplifies signal by binding to the primary antibody; enables multiplexing. | Must be raised against the host species of the primary antibody. Use pre-adsorbed secondary antibodies to minimize cross-reactivity [6]. |
| Fixatives [6] | Preserves cellular morphology and immobilizes antigens. | 4% PFA is common. Organic solvents (e.g., methanol) fix and permeabilize simultaneously [6]. |
| Permeabilization Agents [6] | Allows antibodies to access intracellular epitopes. | Detergents like Triton X-100 (0.1-0.2%). Concentration and time require optimization to preserve antigenicity [6]. |
| Blocking Agents [6] | Reduces non-specific antibody binding to minimize background. | BSA (1-5%) or serum from the secondary antibody host species. Do not use serum from the primary antibody host species [6]. |
| Mounting Medium with Counterstain [82] | Preserves samples and labels cellular structures for spatial reference. | Includes antifade agents and dyes like DAPI for nuclear staining [82]. |
In the field of cell biology and diagnostic research, the accurate detection and quantification of protein expression is paramount. Immunocytochemistry (ICC), Western blot (WB), and Immunohistochemistry (IHC) are cornerstone techniques that exploit antibody-antigen interactions for this purpose. While each method provides unique insights, correlating their findings significantly strengthens experimental validity, particularly in complex research such as drug development and cellular pathway analysis. This application note provides a detailed comparative analysis of these techniques, supported by quantitative data correlations and robust experimental protocols, to guide researchers in designing and validating multifaceted protein studies.
Technical Comparison of Protein Detection Methods
The following table summarizes the core characteristics, advantages, and limitations of ICC, WB, and IHC, providing a framework for understanding their complementary roles.
Table 1: Comparative Analysis of ICC, Western Blot, and IHC
| Feature | Immunocytochemistry (ICC) | Western Blot (WB) | Immunohistochemistry (IHC) |
|---|---|---|---|
| Sample Type | Cultured cells, smears, aspirates [90] [5] | Cell or tissue lysates [91] | Tissue sections (FFPE or frozen) [90] [5] |
| Spatial Resolution | High - Localization within subcellular compartments (e.g., cytoplasm, membrane) [6] | None - No spatial context within the cell [91] | High - Localization within tissue architecture and cell types [91] |
| Key Output | Protein localization and distribution | Molecular weight and semi-quantitative protein levels [91] | Protein localization within a tissue context |
| Quantification | Semi-quantitative (can be quantitative with In-Cell Western) [92] | Quantitative - Signal proportional to protein amount [91] [93] | Semi-quantitative |
| Key Advantage | Visualizes protein localization in intact cells | Confirms antibody specificity and protein size; quantitative data [91] [94] | Preserves tissue morphology and spatial context |
| Primary Limitation | Does not confirm protein molecular weight | Destroys cellular/tissue architecture [91] | Does not confirm protein molecular weight |
Quantitative Correlation of Findings
Empirical studies demonstrate a significant correlation between data obtained from WB, ICC, and IHC, reinforcing the reliability of integrating these methods.
Table 2: Correlation Data Between Western Blot, IHC, and ELISA
| Study Focus / Target | Correlation Finding | Concordance Rate | Significance & Context |
|---|---|---|---|
| p185neu in Breast Cancer [95] | WB vs. IHC | 83.1% (when considering low and high overexpressing as positive) | Chi-square, p < 0.0001 |
| 89.1% (when considering only high overexpressing as positive) | |||
| Antibody Validation [94] | WB (single band) vs. Immunostaining (IHC/ICC) | >90% of antibodies giving a single band in WB also gave a good, specific signal in immunostaining | WB is a crucial validation step for antibody specificity before use in IHC/ICC |
| Autophagy/Mitophagy Flux [93] | ELISA vs. Western Blot | ELISA showed a tighter data distribution and a much smaller average standard error than WB | ELISA provided greater accuracy and test-retest reliability in this specific application |
Experimental Protocols for Method Correlation
Detailed ICC Protocol for Cell Cultures
This protocol is designed for adherent cells grown on coverslips and uses indirect immunofluorescence for detection [6].
Research Reagent Solutions
| Reagent | Function | Example |
|---|---|---|
| Poly-L-Lysine | Coats glass to enhance cell adhesion | N/A |
| Paraformaldehyde (PFA) | Cross-linking fixative; preserves morphology | 4% in PBS [6] |
| Triton X-100 | Detergent for permeabilizing cell membranes | 0.1-0.2% in PBS [6] |
| Bovine Serum Albumin (BSA) | Blocking agent to reduce non-specific antibody binding | 2-10% in PBS [6] |
| Normal Goat Serum | Serum-based blocking agent | 6% with BSA [10] |
| Primary Antibody | Binds specifically to the target protein | Variable by target |
| Fluorophore-conjugated Secondary Antibody | Binds to primary antibody; provides detection signal | Alexa Fluor 488 or 594 [10] |
| DAPI | Counterstain that labels nuclear DNA | N/A |
Stage 1: Sample Preparation and Fixation
- Coat Coverslips: Place sterile coverslips in a culture plate and coat with a filtered solution of Poly-L-Lysine for 1 hour at room temperature. Rinse three times with sterile PBS and allow to dry completely [6].
- Culture Cells: Seed cells onto the coated coverslips and culture until they reach the desired confluence (typically 60-80%) [6].
- Fixation: Aspirate the medium and wash cells gently with sterile PBS. Incubate cells with 4% PFA for 10-20 minutes at room temperature. *Note: Alternative fixatives like ice-cold methanol can be used, which also permeabilize the cells, potentially skipping [6].
- Wash: Wash the fixed cells three times with PBS. Samples can be stored in PBS with 0.1% sodium azide at 4°C for 1-2 weeks [6].
Stage 2: Permeabilization and Blocking
- Permeabilize: Incubate cells with 0.1% Triton X-100 in PBS for 2-5 minutes at room temperature. *Note: This step is optional if methanol or acetone was used for fixation [6].
- Wash: Wash cells three times with PBS.
- Block: Incubate cells in a blocking buffer (e.g., 6% BSA and 2% normal goat serum in PBS) for 1-2 hours at room temperature to prevent non-specific antibody binding [6] [10].
Stage 3: Antibody Incubation
- Primary Antibody: Prepare the primary antibody diluted in a buffer containing 1% BSA. Incubate the cells with this solution for 3 hours at room temperature or overnight at 4°C in a humidified chamber [10].
- Wash: Wash the cells three times with PBS, for about 10 minutes per wash, to remove unbound primary antibody.
- Secondary Antibody: Incubate with the fluorophore-conjugated secondary antibody (e.g., Alexa Fluor 488 or 594), diluted in 1% BSA, for 1 hour at room temperature in the dark.
- Wash: Perform a final series of three washes with PBS in the dark.
Stage 4: Mounting and Imaging
- Mount: Mount the coverslips onto glass slides using a commercial mounting medium that includes an anti-fade agent.
- Counterstain (optional): Include DAPI in the mounting medium to visualize nuclei.
- Image: Acquire images using a fluorescence or confocal microscope. Include controls (e.g., no primary antibody) to confirm signal specificity.
Protocol for Validating ICC Antibodies via Western Blot
Using WB to validate antibody specificity before ICC is a critical best practice that saves time and resources [94].
Figure 1: Western Blot Antibody Validation Workflow. This diagram outlines the key steps for validating an antibody's specificity using Western blotting before its use in ICC [94].
- Prepare Lysate: Lyse the same cell line used for ICC in a RIPA buffer containing 1% SDS to ensure complete protein solubilization [94].
- Gel Electrophoresis: Separate the proteins by molecular weight using SDS-PAGE.
- Membrane Transfer: Transfer the separated proteins from the gel onto a nitrocellulose or PVDF membrane.
- Blocking and Antibody Incubation: Block the membrane with a protein solution (e.g., BSA), then incubate with the same primary antibody and dilution used for your ICC protocol.
- Detection: Use an HRP-conjugated secondary antibody and chemiluminescent substrate for detection.
Interpretation: An antibody that produces a single band at the expected molecular weight is highly likely to be specific and yield reliable ICC results. Multiple bands or a band at the wrong size indicate non-specific binding, and the antibody should not be used for ICC without further validation [94].
Integrated Workflow for Cross-Technique Correlation
The logical relationship between sample processing, technique selection, and data interpretation for a cohesive experimental strategy is outlined below.
Figure 2: A Strategic Workflow for Correlating ICC, WB, and IHC. This workflow illustrates how different sample processing paths feed into the three techniques, whose complementary data outputs are integrated to form a robust conclusion.
The integration of ICC, Western blot, and IHC provides a powerful, multi-faceted approach for protein analysis. The strong quantitative correlation between WB and IHC findings, with concordance rates exceeding 80-90% in validated studies [95] [94], underscores the reliability of this multimodal strategy. The high correlation between a single band in WB and specific immunostaining in ICC/IHC makes Western blot an essential and cost-effective first step in antibody validation [94].
For researchers in drug development, this correlation is critical. It allows for the initial high-throughput, quantitative screening of protein targets (using techniques like In-Cell Western [92] or standard WB) followed by detailed investigation of spatial localization and morphological context using ICC or IHC. This protocol provides a clear roadmap for scientists to implement these techniques in a complementary manner, ensuring that findings are not only statistically significant but also biologically relevant and spatially defined. By adhering to these validated protocols and correlation strategies, researchers can enhance the reproducibility, accuracy, and impact of their work in cell biology and therapeutic discovery.
Artificial intelligence (AI) is revolutionizing traditional pathological staining and analysis by creating predictive models that generate virtual staining results from commonly available tissue samples. This approach addresses significant limitations of conventional immunocytochemistry (ICC), which requires specialized antibody reagents that can take hours to days to process, along with needing specialized equipment and technical skills [96]. AI-based predictive staining platforms can analyze cellular morphological features in whole slide images and label cells as immuno-positive or negative, operating on cloud infrastructure in minutes rather than days [96]. This technology has demonstrated remarkable accuracy, with sensitivity and specificity metrics exceeding 0.97 for markers including CD3 and PAX5 in lymphoma studies [96].
The integration of AI in staining and analysis represents a paradigm shift in digital pathology, particularly for immunocytochemistry protocols in cell culture research. By leveraging deep learning algorithms, these systems can extract complex morphological features from basic staining methods like Wright-Giemsa (WG) and predict immunoreactivity without the need for physical antibody-based staining [96]. This capability significantly reduces both the time and cost associated with traditional ICC protocols while providing pathologists with familiar-looking ICC images produced more rapidly and at reduced complexity [96].
Key Research Applications and Performance Metrics
AI-based predictive staining has demonstrated significant utility across multiple research domains, from basic cell classification to advanced biomarker prediction for immunotherapy response assessment. The table below summarizes key performance metrics from recent studies:
Table 1: Performance Metrics of AI-Based Predictive Staining and Analysis
| Application | Cancer Type/Context | AI Model Type | Performance Metrics | Reference |
|---|---|---|---|---|
| Virtual ICC Platform | Canine T-cell and B-cell lymph node lymphomas | Feature-based machine learning | Sensitivity: 0.98 (CD3), 0.94 (PAX5); Specificity: 0.97 (CD3), 0.99 (PAX5); Accuracy: 97.5% (CD3), 97.8% (PAX5) | [96] |
| MSI/MMRd Prediction | Colorectal Cancer (CRC) | Dual-modality transformer (DuoHistoNet) | AUROC: >0.97 | [97] |
| PD-L1 Prediction | Triple-Negative Breast Cancer | Dual-modality transformer (DuoHistoNet) | AUROC: >0.96 | [97] |
| PD-L1 Prediction from H&E | Non-Small Cell Lung Cancer | Deep Learning: CNN | AUROC: 0.80 | [98] |
| PD-L1 Prediction from H&E | Breast Cancer | Deep Learning: CNN | AUROC: 0.85-0.93 | [98] |
| TIL Abundance Scoring | Oral Squamous Cell Carcinoma | Deep Learning: CNN | Accuracy: 96.31% | [98] |
| Drug Response Prediction | Broad Tumor Types | PEDAL AI Platform | Accuracy: 92% in predicting tumor response to drug compounds | [99] |
Beyond the metrics above, AI-based digital pathology has proven valuable in analyzing the tumor microenvironment (TME) and predicting response to immune checkpoint inhibitors (ICIs) [98]. These tools can quantify tumor-infiltrating lymphocytes (TILs), map their spatial distribution, and identify patterns predictive of treatment outcomes [98]. The technology is particularly valuable for extracting maximal information from limited tissue samples, a common challenge in cell culture research and fine needle aspiration (FNA) samples [96] [98].
Experimental Protocols
AI-Based Virtual ICC Protocol for Cell Culture Research
This protocol details the methodology for implementing an AI-based virtual immunocytochemistry platform for cell cultures, adapted from established procedures in lymphoma research [96].
Table 2: Research Reagent Solutions for AI-Based Predictive Staining
| Reagent/Material | Function/Application | Specifications |
|---|---|---|
| Wright-Giemsa (WG) Stain | Standard cytological staining for initial slide preparation | Azure B-based formulation |
| Anti-CD3 Antibody | T-lymphocyte marker for validation (rabbit polyclonal) | Dako, A0452, 1:200 dilution |
| Anti-PAX5 Antibody | B-lymphocyte marker for validation (mouse monoclonal) | Clone 24, BD Bioscience, 610862, 1:100 dilution |
| Bond Polymer Refine Detection System | Automated immunohistochemistry staining | Leica Biosystems |
| Acid Alcohol Destaining Solution | Removal of WG stain prior to ICC restaining | 1% HCl in 70% alcohol |
| Bond Epitope Retrieval Solution 2 | Heat-induced antigen retrieval | pH9 solution (Leica Biosystems) |
| 3-diaminobenzidine (DAB) chromogen | Chromogenic development for ICC | Leica Biosystems |
| Hematoxylin | Counterstaining for ICC | Leica Biosystems |
Procedure:
Sample Preparation and Initial Staining:
- Prepare cell culture samples on glass slides using standard cytocentrifugation protocols.
- Air-dry slides and stain with standard Wright-Giemsa (WG) stain (Azure B).
- Digitally scan slides using a high-resolution scanner (e.g., NanoZoomer S60, Hamamatsu) at 40x magnification with a resolution of 0.23 μm/pixel.
- Apply z-stacking to capture multiple focal planes, merging them into single high-resolution digital images [96].
ICC Validation Staining:
- Destain WG-stained slides in 1% HCl in 70% alcohol for 1 minute.
- Perform ICC restaining using validated antibodies (e.g., anti-CD3 or anti-PAX5 antibodies).
- Utilize an automated staining system (e.g., Leica Bond-III Automated Immunohistochemistry Staining System) following manufacturer's instructions [96]:
- Apply heat-induced antigen retrieval for 20 minutes using Bond Epitope Retrieval Solution 2 (pH9).
- Block endogenous peroxidase with 3% peroxide solution for 10 minutes.
- Apply primary antibodies at optimized dilutions (1:200 for CD3, 1:100 for PAX5) for 15 minutes.
- Incubate with Bond Post Primary Solution for 8 minutes.
- Apply Bond Polymer Solution for 8 minutes.
- Develop with DAB chromogen for 10 minutes.
- Counterstain with Hematoxylin.
- Rescan destained and ICC-restained slides to create paired image sets [96].
Image Preprocessing and Analysis:
- Crop, register, normalize, and filter paired whole slide images to ensure accurate alignment.
- Perform nuclei segmentation using a deep learning platform that parameterizes each pixel via star-convex polygon and non-max separation.
- Extract geometrical features from segmented cells and translate into structured tabular format.
- Implement Euclidean cell matching algorithms to pair cells across WG and ICC image sets [96].
AI Model Training and Implementation:
- Label cells as immuno-positive or immuno-negative based on pathologist-validated ICC results.
- Train machine learning algorithms on extracted cellular features to distinguish immuno-positive from negative cells.
- Validate model performance using sensitivity, specificity, and accuracy metrics against ground truth ICC results.
- Deploy cloud-based platform for rapid analysis of new WG-stained samples without requiring physical ICC staining [96].
Dual-Modality AI Analysis Protocol for Biomarker Prediction
This protocol outlines procedures for implementing a dual-modality AI framework that integrates H&E and IHC images for enhanced biomarker prediction, adapted from methodologies validated in colorectal and breast cancer research [97].
Procedure:
Sample Preparation and Image Acquisition:
- Prepare FFPE tissue sections from cell culture models according to standard histopathology protocols.
- Stain consecutive sections with both H&E and appropriate IHC markers (e.g., PD-L1 22C3 pharmDx for PD-L1 detection).
- Scan slides using high-resolution digital scanners (Philips or Leica scanners recommended) at 40X resolution.
- Ensure proper quality control through pathologist review of all IHC results according to CLIA/CAP and ISO standards [97].
Image Preprocessing and Segmentation:
- Train QuPath pixel classification models to segment tissues from H&E and IHC whole slide images (WSIs) separately.
- Implement an object detection model based on the YOLO framework to detect control tissue on IHC WSIs.
- Extract representative patches from both H&E and IHC images at 20X magnification for model training [97].
Dual-Modality AI Model Implementation:
- Develop a transformer-based framework (e.g., DuoHistoNet) that integrates both H&E and IHC stained images.
- Implement a three-stage pipeline consisting of:
- Data preprocessing
- Feature extraction using transformer-based model
- Aggregation of features to produce final WSI-level prediction [97]
- Train model to predict biomarker status (e.g., MSI/MMRd, PD-L1) using ground truth molecular data.
Validation and Clinical Correlation:
- Validate model predictions against established biomarker assessment methods (PCR for MSI, IHC for MMRd and PD-L1).
- Correlate AI predictions with clinical outcomes including time-on-treatment and overall survival where applicable.
- Establish predictive thresholds tailored to specific clinical scenarios and research requirements [97].
Signaling Pathways and Workflow Diagrams
AI-Based Predictive Staining Workflow
AI Model Architecture for Biomarker Prediction
The integration of AI-based predictive staining into immunocytochemistry protocols for cell culture research represents a significant advancement in cellular analysis. These methodologies enable researchers to extract substantially more information from standard staining procedures while reducing dependency on costly and time-consuming antibody-based techniques. The robust performance metrics demonstrated across multiple studies, with accuracy rates exceeding 97% for certain applications [96], highlight the transformative potential of these technologies in accelerating drug discovery and enhancing the precision of cellular analysis in research settings.
Immunocytochemistry (ICC) is a powerful technique for visualizing the localization and distribution of specific proteins or antigens within cultured cells using antibody-based staining [6]. In the context of drug development and basic research, the reliability of ICC data is paramount. Analytical validation provides the documented evidence that an ICC method performs consistently and reliably for its intended purpose, ensuring that results are accurate, precise, and reproducible [100]. This process is a critical component of the broader validation landscape in regulated laboratories, which also includes instrument qualification and software validation [100]. For researchers and scientists, a well-validated ICC protocol is not merely a procedural formality but a fundamental requirement for generating robust, trustworthy data that can support scientific conclusions and regulatory submissions.
The principles of analytical validation, as defined by guidelines from agencies like the FDA and the International Conference on Harmonisation (ICH), establish a framework for assessing key performance characteristics of a method [100]. When applied to ICC, these principles ensure that the protocol consistently produces reliable images and data on protein presence and sub-cellular localization, which is vital for understanding protein function and interactions [6] [62]. This application note outlines how these universal validation principles can be systematically applied to ICC protocols, providing a roadmap for researchers to achieve and demonstrate rigorous method reliability in cell culture research.
Core Principles of Analytical Method Validation
The validation of an analytical method involves the investigation of several key performance characteristics. These parameters, often referred to as "The Eight Steps of Analytical Method Validation," form the foundation for demonstrating that a method is suitable for its intended use [100]. The specific parameters requiring validation depend on the type of method and its application; for qualitative techniques like ICC, parameters such as specificity, precision, and robustness are of paramount importance.
The table below summarizes the core validation parameters, their definitions, and their specific relevance to the ICC workflow.
Table 1: Core Analytical Performance Characteristics and Their Application to ICC
| Validation Parameter | Definition | Application to ICC Protocol |
|---|---|---|
| Accuracy | The closeness of agreement between an accepted reference value and the value found [100]. | Assessed by comparing ICC results to a known standard, such as a well-characterized cell line with confirmed protein expression, or by using a second, orthogonal method (e.g., Western blot) [100]. |
| Precision | The closeness of agreement among individual test results from repeated analyses of a homogeneous sample. Includes repeatability and intermediate precision [100]. | Evaluated by repeatedly staining replicate cell samples (intra-assay precision) and by varying conditions such as different analysts, days, or equipment (intermediate precision) [100]. |
| Specificity | The ability to assess unequivocally the analyte in the presence of components that may be expected to be present [100]. | Demonstrated by showing the antibody binds only to the target epitope. This can be supported by using negative controls (omitting primary antibody) and isotype controls, and by confirming expected sub-cellular localization [100]. |
| Limit of Detection (LOD) | The lowest concentration of an analyte that can be detected, but not necessarily quantitated [100]. | Determined by serially diluting the primary antibody to find the lowest concentration that produces a detectable signal above background (negative control) [100]. |
| Limit of Quantitation (LOQ) | The lowest concentration of an analyte that can be quantitated with acceptable precision and accuracy [100]. | While ICC is often qualitative/semi-quantitative, for quantitative ICC (qICC), this is the lowest antibody concentration or antigen level that can be quantified with defined accuracy and precision. |
| Linearity & Range | The ability of the method to obtain results proportional to analyte concentration within a given range [100]. | For qICC, this is validated by establishing a linear relationship between fluorescence intensity and analyte concentration across a defined range of antibody dilutions or cell numbers. |
| Robustness | A measure of the method's capacity to remain unaffected by small, deliberate variations in method parameters [100]. | Tested by intentionally varying critical protocol parameters (e.g., fixation time, permeabilization duration, antibody incubation time) and assessing the impact on the final stain. |
Immunocytochemistry Protocol for Validated Cell Staining
The following detailed ICC protocol is designed with validation principles in mind, highlighting critical steps and points where performance characteristics should be monitored to ensure reproducibility.
Stage 1: Sample Preparation and Fixation
Proper sample preparation is the first critical step in ensuring a valid and reproducible ICC experiment.
Materials Required:
- Standard coverslips or multi-well plate
- Sterile PBS
- Coating protein (e.g., Poly-L-lysine or Poly-D-lysine) [6] [62]
- Cell culture
- Fixative (e.g., 4% Paraformaldehyde (PFA) in PBS or chilled Methanol) [6] [101]
Methodology:
- Surface Coating: Coat coverslips or plate wells with a filtered solution of poly-D-lysine (e.g., 50 μg/mL in PBS) to enhance cell adhesion. Incubate for 1 hour at room temperature, then rinse thoroughly three times with sterile PBS and allow to dry completely [62].
- Cell Culture: Seed cells onto the coated surface at an appropriate density (e.g., 1 × 10^5 cells per chamber for a multi-chambered slide) and culture under standard conditions until semi-confluency is achieved [101]. Cell viability should ideally be 90–95% before proceeding [6].
- Fixation: Aspirate the culture medium and gently wash cells with PBS at room temperature. Incubate cells with a freshly prepared fixative to preserve morphology and antigenicity.
- Post-Fixation Wash: Wash cells three times with PBS to remove residual fixative. Fixed samples can be stored in PBS with 0.1% sodium azide at 4°C for 1-2 weeks, but immediate processing is ideal [6].
Stage 2: Permeabilization and Blocking
These steps are crucial for antibody access and minimizing non-specific background signal.
Materials Required:
- PBS
- Detergent (e.g., Triton X-100, Tween-20, or Saponin)
- Blocking agent (e.g., Normal Serum from the secondary antibody host species or BSA) [6] [101]
Methodology:
- Permeabilization (Optional for organic solvent fixation): This step is essential if PFA was used as the fixative. Incubate cells with a permeabilization solution for 2–5 minutes at room temperature [6].
- Blocking: Incubate cells in a blocking buffer for 1–2 hours at room temperature to reduce non-specific antibody binding. Use a 2–10% solution of normal serum (from the same species as the secondary antibody) or BSA in PBS [6] [101]. Including 0.1 M glycine in the blocking buffer is optional but can help quench any remaining free aldehyde groups from PFA fixation [6].
Stage 3: Antibody Incubation and Imaging
This stage involves the specific detection of the target protein and visualization.
Materials Required:
- Primary antibody against the target protein
- Fluorochrome-conjugated secondary antibody
- Mounting medium with antifade agent
- Counterstain (e.g., DAPI) [101] [62]
Methodology:
- Primary Antibody Incubation: Prepare the primary antibody dilution in blocking buffer (e.g., 1% normal serum or BSA in PBS). Typical working concentrations range from 5–20 μg/mL and require optimization [101]. Incubate the cells with the primary antibody dilution for 1 hour at room temperature or overnight at 4°C [6] [101].
- Washing: Gently wash the cells three times with PBS for approximately 5 minutes each to remove unbound primary antibody. Additional or longer washes may be needed if background is high [101].
- Secondary Antibody Incubation: Prepare an appropriate dilution of fluorochrome-conjugated secondary antibody in blocking buffer. Incubate the cells with this solution for 1 hour at room temperature in a dark environment [101].
- Washing and Counterstaining: Wash the cells three times with PBS in the dark. To visualize nuclei, counterstain with DAPI (e.g., 3 ng/mL) or Hoechst for 10 minutes [62].
- Mounting and Imaging: Invert the coverslip onto a glass slide with a drop of mounting medium containing an antifade agent. Seal the edges if necessary and examine the cells under a fluorescence microscope using appropriate filters [101].
The Scientist's Toolkit: Essential Research Reagents
The reliability of an ICC experiment is contingent upon the quality and appropriate use of key reagents. The following table details essential materials and their functions within the protocol.
Table 2: Essential Reagents for Immunocytochemistry
| Reagent / Material | Function / Purpose | Examples & Notes |
|---|---|---|
| Coating Agent | Enhances cell adhesion to glass surfaces (e.g., coverslips) to prevent loss during processing. | Poly-L-lysine, Poly-D-lysine [6] [62]. Must be rinsed thoroughly as residue can be toxic to cells [62]. |
| Fixative | Preserves cell morphology and immobilizes antigens, preventing degradation. | 4% Paraformaldehyde (PFA) [101] [62]; Methanol/ Acetone (also permeabilizes) [6]. Choice impacts epitope preservation. |
| Permeabilization Detergent | Solubilizes cell membranes to allow antibodies access to intracellular targets. | Triton X-100 (harsh, general use) [101]; Tween-20 or Saponin (milder, for membrane antigens) [6]. Not needed after methanol fixation. |
| Blocking Agent | Reduces non-specific binding of antibodies, minimizing background signal. | Normal serum from secondary host (e.g., Goat Serum) [6] [62]; Bovine Serum Albumin (BSA) [6]. |
| Primary Antibody | Binds specifically to the protein target of interest. | Mouse anti-MAP2 [62], Rabbit anti-GFAP [62]. Must be validated for ICC; concentration requires optimization [101]. |
| Secondary Antibody | Fluorochrome-conjugated antibody that binds to the primary antibody, enabling detection. | Alexa Fluor 488 goat anti-mouse IgG [62]. Must be raised against the host species of the primary antibody. |
| Counterstain | Labels cellular compartments to provide spatial context. | DAPI or Hoechst (stains nuclei) [101] [62]. |
| Mounting Medium | Preserves fluorescence and prepares the sample for microscopy. | ProLong Gold Antifade Reagent [62]. Often contains agents to reduce photobleaching. |
Validation of ICC Method Performance
To formally validate an ICC method, specific experiments must be designed to assess the performance characteristics outlined in Section 2. The following workflow provides a logical framework for planning and executing a method validation study, ensuring that each parameter is evaluated in a systematic sequence that builds from fundamental specificity to operational consistency.
Experimental Design for Key Validation Parameters
1. Specificity: To demonstrate that the observed signal is specific to the target protein, include the following controls in every experiment:
- Negative Control: Omit the primary antibody (replace with buffer or an irrelevant IgG). A lack of signal confirms the secondary antibody is not binding non-specifically [101].
- Isotype Control: Use an antibody of the same isotype as the primary antibody but with irrelevant specificity. This controls for non-specific Fc receptor binding.
- Specificity Verification: Use cells known to express and not express the target protein. Additionally, for well-characterized targets, the signal should localize to the expected sub-cellular compartment (e.g., microtubules for tubulin, nucleus for histone proteins) [100].
2. Precision (Repeatability and Intermediate Precision):
- Repeatability (Intra-assay Precision): Prepare and stain multiple replicates of the same cell sample (e.g., n=6) on the same day, using the same reagents, equipment, and analyst. Calculate the consistency of the outcome (e.g., % of cells showing positive staining, or fluorescence intensity for qICC). Results are typically reported as % Relative Standard Deviation (% RSD) [100].
- Intermediate Precision: Have a second analyst repeat the staining procedure on a different day, using their own preparations of reagents and a different fluorescence microscope system. Compare the results (e.g., the mean values of staining intensity or positivity) between the two analysts. The %-difference in the mean values should be within pre-defined acceptance criteria, and statistical testing (e.g., a Student's t-test) can be used to examine if there is a significant difference [100].
3. Limit of Detection (LOD):
- Perform the ICC protocol using a serial dilution of the primary antibody. The LOD is the lowest antibody concentration that produces a detectable signal clearly distinguishable from the negative control [100]. This is a practical approach for a qualitative technique like ICC, aligning with the signal-to-noise principle defined in guidelines [100].
4. Robustness:
- Intentionally introduce small, deliberate variations to critical method parameters to test the method's resilience. For ICC, this could include:
- Fixation time: e.g., ± 5 minutes from the standard time.
- Permeabilization duration: e.g., ± 2 minutes.
- Antibody incubation time: e.g., ± 15 minutes for a 1-hour incubation.
- Assess the impact of these variations on the final stain quality (signal strength, background, morphology). A robust method will tolerate these minor changes without significant performance degradation [100].
Troubleshooting for Reproducibility
Even with a validated method, issues can arise. The table below outlines common problems and their solutions to maintain reproducibility.
Table 3: ICC Troubleshooting Guide for Common Issues
| Problem | Potential Cause | Corrective Action |
|---|---|---|
| High Background | Inadequate blocking or non-specific antibody binding. | Increase the concentration of blocking agent (e.g., to 5-10% serum) or blocking time [101]. Titrate primary and secondary antibody concentrations downwards [101]. Ensure the blocking serum matches the host species of the secondary antibody [6]. |
| Weak or No Signal | Over-fixation, insufficient permeabilization, low antibody concentration, or photobleaching. | Titrate primary antibody to a higher concentration. Optimize fixation time to avoid epitope masking [6]. Verify permeabilization step was performed and effective [6]. Check antibody expiration dates and avoid exposing fluorophores to light during procedures [101]. |
| Poor Morphology | Toxic coating residue, harsh washing, or cell death prior to fixation. | Ensure coating agents like poly-D-lysine are thoroughly rinsed before cell seeding [62]. Treat cells gently during all washing steps; never let samples dry out [101]. Check cell health and viability before fixation [6]. |
Conclusion
Mastering immunocytochemistry requires a solid grasp of its foundational principles, a meticulous approach to the staining protocol, systematic troubleshooting skills, and rigorous validation. By integrating these elements, researchers can reliably visualize and interpret protein localization and expression in cell cultures, a capability fundamental to advancing our understanding of cellular function and disease mechanisms. Future directions point toward increased automation, the integration of artificial intelligence for image analysis and virtual staining, and the development of even more specific probes, all of which will enhance the quantitative power and reproducibility of ICC in biomedical and clinical research.
References
- 1. Immunocytochemistry [https://en.wikipedia.org/wiki/Immunocytochemistry]
- 2. What is Immunocytochemistry (ICC)? [https://www.sinobiological.com/category/what-is-icc]
- 3. Immunocytochemistry and immunohistochemistry [https://www.ebsco.com/research-starters/chemistry/immunocytochemistry-and-immunohistochemistry]
- 4. Immunocytochemistry/Immunofluorescence Guide - ICC/IF ... [https://www.antibodies.com/applications/immunofluorescence]
- 5. ICC vs IHC vs IF ? Do You Know The Difference? [https://www.bio-techne.com/applications/imaging/immunohistochemistry/icc-ihc-if]
- 6. Immunocytochemistry protocol [https://www.abcam.com/en-us/technical-resources/protocols/icc-protocol]
- 7. Controls for Immunocytochemistry: An Update - PMC [https://pmc.ncbi.nlm.nih.gov/articles/PMC3201116/]
- 8. Tips for Immunofluorescence Protocols [https://www.sigmaaldrich.com/US/en/technical-documents/technical-article/protein-biology/flow-cytometry/antibody-immunofluorescent-tips-best-practices?srsltid=AfmBOorjwy5h50k1NYD9LBCB0pb9UZpCTcm3GV0egH-O3fRZ55KDQlis]
- 9. Fluorescent (ICC) Immunocytochemistry Protocol of Cells ... [https://www.rndsystems.com/resources/protocols/protocol-preparation-and-fluorescent-icc-staining-cells-coverslips]
- 10. 2.6. Immunocytochemistry (ICC) [https://bio-protocol.org/exchange/minidetail?id=16072854&type=30]
- 11. ICC/IF Protocol [https://www.antibodies.com/applications/immunofluorescence/immunofluorescence-protocol]
- 12. Immunocytochemistry Troubleshooting: ICC Help [https://www.novusbio.com/support/support-by-application/immunocytochemistry/troubleshooting.html?srsltid=AfmBOor2XZvJTa7OrKrD7DA3c7gM8XHsa7GxX5NqVF0Mrfj1cmpg8XUM]
- 13. Immunocytochemistry Troubleshooting | Tips & Tricks [https://www.stressmarq.com/support/technical-support/troubleshooting/immunocytochemistry-troubleshooting/?srsltid=AfmBOorFlpPWN3Lrfh8d44bxs42IkuW0Tx_b0_LxHf0gEDjEkotumZtz]
- 14. Methods for Conjugating Antibodies with Quantum Dots [https://pmc.ncbi.nlm.nih.gov/articles/PMC12526299/]
- 15. Immunocytochemistry (ICC) Protocol [https://www.bio-techne.com/resources/protocols-troubleshooting/immunocytochemistry]
- 16. AIâ€Driven Quality Monitoring and Control in Stem Cell Cultures [https://pmc.ncbi.nlm.nih.gov/articles/PMC12336434/]
- 17. AntiCD44 antibody-conjugated gold nanoparticles for targeted ... [https://pubs.rsc.org/en/content/articlehtml/2025/bm/d5bm00701a]
- 18. Immunocytochemistry (ICC) Protocol [https://www.novusbio.com/support/support-by-application/immunocytochemistry/protocol.html?srsltid=AfmBOoomDu5J_qHyVdaAfWPP5vBuoIfHAj9IjZw6E0nx8GQOp3SVR0XO]
- 19. Recent Developments (After 2020) in Flow Cytometry ... [https://pmc.ncbi.nlm.nih.gov/articles/PMC11940362/]
- 20. Flow Cytometry: Products, Technologies and Global Markets [https://www.bccresearch.com/market-research/biotechnology/flow-cytometry.html?srsltid=AfmBOorx0AtDqeQWKtfsYy1AcdnjTXINjG3fpLWT1aejnK05IXNi_xRx]
- 21. Immunocytochemistry (ICC) Protocol [https://www.novusbio.com/support/support-by-application/immunocytochemistry/protocol.html?srsltid=AfmBOorfDfCgDl6MXIragsLvR6zQHQqRznVxx4uwI3WbKJAzsCjqBFrJ]
- 22. Cell & Tissue Fixation Methods for IHC & IF [https://www.bosterbio.com/blog/post/all-you-need-to-know-about-cell-fixation-or-tissue?srsltid=AfmBOorBMAHhpq9XwzcmssSPjCGkMMDyJOoQg9izodau5oFOQt9wEIJO]
- 23. Appropriate Fixation of IHC/ICC Samples [https://www.rndsystems.com/resources/protocols/appropriate-fixation-ihcicc-samples]
- 24. The effect of methanol fixation on single-cell RNA sequencing ... [https://bmcgenomics.biomedcentral.com/articles/10.1186/s12864-021-07744-6]
- 25. An evaluation of fixation methods: Spatial and ... [https://www.sciencedirect.com/science/article/pii/S0924203116302995]
- 26. Comparing fixing agents: methanol vs acetone for IF [https://blog.citeab.com/comparing-fixing-agents/]
- 27. Effects of acetone, methanol, or paraformaldehyde on ... [https://pubmed.ncbi.nlm.nih.gov/11759062/]
- 28. ICC: Staining Protocol - Formaldehyde Fixation [https://www.sysy.com/protocols/protocol-icc-pfa]
- 29. Methanol fixation is the method of choice for droplet-based ... [https://www.nature.com/articles/s42003-023-04834-x]
- 30. An overview of permeabilization in immunocytochemistry ... [https://www.bio-techne.com/resources/blogs/an-overview-of-permeabilization-in-immunocytochemistry-icc]
- 31. Detergents as cell permeabilisation reagents: Saponin vs ... [https://blog.citeab.com/saponin-tween-20-triton-x/]
- 32. Intracellular Flow Cytometry Staining Protocol [https://www.ptglab.com/news/blog/intracellular-flow-cytometry-staining-protocol/?srsltid=AfmBOoqK3ytRyzDhbDpgHCgxqqyKsmjBYO59tOHD3lXNWvcVOPb6ksr7]
- 33. Successful Immunofluorescence: Fixation & Permeabilization [https://blog.cellsignal.com/successful-immunofluorescence-fixation-and-permeabilization]
- 34. Impact of Triton X-100 on Notch 1 Surface Receptor ... [https://pmc.ncbi.nlm.nih.gov/articles/PMC12064322/]
- 35. Immunocytochemistry (ICC) Protocol [https://www.novusbio.com/support/support-by-application/immunocytochemistry/protocol.html?srsltid=AfmBOopJ7XU1aD1by6KmmsnOPeMsgkN0FN9Pw_Zu_1Wf8Jy6TbCQjliK]
- 36. Blocking Strategies for IHC [https://www.thermofisher.com/us/en/home/life-science/protein-biology/protein-biology-learning-center/protein-biology-resource-library/pierce-protein-methods/blocking-strategies-ihc.html]
- 37. Immunohistochemistry Basics: Blocking Non-Specific ... [https://bitesizebio.com/13466/immunohistochemistry-basics-blocking-non-specific-staining/]
- 38. A Practical Guide to Immunocytochemistry [https://www.thermofisher.com/us/en/home/references/newsletters-and-journals/bioprobes-journal-of-cell-biology-applications/bioprobes-issues-2011/bioprobes-66-october-2011/guide-to-immunocytochemistry.html]
- 39. Non-specific binding of antibodies in immunohistochemistry [https://pmc.ncbi.nlm.nih.gov/articles/PMC3216515/]
- 40. Protocol for the Preparation and Fluorescent ICC Staining ... [https://www.rndsystems.com/resources/protocols/protocol-preparation-and-fluorescent-icc-staining-non-adherent-cells]
- 41. Comparison of blocking reagents for antibody microarray- ... [https://pubmed.ncbi.nlm.nih.gov/36829042/]
- 42. Brief guide to immunostaining - PMC [https://pmc.ncbi.nlm.nih.gov/articles/PMC11699723/]
- 43. Direct vs. Indirect Fluorescent Antibody Labeling [https://probes.bocsci.com/resources/direct-vs-indirect-fluorescent-antibody-labeling-which-is-right-for-your-research.html]
- 44. Types of flow cytometry antibody staining [https://www.abcam.com/en-us/technical-resources/guides/flow-cytometry-guide/types-of-antibody-staining-for-flow-cytometry]
- 45. Tech Tip: Combined Direct and Indirect IF Using Primary ... [https://biotium.com/tech-tips-protocols/tech-tip-combined-direct-and-indirect-immunofluorescence-using-primary-antibodies-from-the-same-host/]
- 46. Immunocytochemistry (ICC) Protocol [https://www.novusbio.com/support/support-by-application/immunocytochemistry/protocol.html?srsltid=AfmBOopPGtJYvcbWdcpHa8tMEk15PX7bryi1kL6N6xRTb4tovwltiz4W]
- 47. Cell and Tissue Fixation 101- Top Tips For Protocol ... [https://bitesizebio.com/13459/cell-fixation-101-top-tips-for-protocol-optimization/]
- 48. Multicolor Immunofluorescence Staining Protocol [https://www.novusbio.com/support/support-by-application/multicolor-immunofluorescence-immunocytochemistry/protocol?srsltid=AfmBOoqztiiIjCe53BxfCIYemVi2ijSpJSo9yJeoU-9fXcpb76U2N9VJ]
- 49. Protocol of Multicolor Immunofluorescence (IF) [https://www.antibody-creativebiolabs.com/protocol-of-multicolor-immunofluorescence-if.htm]
- 50. Immunofluorescent Staining Using Multiple Antibodies [https://blog.cellsignal.com/fluorescent-staining-using-multiple-antibodies]
- 51. Antibodies 101: Multiplex Immunofluorescence [https://blog.addgene.org/antibodies-101-multiplex-immunofluorescence]
- 52. Immunocytochemistry (ICC) Protocol [https://www.novusbio.com/support/support-by-application/immunocytochemistry/protocol.html?srsltid=AfmBOopc8VkktuMvmi_hFOymHYqNlVfr4WASjdZ-EtNJzYYUGm2wsE23]
- 53. How to Select a Secondary Antibody [https://www.thermofisher.com/us/en/home/life-science/antibodies/secondary-antibodies/secondary-antibody-selection-guide.html]
- 54. How to Choose Fluorochromes in Multicolor ICC/IF [https://www.bio-techne.com/resources/blogs/rules-for-selection-of-fluorochromes-in-multicolor-icc-if]
- 55. An introduction to Performing Immunofluorescence Staining [https://pmc.ncbi.nlm.nih.gov/articles/PMC6918834/]
- 56. DAPI Counterstaining Protocols [https://www.thermofisher.com/us/en/home/references/protocols/cell-and-tissue-analysis/dapi-protocol/basic-dapi-counterstaining-protocols.html]
- 57. DAPI mounting medium (aqueous, fluoroshield) - ab104139 [https://www.abcam.com/en-us/products/media/mounting-medium-with-dapi-aqueous-fluoroshield-ab104139]
- 58. How To Choose Antifade Mounting Media [https://vectorlabs.com/blog/how-to-choose-antifade-mounting-media/?srsltid=AfmBOorFiqSt9HDgscwfRQwDIa3iE34Tmu8i10CBbcyPC_6DHg-tg-3q]
- 59. SlowFade® Gold Antifade: A Glycerol-Based Mountant for ... [https://www.thermofisher.com/us/en/home/references/newsletters-and-journals/bioprobes-journal-of-cell-biology-applications/bioprobes-issues-2011/bioprobes-65-july-2011/slowfade-gold-antifade.html]
- 60. VECTASHIELD Antifade Mounting Medium With DAPI [https://vectorlabs.com/products/vectashield-with-dapi/?srsltid=AfmBOopHXJGp3xDivF1W2uh9gu7Xlm7WpnG5tGWS_ditxdyhHb8_03vC]
- 61. ICC/IF Troubleshooting [https://www.antibodies.com/applications/immunofluorescence/immunofluorescence-troubleshooting]
- 62. Immunocytochemistry | Thermo Fisher Scientific - US [https://www.thermofisher.com/us/en/home/references/protocols/neurobiology/neurobiology-protocols/immunocytochemistry.html]
- 63. Assessing the Influence of Selected Permeabilization ... [https://pmc.ncbi.nlm.nih.gov/articles/PMC11843891/]
- 64. Immunocytochemistry (ICC) Protocols for Fixed or Live Cells [https://www.alomone.com/info/immunocytochemistry-icc-protocols-for-fixed-or-live-cells-indirect-and-direct-methods?srsltid=AfmBOopVcVaDhCksr8JJEj5MP2L0yPdk8BvdjgdVI4dgGImmkesfUFqC]
- 65. Immunocytochemistry (ICC) Protocol [https://www.novusbio.com/support/support-by-application/immunocytochemistry/protocol.html?srsltid=AfmBOoqldgn1D2uWf_Mm8aawUcRjlXdfvkc2Z9HGAFc-J_coBAzuU3Fk]
- 66. Immunocytochemistry Troubleshooting | Tips & Tricks [https://www.stressmarq.com/support/technical-support/troubleshooting/immunocytochemistry-troubleshooting/?srsltid=AfmBOoowfm7dtlxJ_ZXn7pT4uMO2nIf7dABWV5NUJtiGXyGe6h_fQOft]
- 67. High background in immunohistochemistry [https://www.abcam.com/en-us/technical-resources/troubleshooting/high-background-in-immunohistochemistry]
- 68. Immunocytochemistry (ICC) Protocol [https://www.novusbio.com/support/support-by-application/immunocytochemistry/protocol.html?srsltid=AfmBOooGhRDJZXb5WKc9A9-Xlkf0RhBgRpZPawoB9w8h-cBxmUCz3gpP]
- 69. Impact of sample handling protocols on soft tissue ... [https://pmc.ncbi.nlm.nih.gov/articles/PMC12519020/]
- 70. Immunocytochemistry (ICC) Protocol [https://www.novusbio.com/support/support-by-application/immunocytochemistry/protocol.html?srsltid=AfmBOoqLsyZ4pqE4irBAB9ZRmesEkRpfVP27BbFb9lqAhJmk53EAc0wE]
- 71. Protocol for immunostaining of non-adherent cells and ... [https://pmc.ncbi.nlm.nih.gov/articles/PMC12272898/]
- 72. New Approaches to Old Techniques in Cell Handling for ... [https://www.mdpi.com/2073-4409/14/16/1271]
- 73. Autofluorescence [https://www.jacksonimmuno.com/secondary-antibody-resource/immuno-techniques/autofluorescence/]
- 74. Interference and Artifacts in High-content Screening - NCBI - NIH [https://www.ncbi.nlm.nih.gov/books/NBK615088/]
- 75. Immunofluorescence: Tips for Immunostaining Cultured Cells [https://www.ptglab.com/news/blog/immunofluorescence-tips-for-immunostaining-cultured-cells/?srsltid=AfmBOoo3GJPBz6ao9NVbKX87-UbcHp7Rginnth_PHArqZqNiwbhQJTup]
- 76. Autofluorescence Quenching in Decellularized Plant Scaffolds ... [https://pmc.ncbi.nlm.nih.gov/articles/PMC12399283/]
- 77. A robust method for autofluorescence-free ... [https://www.nature.com/articles/s41598-025-89142-6]
- 78. shedding light on the dark side of multiplexing [https://pubmed.ncbi.nlm.nih.gov/24534750/]
- 79. Secondary Antibody Cross-Adsorption and Cross Reactivity [https://www.thermofisher.com/us/en/home/life-science/antibodies/antibodies-learning-center/antibodies-resource-library/antibody-methods/secondary-antibody-cross-adsorption-cross-reactivity.html]
- 80. Cross-adsorbed secondary antibodies and cross-reactivity [https://www.jacksonimmuno.com/secondary-antibody-resource/technical-tips/cross-adsorbed-and-cross-reactivity/]
- 81. Imaging the Rainbow: Multiplexing with Same-Species ... [https://www.ptglab.com/news/blog/imaging-the-rainbow-multiplexing-with-same-species-antibodies-for-immunofluorescence/?srsltid=AfmBOoo2GcHKntDcIPotklDPWONvBkL3NxamG3Fzr2CwrBjQIXUZdvr0]
- 82. Antibodies for Immunocytochemistry (ICC) [https://www.thermofisher.com/us/en/home/life-science/antibodies/primary-antibodies/antibodies-applications/antibodies-icc.html]
- 83. The Importance of IHC/ICC Controls [https://www.rndsystems.com/resources/protocols/importance-ihcicc-controls]
- 84. What Controls are Necessary for Immunohistochemistry? [https://www.enzo.com/note/what-controls-are-necessary-for-immunohistochemistry/]
- 85. 6 Essential IHC Controls for Reliable Staining Results [https://www.bosterbio.com/blog/post/6-ihc-controls-you-should-know?srsltid=AfmBOoouVRiXLNrRzwIvTdnl7LcmdtdvA16xUJyotSzPqnFpEDarszR9]
- 86. Controls in IHC [https://www.abcam.com/en-us/technical-resources/guides/ihc-guide/controls-in-ihc]
- 87. Learn More About Controls for ICC/IF Experiments [https://www.bio-techne.com/applications/imaging/immunocytochemistry/controls-for-icc-if-experiments]
- 88. Immunocytochemistry (ICC) Protocol [https://www.novusbio.com/support/support-by-application/immunocytochemistry/protocol.html?srsltid=AfmBOoqGgbkhszBFiGdX9Fxfp95p9apsE-ZHDEY46mNqhYX_TOJWCzV9]
- 89. How to Validate An Antibody? [https://www.cusabio.com/c-21077.html?srsltid=AfmBOoq47eMz1Fju064MUqOIQWFss5qaEa4GLd1m5nPyiGX2VfanoMJr]
- 90. Immunohistochemistry (IHC) vs. Immunocytochemistry (ICC) [https://www.thermofisher.com/us/en/home/life-science/protein-biology/protein-biology-learning-center/protein-biology-resource-library/pierce-protein-methods/immunohistochemistry-immunocytochemistry.html]
- 91. A Comparison of Immunohistochemistry and Western Blot [https://www.news-medical.net/life-sciences/A-Comparison-of-Immunohistochemistry-and-Western-Blot.aspx]
- 92. Adapting and Validating In-Cell Westerns in Microfluidic ... [https://pmc.ncbi.nlm.nih.gov/articles/PMC2957247/]
- 93. Comparisons of ELISA and Western blot assays for ... [https://www.sciencedirect.com/science/article/pii/S2352340917302895]
- 94. Validate Antibodies with WB Before Doing IHC! [https://www.antibodiesinc.com/blogs/news/why-don-t-more-researchers-validate-antibodies-with-wb-before-doing-ihc?srsltid=AfmBOoqMJr5jHVsFHQLU1huP5IuArU4lKeonqW2f6BlSfjVYIvYnzgV3]
- 95. Comparison between western blotting ... [https://pubmed.ncbi.nlm.nih.gov/7903522/]
- 96. AI-based virtual immunocytochemistry for rapid and robust ... [https://pmc.ncbi.nlm.nih.gov/articles/PMC12273370/]
- 97. Synergistic H&E and IHC image analysis by AI predicts ... [https://www.nature.com/articles/s43856-025-01045-9]
- 98. Artificial intelligence-based digital pathology using H&E ... [https://pmc.ncbi.nlm.nih.gov/articles/PMC12323524/]
- 99. Predictive Oncology Launches Novel 3D Cell Technology ... [https://investors.predictive-oncology.com/news-releases/news-release-details/predictive-oncology-launches-novel-3d-cell-technology-accelerate]
- 100. Analytical Method Validation: Back to Basics, Part II [https://www.chromatographyonline.com/view/analytical-method-validation-back-basics-part-ii]
- 101. Immunocytochemistry (ICC) Protocol [https://www.novusbio.com/support/support-by-application/immunocytochemistry/protocol.html?srsltid=AfmBOooSdhjtRokIGMfdTnQM2mtRqOQnXWWD3auE4zeEc_QFD6M3hXsF]