Mastering Immunofluorescence on Frozen Sections: A Comprehensive Protocol and Troubleshooting Guide
This article provides a complete guide to performing immunofluorescence (IF) on frozen tissue sections, a critical technique for researchers and drug development professionals analyzing protein localization and expression within a...
Mastering Immunofluorescence on Frozen Sections: A Comprehensive Protocol and Troubleshooting Guide
Abstract
This article provides a complete guide to performing immunofluorescence (IF) on frozen tissue sections, a critical technique for researchers and drug development professionals analyzing protein localization and expression within a native tissue context. It covers the entire workflow from foundational principles of tissue preparation and cryopreservation to a detailed, step-by-step staining protocol. The guide also delivers extensive troubleshooting for common issues like high background and weak signal, and concludes with a discussion on protocol validation and the comparative advantages of frozen sections over alternative methods like FFPE, empowering scientists to generate robust, publication-quality data.
Understanding Frozen Tissue Immunofluorescence: Principles and Preparation
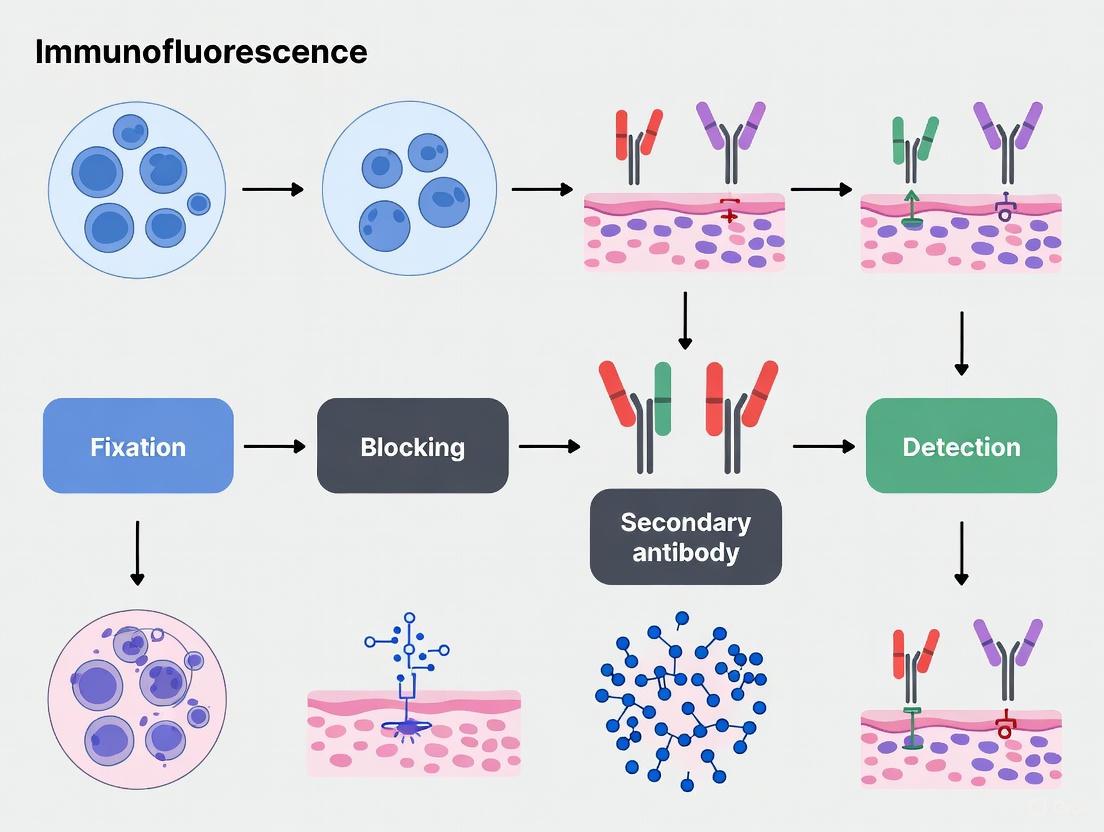
Immunofluorescence (IF) on frozen sections is a foundational technique in biomedical research and diagnostic pathology, enabling the visualization and spatial localization of specific antigens within intact tissue architecture. This method is particularly valuable for studying the tumor microenvironment, immune cell populations, and the expression of therapeutic targets like PD-L1, where preserving antigenicity and cellular structure is paramount [1] [2]. Unlike flow cytometry, which requires tissue disaggregation, IF retains critical spatial information about immune cells' location, proximity, and relationship to tissue structures, providing a powerful alternative for analyzing mucosal and solid tumor tissues [2]. The principle involves using antibodies conjugated to fluorophores to target specific proteins, with signal detection via fluorescence microscopy. The process encompasses tissue preparation, sectioning, staining, and imaging, with careful optimization at each stage to ensure strong, specific signals while minimizing background [3].
Essential Reagents and Materials
Successful immunofluorescence requires a suite of specialized reagents and equipment. The table below summarizes the key solutions and materials needed for the protocol.
Table 1: Essential Research Reagent Solutions for Immunofluorescence on Frozen Sections
| Item | Function/Description |
|---|---|
| O.C.T. Compound | Embedding medium for tissue; supports structure during freezing and sectioning [3] [4] [2]. |
| Fixative (e.g., 4% PFA) | Preserves tissue morphology and immobilizes antigens. Perfusion or immersion fixation can be used [3] [4]. |
| Sucrose Solution (e.g., 30%) | Cryoprotectant; reduces ice crystal formation during freezing to preserve tissue ultrastructure [4]. |
| Blocking Buffer | Contains serum (e.g., horse, donkey) and proteins (e.g., BSA) to block non-specific antibody binding sites, reducing background [3] [5] [4]. |
| Primary Antibodies | Bind specifically to the target antigen of interest. Must be validated for use on frozen tissues [3]. |
| Fluorophore-conjugated Secondary Antibodies | Bind to the primary antibody and provide the detectable fluorescent signal [3] [5]. |
| Wash Buffer (e.g., PBS, TBS) | Used to remove unbound antibodies and reagents between steps [3] [5]. |
| Nuclear Counterstain (e.g., DAPI) | Stains cell nuclei, allowing for visualization of tissue architecture and cellular localization [3] [5]. |
| Anti-fade Mounting Medium | Preserves fluorescence and prevents photobleaching during microscopy and storage [3] [5]. |
Methods and Experimental Protocols
Tissue Preparation and Sectioning
The integrity of the final immunofluorescence image is highly dependent on proper tissue collection and processing.
- Fixation: Fresh tissue should be fixed immediately to preserve morphology. For perfusion fixation, flush with a formaldehyde-based fixative (e.g., 4% PFA), followed by a sucrose solution for cryoprotection [3]. For immersion fixation, dissected tissue is placed in 4% PFA; the fixative volume should be approximately 50 times the tissue volume, with fixation times typically between 4 and 8 hours at room temperature. Over-fixation beyond 24 hours can mask or destroy tissue antigens and should be avoided [3] [4].
- Cryoprotection and Embedding: After fixation, tissue is transferred to a sucrose solution (e.g., 30%) and stored at 4°C until it sinks, indicating infiltration. The tissue is then mounted in O.C.T. compound on a specimen pedestal, with orientation noted for sectioning [4] [2].
- Snap-Freezing and Sectioning: The O.C.T.-embedded block is snap-frozen, preferably in isopentane cooled by dry ice, and stored at -70°C or below [3]. Sectioning is performed using a cryostat with chamber and object temperatures typically set between -15°C and -23°C [3] [2]. Sections are cut at a thickness of 5-15 µm, collected on gelatin- or poly-lysine-coated slides, air-dried, and can be stored at -20°C to -80°C for several months before staining [3] [4] [2].
Immunofluorescence Staining Protocol
The following step-by-step protocol is optimized for frozen tissue sections.
- Slide Rehydration: Remove slides from the freezer and thaw at room temperature for 10-30 minutes. Rehydrate the sections by incubating in wash buffer (PBS or TBS) for 10 minutes [3] [4].
- Permeabilization and Blocking (Optional): If the target is intracellular, permeabilize with a detergent like 0.1% Triton X-100 in PBS for 10-15 minutes. Wash with buffer. Encircle the tissue with a hydrophobic barrier pen. Incubate the sections with a blocking buffer (e.g., 1% horse serum or 10% normal donkey serum in PBS) for 30-60 minutes at room temperature to block non-specific binding [3] [4] [2].
- Primary Antibody Incubation: Apply the primary antibody diluted in an incubation buffer (e.g., containing BSA and serum) onto the tissue section. Incubate overnight at 2-8°C in a humidified, dark chamber for optimal specific binding and reduced background [3] [4].
- Washing: Wash the slides 3 times for 15 minutes each in wash buffer to remove any unbound primary antibody [3] [4].
- Secondary Antibody Incubation: Apply the fluorophore-conjugated secondary antibody, diluted in incubation buffer, onto the sections. Incubate for 30-60 minutes at room temperature, protected from light [3] [4].
- Counterstaining and Mounting: Wash the slides 3 times for 15 minutes each in wash buffer. Incubate with a nuclear counterstain like DAPI for 2-5 minutes. Perform a final rinse with PBS or TBS [3] [5] [4]. Mount the slides with an anti-fade mounting medium and seal with a coverslip. Allow the mounting medium to cure before visualization [5] [4].
Workflow Diagram
The following diagram summarizes the key stages of the protocol.
Data Analysis and Visualization
Image Acquisition and Quantitative Analysis
Fluorescence images are typically acquired using a fluorescence or confocal microscope. For quantification, automated cell counting using open-source software like ImageJ (Fiji) or CellProfiler is essential for high-throughput analysis, reducing investigator bias and improving reproducibility [2]. These tools can be configured to count compact cells (e.g., T cells) using object-based analysis or irregularly shaped cells (e.g., dendritic cells) using pixel-based methods [2]. For advanced applications like 3D pathology, thick tissue sections are stained, optically cleared, and imaged with confocal microscopy. A significant technical advancement is the use of High Dynamic Range (HDR) algorithms to overcome the limited dynamic range of fluorescence detection systems, restoring accurate biomarker expression patterns and improving diagnostic accuracy [6].
Accessible Data Presentation
When presenting immunofluorescence data, it is critical to ensure figures are accessible to all readers, including those with color vision deficiencies. Avoid the classic red/green color combination; instead, use accessible alternatives like green/magenta, yellow/blue, or red/cyan [7]. For multi-color images, a magenta/yellow/cyan combination is recommended. Best practice involves displaying individual grayscale channels alongside the merged image, as the human eye is better at detecting changes in intensity in grayscale [7].
Table 2: Troubleshooting Common Issues in Frozen Section Immunofluorescence
| Problem | Potential Cause | Solution |
|---|---|---|
| High Background | Inadequate blocking, over-fixation, antibody concentration too high. | Optimize blocking serum and antibody dilution; ensure thorough washing [3]. |
| Weak or No Signal | Under-fixation, antigen degradation, low antibody affinity or concentration. | Check antibody specificity; optimize fixation time and primary antibody concentration [3]. |
| Tissue Morphology Damage | Improper freezing (large ice crystals), incorrect cryostat temperature. | Ensure rapid snap-freezing in isopentane/dry ice; optimize cryostat temperature [4]. |
| Sections Detaching from Slide | Slides not adequately coated, sections too thin. | Use positively charged or gelatin-coated slides [3]. |
| Autofluorescence | Endogenous proteins like collagen, aldehyde groups from fixative. | Treat with TrueBlack or similar reagents to quench autofluorescence [2] [6]. |
Advanced Applications and Technological Advances
Immunofluorescence on frozen sections is a gateway to several advanced technological applications that are enhancing research capabilities.
- Multiplex Immunofluorescence (mIF): This technology allows for the simultaneous detection of 5-60 markers on a single tissue section, enabling the definition of complex immunophenotypes, assessment of spatial relationships, and quantification of immune cell subsets within the tumor microenvironment [8]. mIF has shown superior predictive value for response to immunotherapies compared to single-plex assays [8].
- 3D Pathology: By combining IF staining with tissue optical clearing and confocal microscopy, researchers can generate three-dimensional images of thick tissue specimens. This approach has revealed significant spatial heterogeneity in biomarker expression, such as a 25% change in PD-L1 Tumor Proportion Score at different depths within a tumor, which is not discernible with conventional 2D methods [6].
- High-Throughput and Drug Screening: Sensitive IF assays have been developed that are robust enough for high-content screening. These assays can capture expression heterogeneity and are being used to identify and evaluate small molecules that modulate the levels of therapeutic targets like PD-L1 in patient-derived tumor cultures [1].
Immunofluorescence on frozen sections remains an indispensable technique for spatial biology, offering a critical bridge between molecular biology and tissue morphology. Mastery of the core protocol—from optimal tissue fixation and sectioning to rigorous staining and appropriate controls—is fundamental. The field is being rapidly advanced by the integration of multiplex staining, 3D imaging, and sophisticated computational analysis, paving the way for more precise biomarker discovery and evaluation in both research and clinical diagnostics.
Advantages of Frozen Sections for Antigen Preservation
Within the broader scope of optimizing immunofluorescence protocols for frozen sections, the method of tissue preservation is a critical determinant of experimental success. This application note details the principal advantage of frozen sections—superior antigen preservation—and contrasts it with formalin-fixed paraffin-embedded (FFPE) methodologies. For researchers and drug development professionals, the choice of frozen sections is often dictated by the need to study native protein structures, labile epitopes, and certain membrane proteins that are adversely affected by chemical fixation. Herein, we provide a comparative analysis supported by experimental data, a detailed protocol for immunofluorescence on frozen sections, and essential resources to facilitate robust and reproducible research outcomes.
Immunofluorescence (IF) is a powerful technique that allows for the detection and localization of a wide variety of antigens within their precise cellular and tissue context [9]. The integrity of the target antigen's structure and accessibility—collectively termed "antigen preservation"—is paramount for the specificity and intensity of the final signal. The initial steps of tissue processing, namely fixation and embedding, are where the divergence between frozen and FFPE methods becomes most consequential.
FFPE processing, while excellent for preserving morphological detail, involves cross-linking fixatives like formalin and high-temperature embedding in paraffin. A key step often required for FFPE tissues, Heat-Induced Epitope Retrieval (HIER), is indicative of the initial antigen masking that occurs [9] [10]. In contrast, frozen section methodology typically employs a snap-freezing process that rapidly halts cellular activity, preserving antigens in a state closer to their native biological condition without the formation of protein cross-links [11] [12]. This fundamental difference makes frozen sections the preferred starting material for many applications, especially when investigating delicate epitopes or conducting multiplexing experiments.
Comparative Analysis: Frozen vs. FFPE Sections
The decision to use frozen or FFPE tissues hinges on the research objectives, weighing the need for optimal antigenicity against the requirements for superior morphological detail and logistical convenience. The following table summarizes the core differences.
Table 1: Key Characteristics of Frozen versus FFPE Tissue Sections
| Characteristic | Frozen Sections | FFPE Sections |
|---|---|---|
| Antigen Preservation | Superior; avoids cross-linking, preserving native protein structure [11] [13] | Variable; formalin cross-links can mask epitopes, often requiring retrieval [9] [10] |
| Primary Application | Ideal for labile epitopes, post-translational modifications, and certain membrane proteins [12] [13] | Ideal for archival studies, oncology, and projects requiring fine morphological detail [11] [13] |
| Tissue Morphology | Good, but can be compromised by ice crystal artifacts [11] | Excellent; allows for thinner sections and superior cellular detail [11] [10] |
| Processing Time | Rapid (hours to a day) [12] | Lengthy (several days due to fixation and embedding) [13] |
| Long-Term Storage & Logistics | Requires consistent ultra-low temperature (-80°C), costly storage, vulnerable to power failure [13] [14] | Stable at room temperature; easy and inexpensive to store and transport [13] |
| Compatibility with Downstream Assays | Excellent for protein-based assays (IF, Western blot), mass spectrometry, and nucleic acid extraction [13] | Excellent for IHC/IF (post-retrieval); nucleic acids are fragmented but usable with optimized protocols [14] |
Experimental Protocol: Immunofluorescence on Frozen Sections
The protocol below is optimized for balancing antigen preservation with tissue integrity. It is adapted from established methodologies [12] [3] [15] and should serve as a robust starting point.
Stage 1: Tissue Preparation and Snap-Freezing
Aim: To rapidly preserve tissue architecture and antigenicity without ice crystal damage.
- Materials: Fresh tissue, Isopentane, Dry ice, Optimal Cutting Temperature (OCT) compound, embedding molds.
- Steps:
- Prepare a bath of cold isopentane by chilling it in a metal container surrounded by dry ice. Allow 5 minutes for temperature equilibration [12].
- Orient fresh, unfixed tissue in an embedding mold and completely embed with OCT compound.
- Using forceps, snap-freeze the tissue by immersing the mold in the cold isopentane bath for 10–20 seconds, or until the OCT block turns opaque [12].
- Store the frozen tissue block at -80°C until sectioning.
Stage 2: Cryosectioning
Aim: To produce thin, intact tissue sections mounted on slides.
- Materials: Cryostat, cryostat blades, positively charged or gelatin-coated microscope slides.
- Steps:
- Equilibrate the frozen tissue block to the cryostat temperature (typically -15°C to -23°C) for at least 15-20 minutes [12] [4].
- Trim the block to expose the tissue surface at a thickness of 10–30 µm.
- Cut sections at a thickness of 5–10 µm [3] [15].
- Thaw-mount sections onto pre-warmed, coated slides by gently touching the slide to the section. Air-dry the mounted sections for 15-30 minutes at room temperature to improve adhesion [12] [3].
Stage 3: Fixation and Permeabilization
Aim: To preserve cellular morphology and allow antibody access to intracellular targets.
- Materials: Acetone, Methanol, or 4% Paraformaldehyde (PFA); PBS; Triton X-100.
- Steps:
- Fix air-dried sections by immersing in a suitable fixative for 10-15 minutes at room temperature.
- Wash slides 3 times for 5 minutes each with PBS or Tris-Buffered Saline (TBS).
- (Optional) For intracellular targets, permeabilize by incubating in a buffer containing 0.1-0.5% Triton X-100 in PBS for 10-15 minutes [15]. Note that acetone and methanol also permeabilize.
Stage 4: Blocking
Aim: To reduce non-specific binding of antibodies, minimizing background signal.
- Materials: Protein blocking solution (e.g., 2-10% normal serum, BSA, or commercial protein-free blocks), PBS.
- Steps:
- Draw a hydrophobic barrier around the tissue section to minimize reagent volumes [15].
- Incubate the sections with an appropriate blocking buffer for 30-60 minutes at room temperature.
Stage 5: Antibody Incubation
Aim: To specifically label the target antigen with a fluorescent probe.
- Materials: Primary antibody, fluorophore-conjugated secondary antibody, antibody dilution buffer (e.g., PBS with 1% BSA), humidified chamber.
- Steps:
- Prepare the primary antibody in dilution buffer at the manufacturer's recommended concentration.
- Apply the solution to the tissue section, ensuring complete coverage. Incubate overnight at 4°C in a humidified chamber for optimal specificity and signal [3] [15].
- Wash slides 3 times for 10-15 minutes each with PBS or PBST.
- Apply the fluorophore-conjugated secondary antibody, diluted in buffer, for 1-2 hours at room temperature in the dark.
- Wash slides 3 times for 10-15 minutes each with PBS in the dark.
Stage 6: Mounting and Imaging
Aim: To preserve the fluorescence signal for microscopy.
- Materials: Anti-fade mounting medium, DAPI solution, coverslips, clear nail polish.
- Steps:
- (Optional) Counterstain nuclei by incubating with DAPI (e.g., 1:5000 dilution) for 2-5 minutes [3] [15].
- Rinse briefly with PBS.
- Tap off excess liquid and apply a drop of anti-fade mounting medium.
- Carefully lower a coverslip, avoiding bubbles. Seal the edges with clear nail polish if using an aqueous mounting medium.
- Store slides in the dark at 4°C and image using a fluorescence microscope as soon as possible.
The following workflow diagram illustrates the key stages of this protocol.
The Scientist's Toolkit: Essential Reagents and Materials
Successful execution of the protocol relies on high-quality reagents. The following table lists critical materials and their functions.
Table 2: Essential Research Reagents for Frozen Section Immunofluorescence
| Item | Function / Rationale | Examples / Notes |
|---|---|---|
| O.C.T. Compound | A water-soluble embedding medium that provides structural support for frozen tissue during sectioning. | A clear, colorless compound that freezes to a consistent hardness ideal for cryostat sectioning [12] [3]. |
| Isopentane | A coolant for snap-freezing; its high thermal conductivity enables rapid freezing, minimizing destructive ice crystal formation. | Chilled with dry ice for a slurry; prevents direct contact of tissue with liquid nitrogen, which can cause fracturing [12] [15]. |
| Primary Antibody | The key reagent that provides specificity by binding to the target antigen/epitope. | Must be validated for use in IF on frozen tissues. Species host should be different from the tissue sample species [9] [10]. |
| Fluorophore-Conjugated Secondary Antibody | Binds to the primary antibody, providing a detectable signal. Enables signal amplification. | Must be raised against the host species of the primary antibody. Select based on microscope filter sets and to avoid spectral overlap [9] [3]. |
| Blocking Serum | Reduces non-specific background by saturating reactive sites in the tissue before antibody application. | Normal serum from the same species as the secondary antibody (e.g., Normal Donkey Serum) [12] [15] [4]. |
| Anti-fade Mounting Medium | Presves fluorescence signal by reducing photobleaching during microscopy and storage. | Commercially available reagents (e.g., ProLong Diamond, Vectashield) are essential for maintaining signal intensity [3] [15]. |
Technical Considerations and Troubleshooting
Even with a standardized protocol, optimization is often required. Key considerations include:
- Fixative Optimization: The ideal fixative is antigen-dependent. While acetone is common for many targets, others may require mild aldehyde fixation (e.g., 4% PFA). Testing multiple fixatives is recommended for new targets [12].
- Antigen Retrieval for Frozen Sections: While generally not required and potentially damaging to fragile tissues [3] [10], some antibodies may benefit from a gentle retrieval step if fixation has been used.
- Multiplexing: When detecting multiple antigens simultaneously, ensure primary antibodies are from different species and use secondary antibodies with well-separated emission spectra to prevent cross-talk [9] [15].
The strategic advantage of frozen sections lies in their unparalleled capacity for preserving native antigenicity. This makes them an indispensable tool in the modern researcher's arsenal, particularly for exploratory research, the study of sensitive biomarkers, and drug development programs where observing the true biological state of a protein target is critical. While FFPE sections remain valuable for histopathology and archival studies, the frozen section protocol detailed herein provides a reliable pathway to high-quality, trustworthy immunofluorescence data.
In immunofluorescence research, the quality of fixation directly determines the clarity, specificity, and reliability of experimental outcomes. Tissue perfusion and fixation with 4% paraformaldehyde (PFA) represent the foundational steps that preserve cellular architecture and antigen integrity for subsequent analysis. Proper execution of these initial procedures ensures optimal tissue morphology while maintaining the antigenicity required for successful fluorescent detection in frozen sections. This protocol details the critical methodologies for vascular perfusion and immersion fixation, providing researchers with standardized approaches essential for reproducible results in immunological studies.
The Principles of Fixation for Immunofluorescence
Effective fixation halts degradation processes and stabilizes tissue structures for long-term preservation. For immunofluorescence studies, 4% PFA serves as a primary fixative due to its optimal balance between structural preservation and antigen retention. The fixation process involves cross-linking proteins through formaldehyde groups, thereby maintaining cellular integrity without completely destroying epitope recognition sites essential for antibody binding.
The choice between perfusion and immersion fixation depends on research requirements. Perfusion fixation provides superior preservation quality by rapidly delivering fixative through the vascular system, achieving immediate stabilization of tissues in situ. This method is particularly crucial for tissues susceptible to rapid autolysis, such as neural and endocrine tissues [17]. Immersion fixation, while less complex, suffices for smaller tissues or when perfusion equipment is unavailable, though penetration rates must be considered for consistent results.
Preparation of 4% Paraformaldehyde (PFA) Solution
Reagents and Materials
- Paraformaldehyde powder
- 1X PBS (0.145 M NaCl, 0.0027 M KCl, 0.0081 M Na₂HPO₄, 0.0015 M KH₂PO₄, pH 7.4)
- Sodium hydroxide (NaOH), 1N
- Dilute hydrochloric acid (HCl)
- Glassware with stir bar (dedicated to formaldehyde use)
- Hot plate with magnetic stirrer
- Thermometer
- Filter units
- Ventilated fume hood
- Personal protective equipment (gloves, safety glasses)
Protocol
Caution: Formaldehyde is toxic. All procedures must be performed in a ventilated hood with appropriate personal protective equipment [18].
- For 1 liter of 4% PFA, add 800 mL of 1X PBS to a glass beaker on a stir plate in a ventilated hood.
- Heat while stirring to approximately 60°C. Ensure the solution does not boil.
- Add 40 g of paraformaldehyde powder to the heated PBS solution.
- The powder will not dissolve immediately. Slowly add 1N NaOH dropwise from a pipette until the solution clears.
- Once the paraformaldehyde is dissolved, cool the solution and filter.
- Adjust the final volume to 1L with 1X PBS.
- Check the pH and adjust with dilute HCl to approximately 6.9.
- The solution can be aliquoted and stored at 2-8°C for up to one month, or frozen for longer storage.
Note: Commercially available formalin is a saturated formaldehyde solution (37-40%) containing methanol as a stabilizer. For critical immunofluorescence work, preparation from paraformaldehyde powder ensures a pure, methanol-free fixative [18].
Tissue Perfusion Fixation Protocol
Perfusion fixation via the vascular system provides the most rapid and uniform fixation, particularly essential for labile tissues and optimal antigen preservation [17] [3].
Materials and Reagents
- 4% PFA solution (pre-warmed to room temperature)
- Physiological saline (0.9% NaCl)
- Anesthetic: Avertin or Ketamine/Xylazine
- Peristaltic pump or gravity-fed perfusion system
- 21-gauge butterfly needle
- Surgical instruments (forceps, scissors, hemostats)
- Dissection board and pins
Quantitative Parameters for Murine Perfusion Fixation
Table 1: Perfusion Parameters for Murine Models
| Parameter | Neonates/Embryos | Adult Mice | Notes |
|---|---|---|---|
| Anesthetic | Hypothermia | Avertin or Ketamine/Xylazine IP | Absence of withdrawal reflex indicates deep anesthesia [17] |
| Pre-perfusion Flush | Not required | 5-20 mL saline | Flush over ~1 minute until effluent runs clear [17] |
| 4% PFA Volume | Tissue size-dependent | 30-50 mL | Perfuse until body becomes stiff [17] |
| Fixation Time | 1-24 hours [17] | 7-10 days immersion post-perfusion [17] | Crown-rump length determines time for embryos [17] |
| Needle Size | Appropriately sized | 21-gauge butterfly [17] | Placed in left ventricle |
Step-by-Step Protocol
- Anesthesia: Administer appropriate anesthetic intraperitoneally. Confirm deep anesthesia by absence of withdrawal reflex when firmly pinching the foot with forceps [17].
- Positioning: Secure the animal in dorsal recumbancy on a dissection board.
- Surgical Access: Open the thoracic cavity by cutting through the rib cage to expose the heart.
- Circulatory Access: Make a small incision in the right atrium to create an outflow for perfusate. Insert a 21-gauge butterfly needle into the left ventricle.
- Saline Flush: Perfuse with 5-20 mL of physiological saline over approximately one minute to clear blood from the circulatory system [17].
- Fixative Perfusion: Switch to 4% PFA solution and perfuse with 30-50 mL until the body becomes stiff, indicating successful fixation [17].
- Dissection: Carefully dissect required tissues and place them in fresh 4% PFA for post-fixation if required.
- Post-fixation: For complete fixation, immerse tissues in 4% PFA for an additional 7-10 days at 4°C [17].
Immersion Fixation Protocol
For tissues where perfusion is not feasible or for smaller specimens, immersion fixation provides an acceptable alternative, though penetration may be limited in larger samples.
Protocol for Adult Tissues
- Dissection: Rapidly dissect the tissue of interest, minimizing trauma and ischemia time.
- Size Reduction: Trim tissue to less than 10mm in thickness to ensure adequate fixative penetration.
- Fixation Volume: Immerse tissue in a volume of 4% PFA that is approximately 50 times greater than the tissue size [3].
- Fixation Duration: Fix for 2-24 hours at 4°C or room temperature, depending on tissue density and size [19] [3].
- Rinsing: Following fixation, rinse tissue thoroughly with PBS to remove excess PFA.
- Cryoprotection: For frozen sections, immerse tissue overnight at 4°C in a solution of 30% sucrose in PBS for cryopreservation. The tissue will sink once equilibrated with the sucrose solution [19].
Special Considerations for Embryos and Neonates
Table 2: Fixation Guidelines for Embryonic and Neonatal Tissues
| Tissue Type | Fixation Method | Fixation Duration | Recommended Fixative | Storage Conditions |
|---|---|---|---|---|
| Early Embryos(2mm crown-rump) | Immersion | 1 hour [17] | Bouin's solution or 4% PFA [17] | 70% ethanol, room temperature [17] |
| Late Embryos(15mm crown-rump) | Immersion | Up to 24 hours [17] | Bouin's solution or 4% PFA [17] | 70% ethanol, room temperature [17] |
| Neonates | Single midline incisionthen immersion [17] | 2-24 hours [19] | 4% PFA | 30% sucrose in PBS, then -80°C [19] |
For neonates and embryos, remove the skin from the head and perform a single midline ventral incision to open the abdominal and thoracic cavities before placing the specimen in fixative [17]. With Bouin's solution, tissues will become brittle if placed in fixative for too long [17].
Post-Fixation Processing for Frozen Sections
Following fixation, proper processing is essential for preparing tissues for cryosectioning and immunofluorescence staining.
Cryoprotection and Embedding
- Cryoprotection: After fixation and rinsing, transfer tissues to 30% sucrose in PBS until they sink (indicating complete saturation), typically overnight at 4°C [19].
- Embedding: Mount tissue in OCT embedding compound in an appropriate tissue mold.
- Freezing: Slowly submerge the mold in liquid nitrogen or place on dry ice. For better preservation of morphology, freeze in isopentane mixed with dry ice [3].
- Storage: Store frozen tissue blocks at -80°C until sectioning.
Sectioning
- Equilibration: Transfer the tissue block to a cryostat set at -20°C and allow it to equilibrate for 15 minutes [19].
- Section Thickness: Cut 5-15μm thick sections using the cryostat [19] [3].
- Mounting: Thaw-mount sections onto gelatin-coated or positively charged glass slides.
- Drying: Dry slides for 30 minutes on a slide warmer at 37°C or at room temperature [19] [3].
- Storage: Store slides with mounted frozen sections at -20°C to -70°C for up to 12 months [3].
The Scientist's Toolkit: Essential Research Reagents
Table 3: Essential Reagents for Tissue Perfusion and Fixation
| Reagent/Material | Function | Application Notes |
|---|---|---|
| Paraformaldehyde | Cross-linking fixative that preserves tissue structure by forming methylene bridges between proteins [18] | Prepare fresh 4% solution in PBS; methanol-free for best antigen preservation [18] |
| Phosphate-Buffered Saline (PBS) | Isotonic solution for preparing fixatives and wash steps | Maintains physiological pH and osmolarity; 0.145M NaCl, 0.0027M KCl, pH 7.4 [18] [3] |
| Sucrose Solution (30%) | Cryoprotectant that reduces ice crystal formation during freezing [19] | Tissue sinks when equilibrated; essential for preserving morphology in frozen sections [19] |
| O.C.T. Compound | Water-soluble embedding medium for cryosectioning | Provides support during sectioning; must completely surround tissue [3] |
| Sodium Azide | Antimicrobial preservative for reagent storage | Prevents microbial growth in sugar-containing solutions; typically used at 0.01% [3] |
Troubleshooting and Optimization
Successful immunofluorescence begins with optimal fixation. Several factors require careful consideration during the perfusion and fixation processes.
Common Fixation Issues and Solutions
- Incomplete Fixation: Results from insufficient fixative volume or duration. Ensure adequate fixative volume (50:1 fixative:tissue ratio for immersion) and extend fixation time for dense tissues.
- Over-fixation: Can mask epitopes and increase autofluorescence. Limit fixation time to the minimum required for adequate preservation (typically 4-24 hours for immersion).
- Poor Morphology: Often due to delayed fixation or improper handling. Fix tissues immediately after dissection or death, and handle gently to avoid mechanical damage.
- Crystallization in PFA Solution: Ensure proper pH adjustment and filtration when preparing PFA from powder.
- Tissue Floating in Sucrose: Incomplete dehydration indicated by tissue floating after 24+ hours in 30% sucrose. Ensure adequate fixation and consider increasing sucrose concentration to 30% if necessary.
For gentle fixation intended for subsequent tissue arrays or sensitive antigens, place tissues in 4% PFA for no longer than 48 hours at 4°C. After 24-48 hours, tissue can be stored in 1X PBS at 4°C for up to two weeks or in 70% ethanol at 4°C [17].
Tissue perfusion and fixation with 4% PFA represent the critical foundation upon which successful immunofluorescence experiments are built. The choice between perfusion and immersion fixation, careful preparation of fixative solutions, and appropriate post-fixation processing directly impact the quality of morphological preservation and antigen accessibility. By adhering to these standardized protocols and understanding the underlying principles, researchers can ensure consistent, reproducible results in their immunofluorescence studies. Proper execution of these initial steps enables precise localization of cellular components and provides reliable data for scientific discovery in frozen section research.
Cryoprotection and Embedding in OCT Compound
Within the broader scope of immunofluorescence protocol research for frozen sections, the preparatory steps of cryoprotection and embedding in Optimal Cutting Temperature (OCT) compound are foundational. These initial stages are critical for preserving tissue architecture and cellular antigenicity, ultimately determining the success of subsequent immunohistochemical analyses [20]. This application note details standardized, optimized protocols for processing tissues and advanced three-dimensional models, such as organoids, to support high-quality research and drug development.
Scientific Rationale and Principle
Cryoprotection is essential to prevent the formation of ice crystals during the freezing process, which can rupture cellular membranes and destroy tissue morphology [20]. Incubating fixed tissue in a 30% sucrose solution acts as a cryoprotectant; the tissue is sufficiently dehydrated and protected when it sinks to the bottom of the container [20] [21]. Embedding in OCT compound, a water-soluble glycol and resin mixture, provides the necessary structural support for cryosectioning. The OCT matrix infiltrates the tissue and, upon freezing, creates a robust block that allows for the precise cutting of thin sections (typically 5-20 µm) while preserving antigen binding sites for immunohistochemistry [3] [21] [22].
Quantitative Data Comparison
The table below summarizes key parameters and comparative performance data for different embedding approaches, highlighting the significant efficiency gains of high-throughput methods.
Table 1: Comparison of Tissue Embedding and Processing Methods
| Method | Maximum Specimens per Block | Estimated Cost & Time Reduction | Key Advantages | Compatible Tissues |
|---|---|---|---|---|
| Standard OCT Embedding | 1 (individual) | Baseline | Simplicity, widespread use | Diverse tissues and organoids [3] [21] |
| Multiplexed Tissue Molds (MTMs) | ~110 organoids or 19 mouse organs [23] | Up to 96% [23] | Enables direct comparison, reduces slide-to-slide variability [23] | Heterogeneous tissues (e.g., brain, spleen, decalcified bone) [23] |
| PEGDA-Gelatine HistoBrick | 16 retinal organoids [22] | Cost-efficient, saves reagents and time [22] | Superior structural support for fragile substructures [22] | Fragile microtissues (e.g., retinal organoids) [22] |
Detailed Experimental Protocols
Protocol: Cryoprotection and OCT Embedding for Standard Tissues
This protocol is optimized for processing individual tissue samples, such as mouse organs, for subsequent cryosectioning and immunofluorescence [3] [20] [21].
Reagents Required:
- Fixative Solution (e.g., 4% Paraformaldehyde in PBS) [20] [21]
- Phosphate-Buffered Saline (PBS)
- Cryoprotection Solution (30% sucrose in PBS) [20] [21]
- Optimal Cutting Temperature (OCT) Compound
- Isopentane (for snap-freezing)
- Dry Ice
Procedure:
- Fixation: Following dissection, fix tissue by immersion in 4% paraformaldehyde. The volume of fixative should be approximately 50 times the volume of the tissue. Fix for 4-8 hours at 4°C. Avoid exceeding 24 hours of fixation to prevent antigen masking [3] [21].
- Washing: Remove the fixative and rinse the tissue with cold PBS three times for 5 minutes each to remove residual fixative [20].
- Cryoprotection: Transfer the tissue to a 30% sucrose solution in PBS. Incubate at 4°C until the tissue sinks to the bottom of the container (typically 12-16 hours, but can be extended up to 5 days). This indicates sufficient dehydration and cryoprotection [20] [21].
- Embedding: a. Briefly blot the tissue to remove excess sucrose. b. Place the tissue in a cryomold filled with OCT compound, ensuring the tissue is fully immersed and oriented correctly. Avoid introducing air bubbles around the tissue [20]. c. For snap-freezing, prepare a cooling bath by filling a beaker with isopentane and chilling it with dry ice until it reaches approximately -78°C [20]. d. Slowly lower the cryomold into the chilled isopentane bath until the OCT is completely solid (white and opaque). Ensure isopentane does not spill into the cryomold [20].
- Storage: Transfer the frozen block (cryoblock) to dry ice and then store at -80°C for long-term preservation [20].
Protocol: High-Throughput Embedding Using Multiplexed Tissue Molds (MTMs)
This protocol leverages custom MTMs to process numerous specimens simultaneously, drastically improving throughput for screening and comparative studies [23].
Reagents Required:
- Reusable PTFE (Polytetrafluoroethylene) MTMs [23]
- Standard reagents from Protocol 4.1 (Fixative, PBS, Sucrose, OCT)
Procedure:
- Tissue Preparation: Fix and cryoprotect individual tissues or organoids in 30% sucrose as described in Protocol 4.1, Steps 1-3 [23].
- MTM Loading: Transfer the cryoprotected specimens into the wells of a dry MTM. The anti-adherence properties of PTFE facilitate easy release [23].
- OCT Embedding and Freezing: a. Fill the MTM with OCT compound, ensuring all specimens are surrounded. b. Partially pre-freeze the block, then add more OCT to cover any gaps. c. Place a lid on the MTM and apply slight pressure to create a flat surface for sectioning. d. Fully freeze the block, typically on a pre-cooled surface or in a cryostat chamber [23].
- Sectioning: The entire frozen MTM block is removed from the mold and sectioned on a standard cryostat. All embedded specimens are collected on the same slide, ensuring identical processing and staining conditions [23].
The Scientist's Toolkit
Table 2: Essential Research Reagents and Materials
| Item | Function / Application |
|---|---|
| OCT Compound | Water-soluble embedding matrix that provides structural support for frozen tissue sectioning. [3] [20] |
| Sucrose | Cryoprotective agent that displaces water within tissue to prevent ice crystal formation during freezing. [20] [21] |
| Paraformaldehyde | Cross-linking fixative that preserves tissue morphology and stabilizes protein antigens. [20] [21] |
| Polytetrafluoroethylene (PTFE) Molds | Reusable, anti-adherence molds for high-throughput, multiplexed tissue embedding (MTMs). [23] |
| PEGDA-Gelatine Hydrogel | Alternative embedding matrix offering superior mechanical stability for fragile microtissues like organoids. [22] |
Workflow and Process Visualization
The following diagram summarizes the two primary embedding pathways for immunofluorescence sample preparation.
Advanced Alternative: PEGDA-Gelatine Hydrogel for Fragile Tissues
For exceptionally fragile samples like retinal organoids, where traditional OCT may not provide sufficient support, a PEGDA-gelatine hydrogel has been developed as an advanced alternative [22]. This mixture combines 8% Polyethylene Glycol Diacrylate (PEGDA) with 2.5% gelatine, offering several benefits:
- Enhanced Structural Integrity: The matrix provides superior mechanical stability during cryosectioning, preserving delicate substructures such as photoreceptor outer segments that are prone to damage [22].
- Coherent Interface: The hydrogel adheres well to both the sample and the surrounding gel well plate (in a HistoBrick setup), preventing dissociation during sectioning and minimizing sample loss [22].
- Controlled Alignment: The material's properties facilitate the spatial organization and planar alignment of multiple microtissues within a single block, enabling high-throughput analysis of fragile 3D models [22].
Optimal Cryostat Sectioning Techniques and Slide Storage
Within the context of establishing a robust immunofluorescence protocol for frozen sections, mastering cryostat sectioning and slide storage is a fundamental prerequisite. These initial steps directly determine the morphological preservation and antigen integrity essential for high-quality fluorescence imaging [24] [25]. The frozen section technique, first described by Dr. Louis B. Wilson in 1905, provides a rapid method for tissue analysis by freezing the water within the tissue to use the resulting ice as an embedding medium for sectioning [24] [25]. This technique is particularly vital for immunofluorescence studies because it avoids the use of dehydrating and clearing solutions as well as heat-induced antigen retrieval, which can destroy or mask labile antigens [24] [9]. This application note details optimized protocols for cryostat sectioning and the long-term storage of frozen sections, providing a reliable foundation for reproducible immunofluorescence research.
Critical Principles for Frozen Tissue Preparation
The transition from viable tissue to a high-quality frozen section involves several critical steps. Adherence to the following principles is necessary to preserve tissue architecture and antigenicity:
- Prevention of Artifacts: Tissue should be processed promptly after collection to avoid morphological distortions caused by drying artifacts and autolysis (self-digestion by cellular enzymes) [24].
- Fixation Considerations: While optional, fixation is recommended to preserve tissue in a life-like state and prevent autolysis [25]. For immunofluorescence, a common fixative is paraformaldehyde (PFA), which cross-links proteins. The concentration, duration, and temperature of fixation must be optimized for each antigen, as over-fixation can mask epitopes [9] [20].
- Cryoprotection: Cryoprotection is widely adopted to protect tissues from freezing artifacts. Infiltration with sucrose or glycerol solutions makes tissues less buoyant and reduces the formation of damaging ice crystals. Sucrose (e.g., 30%) is common, but a 15% glycerol solution has been demonstrated to be effective for long-term storage of sections, completely avoiding the tissue shrinkage caused by sucrose dehydration [26] [25].
Optimal Cryostat Sectioning Protocol
Tissue Freezing and Embedding
The rate of freezing is a critical factor for reproducibility. Slow freezing promotes large ice crystal formation, which disrupts cell membranes and compromises morphology [25].
- Grossing: Trim the fixed or unfixed tissue to a suitable size (preferably ~1 cm) to enable rapid and uniform freezing. Avoid crushing the specimen [25].
- Embedding: Place the tissue in a cryomold, fully immersed in an Optimal Cutting Temperature (OCT) compound. Ensure no bubbles form around the tissue [27] [20].
- Snap-Freezing: Freeze the block rapidly by placing it on a pre-cooled freezing shelf or submerging it in a cryogen mixture such as isopentane cooled by dry ice (-70°C) or liquid nitrogen (-190°C) [24] [27] [25]. A 2-propanol/dry ice cooling bath (-78°C) is also effective [20]. Fast freezing is essential to form vitreous (amorphous) ice, which minimizes structural damage [25].
- Storage: Store the frozen tissue blocks at -80°C for long-term preservation [20].
Cryostat Sectioning
A cryostat is a chamber containing a microtome that is maintained at sub-zero temperatures, typically between -20°C and -30°C [24]. The optimal block temperature varies by tissue type.
Table 1: Optimal Cryostat Cutting Temperatures for Unfixed Tissues [24]
| Tissue Type | Recommended Temperature |
|---|---|
| Brain, Lymph Node, Liver, Kidney, Spleen, Testis | -12°C to -16°C |
| Breast, Skin, Thyroid, Adrenal, Muscles, Prostate | -18°C to -30°C |
- Equipment Preparation: Set the cryostat to the appropriate temperature for your tissue type. Ensure the microtome blade, anti-roll plate, and brushes are clean.
- Block Mounting: Secure the frozen tissue block on a specimen holder (chuck) using a thin layer of OCT compound.
- Sectioning: Trim the block face until the full tissue surface is exposed. Cut sections at a thickness of 1-10 micrometers, with 5-10 µm being common for immunofluorescence [27]. Soft tissues often section better at a slow rate, while harder tissues may require a slightly faster rate [24].
- Section Collection: For free-floating sections, gently transfer the section into a cryoprotectant solution like 15% glycerol in buffer [26]. For mounted sections, "thaw-mount" the section by touching a room-temperature glass slide to the section. The ~40°C temperature difference causes the section to adhere to the slide [24]. To prevent detachment during staining, especially for fixed tissues, use slides coated with gelatine-formaldehyde or poly-L-lysine [24].
The following workflow diagram summarizes the complete process from tissue preparation to storage.
Protocols for Long-Term Cryostorage of Sections
Long-term storage of cut sections allows for the batch processing of samples collected over months or years, which is critical for quantitative histochemical studies where all samples must be processed in identical reagents to minimize variability [26].
Free-Floating Section Storage
This protocol is adapted from a study that demonstrated the stability of various antigens in brain tissue sections stored for up to 10 years [26].
- Cryoprotectant Solution: Prepare a solution of 15% glycerol in 0.1 M phosphate buffer (PB). Alternative solutions include 30% sucrose in PBS with 30% ethylene glycol and 1% polyvinylpyrrolidone-40 (PVP-40) [26].
- Section Transfer: After sectioning, collect the free-floating sections directly into the cryoprotectant solution. Store the sections at 4°C overnight [26].
- Freezing and Long-Term Storage: Transfer the container with the sections in cryoprotectant to a -80°C freezer. Sections can be stored under these conditions for several years [26].
- Thawing and Processing: When ready to use, remove the sections from -80°C and thaw rapidly. Rinse the sections thoroughly with buffer to remove the cryoprotectant before proceeding with immunofluorescence staining [26].
Table 2: Efficacy of Long-Term Cryostorage in 15% Glycerol at -80°C [26]
| Quantified Histochemical Measure | Maximum Storage Time Tested | Reported Stability |
|---|---|---|
| Neuronal Nuclear Antigen (NeuN) Cell Count | 8.25 years | Stable |
| Parvalbumin (PV) Cell Count | 10.03 years | Stable |
| Orexin-A Cell Count | 6.81 years | Stable |
| Bromodeoxyuridine (BrdU) Cell Count | 3.79 years | Stable |
| pro-Brain-Derived Neurotrophic Factor (proBDNF) Optical Density | 7.65 years | Stable |
| Damaged Myelin Basic Protein (dMBP) Fluorescence Intensity | 10.89 years | Stable |
| Hyaluronic Acid Percent Area | 10.89 years | Stable |
The Scientist's Toolkit: Essential Research Reagents
Table 3: Key Reagent Solutions for Frozen Section Immunofluorescence
| Reagent | Function | Application Notes |
|---|---|---|
| Optimal Cutting Temperature (OCT) Compound | Water-soluble embedding medium that supports tissue during sectioning. | Has similar freezing properties to water, minimizing tissue distortion [27]. |
| Paraformaldehyde (PFA) | Cross-linking fixative that preserves cellular architecture. | Concentration and fixation time must be optimized to balance morphology and antigenicity [9] [20]. |
| Sucrose Solution (e.g., 30%) | Cryoprotectant that displaces water and reduces ice crystal formation. | Tissue is incubated until it sinks, indicating equilibration [20]. Can cause tissue shrinkage [26]. |
| Glycerol-based Cryoprotectant (e.g., 15%) | Cryoprotectant for long-term storage of free-floating sections. | Shown to preserve antigenicity for over a decade at -80°C without shrinkage [26]. |
| Periodate-Lysine-Paraformaldehyde (PLP) Fixative | Specialized fixative for better carbohydrate antigen preservation. | The periodate oxidizes carbohydrates, and lysine creates cross-links [20]. |
| Poly-L-Lysine | A charged polymer used to coat glass slides. | Enhances section adhesion, preventing detachment during rigorous staining steps [24]. |
| Bovine Serum Albumin (BSA) or Normal Serum | Blocking agent used before antibody incubation. | Reduces non-specific antibody binding to the tissue section [9]. |
Troubleshooting Common Sectioning and Storage Issues
Even with optimized protocols, challenges can arise. The table below outlines common problems and their solutions.
Table 4: Troubleshooting Guide for Cryosectioning and Storage
| Problem | Potential Cause | Solution |
|---|---|---|
| Shattering or Cracking of Tissue | Block is too cold. | Allow the block to warm up to the optimal cutting temperature for that tissue type [24]. |
| Tissue Splits or Sections are Compressed | Block is too warm. | Cool the block further. The blade may be dull; replace it [25]. |
| Sections Curl or Roll | Dull blade, incorrect blade angle, or static electricity. | Replace the blade, adjust the cutting angle or speed, or use an anti-static device [25]. |
| Poor Morphology (Holes/Spongy Appearance) | Slow freezing rate, leading to large ice crystals. | Ensure rapid "snap-freezing" in a cold cryogen for future samples [25]. |
| Sections Detaching from Slides | Inadequate slide coating or insufficient thaw-mounting. | Use pre-coated slides (e.g., poly-L-lysine) and ensure a sufficient temperature difference for adhesion [24]. |
| Loss of Antigenicity After Storage | Inadequate cryoprotection or temperature fluctuations. | Ensure sections are fully equilibrated in cryoprotectant and stored consistently at -80°C [26]. |
The journey to a publication-quality immunofluorescence image begins long before the microscope is engaged. It is founded upon the meticulous application of optimal cryostat sectioning and storage protocols. By prioritizing rapid freezing, maintaining precise sectioning temperatures, and employing validated cryostorage methods, researchers can ensure the preservation of tissue morphology and antigen integrity. The protocols and data outlined here provide a framework for achieving highly reproducible and reliable frozen sections, forming the bedrock of successful immunofluorescence research within drug development and biomedical science.
Step-by-Step Immunofluorescence Staining Protocol for Frozen Sections
Slide Acclimation and Fixation with Cold Acetone or Methanol
In immunofluorescence (IF) studies of frozen tissue sections, the dual processes of slide acclimation and chemical fixation are foundational to experimental success. Proper acclimation prevents tissue damage that can occur from condensation and ice crystal formation, while fixation preserves cellular architecture and antigen integrity. Among fixation methods, cold acetone and cold methanol are widely used precipitating fixatives that denature proteins and lock cellular components in place. This application note details standardized protocols for these critical steps, framed within a broader methodology for robust and reproducible immunofluorescence staining of frozen sections, providing researchers with clear guidelines to optimize their experimental outcomes.
Key Concepts and Definitions
Slide Acclimation: The process of allowing frozen slides to gradually reach room temperature in a controlled manner before fixation. This step is critical to prevent the formation of condensation on the tissue section, which can cause morphological damage and lead to non-specific antibody binding [3] [28].
Chemical Fixation: The use of organic solvents like acetone or methanol to preserve tissue morphology and immobilize antigens. These solvents function by precipitating proteins, thereby stabilizing the cellular structure for subsequent staining procedures [29] [30].
Cryoprotection: A pretreatment step involving infusion of tissue with sucrose before freezing. This reduces ice crystal formation during the freezing process, better preserving cellular ultrastructure [4] [3].
Quantitative Data Comparison
The table below summarizes the standard protocols for acclimation and fixation identified from the technical literature.
Table 1: Standardized Protocols for Acclimation and Fixation
| Parameter | Cold Acetone Method | Cold Methanol Method |
|---|---|---|
| Acclimation Temperature | Room Temperature [29] [4] [28] | Room Temperature [30] |
| Acclimation Time | 30 minutes [29] [4] | Not explicitly stated (implied room temperature incubation) |
| Fixation Temperature | -20°C to 4°C (ice-cold) [29] [28] [31] | -10°C to -20°C (ice-cold) [30] [31] |
| Fixation Duration | 5–10 minutes [29] [30] [28] | 5–15 minutes [30] [31] |
| Post-Fixation Processing | Air dry for 30 minutes [29] | Air dry [30] |
| Key Advantages | Excellent for many surface antigens and membrane proteins [30] | Strong precipitation of proteins; can be effective for nuclear antigens [30] |
Detailed Experimental Protocols
Protocol 1: Slide Acclimation and Fixation with Cold Acetone for Frozen Sections
This protocol is optimized for preserving a wide range of antigens, particularly cell surface markers, in frozen tissue sections [29] [28] [31].
Materials:
- Frozen tissue sections mounted on positively charged or gelatin-coated slides [3] [28]
- Acetone (reagent grade), pre-cooled to -20°C
- Phosphate-Buffered Saline (PBS)
- Coplin jars or slide-staining trays
Procedure:
- Acclimation: Remove slides from frozen storage (-20°C to -80°C) and place them at room temperature for 30 minutes. Do not remove the slides from their storage container immediately to minimize condensation [29] [4] [3].
- Fixation: Immediately after acclimation, immerse the slides in pre-cooled acetone (-20°C) for 5–10 minutes [29] [28] [31].
- Drying: After fixation, air-dry the slides for approximately 30 minutes at room temperature [29].
- Rehydration: Wash the slides briefly in PBS to rehydrate the tissue and remove residual acetone [29] [31].
- Proceed to Staining: The slides are now ready for blocking and immunostaining. It is critical not to let the tissue dry out after this point [5].
Protocol 2: Slide Acclimation and Fixation with Cold Methanol for Frozen Sections
Methanol fixation is a strong protein precipitant and can be ideal for certain intracellular and nuclear targets [30].
Materials:
- Frozen tissue sections on slides
- Methanol, pre-cooled to -10°C to -20°C
- PBS
Procedure:
- Acclimation: As with the acetone protocol, thaw frozen slides at room temperature for 30 minutes while protected from condensation [29] [3].
- Fixation: Immerse the slides in pre-cooled methanol (-10°C to -20°C) for 5 minutes [30]. Some protocols extend this to 15 minutes for cell lines [31].
- Drying: Allow the slides to air dry completely [30].
- Rehydration: Wash slides in three changes of PBS to rehydrate and prepare for staining [30].
- Proceed to Staining: Continue with standard immunofluorescence blocking and staining procedures.
The Scientist's Toolkit: Research Reagent Solutions
The following table lists essential materials and their functions for successful slide acclimation and fixation.
Table 2: Essential Reagents and Materials for Frozen Section IF
| Item | Function/Application | Technical Notes |
|---|---|---|
| O.C.T. Compound | A water-soluble embedding medium used to support tissue during cryostat sectioning. | Provides structural integrity for fragile frozen tissues [4] [3] [28]. |
| Positively Charged or Gelatin-Coated Slides | Microscope slides with a treated surface to enhance adhesion of tissue sections. | Prevents tissue detachment during rigorous washing steps [30] [3] [28]. |
| Cold Acetone | Organic solvent fixative that precipitates proteins, preserving cellular structure. | Use reagent grade; pre-cool to -20°C for optimal results [29] [28] [31]. |
| Cold Methanol | Organic solvent fixative that denatures and precipitates proteins. | Effective for certain nuclear and intracellular antigens; pre-cool to -10°C to -20°C [30] [31]. |
| Phosphate-Buffered Saline (PBS) | An isotonic buffer used for washing and rehydrating tissues. | Maintains a stable pH and osmotic balance, preventing tissue damage [29] [30] [5]. |
| Tris-Buffered Saline (TBS) | An alternative buffer for washing steps, sometimes preferred for its buffering capacity. | Can be used interchangeably with PBS in many protocols [5] [31]. |
| Humidified Chamber | A sealed container with a moist atmosphere used for antibody incubations. | Prevents evaporation of small-volume reagents applied to the tissue section [4] [5]. |
Workflow and Decision Pathway
The following diagram illustrates the critical decision points and procedural workflow for preparing and fixing frozen sections for immunofluorescence, from tissue acquisition to the completion of fixation.
Diagram 1: Frozen section preparation and fixation workflow.
Concluding Remarks
The integrity of any immunofluorescence experiment on frozen tissues is fundamentally dependent on the initial steps of slide acclimation and fixation. Adherence to the specified parameters for temperature and duration during acclimation to room temperature and subsequent fixation with either cold acetone or methanol is not merely procedural but critical for preserving antigenicity and cellular morphology. The protocols detailed herein, supported by standardized data and clear workflows, provide a reliable foundation for researchers to generate high-quality, reproducible, and interpretable data in their immunofluorescence studies.
Permeabilization and Blocking to Minimize Non-Specific Background
In immunofluorescence (IF) studies on frozen tissue sections, achieving high signal-to-noise ratio is paramount for accurate data interpretation. Permeabilization and blocking are critical preparatory steps that directly influence antibody specificity and overall image quality. For researchers and drug development professionals, standardizing these steps is essential for generating reproducible and reliable data, particularly when validating new therapeutic targets or biomarkers. This application note details evidence-based protocols designed to minimize non-specific background, a common challenge that can compromise experimental outcomes in frozen section research.
Scientific Rationale and Key Principles
Non-specific background in immunofluorescence staining primarily arises from two sources: 1) non-specific binding of antibodies to cellular components through hydrophobic or ionic interactions, and 2) endogenous fluorescence or endogenous enzymes that interact with detection systems. The strategic combination of permeabilization and blocking addresses these issues directly.
Permeabilization enables antibody access to intracellular targets by dissolving cellular membranes. However, this process can expose hydrophobic regions and charged molecules that readily bind antibodies non-specifically. Consequently, a subsequent blocking step is indispensable. Blocking solutions work by occupying these non-specific binding sites before antibody incubation. The choice of blocking agent—whether normal serum or bovine serum albumin (BSA)—depends on the secondary antibody host species to prevent cross-reactivity [32] [33]. For instance, using normal goat serum is recommended when using a goat-derived secondary antibody [33].
A critical principle often overlooked is that cells fixed with acetone do not require an additional permeabilization step, as the fixative itself adequately permeabilizes the membranes [34]. Furthermore, for experiments investigating phosphorylated proteins, all buffers should be supplemented with protein phosphatase inhibitors to preserve the antigenic epitope [32].
Detailed Protocols for Frozen Tissue Sections
Materials and Reagents
- Tissue Sections: Frozen tissue sections (4-8 μm thick) mounted on positively charged microscope slides [34].
- Fixative: Pre-cooled acetone [34] [33].
- Wash Buffer: Tris-Buffered Saline (TBS) or Phosphate-Buffered Saline (PBS). TBS with Tween (TBST) or PBS with Triton X-100 (PBS-T) can be used for subsequent washes [34] [33].
- Permeabilization Buffer: PBS or TBS containing 0.4% Triton X-100 [33]. Alternative detergents include 0.5% saponin or 100 μM digitonin [34].
- Blocking Buffer: 5% normal serum or 1-5% BSA in the chosen wash buffer [34] [32] [35]. The serum should be from the same species as the secondary antibody host [32] [33].
- Hydrophobic Barrier Pen: To draw a barrier around the tissue, minimizing reagent volume and preventing drying [33].
Step-by-Step Workflow
Protocol Specifications
Fixation: Following fixation in pre-cooled acetone for 10 minutes at 4°C, wash the slides thoroughly with TBS or PBS to remove all traces of fixative [34]. A critical recommendation is to never allow the tissue sections to dry out at any point during the staining procedure, as this dramatically increases non-specific background [34].
Permeabilization: Incubate the sections with permeabilization buffer (e.g., 0.4% Triton X-100 in PBS) for two washes of 10 minutes each at room temperature [33]. The concentration of Triton X-100 can be adjusted within a range of 0.05% to 0.5% based on the target antigen and tissue type [32] [35]. Note that Triton X-100 is a strong detergent that destroys membranes and may not be ideal for preserving membrane-associated proteins; in such cases, milder alternatives like Tween-20 or saponin are recommended [32].
Blocking: Drain the permeabilization buffer and apply the chosen blocking buffer to the tissue sections. Incubate for a period ranging from 30 minutes to 2 hours at room temperature [34] [33]. The blocking solution should also contain a low concentration of detergent (e.g., 0.3% Triton X-100) to further reduce non-specific hydrophobic interactions [35].
Optimization and Troubleshooting
Quantitative Comparison of Blocking Agents
The choice of blocking agent can significantly impact the background and specific signal. The following table summarizes common options and their applications.
Table 1: Comparison of Common Blocking Agents for Immunofluorescence
| Blocking Agent | Recommended Concentration | Mechanism of Action | Best For | Considerations |
|---|---|---|---|---|
| Normal Serum [32] [33] | 1-5% in PBS/TBS with detergent | Occupies non-specific sites via proteins; antibodies in serum bind to reactive sites in tissue. | Standard indirect IF; minimizes cross-reactivity when matched to secondary host. | Must be from a different species than the primary antibody host. |
| Bovine Serum Albumin (BSA) [32] [35] | 1-5% in PBS/TBS with detergent | Non-specific blocking through hydrophobic and ionic interactions. | General purpose; direct IF; when serum components interfere. | Inexpensive and stable; does not contain antibodies. |
| Combination Blocks (PBT-G) [32] | 1% BSA, 0.05% Tween-20, 300 mM Glycine in PBS | BSA and Tween block non-specific binding; glycine quenches free aldehyde groups from fixation. | Tissues with high autofluorescence or after aldehyde-based fixation. | More complex to prepare but can address multiple background sources. |
Troubleshooting Common Issues
- High Background Staining: Increase the concentration of detergent (Triton X-100/Tween-20) in the wash and blocking buffers from 0.1% to 0.3-0.5% [32] [35]. Ensure that the normal serum used for blocking is not cross-reacting with the primary antibody (e.g., do not use normal goat serum with a goat primary antibody) [32].
- Weak or No Specific Signal: Reduce the concentration of detergent in the permeabilization step, as over-permeabilization can damage epitopes. If using methanol fixation, note that a separate permeabilization step is not required [34] [32].
- High Background with Phospho-Specific Antibodies: Add protein phosphatase inhibitors to all buffers, including fixatives, wash buffers, and blocking buffers, according to the manufacturer's instructions [32].
The Scientist's Toolkit: Essential Research Reagents
A successful immunofluorescence experiment relies on a suite of carefully selected reagents. The following table outlines key solutions and their specific functions in the permeabilization and blocking workflow.
Table 2: Key Research Reagent Solutions for Permeabilization and Blocking
| Reagent Solution | Composition | Primary Function | Protocol Notes |
|---|---|---|---|
| Permeabilization Buffer [33] | 0.4% Triton X-100, 1% serum in PBS | Dissolves cellular membranes to allow antibody entry. | Concentration can be tuned from 0.05% to 0.5%. 1% serum helps stabilize cells. |
| Serum-Based Blocking Buffer [32] [35] | 5% normal serum, 0.3% Triton X-100, 1X PBS | Blocks non-specific binding using serum proteins and antibodies. | Serum species must match the host of the secondary antibody. |
| BSA-Based Blocking Buffer [32] [35] | 1% BSA, 0.3% Triton X-100, 1X PBS | Blocks non-specific binding via BSA; reduces cost and variability. | A good alternative to serum. Can be used with antibody diluent of the same composition. |
| Wash Buffer [34] [32] | 1X TBS/PBS with 0.05%-0.1% Tween-20 or Triton X-100 | Removes unbound reagents and minimizes background during washes. | Low concentration of detergent is maintained to prevent reattachment of non-specifically bound antibodies. |
Robust and reproducible permeabilization and blocking protocols are the foundation of high-quality immunofluorescence imaging. By understanding the principles behind these steps and systematically optimizing them for specific tissue-antigen combinations, researchers can effectively minimize non-specific background. The protocols and guidelines provided here offer a structured pathway for scientists in drug development and basic research to enhance the reliability of their data generated from frozen tissue sections, thereby strengthening the conclusions drawn from their immunofluorescence studies.
Within the broader methodological framework of immunofluorescence (IF) research for frozen tissue sections, the optimization of primary antibody incubation stands as a critical determinant of experimental success. This specific procedural step directly governs the specificity, intensity, and signal-to-noise ratio of the final fluorescent image [12]. For researchers and drug development professionals, a systematic approach to optimizing dilution and incubation time is not merely a recommendation but a necessity for generating reproducible, reliable, and quantitatively accurate data. This protocol details a standardized yet adaptable methodology for this essential optimization process, ensuring robust staining outcomes for frozen section immunofluorescence.
Quantitative Optimization Parameters
The table below summarizes the key variable parameters for primary antibody incubation as established in current immunofluorescence protocols. These ranges provide a starting point for the initial optimization experiments.
Table 1: Key Variable Parameters for Primary Antibody Incubation Optimization
| Parameter | Typical Range | Commonly Recommended Starting Point | Notes and Considerations |
|---|---|---|---|
| Incubation Time | 1–2 hours at room temperature (RT) to overnight at 4°C [36] [19] [37] | Overnight at 4°C [38] [16] [39] | Longer incubation at lower temperatures often enhances specificity and signal [19]. |
| Antibody Concentration | 0.5–10 µg/mL [36] [39] | 2–5 µg/mL [39] | Optimal concentration is highly antibody- and target-specific. |
| Dilution Buffer | PBS or TBS with 1% BSA or 1.5% normal blocking serum [36] [40] | 1% BSA in PBS [40] [39] | Using a protein-based buffer reduces non-specific binding. |
Detailed Optimization Protocol
Materials and Reagents
Table 2: The Scientist's Toolkit: Essential Research Reagent Solutions
| Item | Function/Description | Example Formulations |
|---|---|---|
| Frozen Tissue Sections | The sample for analysis, typically 4-10 µm thick on charged slides [36] [38]. | Cut from OCT-embedded, snap-frozen tissue blocks [12]. |
| Blocking Buffer | Reduces non-specific binding of antibodies to the tissue [12]. | 5% normal serum from the secondary antibody host species in PBS [38] [16] [39]. |
| Antibody Diluent | A protein-rich buffer to dilute antibodies, minimizing non-specific binding. | PBS or TBS with 1% BSA [40] [39]. |
| Primary Antibody | The key reagent that specifically binds the target antigen. | Host species, clonality, and conjugation depend on the target and experimental design. |
| Wash Buffer | Removes unbound antibodies and reagents between steps. | PBS or TBS, often with a mild detergent like 0.05% Tween 20 (PBST/TBST) [38] [19]. |
| Mounting Medium | Preserves fluorescence and allows for high-resolution microscopy. | Anti-fade mounting medium, often including DAPI for nuclear counterstaining [41] [39]. |
Workflow for Systematic Optimization
The following diagram outlines the logical workflow for optimizing primary antibody incubation conditions, from initial setup to final imaging and analysis.
Step-by-Step Experimental Procedure
This protocol assumes frozen tissue sections have already been prepared, fixed, and blocked according to standard methods [38] [12] [16].
Preparation of Antibody Dilutions:
- Centrifuge the vial of primary antibody briefly before opening to ensure the solution is collected at the bottom.
- Prepare a serial dilution of the primary antibody in an appropriate diluent (e.g., PBS with 1% BSA). A typical starting series might include dilutions corresponding to 0.5, 1, 2, 5, and 10 µg/mL [36] [39]. Always refer to the antibody datasheet for a recommended starting dilution.
Application and Incubation:
- Aspirate the blocking buffer from the slides.
- Apply the different dilutions of the primary antibody to separate but comparable tissue sections, ensuring the tissue is completely covered. Using a hydrophobic barrier pen can help contain small volumes [19] [40].
- For the time-course optimization, incubate slides at the chosen temperature (e.g., 4°C) and remove replicates from the incubation at different time points (e.g., 1 hour, 2 hours, overnight). Alternatively, test room temperature incubation (1-2 hours) against overnight incubation at 4°C [36] [37] [39].
- Place the slides in a humidified chamber to prevent evaporation during incubation.
Washing:
Secondary Antibody Incubation and Completion:
- Incubate with an optimized, fluorophore-conjugated secondary antibody, diluted in blocking buffer or antibody diluent, for 1 hour at room temperature in the dark [36] [41].
- Wash the slides three times with wash buffer for 5 minutes each in the dark.
- Perform nuclear counterstaining (e.g., with DAPI) if desired [41] [39].
- Apply an appropriate anti-fade mounting medium and coverslip [19] [39].
Imaging and Analysis:
- Image all slides using a fluorescence microscope with identical exposure times, gain, and other settings for each channel.
- Analyze the images to identify the condition that provides the strongest specific signal with the lowest non-specific background. The optimal condition is the one with the highest signal-to-noise ratio.
Troubleshooting and Technical Notes
- High Background Signal: This can result from an overly concentrated primary antibody, insufficient blocking, or inadequate washing [41] [12]. Re-optimize the dilution series, ensure the blocking serum matches the host species of the secondary antibody, and increase the number or duration of washes.
- Weak or No Signal: This often indicates overly dilute antibody, insufficient incubation time, or loss of antigenicity [41]. Increase the antibody concentration, extend the incubation time (e.g., to overnight at 4°C), or verify that the fixation method (e.g., acetone, methanol, PFA) is appropriate for the target antigen [12].
- Inconsistent Staining: Ensure consistent section thickness, fixation time, and temperature across all samples. Always include a positive control (a tissue known to express the target) and a negative control (omission of the primary antibody or use of an isotype control) in every experiment to validate the staining run [41].
The meticulous optimization of primary antibody dilution and incubation time is a foundational element in the immunofluorescence workflow for frozen sections. By systematically testing these parameters as detailed in this protocol, researchers can achieve highly specific and reproducible staining, thereby ensuring the integrity and reliability of their scientific data in both basic research and drug development contexts.
Fluorophore-Conjugated Secondary Antibody Selection and Application
A secondary antibody is an antibody designed to target a primary antibody. In immunoassays, they are used in combination with primary antibodies to detect target proteins in techniques such as western blots, ELISA, and immunofluorescence [42]. Most secondary antibodies are conjugated to molecules like enzymes or fluorophores, which enable detection [42]. The use of secondary antibodies, rather than directly conjugated primary antibodies, offers several key advantages: signal amplification, as multiple secondary antibodies can bind to a single primary antibody; enhanced flexibility, as the same primary antibody can be used with different conjugates for different applications; and cost-effectiveness, avoiding the need to conjugate often costly and specialized primary antibodies [42] [43].
This application note provides a detailed guide for selecting and applying fluorophore-conjugated secondary antibodies, with a specific focus on optimizing immunofluorescence protocols for frozen tissue sections, a critical methodology in biomedical research and drug development.
Selecting the Right Secondary Antibody
The experimental application, primary antibody characteristics, and overall experimental design dictate the type of secondary antibody required. The following factors must be considered to ensure optimal results [42].
Host and Target Species
The host species is the animal in which the secondary antibody was generated (e.g., goat, donkey) [42]. The target species is the species in which the primary antibody was raised (e.g., rabbit, mouse) [42]. The secondary antibody must be raised against the host species of the primary antibody. For example, a rabbit primary antibody requires an anti-rabbit secondary antibody [43]. Crucially, the species used to generate the secondary antibody should always be different from the primary antibody's host and target species to avoid nonspecific binding [42]. Most secondary antibodies are produced in goats or donkeys, with anti-mouse IgG and anti-rabbit IgG being the most common types due to the widespread use of mouse and rabbit primary antibodies [42] [43].
Cross-Adsorption and Specificity
Cross-adsorption is an additional purification process that eliminates cross-reactivity with immunoglobulins or serum proteins from other species, thereby significantly increasing antibody specificity and reducing background signal [42]. This is achieved by passing the affinity-purified secondary antibody over a column containing immobilized serum proteins from non-target species, which removes cross-reactive antibodies [42]. Cross-adsorbed secondary antibodies are especially critical for multiplexing experiments, where detecting multiple targets simultaneously requires exceptionally high specificity to prevent off-target binding [42] [43]. For the highest level of specificity, recombinant secondary antibodies, such as the Invitrogen Superclonal series, offer epitope-specific precision akin to monoclonal antibodies while maintaining the multi-epitope coverage and sensitivity of polyclonal antibodies [42].
Antibody Class, Subclass, and Format
- Class and Subclass: Antibodies have different classes (e.g., IgG, IgM, IgA) and subclasses (e.g., IgG1, IgG2). It is important to select a secondary antibody that targets the specific class or subclass of the primary antibody, particularly when using monoclonal antibodies, which belong to a single subclass [42].
- Whole Antibodies vs. Fragments: Secondary antibodies are available as whole antibodies or antibody fragments.
- Whole antibodies are the most common format and provide strong divalent binding. However, the Fc region can bind to Fc receptors on cells like macrophages, potentially increasing background signal in certain applications [42] [43].
- F(ab')2 fragments, generated by pepsin digestion, lack the Fc region. This eliminates Fc receptor binding, reducing background, and their smaller size can improve tissue penetration for applications like IHC [42] [43].
- Fab' fragments, generated by papain digestion, are smaller, monovalent binding fragments, useful in specific applications where bivalent binding is less advantageous [42].
Fluorophore Conjugate Selection
The choice of fluorophore is paramount for the success of fluorescence-based experiments. Key considerations include:
- Brightness: Bright fluorophores (e.g., Alexa Fluor 488, R-PE) should be paired with weakly expressed targets, while less bright fluorophores (e.g., FITC) can be used for abundant targets [44].
- Spectral Properties: For multiplexing, select fluorophores with minimal spectral overlap to avoid bleed-through between channels. The excitation and emission maxima must be compatible with the microscope's available lasers and filter sets [42] [44].
- Photostability: Fluorophores like the Alexa Fluor series offer superior brightness and photostability, outperforming conventional dyes and reducing photobleaching during imaging [42].
- Experimental Conditions: Some fluorophores may be sensitive to specific fixation and permeabilization buffers, and some may exhibit non-specific binding to certain cell types, requiring careful experimental optimization and the use of appropriate blocking buffers [44].
Table 1: Characteristics of Common Fluorophore Conjugates
| Fluorophore | Excitation Max (nm) | Emission Max (nm) | Relative Brightness | Key Applications |
|---|---|---|---|---|
| Alexa Fluor 488 | 490 | 525 | Very High | ICC/IF, IHC, Flow Cytometry |
| FITC | 490 | 525 | High | ICC/IF, IHC, Flow Cytometry |
| Cyanine 3 (Cy3) | 554 | 566 | High | ICC/IF, IHC |
| R-PE | 490; 565 | 578 | Extremely High | Flow Cytometry |
| Alexa Fluor 594 | 590 | 617 | Very High | ICC/IF, IHC |
| Cyanine 5 (Cy5) | 647 | 665 | High | ICC/IF, IHC, Flow Cytometry |
| APC | 650 | 661 | Extremely High | Flow Cytometry |
Note: Data compiled from [42] [44] [43].
Immunofluorescence Protocol for Frozen Sections
The following protocol is optimized for the fluorescent visualization of protein expression in frozen tissue sections, integrating best practices from established methodologies [45] [4].
Tissue Preparation, Fixation, and Sectioning
- Fixation: For tissue preservation, perfuse or immerse the tissue in freshly prepared 4% Paraformaldehyde (PFA) for 4-24 hours at room temperature. Fixation time and temperature may require optimization based on tissue type and size [45] [4].
- Cryoprotection: Cryoprotect the fixed tissue by immersing it in a 30% sucrose solution in fixative or PBS until the tissue sinks (typically overnight at 4°C). Sucose infusion prevents ice crystal formation during freezing, which can damage tissue morphology [45] [4].
- Embedding and Sectioning: Embed the tissue in Optimal Cutting Temperature (OCT) compound and snap-freeze it. Sections of 5-20 µm thickness should be cut using a cryostat set to approximately -20°C to -22°C [45] [4]. Sections are mounted onto gelatin- or poly-L-lysine-coated slides to ensure adhesion. Frozen blocks and sections can be stored at -80°C for several months [45].
Staining Procedure
- Permeabilization and Blocking: Warm stored slides to room temperature. To permeabilize the tissue and block non-specific binding, wash sections twice with permeabilization buffer (e.g., PBS containing 0.4% Triton X-100 and 1% serum) for 10 minutes each. Subsequently, incubate sections with a blocking solution (e.g., 5% serum in PBS-T) for 30 minutes at room temperature. The species of the serum used should match the host species of the secondary antibody (e.g., use goat serum when using a goat anti-mouse secondary) [45].
- Primary Antibody Incubation: Apply the primary antibody, diluted in 1% animal serum in PBS (with or without 0.05-0.1% Triton X-100), to the sections. Incubate at room temperature for 1-2 hours, followed by an overnight incubation at 4°C in a humidified chamber to prevent evaporation [45] [4].
- Secondary Antibody Incubation: Wash the sections twice with 1% serum in PBS-T for 10 minutes each to remove unbound primary antibody. Apply the fluorophore-conjugated secondary antibody, diluted in 1% serum in PBS, and incubate at room temperature for 1-2 hours in the dark to prevent fluorophore photobleaching [45].
- Nuclear Counterstaining and Mounting: After secondary antibody incubation and subsequent washes, a nuclear counterstain such as DAPI can be applied. After a final wash, tap off excess buffer and apply an anti-fade mounting medium. Place a coverslip and seal the edges with clear nail polish to prevent drying [45] [4]. Store slides at 4°C or -20°C in the dark until imaging.
Advanced Applications and Considerations
Multiplex Immunofluorescence
Multiplexing allows for the simultaneous detection of multiple targets on a single tissue section, which is invaluable for analyzing cell populations, cellular interactions, and co-expression patterns [42] [43]. Successful multiplexing requires careful experimental design:
- Primary Antibody Hosts: Use primary antibodies raised in different host species (e.g., mouse, rabbit, rat) for each target [43].
- Secondary Antibody Specificity: Employ highly cross-adsorbed secondary antibodies, all raised in the same host species (e.g., all donkey anti-...), to prevent cross-reactivity between different secondary antibodies [42] [43].
- Fluorophore Selection: Choose fluorophores with well-separated emission spectra to minimize spectral bleed-through. The conjugates should be compatible with the microscope's filter sets [42] [44].
Table 2: Benchmarking of Nuclear Segmentation Tools for mIF Analysis
| Segmentation Platform | Segmentation Method | User Interface | Cost | Recommended Use Case |
|---|---|---|---|---|
| Mesmer | Deep Learning (Pre-trained) | Python, ImageJ plugin, web portal | Open Source | Highest overall accuracy; generalizable across tissue types [46] |
| Cellpose | Deep Learning (Pre-trained) | Python, GUI available | Open Source | Excellent performance on tonsil tissue and datasets with intensity variance [46] |
| StarDist | Deep Learning (Pre-trained) | Python, plugins for QuPath & ImageJ | Open Source | Fastest computation; suitable when computational resources are limited [46] |
| QuPath | Classical Image Processing | GUI with scripting | Open Source | Best-performing classical/morphological algorithm; no coding required [46] |
| inForm (Akoya) | Classical Techniques (Proprietary) | GUI | Paid License | Integrated commercial solution for segmentation and phenotyping [46] |
Note: Based on quantitative benchmarking across 7 human tissue types; pre-trained deep learning models generally outperform classical algorithms [46].
Imaging and Hardware Considerations
The choice of microscopy hardware profoundly impacts image quality and resolution.
- Widefield Epifluorescence Microscopy: A fundamental and widely available technology suitable for many applications, including evaluating expression levels and visualizing whole tissue mounts. However, it is prone to out-of-focus light, which can reduce contrast [47].
- Confocal Microscopy: Uses a pinhole to block out-of-focus light, enabling optical sectioning and providing higher spatial resolution than widefield systems. It is the workhorse for high-quality immunofluorescence imaging of cells and tissues [47].
- Super-Resolution Microscopy (SRM): Techniques such as Stimulated Emission Depletion (STED) microscopy circumvent the diffraction limit of light, achieving resolutions down to 50 nm [47] [48]. STED uses a depletion laser shaped like a doughnut to deactivate fluorophores at the periphery of the excitation spot, effectively reducing the size of the fluorescent spot [48]. These methods are essential for resolving fine subcellular structures beyond the capabilities of conventional microscopes.
The Scientist's Toolkit: Research Reagent Solutions
Table 3: Essential Materials for Frozen Section Immunofluorescence
| Reagent/Material | Function | Example/Note |
|---|---|---|
| Paraformaldehyde (PFA) | Crosslinking fixative that preserves tissue architecture. | Typically used at 4% concentration. Preparation time and temperature require optimization [45] [4]. |
| Sucrose Solution | Cryoprotectant that prevents ice crystal formation during freezing. | Used at 30% concentration; tissue is immersed until it sinks [45] [4]. |
| OCT Compound | Water-soluble embedding medium for freezing and supporting tissue during cryostat sectioning. | N/A |
| Triton X-100 | Detergent that permeabilizes cell membranes, allowing antibodies to access intracellular targets. | Commonly used at 0.1-0.4% in PBS [45]. |
| Normal Serum | Used as a blocking agent to reduce non-specific binding of antibodies to the tissue. | Should be from the same species as the secondary antibody host (e.g., goat serum for goat secondary) [45]. |
| Primary Antibody | Binds specifically to the target antigen of interest. | Host species and clonality (monoclonal/polyclonal) must be known for secondary antibody selection [42] [43]. |
| Fluorophore-conjugated Secondary Antibody | Binds to the primary antibody and provides a detectable signal. | Must be specific to the host species of the primary antibody. Cross-adsorbed versions are recommended for multiplexing [42] [44]. |
| DAPI | Fluorescent DNA stain used as a nuclear counterstain. | Allows visualization of all nuclei in the sample [45]. |
| Anti-fade Mounting Medium | Preserves fluorescence and reduces photobleaching during storage and imaging. | N/A |
Nuclear Counterstaining with DAPI and Mounting for Preservation
Within the framework of immunofluorescence (IF) protocol research for frozen sections, the selection of an appropriate nuclear counterstain is paramount for providing critical cellular context. The blue-fluorescent 4′,6-diamidino-2-phenylindole (DAPI) nucleic acid stain serves as an essential tool for identifying and delineating nuclear boundaries within the complex architecture of tissue samples [49]. DAPI exhibits high specificity for double-stranded DNA, preferentially binding to AT-rich clusters within the minor groove [49]. This binding event produces a significant ~20-fold fluorescence enhancement, primarily due to the displacement of water molecules from both DAPI and the minor groove of DNA [49]. When utilized in multicolor fluorescent techniques, DAPI's vivid blue fluorescence contrasts sharply with green, yellow, or red fluorescent probes labeling other cellular structures or specific antigens, enabling clear differentiation of nuclear morphology amidst specific antibody-derived signals [49] [50].
The spectral characteristics of DAPI make it particularly suitable for fluorescence microscopy. DAPI bound to dsDNA has an excitation maximum at 358 nm and an emission maximum at 461 nm [49] [3]. It can be effectively excited with standard UV light sources such as xenon or mercury-arc lamps or UV lasers, and is compatible with both fluorescence microscopy and flow cytometry systems utilizing UV excitation [49]. Proper mounting with anti-fade reagents is crucial for preserving this fluorescence signal during imaging and storage, a consideration especially important for precious research samples [49] [3].
Properties and Mechanism of DAPI Staining
Biochemical Characteristics
DAPI is available in several chemical forms, primarily DAPI dihydrochloride (molecular weight 350.3 g/mol) and DAPI dilactate (molecular weight 457.5 g/mol) [49]. The dilactate form may offer marginally improved water solubility, though neither derivative is particularly soluble in standard phosphate-buffered saline (PBS) [49]. For long-term storage, DAPI stock solutions should be aliquoted and stored at -20°C, while for short-term needs, solutions can be kept at 2–6°C protected from light [49]. When handled with appropriate care—bearing in mind that DAPI is a known mutagen—solutions remain stable for at least six months [49].
The stoichiometric binding nature of DAPI to DNA provides a key advantage for quantitative applications. Since the fluorescence intensity is directly proportional to DNA content, DAPI staining can be utilized for DNA content estimation and cell cycle profiling [51]. This property has been successfully exploited in advanced imaging frameworks that utilize discriminative features such as total fluorescence intensity and nuclear area to determine the cell cycle phase (G1, S, or G2) of individual cells within a population [51].
Practical Considerations and Artifacts
Researchers must be aware of potential photoconversion artifacts associated with DAPI. Exposure to UV excitation light can convert a fraction of DAPI molecules into forms that exhibit altered excitation and emission spectra [52]. Photoconverted DAPI can become excitable by blue light and emit in the green spectrum, or more problematically, be excited by green light and emit in the red spectrum [52]. This phenomenon can occur with less than 10 seconds of UV exposure and may lead to misinterpretation in multicolor experiments, particularly when using red fluorescent proteins like mCherry or tdTomato [52]. To minimize this risk, researchers should limit UV exposure during sample examination and image acquisition, and always include appropriate controls to verify signal specificity.
Table 1: DAPI Solution Preparation and Stability
| Parameter | Specification | Notes |
|---|---|---|
| Stock Solution Concentration | 5 mg/mL (14.3 mM for dihydrochloride; 10.9 mM for dilactate) | Prepared by dissolving 10 mg in 2 mL deionized water or DMF [49] |
| Working Solution Concentration | 30 nM - 3 µM | Varies by application; see Table 2 for details [49] |
| Long-Term Storage | -20°C in aliquots | Protects against freeze-thaw cycles and extends shelf life [49] |
| Short-Term Storage | 2–6°C, protected from light | Stable for at least six months when properly handled [49] |
| Safety Considerations | Known mutagen | Handle with care and dispose of according to local regulations [49] |
Experimental Protocols for Frozen Sections
Tissue Preparation and Sectioning
The foundation for successful immunofluorescence begins with proper tissue preservation. For frozen tissues, two primary approaches are employed: fresh freezing (snap-freezing) and fixation prior to freezing [3] [53]. The snap-freezing technique is particularly effective for preserving native protein structures and antigenicity [53]. This process involves embedding fresh tissue in Optimal Cutting Temperature (OCT) compound and rapidly freezing it in a cold isopentane bath cooled by dry ice to approximately -176°C [53] [12]. This rapid freezing minimizes ice crystal formation, which can disrupt tissue morphology and cellular architecture [53].
For tissues from genetically engineered mice expressing fluorescent proteins (e.g., GFP, tdTomato), cold, low-concentration paraformaldehyde (PFA) fixation (1-2%) before freezing is recommended to protect the fluorescent protein from degradation while maintaining cell morphology [53]. Following either preservation method, frozen tissue blocks are sectioned in a cryostat at -15°C to -23°C [3] [12]. Sections typically cut at 5-15 µm thickness are thaw-mounted onto gelatin-coated or charged slides to enhance adhesion, air-dried, and may be stored at -20°C to -70°C for later use [3] [53].
Immunofluorescence Staining and DAPI Counterstaining
The immunofluorescence protocol for frozen sections follows a systematic sequence to ensure specific antibody binding and minimal background. After bringing stored slides to room temperature and rehydrating in wash buffer, samples are encircled with a hydrophobic barrier to conserve reagents [3]. Non-specific blocking is performed using protein-based blocking buffers (e.g., 1-10% normal serum from the same species as the secondary antibody, or 1% bovine serum albumin) for 30-60 minutes at room temperature [3] [12].
Primary antibody incubation follows, typically diluted in incubation buffer containing serum and detergents, and applied overnight at 2-8°C for optimal specific binding and reduced background [3]. After thorough washing, fluorophore-conjugated secondary antibodies are applied for 30-60 minutes at room temperature, protected from light to prevent photobleaching [3].
DAPI counterstaining is performed after all other staining steps are complete [49]. The DAPI stock solution is diluted in PBS to a concentration of approximately 300 nM, and 300 µL of this solution is applied to cover the tissue section [49] [3]. The incubation time is brief, typically 2-5 minutes at room temperature, after which unbound dye is removed by rinsing with PBS [49] [3]. It is important to note that excessive DAPI staining can obscure the visualization of targets localized within cell nuclei, so incubation time and concentration should be optimized for specific tissue types [3].
Table 2: DAPI Staining Parameters for Different Applications
| Application | Working Concentration | Incubation Time | Special Considerations |
|---|---|---|---|
| Fluorescence Microscopy (adherent cells/tissue sections) | 300 nM in PBS [49] | 2-5 minutes at room temperature [49] [3] | Little or no cytoplasmic labeling when used properly [49] |
| Flow Cytometry (cells in suspension) | 3 µM in staining buffer [49] | 15 minutes at room temperature [49] | Analyze by flow cytometry in the presence of the dye [49] |
| Chromosome FISH | 30 nM in PBS [49] | 30 minutes at room temperature [49] | Rinse with dH₂O before staining to reduce background [49] |
| Cell Cycle Profiling | 1 µg/mL (approx. 2.85 mM) [51] | 3 minutes [51] | Enables DNA content quantification [51] |
Mounting and Preservation
The final critical step involves mounting the stained samples with an anti-fade mounting medium to preserve fluorescence signals during microscopy and storage [49] [3]. After DAPI staining and a final PBS rinse, excess buffer is drained from the slide, and an appropriate anti-fade reagent such as ProLong Gold or SlowFade Gold is applied [49] [53]. A glass coverslip is carefully placed over the sample, avoiding air bubbles, and the edges may be sealed with nail polish or wax to prevent drying, particularly for long-term storage [49] [54]. Mounted slides should be stored at 2-8°C in the dark, and for best results with anti-fade media, allowed to cure overnight before imaging [51].
Diagram 1: Comprehensive workflow for immunofluorescence of frozen sections with DAPI counterstaining, highlighting the sequential stages from tissue preparation to imaging.
The Scientist's Toolkit: Essential Reagents and Materials
Table 3: Research Reagent Solutions for DAPI Counterstaining and Mounting
| Reagent/Material | Function/Purpose | Examples/Specifications |
|---|---|---|
| DAPI (as stock solution) | Nuclear counterstain; binds AT-rich DNA regions | 5 mg/mL stock in dH₂O or DMF; dihydrochloride or dilactate forms [49] |
| Anti-fade Mounting Medium | Preserves fluorescence; reduces photobleaching | ProLong Gold, SlowFade Gold, Vectashield, plain or with DAPI [49] [51] [52] |
| Optimal Cutting Temperature (OCT) Compound | Embedding medium for cryosectioning | Tissue-Tek O.C.T. Compound [53] [12] |
| Phosphate-Buffered Saline (PBS) | Washing and dilution buffer | 0.145 M NaCl, 0.0027 M KCl, 0.0081 M Na₂HPO₄, 0.0015 M KH₂PO₄, pH 7.4 [3] |
| Blocking Buffer | Reduces non-specific antibody binding | 1-10% normal serum, 1% BSA, or commercial protein blocks [3] [12] |
| Fixatives | Preserves tissue morphology and antigenicity | 4% PFA, 100% acetone, or methanol [3] [12] |
| Coverslips and Microscope Slides | Sample support for microscopy | Superfrost Plus slides; #1 thickness coverslips (22 × 22 mm) [53] |
Advanced Applications and Quantitative Analysis
The application of DAPI staining extends far beyond simple nuclear localization in frozen sections. When combined with robust image analysis frameworks, DAPI staining enables quantitative assessment of DNA content and cell cycle phase determination [51]. Advanced analytical approaches extract discriminative features such as total DAPI fluorescence intensity and nuclear area from fluorescence images, allowing classification of nuclei into G1, S, and G2 phases of the cell cycle [51]. This method has demonstrated high accuracy (94.0% sensitivity) when validated against Fucci2 reporter technology, providing a non-disruptive approach for integrative analysis of molecular and morphological parameters in cytological and histological samples [51].
For multicolor fluorescence experiments, DAPI's blue fluorescence offers excellent spectral separation from commonly used fluorophores such as FITC (green), Alexa Fluor 488 (green), mCherry (red), and tdTomato (red) [3] [53]. However, researchers should remain cognizant of potential spectral overlap due to DAPI photoconversion, particularly when using green and red fluorescent proteins [52]. This consideration is especially important when imaging samples with long exposure times or when multiple imaging sessions are required for the same sample.
Diagram 2: DAPI fluorescence and photoconversion pathways, showing the primary blue emission upon UV excitation and the potential for green or red emission after photoconversion with extended UV exposure.
Troubleshooting and Optimization
Successful nuclear counterstaining with DAPI requires attention to potential pitfalls and optimization opportunities. Weak nuclear staining may result from insufficient DAPI concentration, overly brief incubation time, or degradation of the stock solution. Conversely, excessive background fluorescence can occur with excessively high DAPI concentration, prolonged incubation, or inadequate washing after staining [49] [3]. For flow cytometry applications using DAPI, a specialized staining buffer containing Nonidet P-40 is recommended to ensure optimal staining conditions [49].
Rapid fluorescence fading during microscopy often indicates inadequate anti-fade protection or excessive light exposure during processing. This can be addressed by ensuring complete curing of mounting media (often requiring overnight setting), storing samples in the dark at 4°C, and minimizing light exposure during all post-staining steps [49] [51]. When performing multicolor experiments, unexpected signal crossover between channels may result from DAPI photoconversion, particularly after repeated UV exposure [52]. To mitigate this, researchers should use minimal UV exposure necessary for image acquisition and include appropriate controls to verify signal specificity.
For specialized applications such as chromosome FISH, a more dilute DAPI solution (30 nM) with longer incubation (30 minutes) provides optimal contrast with minimal background, enhancing the visualization of chromosomal structures while maintaining strong signal from FISH probes [49]. In all applications, the use of antifade reagents is strongly recommended to preserve the DAPI signal for future imaging sessions [49].
Solving Common Problems: Immunofluorescence Troubleshooting Guide
Diagnosing and Fixing High Background Fluorescence
In the context of optimizing immunofluorescence (IF) protocols for frozen tissue sections, high background fluorescence represents a significant impediment to acquiring publication-quality data. This phenomenon obscures specific signal detection, compromises quantitative analysis, and ultimately hinders the validation of experimental hypotheses in biomedical research and drug development. Background fluorescence in frozen sections arises from multiple sources, including tissue autofluorescence, nonspecific antibody binding, suboptimal fixation, and inadequate blocking procedures [55] [56]. This application note provides a structured framework for diagnosing the sources of high background in frozen sections and implements proven protocols to enhance signal-to-noise ratios, thereby improving the reliability and interpretability of immunofluorescence data in research settings.
Accurate diagnosis begins with recognizing that background fluorescence stems from two primary categories: instrument-related factors and sample-specific factors [55]. For researchers working with frozen sections, sample-specific background presents the most frequent challenge and can be further subdivided into autofluorescence and nonspecific staining.
Tissue autofluorescence occurs when endogenous compounds within tissue specimens emit light upon excitation. Common sources in frozen tissues include lipofuscin (age-related pigments), eosinophils, collagen, and elastin fibers [56]. These compounds typically exhibit broad emission spectra, often most problematic in the green wavelength range (500-550 nm) [56] [57]. Additionally, aldehyde-based fixatives can induce autofluorescence through protein cross-linking, particularly when using old formalin solutions [57].
Nonspecific background staining results from immunological interactions rather than intrinsic tissue properties. This includes off-target antibody binding, insufficient blocking of endogenous Fc receptors, excessive antibody concentrations, cross-reactivity of secondary antibodies, and inadequate washing procedures [58] [57]. Frozen sections are particularly susceptible to these issues due to the preservation of native cellular components and the absence of extensive processing that occurs in formalin-fixed paraffin-embedded (FFPE) tissues.
Table 1: Common Sources of Background Fluorescence in Frozen Sections
| Source Category | Specific Source | Characteristics | Most Affected Channels |
|---|---|---|---|
| Tissue Autofluorescence | Lipofuscin | Broad emission spectrum, increases with tissue age | Green to red [56] |
| Eosinophils | Granular appearance, broad emission | Green [56] | |
| Collagen/Elastin | Diffuse stromal pattern | Green [56] | |
| Aldehyde fixation | Uniform background, increases with fixative age | Green [57] | |
| Nonspecific Staining | High antibody concentration | Uniform excessive staining | All channels [58] |
| Inadequate blocking | Patchy background, particularly in immune cells | All channels [58] | |
| Secondary antibody cross-reactivity | Specific to tissue components | All channels [57] | |
| Insufficient washing | Uneven background, higher at edges | All channels [57] |
Diagnostic Workflow for Background Identification
A systematic approach to diagnosing background fluorescence ensures accurate identification of the underlying cause and enables implementation of targeted solutions. The following diagnostic workflow provides a step-by-step methodology for troubleshooting high background in frozen sections.
Diagram 1: Diagnostic workflow for identifying sources of high background fluorescence.
Initial Assessment and Controls
Begin diagnosis by imaging an unstained frozen section under all fluorescence detection channels to assess inherent autofluorescence [57]. This control establishes a baseline for native tissue fluorescence. Common autofluorescence sources in frozen intestinal tissues include eosinophils and lipofuscin, which display broad emission spectra that can overlap with multiple detection channels [56]. If this initial assessment reveals significant autofluorescence, proceed directly to autofluorescence reduction methods outlined in Section 4.1.
If autofluorescence is minimal, proceed with antibody-specific controls. Incubate a tissue section with secondary antibody only (omitting the primary antibody) to detect nonspecific binding of detection reagents [58]. Background staining in this control indicates secondary antibody cross-reactivity with tissue components, requiring secondary antibody replacement or additional blocking steps.
Primary Antibody Evaluation
After excluding secondary antibody issues, apply the complete staining protocol with primary and secondary antibodies. A substantial increase in background compared to the secondary-only control implicates the primary antibody as the primary contributor [58]. This may result from excessive antibody concentration, insufficient specificity, or inadequate blocking of nonspecific binding sites. In such cases, proceed with primary antibody titration and enhanced blocking procedures as described in Section 4.2.
Protocols for Background Reduction
Autofluorescence Reduction Methods
Chemical Quenching with Sudan Black B
Chemical quenching with Sudan Black B (SBB) effectively reduces autofluorescence from lipofuscin and other endogenous pigments in frozen sections [56].
Protocol:
- Following tissue rehydration, prepare SBB as 0.3% solution in 70% ethanol. Stir in the dark for 2 hours before use [56].
- Apply 100 μL of SBB solution to tissue sections and incubate for 10 minutes at room temperature in a humidified chamber.
- Rinse slides with 70% ethanol to remove excess stain.
- Wash for 5 minutes in 0.05 M Tris buffer with 0.2% Tween-20 and 0.9% NaCl [56].
- Proceed with standard immunofluorescence staining protocol.
Note: SBB specifically stains lipids and fats black through boundary surface adsorption, effectively masking fluorescent pigments without significantly affecting specific immunofluorescent labeling intensity [56].
Photobleaching with LED Arrays
Photobleaching using white phosphor light-emitting diode (LED) arrays provides an effective alternative to chemical quenching, particularly for formalin-fixed tissues with significant lipofuscin autofluorescence [59].
Protocol:
- Construct a photobleaching apparatus using white phosphor LED arrays with broad-spectrum emission.
- Prior to immunofluorescence staining, expose tissue sections to LED light for appropriate duration (typically 1-2 hours).
- Higher intensity LED arrays may be used to reduce photobleaching time.
- Proceed with conventional immunofluorescence staining.
Advantages: Photobleaching effectively reduces background and lipofuscin fluorescence without affecting specific probe fluorescence intensity, unlike some chemical quenchers that may reduce both background and signal [59].
Spectral Separation and Fluorophore Selection
When chemical or photobleaching methods are insufficient, strategic fluorophore selection can minimize autofluorescence interference.
Protocol:
- Identify autofluorescence peaks by imaging unstained sections across all detection channels.
- Select fluorophores whose emission spectra minimally overlap with dominant autofluorescence peaks.
- Replace green-emitting fluorophores (e.g., FITC, Alexa Fluor 488) with red or far-red alternatives (e.g., Cy5, Alexa Fluor 647) when possible, as most autofluorescence occurs in the green range [57].
- For multiplexing experiments, use fluorescence imaging systems with spectral unmixing capabilities to mathematically separate specific signal from background autofluorescence [56].
Reducing Nonspecific Antibody Binding
Blocking Optimization
Effective blocking is crucial for minimizing nonspecific antibody binding in frozen sections.
Protocol:
- Following permeabilization, prepare blocking buffer containing 5% normal serum in PBS with 0.05-0.1% Triton X-100 (PBS-T) [15].
- Select normal serum from the same species as the host of the secondary antibody (e.g., use goat serum when using a goat anti-mouse secondary) [15].
- Incubate tissue sections with blocking buffer for 30 minutes at room temperature [15].
- For challenging tissues with high endogenous immunoglobulin or Fc receptor expression, consider alternative blocking strategies:
Antibody Titration and Validation
Optimizing antibody concentrations represents one of the most effective approaches for reducing nonspecific staining [58].
Protocol:
- Prepare a titration series of primary antibody concentrations below, at, and above the manufacturer's recommended dilution.
- Apply these concentrations to serial tissue sections and process identically.
- Image all sections under identical exposure conditions.
- Select the dilution that provides specific staining with minimal background. Typical starting concentrations range from 2-5 μg/mL if not specified on the datasheet [15].
- Similarly, titrate secondary antibodies to identify optimal concentrations that maximize signal-to-noise ratio.
- Include appropriate controls (e.g., isotype controls, knockout tissues) to verify antibody specificity [57].
Table 2: Troubleshooting Guide for High Background Fluorescence
| Problem | Possible Causes | Recommended Solutions | Expected Outcome |
|---|---|---|---|
| High Autofluorescence | Lipofuscin, eosinophils, old fixative, collagen | Chemical quenching (SBB, 0.3% in 70% ethanol, 10 min) [56] | Reduced broad-spectrum background |
| Photobleaching (LED arrays, 1-2 hours) [59] | Decreased lipofuscin fluorescence | ||
| Switch to red/far-red fluorophores [57] | Minimized green channel interference | ||
| Nonspecific Secondary Antibody Binding | Species cross-reactivity, insufficient blocking | Use cross-adsorbed secondary antibodies [57] | Reduced off-target binding |
| Optimize blocking serum (5-10%, 30 min) [15] [56] | Blocked Fc receptors | ||
| Secondary antibody titration [55] | Optimal signal-to-noise ratio | ||
| Non-specific Primary Antibody Binding | High concentration, cross-reactivity | Primary antibody titration (2-5 μg/mL starting point) [15] [58] | Specific signal retention |
| Validate with knockout controls [57] | Verified antibody specificity | ||
| Use monoclonal instead of polyclonal antibodies [58] | Reduced multi-epitope binding | ||
| General Background | Inadequate washing, sample drying | Increase wash steps (2×10 min with PBS-T) [15] [57] | Removal of unbound antibodies |
| Ensure samples remain submerged [57] | Prevented concentration artifacts |
The Scientist's Toolkit: Essential Reagents and Materials
Table 3: Research Reagent Solutions for Background Reduction
| Reagent/Material | Function | Application Notes |
|---|---|---|
| Sudan Black B (0.3% in 70% ethanol) | Masks lipofuscin and eosinophil autofluorescence [56] | Incubate 10 min after rehydration; rinse with 70% ethanol [56] |
| Normal Serum (species-matched) | Blocks nonspecific antibody binding [15] | Use 5-10% in buffer; match to secondary antibody host species [15] [56] |
| Triton X-100 (0.05-0.1%) | Permeabilization agent [15] | Enables intracellular antibody access; use in blocking and antibody buffers [15] |
| Cross-Adsorbed Secondary Antibodies | Minimizes species cross-reactivity [57] | Specifically purified to reduce off-target binding; essential for species-on-species staining |
| Alternative Fixatives (acetone, methanol) | Tissue preservation with reduced autofluorescence [56] | 1:1 acetone:methanol at -20°C for 5 min showed lower background in some tissues [56] |
| White Phosphor LED Arrays | Photobleaching of autofluorescent compounds [59] | Broad-spectrum emission; pre-treatment before staining reduces background [59] |
Effective management of background fluorescence in frozen tissue sections requires a systematic approach to diagnosis and targeted intervention. Through implementation of the detailed protocols and troubleshooting strategies outlined in this application note, researchers can significantly enhance signal-to-noise ratios, thereby improving the quality and reliability of their immunofluorescence data. The methods described—from autofluorescence quenching techniques to antibody optimization strategies—provide a comprehensive toolkit for addressing the most common sources of high background. By applying these standardized approaches within the broader context of immunofluorescence protocol optimization for frozen sections, research scientists and drug development professionals can generate more robust, reproducible, and interpretable data, ultimately accelerating scientific discovery and therapeutic development.
In the context of immunofluorescence (IF) protocols for frozen sections, achieving a strong, specific signal with low background is paramount for accurate data interpretation in research and drug development. Frozen tissue sections are prized for retaining superior antigenicity, especially for targets sensitive to chemical fixation, but present unique challenges including tissue fragility and a heightened propensity for experimental artifacts [12]. A weak or absent signal can stem from a multitude of factors across the entire workflow, from initial tissue preparation to final imaging. This application note systematically outlines the primary causes of suboptimal signal detection in frozen section IF and provides detailed, actionable protocols and solutions to remedy these issues, ensuring reliable and reproducible results.
Troubleshooting Weak or Absent Signal: A Systematic Workflow
The following diagram provides a structured workflow for diagnosing and resolving the common causes of weak or absent immunofluorescence signals in frozen sections. This systematic approach helps researchers efficiently identify and address the root of the problem.
Primary Causes and Detailed Solutions
Pre-Analytical Variables: Tissue Preparation and Fixation
The foundation of a successful IF experiment is laid during sample acquisition and preparation. Inadequacies at this stage can irreversibly compromise antigen preservation and tissue morphology.
Cause: Suboptimal Freezing and Ice Crystal Artifacts
- Problem: Slow freezing leads to the formation of large ice crystals, which damage cellular ultrastructure and can destroy epitopes [12].
- Solution: Perform snap-freezing. Immerse tissue embedded in Optimal Cutting Temperature (OCT) compound in a cold isopentane bath cooled by dry ice. The tissue block should turn opaque in 10-20 seconds. This rapid freezing minimizes ice crystal formation and preserves tissue integrity and antigenicity [12].
Cause: Inappropriate Fixation and Epitope Masking
- Problem: The choice of fixative is critical. While 4% Paraformaldehyde (PFA) is common, it can over-crosslink and mask some epitopes, particularly those of larger proteins. Conversely, under-fixation fails to preserve tissue architecture [60] [12].
- Solution: Match the fixative to the target antigen. For a new antibody, test multiple fixatives in parallel on consecutive sections. A recommended starting panel includes 4% PFA for 15 minutes, 100% methanol for 10-15 minutes, and a 1:1 solution of acetone:methanol for 5-10 minutes at room temperature [12]. Acetone or methanol fixation is often superior for large protein antigens like immunoglobulins [12].
Antibody and Immunostaining Optimization
The core of the IF protocol involves the specific binding of antibodies. Optimization here is essential for maximizing the signal-to-noise ratio.
Cause: Inadequate Antibody Titration and Incubation
- Problem: Using an antibody at a concentration that is too high can cause high background, while a concentration that is too low results in a weak or absent signal. Insufficient incubation time can prevent adequate antibody binding [60] [55].
- Solution: Empirically titrate every primary antibody. Prepare a series of dilutions (e.g., above, at, and below the manufacturer's suggested concentration) and test them on control tissue under identical experimental conditions [55]. Furthermore, extend the primary antibody incubation to overnight at 2-8°C for optimal specific binding and reduced background in frozen sections [3].
Cause: Insufficient Signal Amplification or Quenching
- Problem: For low-abundance targets, the signal generated by a standard secondary antibody may be too weak to detect. Furthermore, the presence of endogenous enzymes can generate high background with certain detection systems [60].
- Solution: Employ signal amplification techniques such as Tyramide Signal Amplification (TSA). TSA uses a horseradish peroxidase (HRP)-conjugated antibody to catalyze the deposition of multiple fluorophore-labeled tyramide molecules at the antigen site, dramatically increasing sensitivity [61]. If using HRP-based systems, block endogenous peroxidases by incubating sections with 3% hydrogen peroxide for 10 minutes before the primary antibody [12].
The table below summarizes the key causes and solutions related to antibody usage.
Table 1: Troubleshooting Antibody-Related Issues
| Cause of Weak Signal | Recommended Solution | Key Protocol Modifications |
|---|---|---|
| Incorrect antibody dilution | Empirical titration of primary antibody | Test a range of concentrations on control tissue; use antibody dilution buffer [60] [55]. |
| Suboptimal incubation time | Prolonged primary antibody incubation | Incubate overnight at 4°C instead of 1-2 hours at room temperature [3]. |
| Low abundance target | Use signal amplification | Implement Tyramide Signal Amplification (TSA) [61]. |
| Endogenous enzyme activity | Perform enzymatic blocking | Block endogenous peroxidases with 3% H₂O₂ for HRP-based systems [12]. |
Detection and Imaging Considerations
The final steps of the protocol determine whether the carefully generated signal is captured effectively.
Cause: Fluorophore Photobleaching and Inadequate Mounting
- Problem: Fluorophores can lose their fluorescence upon exposure to light (photobleaching) during incubation, washing, or imaging, leading to a signal that fades quickly [60].
- Solution: Protect samples from light from the moment the fluorescent secondary antibody is applied. Use an anti-fade mounting medium to slow photobleaching during storage and imaging [3] [61]. Mounting media are specifically formulated to reduce the rate of fluorophore decay.
Cause: High Background and Autofluorescence
- Problem: Background fluorescence can obscure a specific signal. Sources include unbound dye, nonspecific antibody binding, and autofluorescence from the tissue itself or from aldehyde-based fixatives [60] [55].
- Solution: Implement rigorous washing and blocking. Wash samples 2-3 times with PBS or a similar buffer after labeling to remove unbound fluorophores [55]. Block non-specific sites with a protein block (e.g., 1-5% normal serum from the secondary antibody host species) for 30-60 minutes [3] [12]. If autofluorescence is an issue, consider using a fluorescent dye whose emission spectrum is in the red or far-red region, as tissue autofluorescence is often less intense in these wavelengths [55].
Detailed Protocol for Optimized Immunofluorescence on Frozen Sections
This consolidated protocol incorporates best practices to prevent weak signals and high background.
Tissue Freezing, Sectioning, and Fixation
- Snap-Freezing: Embed fresh tissue in OCT compound in a mold. Snap-freeze by suspending the mold in a cold isopentane bath cooled by dry ice for 10-20 seconds until opaque. Store at -80°C [12].
- Cryosectioning: Equilibrate the frozen block to -20°C in a cryostat. Trim the block and cut sections at a thickness of 5-15 µm. Thaw-mount sections onto gelatin-coated or charged slides and air-dry for 15-60 minutes [3] [12].
- Fixation: Select an appropriate fixative based on the target antigen.
- For a new target, test 4% PFA (15 min), 100% methanol (10-15 min), and acetone (5-10 min) in parallel [12].
- Immerse slides in the fixative at room temperature.
- Washing: Wash fixed slides 3 times for 5 minutes each in a wash buffer like PBS or TBS-T (Tris-Buffered Saline with 0.1% Tween 20) to remove the fixative [61] [12].
Blocking and Antibody Incubation
- Blocking: Draw a hydrophobic barrier around the tissue. Incubate the sections with a protein blocking buffer (e.g., 1-5% normal serum in PBS or a commercial protein block) for 30-60 minutes at room temperature to prevent non-specific antibody binding [3] [12].
- Primary Antibody Incubation: Dilute the primary antibody in an appropriate dilution buffer (e.g., PBS with 1% BSA). Apply the solution to cover the tissue section completely. Incubate overnight at 4°C in a humidified chamber for optimal binding [3].
- Washing: Wash the slides 3-6 times for 5-15 minutes each in wash buffer to remove unbound primary antibody [3] [61].
Signal Detection and Amplification
- Secondary Antibody Incubation: Incubate with fluorophore-conjugated secondary antibodies, diluted in antibody dilution buffer, for 30-60 minutes at room temperature, protected from light [3].
- Signal Amplification (Optional): For weak signals, use a Tyramide Signal Amplification (TSA) kit. After the primary antibody, incubate with an HRP-conjugated secondary antibody for 15 minutes. Wash thoroughly. Incubate with the fluorophore-labeled tyramide working solution for 7-10 minutes, protected from light [61].
- Counterstaining and Mounting: Incubate with DAPI (e.g., 1:1000 to 1:35000 dilution in PBS) for 2-10 minutes to stain nuclei [3] [61]. Rinse with PBS and water to remove salts. Apply a drop of anti-fade mounting medium and carefully lower a #1.5 coverslip, avoiding bubbles. Seal the edges with clear nail polish if using an aqueous mounting medium [61].
The Scientist's Toolkit: Essential Reagents for Success
The table below lists key reagents and their critical functions in ensuring a successful immunofluorescence experiment on frozen sections.
Table 2: Essential Research Reagents for Immunofluorescence on Frozen Sections
| Reagent | Function | Considerations for Optimal Use |
|---|---|---|
| OCT Compound | Embedding medium for tissue support during snap-freezing and cryosectioning. | Ensure complete embedding to prevent ice crystal formation and tissue damage [12]. |
| Acetone, Methanol, PFA | Fixatives to preserve tissue morphology and immobilize antigens. | Choice is antigen-dependent; test multiple for new targets [12]. |
| Normal Serum | Component of blocking buffer to reduce non-specific binding of secondary antibodies. | Should match the host species of the secondary antibody (e.g., use normal goat serum for anti-rabbit IgG made in goat) [12]. |
| Antibody Dilution Buffer | Medium for diluting antibodies, typically containing BSA and detergent. | Prevents antibody aggregation and adhesion to tube walls; maintains antibody stability [3]. |
| Fluorophore-Conjugated Secondary Antibodies | Detect the primary antibody. Multiple fluorophores allow for multiplexing. | Select bright, photostable fluorophores (e.g., Alexa Fluor dyes). Protect from light to prevent photobleaching [3] [61]. |
| Tyramide Signal Amplification (TSA) Kits | Signal amplification system for detecting low-abundance targets. | Provides significant signal boost but requires careful optimization and thorough washing to avoid high background [61]. |
| Anti-Fade Mounting Medium | Preserves fluorescence signal during storage and imaging by reducing photobleaching. | Essential for long-term sample preservation. Choose a medium compatible with your fluorophores [3] [61]. |
Logical Workflow for Signal Enhancement
When faced with a weak signal, the decision to optimize standard protocols versus implementing an amplification strategy can be visualized as follows. Amplification methods like TSA can resolve issues where a signal is genuinely absent due to low target abundance, rather than technical failure.
Preventing and Correcting Sample Detachment and Morphology Issues
Sample detachment and morphological degradation are critical challenges in immunofluorescence (IF) studies, particularly when working with frozen tissue sections. These issues can compromise experimental validity by altering protein localization, increasing background signal, and ultimately leading to data misinterpretation [60]. Within the broader context of optimizing immunofluorescence protocols for frozen sections, maintaining sample integrity throughout the experimental workflow is fundamental to achieving reliable, reproducible results. This application note addresses the primary causes of detachment and morphological artifacts, providing evidence-based prevention strategies and corrective protocols to enhance research outcomes for scientists and drug development professionals.
The integrity of biological samples during immunofluorescence processing is paramount for accurate spatial localization of proteins and cellular structures. Structural damage and protein loss frequently occur due to improper handling, suboptimal fixation, or inappropriate permeabilization techniques [60]. Furthermore, membrane damage and disruption of native tissue architecture can significantly alter antigen accessibility and antibody binding efficiency. These technical challenges are particularly pronounced in frozen section methodologies where tissue preservation is inherently more vulnerable compared to paraffin-embedded alternatives. By implementing robust standardized protocols and understanding the underlying mechanisms of sample degradation, researchers can significantly improve data quality and experimental reproducibility.
Understanding the Causes and Impacts
Primary Causes of Sample Detachment
Sample detachment predominantly occurs during washing and incubation steps and is influenced by several technical factors:
- Inadequate Slide Coating: Uncharged or improperly coated slides provide insufficient adhesive surface for tissue sections, particularly during repeated fluid exchanges and washing steps [62].
- Over-fixation or Improper Fixative Choice: Prolonged fixation or use of inappropriate fixatives can compromise tissue architecture and reduce adhesion. Acetone fixation alone may be insufficient for certain tissue types [62].
- Overly Aggressive Permeabilization: Excessive permeabilization duration or concentration can destroy cellular membranes and extracellular matrices that anchor the tissue to the slide surface [60].
- Mechanical Stress During Processing: Physical disruption from vigorous pipetting, improper slide handling, or turbulent fluid exchange can mechanically dislodge samples [60] [63].
- Enzymatic Detachment Methods: In cell-based IF, enzymatic detachment using trypsin or accutase can cleave surface proteins and adhesion molecules, compromising subsequent attachment and morphology [63].
Consequences of Morphological Damage
Morphological degradation manifests in multiple ways that impact data interpretation:
- Protein Redistribution: Leakage or relocation of target antigens from their native cellular compartments, leading to false localization patterns [60].
- Increased Background Signal: Disrupted membranes and cellular structures increase non-specific antibody binding, reducing signal-to-noise ratio [60].
- Epitope Masking or Loss: Conformational changes in proteins during processing can hide antigenic sites or destroy them entirely [60].
- Altered Cellular Morphology: Distortion of cellular and subcellular structures impedes accurate morphological analysis and colocalization studies.
Table 1: Quantitative Impacts of Cell Detachment Methods on Surface Protein Expression
| Detachment Method | Surface FasL Expression | Surface Fas Receptor | Cell Viability | Recovery Time Required |
|---|---|---|---|---|
| Scraping (Mechanical) | Preserved (Highest) | Preserved | Variable | Minimal |
| EDTA-based Solution | Slight Decrease | Minimal Impact | Moderate | 2-4 hours |
| Accutase (10min) | Significant Decrease | Significant Decrease | High | 20 hours |
| Accutase (30min) | Severe Decrease | Severe Decrease | High | 20+ hours |
| Trypsin | Not Tested | Not Tested | Moderate | Not Tested |
The data presented in Table 1 underscores a critical trade-off in sample preparation. While enzymatic methods like accutase maintain superior cell viability compared to mechanical approaches or EDTA-based solutions, they significantly compromise the detection of specific surface markers like Fas ligand and Fas receptor [63]. This effect is time-dependent, with longer exposure resulting in more substantial protein loss. Researchers must therefore select detachment strategies based on their specific experimental objectives—opting for gentler enzymatic methods when viability is paramount but using mechanical or chemical dissociation when preserving surface epitopes is essential.
Experimental Protocols and Methodologies
Optimized Protocol for Frozen Tissue Sections
This standardized protocol for frozen tissue sections minimizes detachment and preserves morphology:
Tissue Preparation and Sectioning
- Pre-cool cryostat to -20°C and equilibrate frozen tissue blocks at -20°C for 15-20 minutes before sectioning to prevent cracking [62].
- Cut sections at 4-8μm thickness using a sharp cryostat blade and place on pre-cleaned, positively charged microscope slides [62].
- Air dry sections for 30-60 minutes at room temperature to enhance adhesion before fixation.
Fixation and Permeabilization
- Fix sections in pre-cooled acetone for 10 minutes at 4°C. Acetone effectively preserves cellular architecture while maintaining antigen accessibility [62].
- Wash with Tris-Buffered Saline (TBS) for 5 minutes to remove residual acetone.
- Permeabilize with 0.25% Triton X-100 in TBS for 10 minutes at room temperature for intracellular targets [62].
- Wash twice with Tris-Buffered Saline + Tween (TBST) for 5 minutes each.
Blocking and Antibody Incubation
- Block with 5% serum or BSA for 2 hours at room temperature to minimize non-specific binding [62].
- Incubate with primary antibody diluted in blocking buffer overnight at 4°C with gentle agitation [62].
- Wash three times with TBST for 5 minutes each.
- Incubate with fluorochrome-conjugated secondary antibody for 2 hours at room temperature with gentle agitation, protected from light [62].
- Wash three times with TBST for 5 minutes each.
Mounting and Imaging
- Apply antifade mounting medium containing DAPI for nuclear counterstaining.
- Carefully apply coverslips, avoiding bubble formation.
- Seal edges with clear nail polish if necessary for long-term storage.
- Store slides in the dark at 4°C or -20°C and image within 72 hours for optimal signal preservation [62].
Cell Culture Immunofluorescence with Controlled Detachment
For cell-based IF studies, the detachment method critically impacts surface marker preservation:
Gentle Detachment for Sensitive Surface Proteins
- For surface proteins vulnerable to enzymatic cleavage (e.g., FasL, Fas receptor), prefer non-enzymatic EDTA-based detachment solutions over accutase or trypsin [63].
- Incubate cells with EDTA-based solution for minimal time required for detachment (typically 5-15 minutes).
- If enzymatic detachment is unavoidable, allow 20 hours recovery time post-detachment for surface protein re-expression before proceeding with IF [63].
- Centrifuge detached cells gently (200-300 × g for 5 minutes) and reseed on polyethylenimine or poly-L-lysine coated coverslips for enhanced adhesion [62].
Fixation and Staining
- Fix cells with 3-4% paraformaldehyde in TBS for 15 minutes at room temperature [62].
- Permeabilize with 0.25% Triton X-100 in TBS for 10 minutes if intracellular targets are investigated.
- Proceed with blocking and antibody incubation as described for tissue sections.
Diagram 1: Comprehensive workflow for immunofluorescence sample preparation highlighting critical steps for preventing detachment and preserving morphology. Red arrows emphasize steps requiring particular attention to prevent sample loss.
The Scientist's Toolkit: Essential Research Reagents
Table 2: Key Reagents for Preventing Sample Detachment and Morphology Issues
| Reagent/Category | Specific Examples | Function & Application Notes |
|---|---|---|
| Slide Adhesives | Positively charged slides, poly-L-lysine, polyethylenimine | Enhance tissue/cell adhesion; essential for fragile samples and multiple washing steps [62]. |
| Fixatives | Pre-cooled acetone, 3-4% paraformaldehyde | Preserve cellular morphology; acetone preferred for frozen sections, PFA for cells [62]. |
| Permeabilization Agents | Triton X-100 (0.25%), digitonin (100μM), saponin (0.5%) | Enable antibody access to intracellular targets; concentration and duration critical for morphology [62]. |
| Blocking Agents | BSA (5%), normal serum (5%), serum from secondary antibody species | Reduce non-specific background; choice depends on antibody and sample type [62]. |
| Detachment Solutions | EDTA-based (non-enzymatic), accutase (enzymatic), mechanical scraping | Cell harvesting; EDTA preserves surface proteins, accutase maintains viability but cleaves some epitopes [63]. |
| Wash Buffers | Tris-Buffered Saline + Tween (TBST), PBS | Remove unbound antibodies; gentle agitation prevents detachment [62]. |
| Mounting Media | Antifade mounting media with DAPI | Preserve fluorescence and provide nuclear counterstaining; prevents photobleaching [62]. |
Advanced Methodological Considerations
Troubleshooting Common Artifacts
Even with optimized protocols, researchers may encounter specific artifacts requiring targeted interventions:
Partial Tissue Detachment
- Cause: Insufficient slide coating, excessive washing force, or incomplete fixation.
- Solution: Increase slide coating concentration or duration, use gentle agitation during washes, extend fixation time, or switch fixatives.
- Corrective Action: For valuable samples with partial detachment, proceed carefully with remaining protocol and mark areas of detachment during imaging to exclude from analysis.
High Background Signal
- Cause: Inadequate blocking, over-fixation, antibody concentration too high, or insufficient washing.
- Solution: Optimize blocking buffer (try different sera or concentration), titrate antibodies, increase wash duration and volume, add detergent to wash buffers.
- Preventive Measure: Include control samples without primary antibody to assess non-specific secondary antibody binding.
Poor Morphological Preservation
- Cause: Improper freezing technique, slow fixation, or excessive permeabilization.
- Solution: Ensure rapid freezing in OCT compound, pre-chill fixatives, optimize permeabilization time and concentration.
- Alternative Approach: For particularly delicate tissues, consider mild detergents like saponin or digitonin instead of Triton X-100 [62].
Method Selection Framework
Choosing the appropriate approach requires consideration of multiple experimental factors:
Diagram 2: Decision framework for selecting appropriate sample preparation methods based on experimental priorities. Red arrows highlight critical recommendations for preserving surface proteins and maintaining viability.
Preventing and correcting sample detachment and morphology issues requires a comprehensive understanding of the technical variables influencing sample integrity throughout the immunofluorescence workflow. By implementing the optimized protocols outlined in this application note—including proper slide selection, controlled fixation and permeabilization, and appropriate detachment methods for cell studies—researchers can significantly enhance data quality and reliability. The reagent toolkit and decision frameworks provide practical guidance for selecting appropriate methodologies based on specific experimental requirements. As immunofluorescence techniques continue to evolve toward higher multiplexing and quantitative applications [64], maintaining sample integrity through these fundamental best practices becomes increasingly critical for generating meaningful biological insights and advancing drug development research.
Controlling for Autofluorescence and Photobleaching
Immunofluorescence (IF) on frozen tissue sections is a powerful technique for visualizing protein localization and expression. However, two significant technical challenges can compromise data integrity: autofluorescence (AF), caused by endogenous molecules emitting fluorescent signals, and photobleaching, the irreversible loss of fluorescence upon light exposure. Within the broader context of developing robust immunofluorescence protocols for frozen sections, this application note provides detailed methodologies and quantitative data to control for these factors, ensuring specific, high-quality fluorescence signals for accurate analysis in research and drug development.
Understanding and Controlling Autofluorescence
In frozen tissue sections, autofluorescence originates from various intracellular and extracellular components. Common sources include lipofuscin (fatty pigments in macrophages), eosinophils, collagen, and elastin [56]. These compounds exhibit a broad emission spectrum, which can overlap with and obscure the signals from commonly used fluorophores, leading to potential false-positive results [56] [65].
Quantitative Efficacy of Autofluorescence Reduction Methods
The following table summarizes the performance of different autofluorescence reduction strategies as reported in recent studies:
Table 1: Efficacy of Autofluorescence Reduction Methods
| Method | Tissue Type | Key Reagent | Reduction Efficacy (Channel) | Reference |
|---|---|---|---|---|
| Chemical Quenching | Bovine Intestine | 0.3% Sudan Black B (SBB) & DAB | Significant visual masking of pigments | [56] |
| Chemical Quenching | Mouse Brain (ICH Model) | 0.15% Sudan Black B (SBB) | 73.68% (FITC); 76.05% (Tx Red); 71.88% (DAPI) | [65] |
| Chemical Quenching | Mouse Brain (TBI Model) | 0.15% Sudan Black B (SBB) | 56.85% (FITC); 44.28% (Tx Red); 46.36% (DAPI) | [65] |
| Photobleaching (Light-only) | Human FFPE Tonsil | 24-hour LED exposure (Multi-wavelength) | Consistent reduction across most emission channels | [66] |
| Photobleaching (Chemical-Assisted) | Human FFPE Tonsil | 3-hour LED + 4.5% H₂O₂/20mM NaOH | Effective suppression within a shorter timeframe | [66] |
| FLIM (Digital Method) | Human Tonsil | Phasor Analysis (No chemicals) | Effective separation of specific IF from background AF | [67] |
Detailed Protocol: Chemical Quenching with Sudan Black B (SBB)
This protocol is optimized for frozen sections and has been successfully applied to brain and intestinal tissues [56] [65].
Reagents:
- Sudan Black B (SBB) (e.g., Sigma-Aldrich, 199664-25G)
- 70% Ethanol
- 1X Phosphate-Buffered Saline (PBS)
Procedure:
- SBB Solution Preparation: Stir 300 mg of SBB in 100 ml of 70% ethanol overnight in the dark. Filter the solution through a 0.22 µm filter to remove undissolved particles. This stock solution can be stored at 4°C in an airtight container for up to 3-4 weeks [65].
- Working Solution: Freshly before use, dilute the SBB stock to a 0.15% working solution using 70% ethanol [65].
- Treatment: After completing the standard immunofluorescence staining protocol (including secondary antibody incubation and final washes), pipette the 0.15% SBB working solution onto the tissue section, ensuring complete coverage.
- Incubation: Incubate the slide for 5 minutes at room temperature, protected from light.
- Rinsing: Briefly rinse the slide with 70% ethanol for 30 seconds to remove excess dye.
- Final Wash: Rinse the slide with 1X PBS for 5 minutes [65].
- Mounting: Proceed to mount the slide with an antifade mounting medium.
Note: SBB staining is typically performed as a final step after immunofluorescence labeling to avoid potential interference with antibody binding [65].
Detailed Protocol: Chemical-Assisted Photobleaching
This method uses light and a chemical agent to rapidly reduce autofluorescence in formalin-fixed paraffin-embedded (FFPE) or frozen tissues [66].
Reagents:
- Hydrogen Peroxide (H₂O₂), 30% solution
- Sodium Hydroxide (NaOH), 1M solution
- 1X Phosphate-Buffered Saline (PBS)
Procedure:
- Bleaching Solution Preparation: Mix 25 mL of 1X PBS with 4.5 mL of 30% H₂O₂ and 0.8 mL of 1M NaOH. The final working solution contains 4.5% (wt/vol) H₂O₂ and 20 mM NaOH in PBS [66].
- Tissue Treatment: Submerge the tissue slides in the bleaching solution in a petri dish.
- Illumination: Expose the slides to intense, multi-wavelength light. The cited study used a high-power LED panel for a period of up to 3 hours. Note that optimal exposure time may require optimization for your specific setup [66].
- Post-Treatment Washes: Following illumination, thoroughly wash the slides with 1X PBS to remove the bleaching solution before proceeding with immunofluorescence staining.
Understanding and Mitigating Photobleaching
The Photobleaching Problem
Photobleaching is the permanent loss of fluorescence caused by the photochemical destruction of fluorophores after repeated cycles of excitation and emission [68]. It leads to signal fading, complicating image acquisition and quantitative analysis, and potentially causing false-negative results [68] [69].
Strategies for Photobleaching Prevention
A multi-faceted approach is recommended to minimize photobleaching.
1. Microscope and Imaging Setup:
- Reduce Light Intensity: Use neutral-density (ND) filters to attenuate the excitation light source [68] [69].
- Minimize Exposure Time: Keep shutter open only for the minimal time required for image acquisition. Use transmitted light for finding focus and navigating the sample [69].
- Increase Camera Gain: Amplify the signal electronically to allow for reduced light intensity or exposure time, though this can also amplify background noise [68].
- Use a High Numerical Aperture (NA) Objective: Objectives with higher NA collect more light, allowing for shorter exposures or lower light intensity [68].
2. Fluorophore Selection:
- Choose newer generation, photostable fluorophores (e.g., Alexa Fluor series, DyLight) over traditional dyes (e.g., FITC, TRITC) which are more prone to bleaching [68] [69].
- For multiplexing, select fluorophores with minimal spectral overlap to prevent cross-excitation and simultaneous bleaching of multiple channels [68].
3. Use of Antifade Mounting Media:
- This is the most effective step for fixed-cell imaging. Antifade mounting media contain compounds that scavenge free radicals generated during excitation, thereby protecting the fluorophore and extending its functional lifespan [68] [70] [3]. Always use these media for immunofluorescence experiments.
Leveraging Photobleaching in Multiplexed Imaging
In cyclic immunofluorescence, photobleaching is intentionally used as a gentle method for signal removal between staining rounds. Filtered photobleaching (excluding damaging UV/IR wavelengths) allows for over 20 cycles of staining, imaging, and signal removal without significant damage to tissue integrity or epitope antigenicity [71].
The Scientist's Toolkit: Essential Research Reagents
Table 2: Key Reagents for Autofluorescence and Photobleaching Control
| Reagent / Material | Function / Application | Example Usage |
|---|---|---|
| Sudan Black B (SBB) | Chemical quencher of autofluorescence. Stains lipids and lipofuscin black, masking their fluorescence. | Post-staining treatment of frozen sections; 0.15% in 70% ethanol for 5 min [65]. |
| Antifade Mounting Medium | Protects against photobleaching by reducing photochemical damage. Essential for image preservation. | Final mounting step for all fluorescence slides [68] [70]. |
| Hydrogen Peroxide (H₂O₂) | Chemical agent in bleaching solution to accelerate autofluorescence reduction via photobleaching. | Used at 4.5% in NaOH/PBS under intense light for rapid AF reduction [66]. |
| Photostable Fluorophores | Fluorescent dyes with engineered structures that resist photobleaching. | Alexa Fluor or DyLight dyes for brighter, longer-lasting signals [68]. |
| Normal Serum | Blocking agent to reduce non-specific antibody binding and background. | 1-10% serum from secondary antibody host species in buffer [56] [3]. |
| Coagulant Fixatives | Preserve tissue structure without strong cross-linking. Can influence autofluorescence levels. | Acetone, Methanol, or 1:1 Acetone:Methanol mix; cold fixation for 5-20 min on frozen sections [56] [70]. |
Integrated Experimental Workflow
The following diagram illustrates a comprehensive workflow for immunofluorescence on frozen sections, integrating the key controls for autofluorescence and photobleaching detailed in this note:
Integrated IF Workflow with AF and Photobleaching Controls
Controlling for autofluorescence and photobleaching is not merely a troubleshooting exercise but a fundamental requirement for generating reliable, quantitative immunofluorescence data from frozen sections. By understanding the sources of these issues and implementing the validated protocols and reagents outlined in this application note—such as Sudan Black B quenching, optimized mounting, and careful imaging practices—researchers can significantly improve their signal-to-noise ratio and data integrity. The integrated workflow provides a robust framework for applying these controls effectively, advancing research and drug development efforts that depend on precise fluorescence imaging.
Application Note
Immunofluorescence (IF) on frozen tissue sections is a powerful technique for visualizing protein localization and expression within a morphological context. A significant challenge in this method involves balancing robust antigen detection with the preservation of tissue architecture, often compromised by formalin-induced cross-links that mask epitopes. This application note details advanced protocols for antigen retrieval and multiplex immunofluorescence specifically optimized for frozen sections, enabling high-quality, multi-target detection essential for sophisticated analysis of the tumor microenvironment and other complex biological systems [72].
While heat-induced epitope retrieval (HIER) is a cornerstone technique for reversing epitope masking, its application on frozen sections requires careful optimization to prevent tissue damage [73] [3]. This note provides a comparative analysis of antigen retrieval methods and presents two robust, detailed multiplexing workflows—one for antibodies from different host species and another for antibodies from the same host—complete with formulated buffers and procedural specifics [74].
Experimental Data and Comparisons
The tables below summarize the key parameters for optimizing antigen retrieval and selecting an appropriate multiplexing strategy.
Table 1: Antigen Retrieval Method Comparison for Frozen Sections
| Method | Typical Conditions | Key Considerations for Frozen Sections |
|---|---|---|
| Heat-Induced (HIER) | 95-100°C for 20 min [75] | Can be too harsh; requires rigorous testing to prevent tissue detachment [73] [3]. |
| Enzymatic Retrieval | Protease incubation for 5-30 min [75] | Lower risk of tissue damage but potential for over-digestion and non-specific staining [75]. |
| Methanol/Acetone Fixation | Cold incubation for 10-20 min [73] [3] | A common, gentle alternative to HIER for frozen sections; often sufficient for many targets. |
Table 2: Multiplexing Strategy Selection Guide
| Parameter | Primary Antibodies from Different Hosts | Primary Antibodies from the Same Host |
|---|---|---|
| Workflow Complexity | Lower | Higher (Sequential staining required) |
| Key Requirement | Host-specific secondary antibodies | Blocking of residual secondary antibody binding sites |
| Primary Antibody Incubation | Simultaneous (cocktail) | Sequential |
| Total Experimental Time | Shorter | Longer |
| Risk of Cross-Reactivity | Low, with validated secondaries | Higher, mitigated by a blocking step with normal serum [74] |
Detailed Experimental Protocols
Antigen Retrieval Optimization for Frozen Sections
Due to the delicate nature of frozen tissue, antigen retrieval must be approached cautiously. While HIER is a standard method, one protocol explicitly states that "many antigen retrieval techniques are too harsh for cryostat-cut tissue sections" [3]. An alternative, gentler approach is fixation with cold organic solvents upon removal from storage.
Protocol: Post-Sectioning Fixation for Antigen Retrieval [3]
- Preparation: After cutting frozen sections (5-15 µm) and mounting them on slides, air-dry the sections for 30 minutes at room temperature.
- Fixation: Immediately upon removal from freezer storage, add 50 µL of ice-cold fixative (e.g., acetone or methanol) to each tissue section.
- Incubation: Fix for 8 minutes at 2-8°C or, optimally, at -20°C for 20 minutes.
- Proceed: Continue with the standard immunofluorescence staining protocol, beginning with a wash and blocking step.
For targets that require HIER despite the risks, the standard protocol involves using a pressure cooker, microwave, or steamer to heat slides in retrieval buffer (e.g., Sodium Citrate pH 6.0 or Tris-EDTA pH 9.0) at 95-100°C for 20 minutes, followed by a 10-minute cooling period under cold running water [75].
Multiplex Immunofluorescence Protocols
The following protocols are adapted for frozen sections and assume the use of a blocking buffer containing serum and Triton X-100 for permeabilization [74] [3].
This is the most straightforward multiplexing approach.
Incubation with Primary Antibody Cocktail: Incubate sections with a cocktail containing both primary antibodies (e.g., rabbit and guinea pig) diluted in Multiplex Antibody Solution for 1 hour at room temperature, then incubate at 4°C overnight.
Multiplex Antibody Solution Formulation [74]
Reagent % of final volume IHC-PBS 95.65% Triton X-100 0.3% Tween-20 0.05% Normal Goat Serum (NGS) 2% Normal Donkey Serum (NDS) 2% Wash: Rinse sections with IHC-PBS containing 2% NGS and 2% NDS for 2 x 5 minutes.
- Incubation with Secondary Antibody Cocktail: Incubate sections with a cocktail of host-specific secondary antibodies conjugated to different fluorescent dyes, diluted in Multiplex Antibody Solution, for 1 hour at room temperature. Then incubate at 4°C overnight.
- Wash and Mount: Rinse sections and proceed to mounting and nuclear staining with DAPI [74] [73].
This sequential method includes a critical blocking step to prevent cross-reactivity.
First Primary Antibody: Incubate sections with the first rabbit primary antibody (unconjugated) diluted in Antibody Solution for 1 hour at room temperature, then at 4°C overnight.
Antibody Solution Formulation [74]
Reagent % of final volume IHC-PBS 97.65% Triton X-100 0.3% Tween-20 0.05% Normal Goat Serum (NGS) 2% First Secondary Antibody: Wash and incubate with a goat anti-rabbit secondary antibody conjugated to fluorescent dye A in Antibody Solution for 1 hour at room temperature, then at 4°C overnight.
- Blocking: Wash sections and incubate with 2% normal rabbit serum (NRS) for 1 hour at room temperature to saturate any free binding sites on the secondary antibody.
- Second Primary Antibody: Wash and incubate with the second rabbit primary antibody directly conjugated to a different fluorescent dye (dye B), diluted 1:50–1:60 in Antibody Solution for 1 hour at room temperature, then at 4°C overnight.
- Wash and Mount: Rinse sections and proceed to mounting and nuclear staining with DAPI [74].
Workflow Visualization
The following diagram illustrates the logical decision-making process and the key steps involved in the two main multiplexing workflows.
The Scientist's Toolkit
Table 3: Essential Research Reagents for Frozen Section IHC
| Item | Function/Benefit |
|---|---|
| O.C.T. Compound | Optimal Cutting Temperature compound; a water-soluble embedding medium that supports tissue architecture during cryostat sectioning [3]. |
| Normal Sera (e.g., Goat, Donkey) | Used in blocking buffers and antibody solutions to reduce non-specific background staining by occupying hydrophobic and charged sites [74] [3]. |
| Triton X-100 | A non-ionic detergent used for permeabilization, allowing antibodies to access intracellular targets by dissolving cell membranes [74] [73]. |
| Paraformaldehyde (PFA) | A cross-linking fixative (typically 4%) that preserves tissue morphology and stabilizes protein antigens while retaining immunoreactivity [3]. |
| Sucrose Solution | A cryoprotectant; reduces ice crystal formation during the freezing process, which helps to preserve fine cellular structure [3]. |
| DAPI (4',6-diamidino-2-phenylindole) | A fluorescent nuclear counterstain that binds to DNA, allowing for the identification and quantification of all cells in the field [74] [73]. |
| Anti-fade Mounting Medium | Preserves fluorescence by reducing photobleaching, thereby extending the signal lifetime for microscopy and archival storage [73] [3]. |
Ensuring Reliability: Validation, Controls, and Method Comparison
Implementing Essential Controls for Assay Validation
Assay validation is a critical process in biomedical research and drug development, ensuring that analytical methods used for supporting drug and biological product applications are reliable for their intended purpose. In the specific context of immunofluorescence protocols for frozen sections, implementing robust controls is fundamental to generating reproducible, specific, and quantitatively accurate data. This document outlines the essential controls and validation strategies required for high-quality immunofluorescence (IF) assays, providing researchers with a framework to ensure data integrity from tissue preparation through final imaging.
The validation of immunofluorescence assays for frozen sections presents unique challenges, including preserving antigenicity, maintaining tissue morphology, and controlling for variabilities in fixation, sectioning, and staining protocols. Within the broader thesis on optimizing immunofluorescence for frozen sections, this note establishes the control framework necessary to draw biologically meaningful and statistically valid conclusions, which is particularly crucial for researchers and drug development professionals relying on these assays for preclinical and diagnostic decision-making.
Core Principles of Assay Validation
Validation ensures that an immunofluorescence assay is reliable, reproducible, and fit for its intended purpose, which is especially critical for assays informing patient care and treatment decisions [76]. The purpose of the assay directly correlates with the level of validation required.
Key Validation Parameters
For an immunofluorescence assay to be considered validated, several performance characteristics must be systematically evaluated and documented. The table below summarizes the essential parameters, their definitions, and acceptable criteria for a qualified IF assay.
Table 1: Key Performance Parameters for Immunofluorescence Assay Validation
| Parameter | Definition | Acceptance Criteria |
|---|---|---|
| Specificity | Ability to accurately measure the target antigen without interference. | Minimal to no signal in negative control samples (no primary antibody, isotype control). |
| Sensitivity | Lowest detectable level of the target antigen that can be distinguished from background. | Consistent detection of target at the lowest expected expression levels. |
| Precision | Degree of reproducibility among repeated measurements. | Intra-assay CV < 15%; Inter-assay CV < 20%. |
| Linear Range | Range of antigen expression over which the assay provides a linear fluorescent response. | R² value > 0.95 for a dilution series of a known positive control. |
| Robustness | Capacity of the assay to remain unaffected by small, deliberate variations in method parameters. | Consistent performance with minor changes in fixation time, antibody incubation time, or temperature. |
Essential Control Strategies for Immunofluorescence
Implementing a comprehensive panel of controls is non-negotiable for a validated immunofluorescence assay. These controls verify the specificity of the antibody-antigen interaction, the quality of the tissue sample, and the functionality of the detection system.
Experimental Workflow and Control Points
The following diagram illustrates a standard immunofluorescence workflow for frozen sections, highlighting the critical stages where specific controls must be implemented to ensure assay validity.
Hierarchy of Essential Controls
The controls required for a validated assay can be categorized hierarchically based on their function, from establishing baseline specificity to confirming the final result.
Detailed Immunofluorescence Protocol with Integrated Controls
This protocol provides a detailed methodology for immunofluorescence staining of frozen tissue sections, with integrated validation controls highlighted at each critical step.
Tissue Preparation and Sectioning
Reagents:
- O.C.T. Embedding Compound: For mounting and freezing tissue to preserve structure during sectioning [3] [15].
- Fixative: 4% Paraformaldehyde (PFA) or 10% Neutral Buffered Formalin. Cross-links proteins to preserve tissue morphology and antigenicity [3] [77].
- Cryoprotectant: 30% Sucrose Solution. Prevents ice crystal formation that can damage tissue ultrastructure [4] [3].
Protocol:
- Fixation: Fix tissue by perfusion or immersion in an appropriate volume of fixative (e.g., 4% PFA for 4-24 hours at room temperature). Control: Optimize fixation time and temperature for your specific antigen; over-fixation can mask epitopes, while under-fixation degrades morphology [3] [15].
- Cryoprotection: Transfer fixed tissue to 30% sucrose in PBS or a sucrose/formaldehyde mix and incubate at 4°C until the tissue sinks (typically overnight) [4] [15].
- Embedding: Embed tissue in O.C.T. compound, orient correctly, and snap-freeze using dry ice or isopentane cooled by liquid nitrogen. Store at -80°C [3] [15].
- Sectioning:
- Equilibrate the frozen block to the cryostat temperature (typically -15°C to -23°C).
- Cut sections at 5-20 µm thickness (10 µm is common).
- Thaw-mount sections onto gelatin-coated or positively charged slides. Control: Assess tissue morphology on a test slide stained with H&E to confirm integrity [3] [77].
- Air-dry slides for 30 minutes. Slides can be stored at -80°C for up to 12 months [15].
Staining Procedure with Embedded Controls
Reagents:
- Blocking Buffer: 1X PBS with 1-5% normal serum (from secondary antibody host species) and 0.1-0.3% Triton X-100. Reduces non-specific antibody binding and permeabilizes membranes [3] [77] [15].
- Primary Antibody Diluent: Blocking buffer or 1% serum in PBS.
- Wash Buffer: 1X PBS or 1X TBS.
- Fluorescent Secondary Antibody: Species-specific, conjugated to a fluorophore like Alexa Fluor dyes.
- Nuclear Counterstain: DAPI (4',6-diamidino-2-phenylindole). Binds to DNA to label nuclei [3] [15].
- Anti-fade Mounting Medium: Presves fluorescence and prevents photobleaching [15].
Staining Steps:
- Slide Preparation: Warm stored slides to room temperature for 10-20 minutes. Rehydrate in wash buffer for 10 minutes [3] [77].
- Permeabilization and Blocking:
- Primary Antibody Incubation:
- Prepare the primary antibody at the optimal dilution in antibody diluent.
- Apply to the tissue section.
- Incubate overnight at 4°C in a humidified chamber. This extended incubation at a lower temperature optimizes specific binding and reduces background [77] [15].
- Critical Controls to Include:
- No Primary Antibody Control: Incubate with diluent only. This identifies background from the secondary antibody.
- Isotype Control: Incubate with a non-specific immunoglobulin of the same isotype and concentration as the primary antibody. This assesses non-specific Fc receptor binding.
- Absorption Control: Pre-incubate the primary antibody with a 5-10 fold molar excess of its target peptide antigen before applying to the tissue. The specific signal should be abolished.
- Washing: Wash slides 3 times for 10-15 minutes each in wash buffer [3] [15].
- Secondary Antibody Incubation:
- Washing: Wash slides 3 times for 10-15 minutes each in wash buffer in the dark.
- Counterstaining and Mounting:
- Incubate with DAPI (e.g., 1:5000 dilution in PBS) for 2-5 minutes at room temperature.
- Rinse briefly with PBS or wash buffer.
- Tap off excess liquid and apply a drop of anti-fade mounting medium.
- Carefully place a coverslip and seal the edges with clear nail polish if necessary. Allow to dry in the dark [15].
- Storage: Store finished slides at 4°C or -20°C in the dark.
The Scientist's Toolkit: Essential Research Reagent Solutions
The following table details the key reagents and materials required for a successful and validated immunofluorescence experiment on frozen sections.
Table 2: Essential Research Reagent Solutions for Immunofluorescence
| Reagent/Material | Function/Purpose | Key Considerations |
|---|---|---|
| O.C.T. Compound | Water-soluble embedding medium for freezing and supporting tissue during cryosectioning. | Ensures structural integrity of the tissue block for thin sectioning. |
| Paraformaldehyde (PFA) | Cross-linking fixative that preserves tissue architecture and immobilizes antigens. | Concentration and fixation time must be optimized for each antigen to balance morphology and epitope preservation [3]. |
| Sucrose Solution | Cryoprotectant that displaces water, preventing destructive ice crystal formation during freezing. | Tissue is typically incubated until it sinks, indicating full penetration. |
| Normal Serum | Component of blocking buffer; reduces non-specific background staining by occupying reactive sites. | Should be from the same species as the secondary antibody host [15]. |
| Triton X-100 | Non-ionic detergent used in blocking and antibody buffers to permeabilize cell membranes. | Allows antibodies to access intracellular targets; concentration is critical (typically 0.1-0.3%) [15]. |
| Validated Primary Antibody | Binds specifically to the target protein of interest. | Must be validated for immunofluorescence on frozen tissue; refer to manufacturer's datasheet for recommended dilutions [15]. |
| Fluorophore-conjugated Secondary Antibody | Binds to the primary antibody and provides the detectable signal. | Must be highly cross-adsorbed against other species to minimize cross-reactivity; select appropriate fluorophore for your microscope's filter sets. |
| DAPI | DNA-intercalating dye used as a nuclear counterstain. | Fluoresces blue; helps visualize tissue architecture and confirm cell/nuclear integrity [3]. |
| Anti-fade Mounting Medium | Preserves fluorescence signal during storage and imaging by reducing photobleaching. | Essential for maintaining signal intensity over time, especially for labile fluorophores [15]. |
Imaging, Analysis, and Validation
The final stage of the assay involves image acquisition and quantitative analysis, where additional controls are necessary to ensure data accuracy.
Imaging Controls and Quantitative Standards
- Microscope Performance: Regularly calibrate the microscope using fluorescent beads or other standards to ensure intensity measurements are linear and comparable over time.
- Cross-Talk Controls: For multiplex IF (multiple targets), image each fluorophore separately using single-stained control samples to set acquisition parameters that eliminate bleed-through between channels.
- Exposure Control: Use consistent exposure times, gains, and light intensities across compared samples within an experiment. Avoid pixel saturation.
- Background Quantification: Measure fluorescence intensity in areas of the tissue expected to be negative (e.g., based on the no-primary control) and set a threshold for positive signal. The signal-to-noise ratio should be sufficiently high (e.g., >3:1).
Regulatory and Quality Considerations
For assays intended for diagnostic use or supporting regulatory submissions, validation requirements become more stringent. The Clinical Laboratory Improvements Amendment (CLIA) provides a baseline for laboratory testing, but Pre-market Approval (PMA) submissions to the FDA require more extensive studies [76]. Guidelines from bodies like the Clinical Laboratory Standards Institute (CLSI) are critical for designing these validation studies. A robust quality management system, compliant with standards such as ISO 15189 for medical laboratories and ISO 13485 for quality management systems, is often required for commercialization, particularly for companion diagnostics [76].
Implementing essential controls is not an optional extra but a fundamental requirement for any rigorous immunofluorescence assay using frozen sections. From tissue preparation and antibody specificity checks to imaging calibration and quantitative analysis, each control serves to bolster the validity and reliability of the experimental data. By systematically integrating the controls and validation protocols outlined in this document, researchers can generate high-quality, reproducible results that are fit for their intended purpose, whether in basic research or advanced drug development contexts.
The choice between fresh frozen (FF) and formalin-fixed paraffin-embedded (FFPE) tissue sections is a fundamental consideration in biomedical research and drug development. Each preservation method offers distinct advantages and limitations that significantly impact experimental outcomes, particularly in immunofluorescence (IF) studies. FF tissues are preserved by rapid cooling, while FFPE tissues undergo chemical fixation in formalin followed by embedding in paraffin wax [14]. The decision between these methods influences nucleic acid and protein integrity, antigen preservation, experimental workflow, and compatibility with analytical platforms. This article provides a detailed comparison of FF and FFPE sections, focusing on their applications in immunofluorescence protocols, to guide researchers in selecting the appropriate methodology for their specific research objectives.
Core Characteristics and Comparative Analysis
Fundamental Differences in Tissue Preservation
Fresh Frozen (FF) Tissue preservation involves rapid cooling of tissue specimens using liquid nitrogen or pre-cooled isopentane, a process known as snap-freezing [14] [3] [12]. This method immediately halts cellular processes and enzymatic degradation, preserving biological molecules in a state closely resembling their native condition. Frozen tissues are typically stored at -80°C until sectioning in a cryostat [12].
Formalin-Fixed Paraffin-Embedded (FFPE) Tissue preservation employs formalin to create cross-links between proteins, effectively stabilizing tissue architecture [14] [78]. Following fixation, tissues are dehydrated through graded alcohols, cleared in xylene, and infiltrated with paraffin wax to create blocks that can be stored at room temperature for decades [78]. This method provides excellent morphological preservation and facilitates thin sectioning (typically 2-5 μm) using a microtome [78].
Comprehensive Comparison of Technical Attributes
Table 1: Comparative analysis of fresh frozen versus FFPE tissue sections
| Parameter | Fresh Frozen (FF) Sections | Formalin-Fixed Paraffin-Embedded (FFPE) Sections |
|---|---|---|
| Nucleic Acid Quality | High-quality, minimally degraded DNA and RNA [14] | Moderately to highly fragmented nucleic acids due to cross-linking and chemical modifications [14] |
| Protein Integrity | Preserves native protein structure and post-translational modifications; minimal chemical alterations [79] | Cross-linking induces modifications; formylation and methylation common on peptides [79] |
| Antigen Preservation | Native epitopes preserved; ideal for labile antigens [12] | Antigen masking due to cross-links; often requires retrieval techniques [80] [81] |
| Morphological Quality | Moderate; potential for ice crystal artifacts [12] | Excellent tissue architecture and cellular detail [80] [78] |
| Storage Requirements | -80°C ultra-low freezers; energy-intensive [14] | Room temperature; cost-effective for biobanking [14] [78] |
| Sample Availability | Limited biobanks; logistically challenging [14] | Vast archives (400 million to 1+ billion samples) [14] [78] |
| Immunofluorescence Workflow | Simplified; typically no antigen retrieval needed [3] [40] | Requires deparaffinization, rehydration, and antigen retrieval [80] [81] |
| Biosafety Considerations | Retains potential pathogens; may require special handling [81] | Formalin fixation inactivates most infectious agents [81] |
| Long-term Stability | Vulnerable to power failures; limited shelf life [14] | Decades-long stability at room temperature [14] [78] |
| Multi-omics Integration | Gold standard for RNA-Seq and proteomics [14] [79] | Compatible with modern genomics and proteomics with specialized protocols [14] [79] [78] |
Quantitative Performance Metrics
Table 2: Quantitative performance comparison from experimental studies
| Analysis Type | Performance Metric | Fresh Frozen | FFPE | Key Study Findings |
|---|---|---|---|---|
| Whole Transcriptome Sequencing [82] | Correlation of protein-coding transcripts | Reference standard | ρ > 0.94 | High correlation maintained despite FFPE RNA degradation |
| Proteomic Analysis [79] | Proteins identified | 5,378 | 5,338 | Comparable protein detection (p = 0.053) |
| Proteomic Analysis [79] | Peptides with chemical modifications | 8% | 23% | Significantly more modifications in FFPE (p < 0.001) |
| Next-Generation Sequencing [14] | Gene detection overlap | Reference standard | >70% significant overlap | FFPE suitable with optimized protocols |
| Next-Generation Sequencing [14] | Mapping statistics (% uniquely mapped reads) | Comparable between methods | Comparable to FF | No significant difference in mapping efficiency |
Experimental Protocols
Immunofluorescence Protocol for Frozen Tissue Sections
Principle: This protocol preserves native antigenicity through rapid freezing without chemical cross-linking, making it ideal for detecting epitopes sensitive to formalin fixation [12].
Materials Required:
- Optimal Cutting Temperature (OCT) compound
- Isopentane cooled by liquid nitrogen or dry ice
- Cryostat
- Gelatin or poly-L-lysine coated slides
- Acetone, methanol, or 4% paraformaldehyde fixative
- Wash buffer (PBS or TBS)
- Permeabilization buffer (0.1-0.4% Triton X-100 in PBS)
- Blocking solution (2-10% normal serum)
- Primary antibodies
- Fluorescently-labeled secondary antibodies
- DAPI solution (for nuclear counterstaining)
- Anti-fade mounting medium
Procedure:
Tissue Freezing and Sectioning
- Embed fresh tissue in OCT compound in an appropriate mold [12].
- Snap-freeze by immersing the mold in isopentane cooled by liquid nitrogen or dry ice for 10-20 seconds until the block turns opaque [12].
- Store frozen tissue blocks at -80°C until sectioning.
- Equilibrate frozen blocks to cryostat temperature (-15°C to -23°C) [3].
- Cut 5-15 μm sections using a cryostat [3] [40].
- Thaw-mount sections onto coated slides and air dry for 30 minutes [3].
Fixation
Blocking and Permeabilization
Antibody Staining
- Apply primary antibody diluted in 1% BSA or serum-containing dilution buffer.
- Incubate for 1-2 hours at room temperature or overnight at 4°C [12].
- Wash 3 times for 5-15 minutes each with wash buffer [3] [40].
- Apply fluorophore-conjugated secondary antibody diluted in antibody diluent.
- Incubate for 30-60 minutes at room temperature, protected from light [3].
- Wash 3 times for 5-15 minutes each with wash buffer [3] [40].
Nuclear Counterstaining and Mounting
Immunofluorescence Protocol for FFPE Tissue Sections
Principle: This protocol leverages the superior morphology and stability of FFPE tissues while overcoming protein cross-links through antigen retrieval to enable high-quality immunofluorescence [80] [81].
Materials Required:
- FFPE tissue blocks
- Xylene or xylene substitutes
- Graded ethanol series (100%, 95%, 70%, 50%)
- Antigen retrieval buffer (citrate-based pH 6.0 or Tris-EDTA pH 9.0)
- Wash buffer (PBS or TBS)
- Blocking solution (2-10% normal serum or protein block)
- Primary antibodies validated for FFPE
- Fluorescently-labeled secondary antibodies
- DAPI solution
- Anti-fade mounting medium
Procedure:
Deparaffinization and Rehydration
Antigen Retrieval
- Choose appropriate antigen retrieval method based on target antigen:
- Alternative: Enzymatic retrieval (proteinase K, trypsin) for 5-15 minutes at 37°C.
Blocking
Antibody Staining
- Apply primary antibody diluted in antibody diluent.
- Incubate for 1-2 hours at room temperature or overnight at 4°C [80].
- Wash 3 times for 5 minutes each with wash buffer containing 0.025-0.1% Tween-20.
- Apply fluorophore-conjugated secondary antibody diluted in antibody diluent.
- Incubate for 30-60 minutes at room temperature, protected from light [80].
- Wash 3 times for 5 minutes each with wash buffer.
Nuclear Counterstaining and Mounting
- Apply DAPI solution (1:5000 dilution) for 2-5 minutes.
- Rinse briefly with dH₂O or wash buffer.
- Mount with anti-fade mounting medium and apply coverslip.
- Seal coverslip edges with clear nail polish.
- Store slides at 4°C or -20°C protected from light.
- Image using fluorescence or confocal microscopy [80].
The Scientist's Toolkit: Essential Research Reagents
Table 3: Key research reagent solutions for immunofluorescence workflows
| Reagent Category | Specific Examples | Function | Application Notes |
|---|---|---|---|
| Tissue Embedding Media | OCT compound | Supports tissue during cryostat sectioning; maintains structural integrity [12] | Optimal for frozen sections; water-soluble |
| Fixatives | 4% Paraformaldehyde (PFA), Acetone, Methanol | Preserves tissue architecture; prevents degradation [12] | PFA provides strong cross-linking; acetone/methanol better for some epitopes |
| Antigen Retrieval Reagents | Citrate buffer (pH 6.0), Tris-EDTA (pH 9.0), Proteinase K | Reverses formalin-induced cross-links; exposes masked epitopes [80] [81] | Critical for FFPE IF; pH and method require optimization |
| Blocking Solutions | Normal serum, BSA, Commercial protein blocks | Reduces non-specific antibody binding; minimizes background [12] | Serum should match secondary antibody host species |
| Permeabilization Agents | Triton X-100, Tween-20, Saponin | Enables antibody access to intracellular targets [83] | Concentration optimization essential for balance between access and preservation |
| Detection Systems | Alexa Fluor series, NorthernLights secondaries | High-sensitivity fluorescence detection with minimal photobleaching [3] [80] | Bright, photostable conjugates improve signal-to-noise ratio |
| Mounting Media | Anti-fade mounting media with DAPI | Preserves fluorescence; provides nuclear counterstain [3] [83] | Prolongs signal stability; DAPI confirms tissue architecture |
| Specialized Stains | DAPI, Phalloidin, WGA | Nuclear, F-actin, and membrane staining for structural context [3] [83] | Essential for morphological reference in multiplex experiments |
Advanced Applications and Integration with Next-Generation Technologies
Super-Resolution Microscopy of FFPE Tissues
Recent advancements in optical super-resolution microscopy (SRM) have enabled nanoscale visualization of FFPE histological samples, bridging the gap between conventional light microscopy and electron microscopy [78]. Several SRM strategies have been successfully implemented:
- Structured Illumination Microscopy (SIM) provides approximately twice the resolution of conventional microscopy and has been applied to study glomerulopathies in kidney samples and macular degeneration in retinal tissues [78].
- Stimulated Emission Depletion (STED) Microscopy offers deterministic super-resolution by narrowing the effective fluorescence point spread function and has been used for nanoscale assessment of breast cancer tissues [78].
- Single-Molecule Localization Microscopy (SMLM) techniques achieve ~20 nm resolution by temporally separating the emission of individual fluorophores and have been implemented to study HER2 receptor clustering in breast cancer, synapse interactions in Alzheimer's disease, and slit diaphragm architecture in kidney glomeruli [78].
- Expansion Microscopy (ExM) physically enlarges biological specimens through hydrogel embedding, enabling nanoscale imaging on conventional microscopes and showing particular promise for FFPE samples [78].
These SRM methods allow visualization of subcellular structures crucial for accurate disease diagnosis, including tight junctions, synapses, foot processes, and microvilli brush-border that were previously only visible by electron microscopy [78].
Multi-Omics Integration
Both FF and FFPE tissues can be utilized in multi-omics approaches, though with different considerations:
Genomics and Transcriptomics: While frozen tissue remains the gold standard for RNA-Seq, optimized protocols enable reliable whole transcriptome sequencing from FFPE tissues with high correlations (ρ > 0.94) for protein-coding genes [82]. FFPE-derived RNA is typically more degraded but can still yield valuable data for expression analysis [14] [82].
Proteomics: Bottom-up proteomic analysis reveals that FFPE and fresh frozen tissues (FFT) facilitate similar numbers of protein identifications (5,378 vs. 5,338 proteins, p = 0.053) [79]. However, marked differences in proteome composition are apparent, with FFPE specimens containing significantly more chemical modifications (23% of peptides vs. 8% in FFT) and enrichment of smaller proteins [79].
The choice between FF and FFPE for multi-omics studies depends on the specific application, with FF offering superior biomolecule integrity and FFPE providing access to vast archival collections with rich clinical annotation [14] [79].
The decision between fresh frozen and FFPE tissue sections involves careful consideration of multiple factors, including analytical applications, sample availability, infrastructure requirements, and downstream technologies. Fresh frozen sections preserve native biomolecule integrity and are ideal for detecting labile epitopes, making them particularly valuable for transcriptomics, proteomics, and immunofluorescence targeting sensitive antigens. In contrast, FFPE sections offer superior morphological preservation, room temperature storage stability, access to vast archival collections, and compatibility with clinical workflows.
Modern methodologies, including optimized antigen retrieval techniques, specialized protocols, and advanced imaging technologies, have significantly narrowed the performance gap between these preservation methods. The development of robust immunofluorescence protocols for FFPE tissues has been particularly transformative, enabling high-quality multiplex imaging from archival samples [80] [81]. Similarly, advances in genomics and proteomics have made FFPE tissues viable for multi-omics approaches, unlocking the potential of extensive biobanks for retrospective studies [14] [79] [78].
Researchers should base their selection on specific project requirements, recognizing that methodological choices made during sample preservation will influence experimental possibilities throughout the research pipeline. With proper protocol optimization and quality control, both fresh frozen and FFPE tissues can yield valuable scientific insights across diverse applications in basic research and drug development.
Integrating with Downstream Analyses and Spatial Biology
The integration of immunofluorescence (IF) with advanced spatial transcriptomics technologies represents a transformative approach in modern biological research, enabling a multi-modal understanding of tissue architecture and function. Immunofluorescence provides high-resolution protein localization data, while spatial transcriptomics captures the genome-wide expression profile within its native spatial context. Combining these powerful techniques allows researchers and drug development professionals to correlate protein expression and subcellular localization with transcriptional activity across complex tissues. This integrated framework is particularly crucial for investigating heterogeneous tissues, such as tumors and developing organs, where understanding the spatial relationship between different cell types and their functional states is key to unlocking novel biological mechanisms and therapeutic targets. The protocols and application notes detailed herein are framed within a broader thesis on immunofluorescence for frozen sections, providing a standardized workflow for generating high-quality data that is primed for robust downstream spatial analyses.
Essential Immunofluorescence Protocol for Frozen Sections
A reliable immunofluorescence protocol is the foundational step for any subsequent spatial biology integration. The following detailed methodology is optimized for frozen tissue sections to preserve antigenicity and cellular morphology [84] [85].
Solutions and Reagents
The table below lists the essential reagents required for the protocol, along with their specific functions in the experimental workflow [84].
Table 1: Key Research Reagent Solutions for Immunofluorescence
| Reagent | Composition / Preparation | Primary Function |
|---|---|---|
| Fixative | 4% Formaldehyde, Methanol-Free [84] | Preserves cellular architecture and immobilizes antigens. |
| Wash Buffer | 1X Phosphate Buffered Saline (PBS), pH 8.0 [84] | Rinses away excess fixative and antibodies without disrupting the sample. |
| Permeabilization & Blocking Buffer | 1X PBS / 5% Normal Serum / 0.3% Triton X-100 [84] | Permeabilizes cell membranes for antibody access and blocks non-specific binding sites. |
| Antibody Dilution Buffer | 1X PBS / 1% BSA / 0.3% Triton X-100 [84] | Dilutes primary and secondary antibodies to maintain stability and reduce background. |
| Primary Antibody | Target-specific antibody diluted in Antibody Dilution Buffer. | Binds specifically to the protein antigen of interest. |
| Fluorophore-conjugated Secondary Antibody | Species-reactive antibody diluted in Antibody Dilution Buffer. | Binds to the primary antibody and provides a detectable fluorescent signal. |
| Nuclear Counterstain | DAPI (1:1000 dilution in PBS) [85] | Labels all nuclei, facilitating cell counting and spatial orientation. |
| Mounting Medium | Anti-fade mounting gel or resin. | Preserves fluorescence and prepares the sample for microscopy. |
Step-by-Step Experimental Workflow
The following diagram illustrates the complete immunofluorescence workflow for frozen sections, from sample preparation to imaging.
Diagram 1: Immunofluorescence workflow for frozen sections.
- Tissue Preparation and Fixation: Begin with frozen tissue sections placed on slides. Immediately fix the samples by covering them with 2–3 mm of fresh, 4% methanol-free formaldehyde. Incubate for 15 minutes at room temperature. Rinse the slides three times in 1X PBS for 5 minutes each to remove all traces of the fixative [84].
- Permeabilization and Blocking: Cover the specimen with Blocking Buffer (1X PBS, 5% normal serum, 0.3% Triton X-100) and incubate for 60 minutes at room temperature. This step is critical for allowing antibody penetration and minimizing non-specific background signal [84].
- Primary Antibody Incubation: While blocking, prepare the primary antibody at the manufacturer's recommended dilution in Antibody Dilution Buffer. Aspirate the blocking solution and apply the diluted primary antibody to the tissue section. Incubate overnight at 4°C in a humidified chamber to ensure specific binding [84].
- Washing and Secondary Antibody Incubation: Rinse the slides three times in 1X PBS for 5 minutes each to remove unbound primary antibody. Apply the fluorophore-conjugated secondary antibody, diluted in Antibody Dilution Buffer, and incubate for 1–2 hours at room temperature, protected from light [84].
- Counterstaining and Mounting: Following incubation, wash the slides three times in 1X PBS for 5 minutes each, protected from light. Apply a nuclear counterstain such as DAPI (diluted 1:1000 in PBS) for 5 minutes, followed by a final 5-minute wash in PBS [85]. Mount the samples with an appropriate anti-fade mounting medium and store at 4°C protected from light until imaging [84].
Multi-Slice Spatial Transcriptomics Integration
Spatial transcriptomics (ST) technologies measure genome-wide gene expression while preserving the spatial coordinates of cells or spots within a tissue section. To gain a comprehensive, three-dimensional understanding of a tissue, data from multiple consecutive slices must be aligned and integrated. This multi-slice integration is a non-trivial computational task due to tissue heterogeneity, technical variability, and spatial warping [86] [87].
Benchmarking Integration Methods
A comprehensive benchmark study evaluated 12 state-of-the-art multi-slice integration methods across 19 diverse datasets. These methods can be broadly categorized by their underlying algorithms, each with distinct strengths and limitations for specific applications [86].
Table 2: Benchmarking Multi-Slice Spatial Transcriptomics Integration Methods
| Method Category | Representative Tools | Primary Strategy | Key Strengths | Considerations for Integration with IF |
|---|---|---|---|---|
| Deep Learning-Based | GraphST, SPIRAL, STAIG [86] | Uses variational autoencoders (VAEs) or graph neural networks (GNNs) to integrate data and correct batch effects. | High capacity for modeling complex, non-linear relationships in large datasets. | Can leverage protein expression data from IF as an additional input modality for more robust integration. |
| Statistical Methods | Banksy, MENDER, PRECAST [86] | Leverages cellular microenvironment or abundance data; may use batch correction tools (e.g., Harmony). | Often more interpretable; naturally mitigates batch effects through spatial context. | IF-based spatial domains can serve as biological labels to validate and guide the integration process. |
| Hybrid Methods | CellCharter, STAligner [86] | Combines deep learning frameworks with spatial context refinement. | Balances the power of deep learning with spatial statistical constraints. | Ideal for projects where IF-defined regions of interest need to be precisely aligned across multiple slices. |
The benchmarking revealed that no single method performs best across all datasets and tasks. Method selection is highly dependent on the specific technology, dataset size, and the primary downstream application, such as spatial clustering or 3D alignment [86]. For instance, while some methods excel at removing batch effects, others are superior at preserving fine-grained biological variance.
Downstream Analytical Applications
The integration of immunofluorescence and spatial transcriptomics data enables a powerful pipeline of downstream analyses that provide deeper biological insights, crucial for drug development and disease research.
The Integrated Spatial Analysis Pipeline
The relationship between multi-slice integration and its key downstream applications forms a hierarchical workflow where the quality of each step influences the next [86].
Diagram 2: Integrated spatial biology analysis pipeline.
- Multi-Slice Integration: This is the foundational step. Methods generate spatially-aware embeddings that jointly capture gene expression and spatial context from multiple tissue slices, effectively removing technical batch effects. The quality of this integration directly impacts all subsequent analyses [86].
- Spatial Clustering: Operating on the integrated embeddings, unsupervised clustering algorithms identify distinct spatial domains or cell communities within the tissue. These domains represent areas with similar transcriptomic and/or protein profiles. Studies show that clustering performance is strongly influenced by the quality of the upstream integration [86].
- Spatial Alignment: This task involves aligning multiple 2D tissue slices into a common coordinate system to reconstruct a 3D representation of the original tissue. Methods can be "integration-based," relying on spatial domains from clustering to guide alignment, or "non-integration-based," using image registration or optimal transport on raw data [86] [87]. Integration-based alignment is closely correlated with spatial clustering performance.
- Slice Representation and Biomarker Discovery: In this final stage, each tissue slice is characterized based on its composition of spatial domains. This allows for connection with clinical metadata (e.g., patient survival, drug response) to derive biological insights and identify novel protein and gene expression biomarkers associated with specific tissue structures or disease states [86].
Actionable Protocol for Integrated Analysis
To implement a robust integrated analysis, follow this sequential protocol:
- Step 1: Coordinated Data Generation: Perform immunofluorescence and spatial transcriptomics on consecutive frozen sections from the same tissue sample. Ensure sectioning thickness and orientation are consistent to facilitate later alignment.
- Step 2: Image and Data Preprocessing: Process IF images to segment cells and quantify protein expression levels. Preprocess ST data according to the platform-specific guidelines, including quality control, normalization, and spot-cell segmentation.
- Step 3: Method Selection for Integration: Choose a multi-slice integration method based on your data and goal. For large, complex datasets (e.g., from 10X Visium), deep learning-based methods like GraphST may be suitable. For studies focusing on the cellular niche, statistical methods like Banksy or MENDER are advantageous. If IF-defined regions are a priority, a hybrid method like CellCharter or STAligner is recommended [86].
- Step 4: Execute Downstream Workflow: Use the integrated embeddings for spatial clustering (e.g., with Leiden clustering) to define domains. Validate these domains against the protein expression patterns from your IF data. Subsequently, use an integration-based alignment tool like STAligner or a non-integration-based tool like PASTE or STalign for 3D reconstruction, depending on the availability of reliable spatial domains [86] [87].
- Step 5: Cross-Modal Correlation and Biomarker Identification: Correlate the abundance of specific spatial domains or transcriptional states with protein marker intensity across slices. Perform differential expression analysis between domains to identify uniquely enriched genes, combining them with IF data to propose multi-omic biomarkers for validation.
Best Practices for Imaging, Data Analysis, and Reproducibility
Immunofluorescence (IF) staining of frozen tissue sections is a powerful technique for visualizing protein expression and spatial relationships within a tissue context. When performed with precision, it provides invaluable data for understanding cellular interactions, particularly in complex environments like the tumor microenvironment. However, the journey from tissue preparation to final data interpretation is fraught with potential technical variations that can compromise reproducibility. This application note details established and emerging best practices for imaging and analyzing immunofluorescence data, with a focus on mitigating batch effects and ensuring that results are both robust and reliable. Adherence to these guidelines is essential for generating high-quality, publication-ready data that can be confidently used in drug development and translational research.
Standardized Immunofluorescence Protocol for Frozen Sections
A consistent and well-optimized staining protocol is the foundation for reproducible imaging and analysis. The following methodology has been compiled from optimized protocols to ensure reliability [20] [15] [3].
Materials and Reagents
- Tissue: Frozen tissue sections (5-15 µm thick) mounted on gelatin or poly-L-lysine coated slides.
- Fixative: 4% Paraformaldehyde (PFA) or PLP (Periodate-Lysine-Paraformaldehyde) fixative for superior tissue stabilization [20].
- Blocking Buffer: 1-5% serum in PBS-T (PBS with 0.3% Triton X-100). The serum should match the host species of the secondary antibody [15] [3].
- Antibodies: Validated primary antibodies and fluorophore-conjugated secondary antibodies.
- Nuclear Counterstain: DAPI (4',6-diamidino-2-phenylindole).
- Mounting Medium: Anti-fade mounting medium.
Step-by-Step Procedure
- Tissue Preparation and Fixation: Bring frozen slides to room temperature and rehydrate in PBS for 10 minutes. For tissues not fixed prior to freezing, fix with cold acetone or methanol for 10 minutes [15]. For pre-fixed tissues, a post-sectioning fixation with 1-4% PFA for 8-20 minutes is recommended [3] [20].
- Permeabilization and Blocking: Draw a hydrophobic barrier around the tissue. Permeabilize sections by washing twice with PBS-T for 10 minutes each. Incubate with blocking buffer for 30 minutes at room temperature to reduce non-specific background [15] [4].
- Antibody Staining: Apply primary antibody diluted in incubation buffer (e.g., 1% BSA, 1% serum in PBS-T) and incubate for 1-2 hours at room temperature, followed by an overnight incubation at 4°C in a humidified chamber [3]. Wash slides three times for 10-15 minutes in wash buffer. Apply fluorophore-conjugated secondary antibody diluted in incubation buffer and incubate for 1-2 hours at room temperature, protected from light [15].
- Nuclear Staining and Mounting: Incubate with DAPI solution for 2-5 minutes. Perform a final wash in PBS. Mount sections with an anti-fade mounting medium and apply a coverslip [3] [4].
Quantitative Data Analysis and Normalization
Technical variations in staining intensity, tissue fixation, and imaging conditions introduce batch effects that must be corrected to ensure data integrity.
The Challenge of Batch Effects
Multiplexed tissue imaging (MTI) data often exhibit right-skewed and heterogeneous expression patterns. Traditional normalization methods like Z-score and ComBat assume a normal distribution of data and can distort the biologically relevant marker-positive populations [88]. This necessitates robust, distribution-agnostic normalization approaches.
UniFORM Normalization Pipeline
The UniFORM (Universal immunofluorescence normalization) pipeline is a non-parametric, Python-based method designed for MTI data. It operates on two key assumptions:
- Minimal biological variability in negative populations (non-expressing cells) across samples.
- Consistent distribution patterns in positive and negative populations across samples [88].
UniFORM's automated rigid landmark registration aligns the intensity distributions of the negative population, which is biologically invariant and serves as a baseline for technical variation. This process corrects for technical variability while preserving the integrity of the positive, biologically relevant signals [88].
Table 1: Comparison of Intensity Normalization Methods for Multiplex Imaging Data
| Method | Type | Key Principle | Pros | Cons |
|---|---|---|---|---|
| UniFORM [88] | Non-parametric | Aligns negative population peaks across samples | Handles right-skewed data; preserves positive populations; works for feature & pixel-level data | Newer method, requires adoption |
| Z-score [88] | Parametric | Standardizes data using mean and standard deviation | Simple, widely implemented | Assumes normal distribution; can distort skewed data |
| ComBat [88] | Parametric | Empirical Bayes framework for batch adjustment | Effective for known batch effects | Assumes consistent cell composition and normal data |
| MxNorm [88] | Non-parametric | Mean division or B-spline registration | Does not assume normality | Sensitive to skewed data; may remove biological variation |
| FLINO [88] | Non-parametric | Grid-based quantile normalization | Handles pixel-level data | Can over/under-correct; computationally inefficient |
Experimental Workflow for Reproducible IF Analysis
The following diagram outlines the critical steps from sample preparation to data analysis, highlighting key quality control checkpoints essential for reproducibility.
The Scientist's Toolkit: Essential Research Reagents and Materials
Successful execution of a reproducible immunofluorescence experiment relies on carefully selected reagents and tools. The following table details key solutions and their functions.
Table 2: Key Research Reagent Solutions for Immunofluorescence on Frozen Sections
| Item | Function/Description | Application Notes |
|---|---|---|
| OCT Compound | Optimal Cutting Temperature medium; a water-soluble embedding matrix for frozen tissue specimens. | Provides structural support for cryostat sectioning. Ensure the tissue is fully immersed without bubbles [20]. |
| Periodate-Lysine-Paraformaldehyde (PLP) Fixative [20] | A cross-linking fixative that stabilizes tissue by cross-linking proteins and carbohydrates. | Superior for preserving tissue morphology and antigenicity, especially in lymphoid tissues [20]. |
| Hydrophobic Barrier Pen | Used to draw a solvent-resistant barrier around the tissue section on the slide. | Prevents antibody solutions from spreading and minimizes reagent volumes required for staining [20]. |
| Normal Serum | Animal serum (e.g., goat, donkey) used in blocking and antibody dilution buffers. | Reduces non-specific background staining by blocking Fc receptors. The species should match the host of the secondary antibody [15] [3]. |
| Triton X-100 | Non-ionic detergent used in permeabilization buffers. | Disrupts lipid membranes, allowing antibodies to access intracellular targets. Typical concentrations range from 0.1% to 0.5% [15] [3]. |
| Anti-Fade Mounting Medium | Aqueous mounting medium containing reagents that retard photobleaching of fluorophores. | Critical for preserving fluorescence signal during microscopy and long-term slide storage at 4°C or -20°C [15] [3]. |
| Validated Antibody Panels | Primary and secondary antibodies that have been optimized for multiplex IF. | Validation is critical. Use datasheet-recommended dilutions and include appropriate controls (e.g., no primary antibody, isotype controls) [3] [8]. |
| DAPI | DNA-binding dye that fluoresces blue upon binding to adenine-thymine-rich regions of DNA. | A common nuclear counterstain for defining cellular boundaries and enabling cell counting. Incubate for 2-5 minutes [3]. |
Achieving reproducibility in immunofluorescence requires a holistic approach that integrates meticulous sample preparation, rigorous staining protocols, and sophisticated data normalization strategies. The adoption of advanced computational tools like UniFORM for normalizing multiplex imaging data is a significant step toward standardizing results across different batches and platforms. By adhering to these best practices in imaging, analysis, and quality control, researchers can generate robust, high-fidelity data that reliably informs scientific discovery and drug development efforts.
Adapting the Protocol for Specific Tissues and Research Goals
Immunofluorescence (IF) on frozen tissue sections is a powerful technique for visualizing protein expression and spatial organization within a biological context. While a standard protocol provides a foundation, its careful adaptation is paramount for research success. The specific characteristics of the tissue under investigation and the particular goals of the study, such as single-plex versus multiplexed protein detection, require deliberate optimization of each step. This document provides detailed application notes and protocols, framed within broader thesis research on immunofluorescence, to guide researchers and drug development professionals in tailoring these methods for robust and reproducible results.
Tissue-Specific Optimization
The fixation, permeabilization, and blocking steps are highly dependent on tissue architecture and the target antigen. Suboptimal conditions can lead to poor morphology, high background, or false-negative results. The following table summarizes key considerations for different tissue types.
Table 1: Tissue-Specific Protocol Adaptation Guidelines
| Tissue Type | Fixation Recommendations | Permeabilization & Blocking | Section Thickness | Primary Considerations |
|---|---|---|---|---|
| Brain | Overnight in 4% PFA at 4°C [4] | 0.2% Triton X-100; 2-5% serum [89] | 10-30 µm | Antigen preservation in dense neural tissue; high lipid content. |
| Lymphoid Tissue (Spleen, Lymph Node) | 4-6 hours in 4% PFA at room temperature [90] | 0.05-0.1% Triton X-100; 5% serum [90] | 5-10 µm | High density of fragile cells; requires gentle permeabilization. |
| Liver/Kidney | 4-24 hours in 4% PFA at room temperature [90] | 0.4% Triton X-100; 5% serum [90] | 10-20 µm | Dense, protein-rich parenchyma; requires stronger permeabilization. |
| Sciatic Nerve | Overnight in 4% PFA at 4°C [4] | 0.2% Triton X-100; 5-10% serum [4] | ~10 µm [4] | Myelinated axons; specific morphological preservation is critical. |
Workflow for Protocol Adaptation
The following diagram outlines a logical workflow for adapting the core immunofluorescence protocol based on tissue type and research goals, guiding researchers through key decision points to achieve optimal results.
Advanced Applications: Multiplex Immunofluorescence (mIF)
Multiplex immunofluorescence (mIF) has emerged as a transformative tool in spatial biology, allowing for the simultaneous detection of multiple biomarkers on a single formalin-fixed paraffin-embedded (FFPE) or frozen tissue section [72]. This enables deep profiling of the tumor microenvironment (TME), including complex cell phenotyping and the analysis of spatial relationships, which can predict response to immunotherapy [8]. Adapting a standard IF protocol for multiplexing involves several critical considerations to ensure specific and non-overlapping signals.
Table 2: Key Considerations for Multiplex Immunofluorescence (mIF)
| Consideration | Description | Application Note |
|---|---|---|
| Antibody Validation | Confirm specificity and lack of cross-reactivity in a multiplex format. | Validate each antibody individually and in combination on a control tissue [8]. |
| Signal Amplification | Use methods like tyramide signal amplification (TSA) to detect low-abundance targets. | TSA-based methods allow for 5-8 markers, while cyclical staining can enable 30-60 markers [8]. |
| Spectral Unmixing | Computational separation of overlapping fluorescent emission spectra. | Essential for accurate assignment of marker expression; requires specialized software [8]. |
| Tissue & Cell Segmentation | Automated identification of tissue regions and individual cells. | Critical for quantitative spatial analysis (e.g., cell proximity, compartment analysis) [8]. |
| Image Acquisition | Whole-slide imaging vs. region of interest (ROI). | Whole-slide is preferred for heterogeneous markers/tissues; a minimum of 5 high-power fields is common [8]. |
Multiplex Immunofluorescence Experimental Workflow
A robust mIF protocol relies on iterative cycles of staining, imaging, and in some platforms, dye inactivation or antibody stripping. The following diagram illustrates a generalized workflow for a sequential mIF staining and imaging process.
Detailed Experimental Protocols
Core Protocol: Immunofluorescence for Frozen Sections
Materials:
- 1x Phosphate-Buffered Saline (PBS)
- Blocking solution (e.g., 2-5% donkey serum, 0.2% Triton X-100 in PBS) [89]
- Primary antibody diluted in blocking solution
- Fluorescently-labeled secondary antibody diluted in blocking solution
- ProLong Gold Antifade Mountant with DAPI [89]
- ImmunoPen (hydrophobic barrier pen) [89]
- Humidified slide chamber
Method:
- Section Preparation: Bring frozen slides to room temperature for ~30 minutes. Wash slides in PBS for 5 minutes, twice, to remove OCT compound [89].
- Permeabilization and Blocking: Wipe excess PBS from around sections without touching the tissue. Draw a barrier around the tissue with an ImmunoPen. Incubate sections with blocking solution for 1 hour at room temperature in a humidified chamber [89].
- Primary Antibody Incubation: Tap off blocking solution. Apply primary antibody at the optimal dilution (typically 1:100 to 1:500) and incubate overnight at 4°C in a humidified chamber [89].
- Washing: Wash slides with PBS three times for 10 minutes each on a nutator [89].
- Secondary Antibody Incubation: Apply fluorescently-labeled secondary antibody (e.g., 1:500 dilution in blocking solution). Incubate for 1 hour at room temperature in a humidified chamber. Protect from light from this step forward [89].
- Nuclear Staining and Mounting: Wash slides with PBS three times for 10 minutes in the dark. Perform a quick rinse in dH₂O. Apply an anti-fade mounting medium containing DAPI and place a coverslip [89].
- Storage and Imaging: Seal coverslip edges with polish if needed. Store slides at -20°C in the dark. Image with a fluorescence microscope equipped with appropriate filter sets [90].
Protocol Adaptation for Multiplex IF (Sequential Staining)
This protocol extends the core method for detecting multiple targets using sequential staining, imaging, and dye inactivation cycles [8].
Additional Materials:
- Antibodies validated for multiplexing
- Stripping buffer (if required by the method)
- Microscope capable of multi-channel fluorescence imaging
- Image analysis software with spectral unmixing capabilities
Method:
- Initial Staining Cycle: Complete steps 1-6 of the core protocol for the first target protein.
- Initial Image Acquisition: Image the slide using all fluorescence channels required for the first target and any control channels. Save the image data.
- Dye Inactivation/Stripping: Apply a stripping buffer to the slide to inactivate or remove the fluorescent signal from the first cycle, following the manufacturer's protocol or an established method.
- Validation of Stripping: Re-image the slide using the same channels as in step 2 to confirm the complete removal of the fluorescent signal.
- Subsequent Staining Cycles: Return to step 3 of the core protocol (primary antibody incubation) for the next target protein. Use a secondary antibody conjugated to a fluorophore with a distinct emission spectrum.
- Repeat: Repeat steps 2-5 for each additional target in the panel.
- Final Image Analysis: Use specialized software to align the image stacks from each cycle and perform spectral unmixing and quantitative analysis [8].
The Scientist's Toolkit: Research Reagent Solutions
Successful immunofluorescence relies on a suite of essential reagents, each with a critical function.
Table 3: Essential Materials for Immunofluorescence on Frozen Sections
| Item | Function | Example/Note |
|---|---|---|
| OCT Compound | Embedding medium for tissue freezing and cryostat sectioning. | Provides structural support for cutting thin sections [90] [4]. |
| Paraformaldehyde (PFA) | Cross-linking fixative. | Preserves tissue architecture and antigen structure; typically used at 4% [90] [4]. |
| Triton X-100 | Detergent for permeabilization. | Creates pores in cell membranes, allowing antibodies to access intracellular targets [90] [89]. |
| Normal Serum | Blocking agent. | Reduces non-specific background binding by saturating reactive sites; should match secondary antibody host species [90]. |
| Primary Antibody | Binds specifically to the target antigen. | Must be validated for immunofluorescence; concentration requires optimization [90]. |
| Fluorophore-Conjugated Secondary Antibody | Binds to the primary antibody and provides detectable signal. | Must be raised against the host species of the primary antibody; choose bright, photostable dyes [91]. |
| DAPI | DNA intercalating dye. | Counterstain for visualizing cell nuclei [90] [89]. |
| Anti-fade Mounting Medium | Preserves fluorescence. | Reduces photobleaching during microscopy and storage [89]. |
Conclusion
Mastering immunofluorescence on frozen sections is a powerful skill that enables precise spatial protein analysis within a preserved tissue architecture. By understanding the foundational preparation steps, meticulously following the staining protocol, proactively troubleshooting common pitfalls, and rigorously validating results with appropriate controls, researchers can reliably generate high-quality data. The versatility of frozen sections makes them indispensable for many research and pre-clinical applications, particularly where superior antigen detection is paramount. As techniques advance, this robust protocol will continue to be a cornerstone for integrative approaches in biomedical research, including the growing field of spatial biology, pushing the boundaries of discovery in disease mechanisms and drug development.
References
- 1. High-Content Immunofluorescence Assay Detecting PD-L1 ... [https://www.sciencedirect.com/science/article/pii/S2472555225000796]
- 2. Quantitative Immunofluorescent Imaging of Immune Cells ... [https://pmc.ncbi.nlm.nih.gov/articles/PMC12269647/]
- 3. Frozen Tissue Preparation & IHC Cryosection Staining ... [https://www.rndsystems.com/resources/protocols/protocol-preparation-and-fluorescent-ihc-staining-frozen-tissue-sections]
- 4. Immunofluorescence protocol for frozen sections [https://sites.wustl.edu/cavallilab/items/immunofluorescence-protocol-for-frozen-sections/]
- 5. BestProtocols: IHC Frozen Tissue—Direct Method [https://www.thermofisher.com/us/en/home/references/protocols/cell-and-tissue-analysis/protocols/ihc-frozen-tissue-direct-method.html]
- 6. Optimizing immunofluorescence with high-dynamic-range ... [https://www.nature.com/articles/s41598-024-65187-x]
- 7. How to make scientific figures accessible to readers with ... [https://www.ascb.org/diversity-equity-and-inclusion/how-to-make-scientific-figures-accessible-to-readers-with-color-blindness/]
- 8. Society for Immunotherapy of Cancer - PubMed Central - NIH [https://pmc.ncbi.nlm.nih.gov/articles/PMC11749220/]
- 9. An introduction to Performing Immunofluorescence Staining [https://pmc.ncbi.nlm.nih.gov/articles/PMC6918834/]
- 10. Techniques, Strengths, Immunohistochemistry and... Limitations [https://www.technologynetworks.com/analysis/articles/immunohistochemistry-techniques-strengths-limitations-and-applications-363107]
- 11. Frozen vs. Formalin-Fixed Paraffin-Embedded Tissue ... [https://www.stagebio.com/blog/frozen-vs-formalin-fixed-paraffin-embedded-tissue-sections-for-ihc]
- 12. Protocol for performing IHC on frozen samples | Abcam [https://www.abcam.com/en-us/technical-resources/protocols/ihc-with-frozen-samples]
- 13. FFPE vs. Frozen Tissue Samples - iProcess Global Research [https://iprocess.net/ffpe-vs-frozen-tissue-samples/]
- 14. Fresh frozen vs FFPE samples for next-generation ... [https://www.lexogen.com/blog/fresh-frozen-vs-ffpe-samples-for-next-generation-sequencing-studies/]
- 15. Fluorescent IHC Staining of Frozen Tissue Protocol [https://www.bio-techne.com/resources/protocols-troubleshooting/immunohistochemistry-frozen]
- 16. IMMUNOFLUORESCENCE PROTOCOL FOR FROZEN ... [http://biosskorea.com/?kboard_content_redirect=1177]
- 17. Fixation Protocols | Comparative Pathology Research Core [https://medicine.yale.edu/compmed/mrp/fixationprotocols/]
- 18. Protocol for Making a 4% Formaldehyde Solution in PBS [https://www.rndsystems.com/resources/protocols/protocol-making-4-formaldehyde-solution-pbs]
- 19. Immunohistochemistry Protocols [https://www.antibodies.com/applications/immunohistochemistry/ihc-protocol]
- 20. Optimized immunofluorescence staining protocol for ... [https://pmc.ncbi.nlm.nih.gov/articles/PMC8233161/]
- 21. Fluorescent IHC Staining of Frozen Tissue Protocol [https://www.novusbio.com/support/support-by-application/immunohistochemistry-frozen/protocol.html?srsltid=AfmBOor_4t8gRRAtyt8I3Is-WMSmsn-CXUDDosshmXpjEaEOwLOoZ_Q8]
- 22. PEGDA-based HistoBrick for increasing throughput of ... [https://www.nature.com/articles/s41598-024-83164-2]
- 23. A cost- and time-efficient method for high-throughput ... [https://pmc.ncbi.nlm.nih.gov/articles/PMC12256940/]
- 24. and Frozen | PPTX section cryostat [https://www.slideshare.net/slideshow/frozen-section-and-cryostat/156731486]
- 25. Histology Hacks for Cryosectioning [https://www.leicabiosystems.com/us/educational-resources/webinars/histology-hacks-for-cryosectioning/]
- 26. Evaluation of Long-Term Cryostorage of Brain Tissue Sections ... [https://pmc.ncbi.nlm.nih.gov/articles/PMC5298458/]
- 27. - DPMI Frozen section technique [https://www.dpmiindia.com/blog/frozen-section-technique]
- 28. Fluorescent IHC Staining of Frozen Tissue Protocol [https://www.novusbio.com/support/support-by-application/immunohistochemistry-frozen/protocol.html?srsltid=AfmBOooQIHvRaevXEWiWO7TYl-KlPGW_vqIR5GWzlPzg53qkHK17uRf2]
- 29. Protocols | Immunofluorescence [https://www.stressmarq.com/support/technical-support/protocols/immunofluorescence-protocol/?srsltid=AfmBOorhBvXevqTix9FTV1PUnIp1LdkO8wZcqofglUfA5vWkI0-e0CiM]
- 30. Immunofluorescence Cell Staining [https://www.scbt.com/resources/protocols/immunofluorescence-cell-staining?srsltid=AfmBOoqwKS_sH08m9YCeTgTwtq1v4xx9v5h_IHci0-N0bsOPQRrwixSw]
- 31. Immunofluorescence Protocol [https://www.biossusa.com/pages/immunofluorescence-protocol?srsltid=AfmBOoqWHuzAUSeVnmvUnvjNrIemoRIhdm8em73zAF9cFN6izrrHMpJa]
- 32. ICC/IF Protocol [https://www.antibodies.com/applications/immunofluorescence/immunofluorescence-protocol]
- 33. Fluorescent IHC Staining of Frozen Tissue Protocol [https://www.novusbio.com/support/support-by-application/immunohistochemistry-frozen/protocol.html?srsltid=AfmBOorjHEVJXcYkkbtbDtSTElzRfu9PPa6hq50yOGHzK4IJaIENi_zT]
- 34. Immunofluorescence Protocol [https://www.biossusa.com/pages/immunofluorescence-protocol?srsltid=AfmBOooNPfPnPEnNC-RdiTV-U3KQScfouvBQPLierwFm9Vxq96elD2R0]
- 35. Immunofluorescence Protocol with Formaldehyde Fixation [https://www.cellsignal.com/learn-and-support/protocols/protocol-if?srsltid=AfmBOopqXceGnGBlIBlUMfJlazq_k1lBOrl60vEiwuZlcAQka8I56Pw2]
- 36. Immunofluorescence Cell Staining [https://www.scbt.com/resources/protocols/immunofluorescence-cell-staining?srsltid=AfmBOooLy4LT25072g__T31AILslvqMEDyyg9Y9Kpwh9i1GYkivKGhCz]
- 37. Immunofluorescence Protocol with Formaldehyde Fixation [https://www.cellsignal.com/learn-and-support/protocols/protocol-if?srsltid=AfmBOorRz1AxpP-FMHSKNA6EVG0h2YMJ96GTJsn0EWaLopCRZKdp2NBV]
- 38. Immunofluorescence Protocol [https://www.biossusa.com/pages/immunofluorescence-protocol?srsltid=AfmBOop8bhJy3BC2KvAhr3-jqAQntoEYEGZT1gGr-OdQ5UGSk3vWU6sZ]
- 39. Fluorescent IHC Staining of Frozen Tissue Protocol [https://www.novusbio.com/support/support-by-application/immunohistochemistry-frozen/protocol.html?srsltid=AfmBOooc8uWR-iDd52JGn1LAYUVCID2NXHzkySiPs915cqZgKFNjvmEQ]
- 40. 2-Step Immunofluorescence Protocol: Fresh Frozen Tissue ... [https://www.fortislife.com/protocols/spatial-biology-protocols/2-step-immunofluorescence-protocol-fresh-frozen-tissue-sections]
- 41. Comprehensive Immunofluorescence Protocols: IF Protocol Hub [https://ifprotocol.org/]
- 42. How to Select a Secondary Antibody [https://www.thermofisher.com/us/en/home/life-science/antibodies/secondary-antibodies/secondary-antibody-selection-guide.html]
- 43. How to Choose a Secondary Antibody [https://www.antibodies.com/antibody-basics/secondary-antibody-selection]
- 44. Selecting Fluorophores for Antibody-based Research [https://www.jacksonimmuno.com/secondary-antibody-resource/immuno-techniques/selecting-fluorophores/]
- 45. Fluorescent IHC Staining of Frozen Tissue Protocol [https://www.novusbio.com/support/support-by-application/immunohistochemistry-frozen/protocol.html?srsltid=AfmBOoogCX5zL9IKq3aPqsDWlRov7SH7aADBGs5RFP0DZ5YMG8sEcZBt]
- 46. Quantitative benchmarking of nuclear segmentation ... [https://pmc.ncbi.nlm.nih.gov/articles/PMC12125308/]
- 47. Fluorescence Microscopy—An Outline of Hardware ... [https://pmc.ncbi.nlm.nih.gov/articles/PMC8750338/]
- 48. STED Microscopy [https://svi.nl/STED-Microscopy]
- 49. | Thermo Fisher Scientific - US DAPI Counterstaining Protocols [https://www.thermofisher.com/us/en/home/references/protocols/cell-and-tissue-analysis/dapi-protocol/basic-dapi-counterstaining-protocols.html]
- 50. DAPI Staining Guide for Clear Nuclear Imaging [https://www.betalifesci.com/blogs/news/dapi-staining?srsltid=AfmBOorR0eyOVRrzLXom-gj75I7dApDuBCwBms8iGMGjBmIdIB4OY7Ev]
- 51. Blue intensity matters for cell cycle profiling in fluorescence ... [https://www.nature.com/articles/labinvest201713]
- 52. Photoconversion of DAPI and Hoechst dyes to green ... [https://pmc.ncbi.nlm.nih.gov/articles/PMC5945337/]
- 53. Protocol for immunofluorescence staining of murine ... [https://pmc.ncbi.nlm.nih.gov/articles/PMC10322902/]
- 54. 免疫荧光(IF)染色实验报告-冰冻切片 [https://www.cloud-clone.com.cn/record/202205181654261656.html]
- 55. Background in Fluorescence Imaging [https://www.thermofisher.com/us/en/home/life-science/cell-analysis/cell-analysis-learning-center/molecular-probes-school-of-fluorescence/imaging-basics/protocols-troubleshooting/troubleshooting/background-fluorescence.html]
- 56. Autofluorescence and Nonspecific Immunofluorescent ... [https://pmc.ncbi.nlm.nih.gov/articles/PMC5582670/]
- 57. Overcoming Common Challenges with Fluorescent IHC [https://fluorofinder.com/challenges-fluorescent-ihc/]
- 58. Immunofluorescence Troubleshooting [https://stjohnslabs.com/blog/immunofluorescence-troubleshooting?srsltid=AfmBOoqtUdWXvrhWxeX4tvW0WYDi6lDPo4Aeh50T3zNPYLofGg2YcN8T]
- 59. Simple Elimination of Background Fluorescence in ... [https://pubmed.ncbi.nlm.nih.gov/28892031/]
- 60. Ten Approaches That Improve Immunostaining: A Review of the Latest... [https://pmc.ncbi.nlm.nih.gov/articles/PMC8836139/]
- 61. staining for Frozen (IF) microscopy section immunofluorescence [https://imb.uq.edu.au/facilities/microscopy/2020-microscopy-resources/sample-prep/frozen-section-staining-immunofluorescence-if-microscopy]
- 62. – Bioss Immunofluorescence Protocol [https://www.biossusa.com/pages/immunofluorescence-protocol]
- 63. Different methods of detaching adherent cells and their ... [https://www.nature.com/articles/s41598-022-09605-y]
- 64. High-plex immunofluorescence imaging and traditional ... [https://www.nature.com/articles/s43018-023-00576-1]
- 65. Frontiers | Blocking autofluorescence in brain tissues affected by ischemic stroke, hemorrhagic stroke, or traumatic brain injury [https://www.frontiersin.org/journals/immunology/articles/10.3389/fimmu.2023.1168292/full]
- 66. Quantitative investigation of photobleaching-based ... [https://pmc.ncbi.nlm.nih.gov/articles/PMC11828445/]
- 67. A robust method for autofluorescence-free ... [https://www.nature.com/articles/s41598-025-89142-6]
- 68. How To Protect Your Tissue From Photobleaching [https://vectorlabs.com/blog/how-to-protect-your-tissue-from-photobleaching/?srsltid=AfmBOopHQuwOtBhL4NFbsSpcP5alxwmXw5TnYQQ1yZy9DkNSpV_UARN9]
- 69. Photobleaching in Fluorescence Imaging [https://www.thermofisher.com/cl/en/home/life-science/cell-analysis/cell-analysis-learning-center/molecular-probes-school-of-fluorescence/imaging-basics/protocols-troubleshooting/troubleshooting/photobleaching.html]
- 70. Fluorescent IHC Staining of Frozen Tissue Protocol [https://www.novusbio.com/support/support-by-application/immunohistochemistry-frozen/protocol.html?srsltid=AfmBOorMRhvjSi6ywChAfWS3dgPshr7poWTm2qVBy5fetpTsJjpN_KSu]
- 71. Photobleaching as a Signal Removal Tool in Multiplex ... [https://brukerspatialbiology.com/photobleaching-as-a-signal-removal-tool-in-multiplex-fluorescence-imaging/]
- 72. SITC 2025 - Research Use Only (RUO) Validation of 'Off ... [https://dls.com/resources/sitc-2025-ruo-validation-of-off-the-shelf-mif-panels/]
- 73. Fluorescent IHC Staining of Frozen Tissue Protocol [https://www.novusbio.com/support/support-by-application/immunohistochemistry-frozen/protocol.html?srsltid=AfmBOooJF4VHfwRYITrLR8Aba5kj_hOffuoGcWTZwlCQhmBPrPGzE-7p]
- 74. Immunohistochemistry (IHC) Protocols for Frozen Sections [https://www.alomone.com/info/immunohistochemistry-ihc-protocols-for-frozen-sections-multiplex-staining?srsltid=AfmBOorE66conxYOabi9R-na-PRw784mc_UJtN9fcYhqWfXWPEqKY4Yd]
- 75. IHC antigen retrieval protocol [https://www.abcam.com/en-us/technical-resources/protocols/ihc-antigen-retrieval]
- 76. Optimizing Immunohistochemistry Validation and ... [https://www.precisionformedicine.com/blog/optimizing-ihc-validation-regulatory-strategies]
- 77. IHC-F Protocol - for SignalStain Boost Detection Reagent [https://www.cellsignal.com/learn-and-support/protocols/protocol-ihc-frozen-signalstain?srsltid=AfmBOopNibyYn8S28JdCyhp9LFvhgjIlXR8ZTMIeOD-T_UGXAODBQFfg]
- 78. Optical super-resolution histology of formalin-fixed paraffin- ... [https://www.nature.com/articles/s41467-025-64626-1]
- 79. Comparison of matched formalin-fixed paraffin embedded and fresh frozen meningioma tissue reveals bias in proteomic profiles - PubMed [https://pubmed.ncbi.nlm.nih.gov/36098096/]
- 80. Multiple immunofluorescence labelling of formalin-fixed paraffin-embedded (FFPE) tissue - PMC [https://www.ncbi.nlm.nih.gov/pmc/articles/PMC2288605/]
- 81. Adaptable Immunofluorescence Protocol for Muscle Fiber ... [https://pmc.ncbi.nlm.nih.gov/articles/PMC12582162/]
- 82. Comparison of whole transcriptome sequencing of fresh, frozen, and formalin-fixed, paraffin-embedded cardiac tissue - PubMed [https://pubmed.ncbi.nlm.nih.gov/36989279/]
- 83. Fluorescent IHC Staining of Frozen Tissue Protocol [https://www.novusbio.com/support/support-by-application/immunohistochemistry-frozen/protocol.html?srsltid=AfmBOooIVSqmIEChoEUqPYQWianT_SZ-C-byE6AG0RfAFrtTjeOeM4sR]
- 84. Immunofluorescence Protocol with Formaldehyde Fixation [https://www.cellsignal.com/learn-and-support/protocols/protocol-if?srsltid=AfmBOop38Gx30ViG_Z9Q8nrK1L18owQfLvFwB5Q4FIXFxeFmaz2BeEvI]
- 85. Immunofluorescence - Protocols - Microscopy [https://biotech.unl.edu/immunofluorescence-protocols-microscopy/]
- 86. Benchmarking multi-slice integration and downstream ... [https://genomebiology.biomedcentral.com/articles/10.1186/s13059-025-03796-z]
- 87. A comprehensive review of spatial transcriptomics data ... [https://pmc.ncbi.nlm.nih.gov/articles/PMC12199153/]
- 88. Toward universal immunofluorescence normalization for ... [https://pmc.ncbi.nlm.nih.gov/articles/PMC12539234/]
- 89. IHC from Frozen Section [https://www.protocols.io/view/ihc-from-frozen-section-drv6569e.html]
- 90. Fluorescent IHC Staining of Frozen Tissue Protocol [https://www.novusbio.com/support/support-by-application/immunohistochemistry-frozen/protocol.html?srsltid=AfmBOorJgqLoQdm2279idKVLSzgWi_4FyQwv2F-jzTxN1YutUiOzauy5]
- 91. How Immunofluorescence Assay Works — In One Simple ... [https://www.linkedin.com/pulse/how-immunofluorescence-assay-works-one-simple-flow-dmmnf/]