Multiplex Immunohistochemistry (mIHC): A Comprehensive Guide from Principles to Clinical Translation
This article provides a comprehensive overview of multiplex immunohistochemistry (mIHC) techniques, a transformative approach for simultaneous detection of multiple protein markers within a single tissue section.
Multiplex Immunohistochemistry (mIHC): A Comprehensive Guide from Principles to Clinical Translation
Abstract
This article provides a comprehensive overview of multiplex immunohistochemistry (mIHC) techniques, a transformative approach for simultaneous detection of multiple protein markers within a single tissue section. Tailored for researchers, scientists, and drug development professionals, it covers the foundational principles of mIHC, details current methodological approaches and their applications in characterizing the tumor microenvironment, offers practical troubleshooting and optimization strategies, and discusses the critical path for analytical validation and regulatory compliance. By synthesizing the latest advancements and best practices, this guide aims to empower the development of robust, reproducible mIHC assays for both research and clinical diagnostics.
Understanding Multiplex IHC: Unlocking the Spatial Complexity of Tissues
Multiplex immunohistochemistry (mIHC) represents a pivotal technological advance in tissue-based protein detection, fundamentally moving beyond the “one marker per slide” paradigm of traditional IHC [1]. This transformative technique enables the simultaneous detection and visualization of multiple antigens within a single tissue section, providing rich insights into the spatial organization, phenotypic heterogeneity, and functional interplay of diverse cellular populations in their native microenvironment [1]. The ability to study complex cellular relationships within their architectural context has positioned mIHC as an indispensable tool in modern oncology, immunology, neuroscience, and systems biology, where unraveling tissue complexity is essential for understanding disease pathogenesis and therapeutic response [1] [2].
The limitations of conventional IHC have become increasingly apparent as research questions grow more complex. Traditional IHC suffers from an inability to label more than one marker per tissue section, high inter-observer variability, and missed opportunities to gain important prognostic and diagnostic information from precious patient samples [2]. mIHC addresses these constraints by allowing comprehensive studies of cell composition, cellular function, and cell-cell interactions while preserving spatial relationships and using less sample material [2] [3]. This capability is particularly valuable when studying samples from rare donors or limited biopsy tissue where tissue availability is constrained [2] [3].
Fundamental Principles and Methodological Approaches
Core Technological Frameworks
Multiplex IHC protocols can be broadly classified based on several fundamental parameters. The detection chemistry may involve chromogenic (enzyme-mediated colorimetric), fluorescent (fluorophore-tagged), metal-based (isotopically labeled), or DNA-barcoded/oligonucleotide-conjugated strategies [1]. Staining formats can be simultaneous ("all-in-one" cocktail) or sequential (cyclic) application of antibodies and detection reagents [1]. Amplification methods include polymer systems, tyramide signal amplification (TSA), hybridization-based signal amplification, or metal-conjugated oligonucleotides [1]. These technical approaches can be applied to various sample preparations, including formalin-fixed paraffin-embedded (FFPE) tissue, fresh frozen specimens, and cytological preparations [1].
The combination of these technological factors enables remarkable detection capabilities, ranging from 2-5 markers with chromogenic methods to over 60-100 markers with highly multiplexed cyclic DNA-barcoding or mass cytometry-based approaches [1]. This expanded capacity redefines how researchers and pathologists view tissue complexity, enabling comprehensive profiling of cellular ecosystems rather than isolated marker assessment.
Key Detection Systems and Their Applications
Fluorescent Detection Systems
Fluorescent multiplex IHC relies on fluorophore-conjugated antibodies (direct detection) or secondary detection (indirect) to produce discrete emission wavelength signals upon excitation [1]. A vast range of organic dyes is available (e.g., Alexa Fluor, Cyanine, FITC), with typical experiments detecting 4-7 markers per round, and higher capacity achievable via cyclic or spectral unmixing approaches [1]. Advanced multispectral microscopy and computational unmixing enable analysis of closely related emission spectra, increasing plexing potential to 8-10 or more with cyclic strategies [1]. While fluorescent signals are subject to photobleaching and tissue autofluorescence, these limitations can be mitigated by quenching reagents or mathematical unmixing algorithms [1].
Tyramide Signal Amplification (TSA)
TSA, also known as Catalyzed Reporter Deposition (CARD), is a highly sensitive enzymatic technique that represents a major innovation in multiplex IHC [1]. This method involves HRP-conjugated secondary antibodies catalyzing the deposition of tyramide-linked fluorophores or haptens onto electron-rich residues adjacent to the antigen site [1]. The core mechanism generates a covalent, spatially restricted signal amplification that provides exceptional spatial resolution and high sensitivity—up to 100-fold greater than traditional methods [1]. The covalent nature of the labeling allows for subsequent rounds of antibody stripping and re-staining, making TSA highly compatible with cyclic multiplexing workflows and enabling the use of same-species primary antibodies by eliminating the need for different species primaries for each step [1] [4].
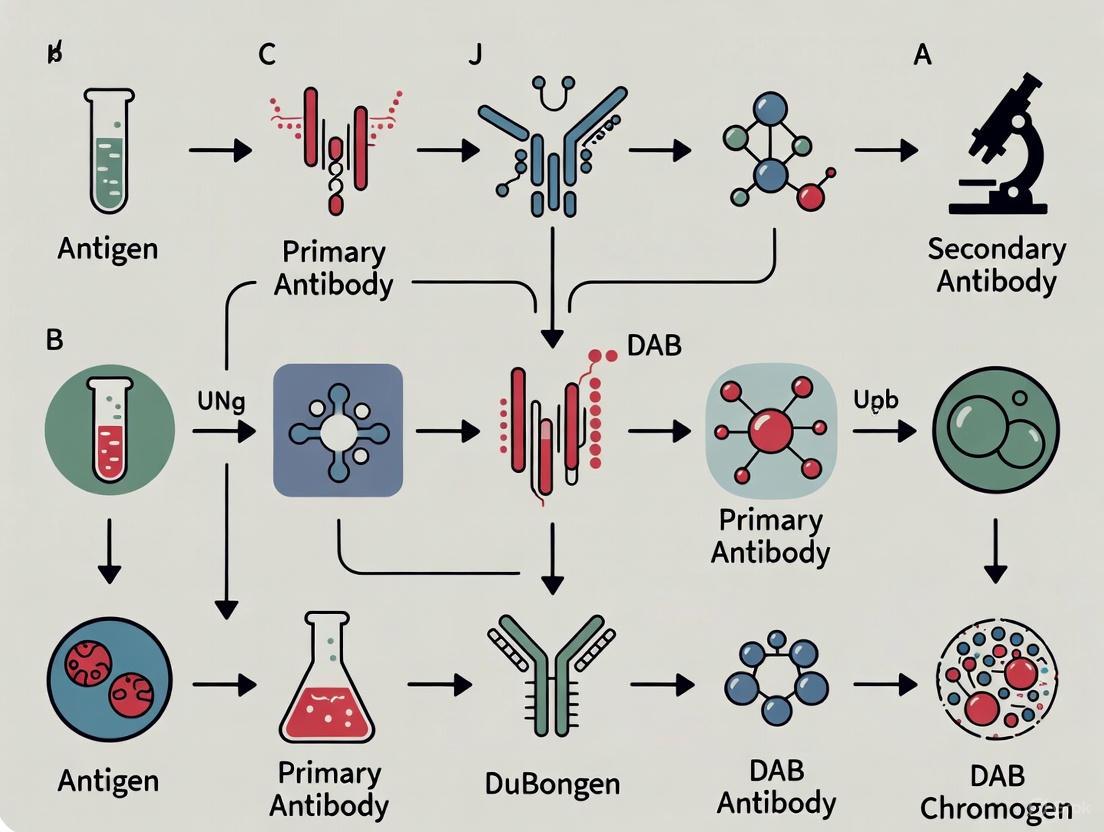
The following diagram illustrates the sequential workflow of a typical mIHC process utilizing TSA technology and antibody stripping:
Comparative Platform Technologies
The evolving landscape of mIHC technologies includes numerous commercial platforms and research solutions, each with distinct capabilities and applications. The table below summarizes key characteristics of current multiplex IHC/IF technologies:
Table 1: Comparison of Multiplex IHC/IF Platforms and Technologies
| Technology/Platform | Vendor | Plexing Capacity | Detection Method | Imaging Area | Key Applications |
|---|---|---|---|---|---|
| Multiplex IF | Various | 5-8 (TSA-based); 30-60 (non-TSA cyclical) | Fluorescent-based | Up to whole slide | Immune cell profiling, spatial analysis [5] |
| DISCOVERY ULTRA | Roche | 5+ | Fluorescent & chromogenic-based | Whole slide | Translational research, biomarker studies [2] |
| MICSSS | - | 10+ | Iterative chromogenic staining | Whole slide | High-plex brightfield applications [5] |
| Digital Spatial Profiling (DSP) | NanoString | 40-50 | UV-cleavable fluorescent DNA tags | ROI (0.28 mm²) | Targeted spatial genomics, protein co-detection [5] |
| Codex | Akoya | 40+ | DNA-barcoding based | - | High-plex cellular phenotyping [2] |
| Imaging Mass Cytometry | Fluidigm | 37+ | Metal-based | ROI (1.0 mm²) | Deep tissue profiling, metal-conjugated antibodies [5] [2] |
| MIBI | IonPath | 40+ | Metal-based | ROI (1.0 mm²) | High-dimensional tissue imaging [2] |
Research Applications and Experimental Protocols
Tumor Microenvironment and Immuno-Oncology Applications
mIHC has demonstrated particular transformative potential in immuno-oncology and tumor microenvironment (TME) research. A meta-analysis comparing mIF/IHC assays to PD-L1 IHC, interferon-gamma-related gene signatures, and mutational density for predicting response to anti-PD-(L)1 therapies showed that mIF/IHC assays had an area under the summary receiver operating characteristic curve on the order of 0.8, while other modalities had AUCs of approximately 0.65-0.7 [5]. This performance level, with a validated AUC of 0.8 or above, is consistent with potential companion diagnostics and may warrant consideration for biomarker-driven clinical trials [5].
Specific applications include quantifying the proportion of intratumoral CD8+CD39+ cells or the density of CD8+FoxP3+ T cells in non-small cell lung carcinoma [5], assessing the density of PD-1+ to PD-L1+ cells within specific proximity in Merkel cell carcinoma [5], and developing combinatorial biomarkers using CD8+FoxP3+PD-1low/mid+ and CD163+PD-L1− cell densities in advanced melanoma [5]. These approaches have also been used to categorize the TME of different tumor types into geographic immune contexts or "immunotypes" that may inform our understanding of immune escape mechanisms and predict therapeutic responses [5].
Protocol: Multiplex IHC with TSA Amplification
The following protocol details a standardized approach for sequential multiplex IHC utilizing tyramide signal amplification, adaptable for 4-9 color multiplexing on a single slide [6] [4].
Sample Preparation and Pre-Treatment
- Begin with formalin-fixed paraffin-embedded (FFPE) tissue sections cut at 2-5μm thickness and mounted on charged slides.
- Bake slides at 60°C for 1 hour to ensure proper adhesion.
- Deparaffinize through xylene and graded ethanol series (100%, 95%, 70%) to water.
- Perform antigen retrieval using appropriate buffer (e.g., citrate-based or EDTA-based) with heat-induced epitope retrieval (HIER). Optimal retrieval conditions (pH, time, temperature) must be determined empirically for each antibody.
- Block endogenous peroxidase activity with 3% hydrogen peroxide for 10-15 minutes.
- Block non-specific binding with protein block (e.g., 2.5% normal horse serum) for 30 minutes at room temperature.
Sequential Staining with TSA
- Apply primary antibody diluted in antibody diluent at optimized concentration. Incubate according to validated conditions (typically 1 hour at room temperature or overnight at 4°C).
- Apply species-specific HRP-conjugated secondary antibody for 30 minutes at room temperature.
- Detect signal with fluorophore-conjugated tyramide (e.g., TSA-Cy3, TSA-FITC) diluted 1:50-1:100 in amplification diluent for 5-10 minutes.
- Strip antibody complex by heating slides in retrieval buffer at 95°C for 20-30 minutes or using specific antibody elution buffers (e.g., Absin antibody eluent) [6].
- Verify complete antibody removal by checking for absence of signal before proceeding to next cycle.
- Repeat steps for each marker in the panel, progressing from lowest to highest expressing epitopes [4].
Counterstaining and Mounting
- After final staining cycle, apply nuclear counterstain (e.g., DAPI) for 5-10 minutes.
- Rinse slides in PBS and distilled water.
- Mount with fluorescence-compatible mounting medium.
- Store slides at 4°C in the dark until imaging.
Antibody Panel Design and Validation Considerations
Successful mIHC hinges on careful antibody selection and rigorous validation. Monoclonal antibodies, especially recombinant monoclonal antibodies, are widely favored for their specificity, lot-to-lot consistency, and amenability to direct labeling [1]. Key validation strategies include testing on positive and negative control tissues or cell lines, use of isotype controls and "knockout" validation with genetically modified models, titration and single-plex testing under intended experimental conditions, and assessment of subcellular localization compared to canonical patterns [1].
Rational panel design must avoid cross-reactivity and consider species/isotype compatibility (particularly when using secondary detection schemes), epitope stability across sequential staining or stripping steps, and fluorophore compatibility to avoid spectral overlap [1]. Panel validation should begin with each antibody as a single stain to ensure specificity and sensitivity before combining, followed by panel-wise optimization for signal-to-noise, sequence, and antigen retrieval compatibility [1].
Data Analysis and Quantitative Assessment
Image Acquisition and Processing Workflows
The analysis of mIHC data requires specialized computational approaches to extract meaningful biological insights. The first step involves acquiring high-quality images of stained tissues, which can include whole slide imaging or specific regions of interest (ROIs) depending on the research question [5]. For fluorescent multiplex IHC, multispectral imaging (MSI) is the primary technology used to accurately capture mIF images, whereby the intensity wavelength spectrum of every pixel is captured [7]. This procedure generates a third dimension of information for every pixel in the image and potentially increases the number of wavelengths that can be captured from 4 bands to 10-30 bands [7].
Color deconvolution (for chromogenic mIHC) and spectral unmixing (for fluorescent mIHC) are essential processes for accurate assignment of marker expression [5]. These techniques separate overlapping signals into individual channels representing specific markers, which has a pronounced impact on downstream cell segmentation, phenotyping, and scoring [5]. Following unmixing, cell segmentation identifies individual cells and their compartments (membrane, cytoplasm, nucleus), typically using algorithms that examine fluorescent intensity thresholds [7]. Finally, cell phenotyping classifies cells based on marker expression profiles, often employing machine learning approaches such as random forest algorithms [7].
Statistical Considerations for mIHC Data
The quantitative data generated from mIHC presents unique statistical challenges that require specialized analytical approaches. Key considerations include:
- Zero-inflated data: Many tissue samples, particularly "cold" tumors with little immune infiltration, may have zero positive cells for markers of interest, requiring specialized statistical models [7].
- Repeated measurements: Studies often involve multiple cores or ROIs from the same tumor tissue sample, necessitating statistical methods that account for this correlation structure [7].
- Spatial analysis: Determining the level of clustering and co-localization between different cell types in the tumor immune microenvironment requires spatial statistical methods that consider uneven assessment areas and "holes" in images where no cells could be measured [7].
- Batch effects and phenotype misclassification: Quality control issues related to batch effects between tissue microarrays and false positive/negative cell calling are common and must be addressed in the analytical pipeline [7].
Essential Research Reagents and Materials
Successful implementation of mIHC requires careful selection of reagents and materials optimized for multiplex applications. The following table details key components of the mIHC research toolkit:
Table 2: Essential Research Reagent Solutions for Multiplex IHC
| Reagent Category | Specific Examples | Function and Application Notes |
|---|---|---|
| Signal Amplification Systems | Tyramide Signal Amplification (TSA) reagents | Enzymatic signal amplification providing 100x sensitivity increase; enables same-species primary antibodies [1] [4] |
| Multiplex IHC Kits | Absin 4/5/6/7-Color IHC Kits [6] | Pre-optimized reagent systems for specific plexity; include secondary antibodies and sometimes TSA reagents |
| Antibody Stripping Reagents | Antibody eluent (e.g., Absin antibody eluent) [6] | Removes primary-secondary antibody complexes between staining cycles while preserving deposited labels |
| Primary Antibodies | Validated monoclonal antibodies | Target-specific binding agents; require rigorous validation for multiplex applications [1] |
| Fluorophore Conjugates | TSA-series fluorophores, Alexa Fluor dyes | Signal generation; selection critical for spectral separation and minimal overlap [1] [3] |
| Chromogenic Substrates | DAB, Purple, Red, Yellow, Teal chromogens | Enzyme-mediated color precipitation for brightfield applications [4] |
| Nuclear Counterstains | DAPI, Hematoxylin | Nuclear visualization; DAPI for fluorescence, Hematoxylin for brightfield [3] |
| Mounting Media | Fluorescence-compatible mounting media | Preserves fluorescence signal and provides appropriate refractive index [3] |
| Automated Platform Reagents | DISCOVERY ULTRA reagents [4] | Optimized for specific automated staining systems; ensure reproducibility |
Multiplex immunohistochemistry represents a fundamental advancement in tissue-based research, enabling unprecedented insights into cellular organization and interactions within intact tissue architecture. By moving beyond single-plex paradigms, mIHC provides a comprehensive framework for analyzing complex biological systems in their native context. The technical considerations, experimental protocols, and analytical approaches outlined in this article provide researchers with the foundation needed to implement these powerful techniques in their investigation of disease mechanisms, biomarker discovery, and therapeutic development. As the field continues to evolve with improvements in plexing capacity, analytical algorithms, and standardization, mIHC is poised to become an increasingly essential tool in both research and clinical applications.
Core Principles of Antibody-Antigen Binding
The fundamental mechanism of immunohistochemistry relies on the highly specific binding between an antibody and its target antigen. This interaction is governed by the precise molecular structure of the antibody.
Antibody Structure and the Antigen-Binding Site
An antibody (immunoglobulin) is a Y-shaped protein composed of two identical heavy chains and two identical light chains [8]. The region that recognizes and binds to a specific antigen is located at the tips of the Y-shaped molecule and is formed by the variable domains of both the heavy (VH) and light (VL) chains [9]. Within these variable domains, complementarity-determining regions (CDRs) are the key segments that determine antigen specificity [9]. There are three CDRs in the VH domain and three in the VL domain (CDR1, CDR2, and CDR3), which together create a surface complementary to the antigen [9]. The combination of the heavy and light chain V regions determines the final antigen specificity, a principle known as combinatorial diversity [9].
Nature of Antigens and Epitopes
The specific structure on an antigen that an antibody recognizes is called an epitope or antigenic determinant [9]. Epitopes can be classified into two main types:
- Conformational (Discontinuous) Epitopes: Formed by amino acids from different parts of the polypeptide chain that are brought together by protein folding. Most antibodies raised against intact proteins recognize this type of epitope [9].
- Linear (Continuous) Epitopes: Composed of a single, continuous segment of a polypeptide chain [9].
Forces Involved in Antigen-Antibody Binding
The binding between an antibody and its antigen is a reversible, noncovalent interaction involving several forces [9]:
- Electrostatic interactions: Occur between charged amino acid side chains.
- Hydrogen bonds: Bridge oxygen and/or nitrogen atoms.
- Van der Waals forces: Operate over very short ranges and require complementary surface shapes.
- Hydrophobic interactions: Occur when two hydrophobic surfaces come together to exclude water; the strength is proportional to the surface area hidden from water.
Table 1: Forces in Antigen-Antibody Interactions
| Interaction Type | Chemical Basis | Role in Binding | Factors That Disrupt |
|---|---|---|---|
| Electrostatic | Attraction between oppositely charged groups | Stronger contribution to binding affinity | High salt concentration, extreme pH |
| Hydrogen Bonds | Sharing of hydrogen between electronegative atoms | Specificity and affinity | High salt concentration, extreme pH |
| Van der Waals | Fluctuations in electron clouds | Close-range attraction; shape complementarity | Not specified |
| Hydrophobic | Exclusion of water from non-polar surfaces | Major contributor to binding energy | Detergents |
Detection Chemistries and Staining Formats in Multiplex IHC
Multiplex Immunohistochemistry (mIHC) enables the simultaneous detection of multiple biomarkers on a single tissue section, providing deep insights into cellular spatial relationships and the tissue microenvironment [1] [2]. The choice of detection chemistry and staining format is critical for successful multiplexing.
Detection Systems
mIHC protocols can be broadly classified based on their detection chemistry, which determines the readout modality and the maximum number of markers that can be detected [1].
Chromogenic Detection
Chromogenic multiplex IHC employs enzyme-mediated reactions where horseradish peroxidase (HRP) or alkaline phosphatase (AP) catalyze color precipitation at the antigen-antibody complex site [1] [10]. Common chromogens include DAB (brown) and AP Red [10].
- Advantages: Simple, compatible with standard light microscopy, and provides stable, archivable slides [1].
- Limitations: Chromogen spectral overlap typically limits plex capacity to ~3-5 markers, and it is generally semi-quantitative at best [1] [11].
Fluorescent Detection
Fluorescent mIHC relies on fluorophore-conjugated antibodies (direct) or secondary detection (indirect) to produce discrete emission signals [1].
- Advantages: Higher plexing potential (typically 4-7 markers per round, and more with cyclic approaches), better for co-localization studies and quantitative analysis [1] [2].
- Limitations: Signal is subject to photobleaching and tissue autofluorescence, which may require spectral unmixing algorithms to mitigate [1] [5].
Signal Amplification Techniques
To enhance sensitivity, especially for low-abundance targets, signal amplification techniques are often employed:
- Tyramide Signal Amplification (TSA): Also known as Catalyzed Reporter Deposition (CARD), TSA uses HRP to catalyze the covalent deposition of tyramide-linked fluorophores or haptens onto electron-rich residues near the antigen site [1]. This provides substantial signal amplification (up to 100-fold), high spatial resolution, and enables the use of same-species primary antibodies by allowing antibody stripping between staining cycles [1] [4].
- Polymer-Based Amplification: Polymer systems link multiple enzyme molecules (e.g., HRP-polymer) to a backbone structure, increasing the number of enzymatic reactions per antibody binding event and thus enhancing the signal [1] [10].
Staining Formats
Multiplex staining can be performed in two main formats, which differ in how antibodies and detection reagents are applied [1].
- Simultaneous Staining: All primary antibodies and detection reagents are applied as a cocktail in a single step. This is simpler but requires carefully validated antibody panels to avoid cross-reactivity [1].
- Sequential Staining: Antibodies and detection reagents are applied in consecutive cycles. This format is more flexible and is essential for high-plex methods, as it allows for antibody stripping between cycles without affecting previously deposited signal, particularly when using TSA [1] [4].
Figure 1: Decision workflow for selecting multiplex IHC staining formats, detection chemistries, and amplification methods.
Table 2: Comparison of Multiplex IHC Detection Modalities
| Characteristic | Chromogenic IHC | Multiplex Fluoro. (mIF) | Tyramide Signal Amp. (TSA) |
|---|---|---|---|
| Primary Use | Low-plex, diagnostic workflows | Medium to high-plex, research | High-sensitivity, high-plex research |
| Typical Plex Capacity | 3–5 markers [1] | 5–8 (TSA-based), 30–60 (non-TSA cyclical) [5] | Enables high-plexing (e.g., 10+) [1] [5] |
| Readout/Imaging | Brightfield microscope [1] | Fluorescence microscope [1] | Fluorescence or brightfield [1] |
| Quantification | Semi-quantitative at best [1] | Highly quantitative [2] | Highly quantitative [1] |
| Key Advantage | Simple, stable slides, standard pathology workflows [1] | Higher plex, better for co-localization [1] | High sensitivity, use of same-species antibodies [1] [4] |
| Main Limitation | Limited plex, color overlap, semi-quantitative [1] | Photobleaching, autofluorescence [1] | Requires optimization to avoid over-amplification [1] |
Detailed Experimental Protocols
This section provides a generalized protocol for a sequential, fluorescence-based multiplex IHC assay using tyramide signal amplification, which allows for high-plex analysis.
Protocol: Sequential Multiplex IHC with TSA
This protocol is adapted for formalin-fixed, paraffin-embedded (FFPE) tissue sections [1] [12] [4].
Pre-Staining Steps: Sample Preparation
- Sectioning: Cut FFPE tissue sections at a thickness of 4–5 µm and mount on charged or adhesive glass slides. Bake slides in an oven to ensure adhesion [12].
- Deparaffinization and Rehydration:
- Immerse slides in xylene (or xylene substitute) for 5–10 minutes. Repeat with fresh xylene.
- Rehydrate through a graded series of ethanol: 100% ethanol (twice), 95% ethanol, 70% ethanol, for 2 minutes each.
- Rinse slides in deionized water.
- Antigen Retrieval: Perform Heat-Induced Epitope Retrieval (HIER) by boiling slides in a suitable buffer (e.g., citrate buffer, pH 6.0, or EDTA/TRIS buffer, pH 9.0) using a pressure cooker, microwave, or steamer. Cool slides to room temperature [12].
- Blocking: Incubate sections with a protein block (e.g., 2.5–5% normal serum from the same species as the secondary antibody) for 10–30 minutes to reduce non-specific background staining [10] [12]. For peroxidase-based detection, also block endogenous peroxidase activity [10].
Sequential Staining Cycle (Repeat for Each Marker)
The following steps constitute one complete staining cycle. The cycle is repeated for each marker in the panel, starting with the lowest expressing or most labile epitope [4].
- Primary Antibody Incubation: Apply optimized concentration of primary antibody and incubate for the determined time (e.g., 30–60 minutes at room temperature or overnight at 4°C) [10] [4].
- Secondary Antibody Incubation: Apply an HRP-conjugated secondary antibody compatible with the primary antibody host species. Incubate for a specified time (e.g., 30 minutes) [4].
- Tyramide-Fluorophore Incubation: Apply the tyramide conjugate (e.g., tyramide conjugated to a fluorophore like Alexa Fluor 488) diluted in the provided amplification buffer. Incubate for the recommended time (e.g., 5–10 minutes) [1].
- Antibody Stripping: After signal deposition, strip the primary-secondary antibody complex to prepare for the next cycle. This is typically done by heating the slides in a retrieval buffer (e.g., 10mM Citrate buffer, pH 6.0) at ~95°C for 10–20 minutes, or by using a chemical denaturant [1] [4]. This step removes the antibodies but leaves the covalently bound tyramide signal intact.
Post-Staining and Imaging
- Counterstaining and Mounting: After the final staining cycle, apply a nuclear counterstain such as DAPI. Mount slides with an anti-fade mounting medium [10] [12].
- Image Acquisition: Image the slides using a fluorescence or multispectral microscope. For high-plex panels, use a system capable of spectral unmixing to resolve overlapping fluorophore emission spectra [5] [2].
Figure 2: Experimental workflow for sequential multiplex IHC using TSA and antibody stripping.
Key Optimization Considerations
- Antibody Order: Stain the lowest expressing or most labile epitope first. Place targets requiring unique retrieval or blocking reagents later in the sequence [4].
- Chromogen/Fluorophore Order: In chromogenic mIHC, apply chromogens in a specific order (e.g., DAB > purple > red > yellow) to achieve distinct colors. For co-localization studies using fluorescent TSA, ensure fluorophores have minimal spectral overlap [4].
- Controls: Always include single-stain controls, denaturing controls to determine antibody order, and stripping controls to verify signal specificity and complete antibody removal [4].
The Scientist's Toolkit: Essential Research Reagents and Materials
Table 3: Key Reagents and Materials for Multiplex IHC
| Item Category | Specific Examples | Critical Function |
|---|---|---|
| Tissue Preparation | Formalin; Paraffin Embedding Medium; Charged/Adhesive Glass Slides | Preserves tissue architecture (fixation); provides support for microtomy (embedding); ensures section adhesion [12] |
| Antibodies | Validated Primary Antibodies (monoclonal recommended); HRP-conjugated Secondary Antibodies | Primary antibody binds specific target epitope; secondary antibody conjugated to enzyme enables detection [1] [10] |
| Detection Chemistry | Tyramide Signal Amplification (TSA) Kits; Polymer-Based Detection Systems; Chromogens (DAB, AP Red); Fluorophores (Alexa Fluor dyes) | Signal generation and amplification. TSA allows high sensitivity and use of same-species antibodies [1] [4] |
| Antigen Retrieval | Citrate Buffer (pH 6.0); EDTA/TRIS Buffer (pH 9.0) | Reverses formaldehyde cross-links to expose epitopes for antibody binding [12] |
| Blocking Reagents | Normal Serum; Protein Block | Reduces non-specific binding of antibodies to tissue, minimizing background [10] [12] |
| Automation & Imaging | Automated IHC Stainers (e.g., BOND RX); Multispectral Imaging Systems (e.g., Vectra/Polaris, Aperio VERSA) | Ensures staining reproducibility; acquires high-quality, quantitative multiplex images for analysis [2] [11] |
The Critical Role of mIHC in Immuno-Oncology and Biomarker Discovery
Multiplex immunohistochemistry (mIHC) and immunofluorescence (mIHC/IF) represent a transformative set of technologies in immuno-oncology, enabling the simultaneous detection of multiple immunomarkers on a single tissue section. By visualizing cellular interactions directly within the intact tumor microenvironment (TME), these techniques provide unprecedented insights into complex immunophenotypes, spatial relationships between cell types, and the functional state of immune cells infiltrating tumors [13]. The ability to characterize the TME with single-cell resolution has positioned mIHC as a powerful tool for discovering predictive biomarkers for immunotherapy response and understanding fundamental mechanisms of immune evasion [5].
The technological landscape for mIHC has evolved significantly, with current platforms capable of detecting up to 60 markers per section using cyclical staining approaches [5]. This advancement addresses the critical need to better understand the immune response to cancer and to define predictive tissue-based biomarkers for immunotherapies and novel therapeutic agents under development. Notably, meta-analyses have demonstrated that mIHC/IF assays outperform other biomarker modalities, including PD-L1 immunohistochemistry and gene expression signatures, for predicting response to anti-PD-(L)1 therapies, with area under the curve (AUC) values reaching approximately 0.8 – a performance level associated with potential companion diagnostics [5].
Key Applications and Impact in Immuno-Oncology
Dissecting the Tumor Microenvironment
mIHC enables comprehensive characterization of the cellular composition and spatial organization of the TME, revealing biologically and clinically relevant patterns across different cancer types. In diffuse large B-cell lymphoma (DLBCL), for instance, mIHC has uncovered distinct TME patterns between germinal center B-cell (GCB) and activated B-cell (ABC) subtypes. ABC DLBCL environments are characterized by high proportions of M2-like tumor-associated macrophages (TAMs) and cytotoxic tumor-infiltrating T cells (TILs), with higher CD8+ TIL content translating to favorable outcomes. In contrast, GCB DLBCL TMEs are enriched with CD4+ TILs and regulatory TILs, where high proportions of TAMs and Granzyme B+ cells associate with worse survival [14].
The analytical power of mIHC extends beyond mere cell counting to spatial interaction analysis. Research has demonstrated that specific cellular interaction patterns have prognostic significance. In testicular DLBCL, interactions between CD4+ TILs and TAMs, as well as among CD4+ TILs themselves, correlate with favorable outcomes, whereas numerous interactions between CD163+ TAMs and distinct TILs predict unfavorable survival in both GCB DLBCL and testicular DLBCL [14]. These findings highlight how mIHC-derived spatial data can reveal clinically relevant biology that would remain hidden with simpler analytical approaches.
Predictive Biomarker Discovery
mIHC has proven particularly valuable for developing combinatorial biomarkers that predict response to immunotherapy with high accuracy. Several exemplar biomarkers discovered through mIHC approaches have demonstrated impressive predictive power:
- Intratumoral CD8+CD39+ cells: This cell population predicts therapeutic responses in multiple cancer types with AUC values approaching 0.8 [5].
- CD8+FoxP3+ T-cell density: In non-small cell lung carcinoma patients, the density of these cells serves as a potent predictive biomarker [5].
- Spatial proximity of PD-1+ to PD-L1+ cells: In Merkel cell carcinoma, this spatial relationship has demonstrated predictive value [5].
- Combinatorial biomarker for melanoma: A multi-parameter signature incorporating CD8+FoxP3+PD-1low/mid+ and CD163+PD-L1− cell densities effectively stratifies patients with advanced melanoma [5].
These biomarkers exemplify how mIHC moves beyond single-parameter analysis to capture the complexity of anti-tumor immune responses, providing clinically actionable insights for patient stratification.
Table 1: Clinically Validated mIHC-Derived Biomarkers in Immuno-Oncology
| Biomarker | Cancer Type | Predictive Value | Clinical Utility |
|---|---|---|---|
| Proportion of intratumoral CD8+CD39+ cells | Multiple | AUC ~0.8 | Predicts response to anti-PD-(L)1 therapies |
| Density of CD8+FoxP3+ T cells | Non-small cell lung carcinoma | Significant predictive value | Patient stratification for immunotherapy |
| Spatial proximity of PD-1+ to PD-L1+ cells | Merkel cell carcinoma | Significant predictive value | Predicts immunotherapy response |
| CD8+FoxP3+PD-1low/mid+ and CD163+PD-L1− cell densities | Advanced melanoma | High predictive accuracy | Combinatorial biomarker for treatment selection |
| M1-like:M2-like TAM ratio | GCB DLBCL | Prognostic significance | Associates with survival outcomes |
| CD8+ TIL content | ABC DLBCL | Prognostic significance | Higher levels correlate with favorable outcome |
Essential Research Reagent Solutions
The successful implementation of mIHC requires carefully selected and validated reagents across several categories. Each component plays a critical role in ensuring specific, reproducible staining essential for accurate data interpretation.
Table 2: Key Research Reagent Solutions for mIHC Experiments
| Reagent Category | Specific Examples | Function & Importance |
|---|---|---|
| Primary Antibodies | Clones against CD8, CD4, FoxP3, CD68, CD163, PD-1, PD-L1 | Target protein detection; require rigorous validation for multiplex compatibility [5] |
| Detection Systems | Tyramide Signal Amplification (TSA), DNA barcoding | Signal amplification and multiplexing capability; determines number of markers [5] |
| Tissue Processing Reagents | Formalin, Paraffin, Antigen Retrieval Buffers | Tissue preservation and antigen accessibility; critical for epitope preservation [14] |
| Counterstains & Mounting Media | Hematoxylin, DAPI-containing media | Nuclear visualization and tissue architecture context [5] |
| Validation Controls | Isotype controls, positive/negative tissue controls | Assay performance verification and staining specificity [5] |
Antibody validation represents a particularly critical step in mIHC workflow development. As emphasized in best practice guidelines, proper validation must address specificity, sensitivity, and cross-reactivity within the multiplex panel [13]. The Society for Immunotherapy of Cancer task force specifically recommends rigorous optimization of immunolabeling conditions, including antibody clone selection and antigen retrieval parameters, to achieve required performance criteria for individual markers [5].
Detailed mIHC Protocol for TME Characterization
Sample Preparation and Staining
The following protocol outlines a standardized method for effective mIHC analysis of the tumor microenvironment, incorporating best practices from recent guidelines [13] [5]:
Tissue Sectioning and Preparation
- Cut formalin-fixed, paraffin-embedded (FFPE) tissue sections at 4-5μm thickness
- Mount on charged slides and dry at 60°C for 1 hour
- Deparaffinize in xylene and rehydrate through graded ethanol series
- Perform antigen retrieval using appropriate buffer (citrate or EDTA-based) with optimized heating conditions
Multiplex Immunostaining
- Implement sequential staining protocol with antibody panel designed for spectral separation
- For each marker:
- Apply protein block to reduce non-specific binding (10 minutes)
- Incubate with primary antibody (optimized concentration, 60 minutes at room temperature)
- Apply appropriate secondary detection system (30 minutes)
- Develop with chromogenic or fluorescent substrates
- Between staining cycles, perform antibody removal using gentle stripping buffer (for sequential methods)
- Counterstain with hematoxylin or DAPI
- Coverslip using appropriate mounting medium
Image Acquisition
- Scan slides using high-resolution digital scanner with consistent exposure settings
- For brightfield mIHC, capture whole slide images at 20x-40x magnification
- For multiplex immunofluorescence, acquire images using spectral imaging system with appropriate filters
- Ensure proper calibration and focus throughout the imaging process
Image Analysis Workflow
The analysis of mIHC data requires a validated digital pipeline with quality assurance at each step [5]:
Color Deconvolution/Spectral Unmixing
- Separate overlapping signals using reference spectra
- Generate individual channels for each marker as 8-bit images
Tissue and Cell Segmentation
- Identify tissue regions and exclude artifacts
- Segment individual cells using nuclear markers as reference
- Differentiate tumor and stromal compartments
Cell Phenotyping
- Apply thresholding algorithms to classify marker positivity
- Assign cell phenotypes based on marker combination rules
- Quantify cell densities and proportions
Spatial Analysis
- Calculate cell-to-cell distances and interactions (typically <22μm)
- Determine spatial patterns and distributions
- Analyze compartment-specific cell localization
Integration with Artificial Intelligence
The combination of mIHC with artificial intelligence (AI) represents a frontier in cancer biomarker discovery. Recent studies demonstrate that AI frameworks integrating H&E and IHC stained whole slide images can achieve exceptional performance in predicting key biomarkers, with area under the receiver operating characteristic curve (AUROC) exceeding 0.97 for microsatellite instability (MSI)/mismatch repair deficiency (MMRd) prediction in colorectal cancer and 0.96 for PD-L1 prediction in breast cancer [15].
Dual-modality AI approaches that leverage both H&E and IHC images show particular promise. These systems not only predict biomarker status with high accuracy but also demonstrate superior prognostic stratification compared to conventional biomarker assessment methods. For example, patients with AI-predicted biomarker-positive status showed prolonged time-on-treatment and overall survival when treated with pembrolizumab, with the model's predictions outperforming PD-L1 IHC in stratifying breast cancer patients likely to benefit from immunotherapy [15].
The integration of mIHC with AI creates a powerful synergistic relationship: mIHC provides high-quality, spatially resolved training data for AI algorithms, while AI enables the extraction of subtle, prognostically significant patterns from complex mIHC datasets that might escape human detection. This combination accelerates the discovery of novel biomarkers and enhances the predictive power of existing ones.
Technology Platforms and Comparison
Multiple technological platforms are currently available for mIHC/IF, each with distinct advantages and limitations. The selection of an appropriate platform depends on the specific research questions, required multiplexing capacity, and available resources.
Table 3: Comparison of Current Multiplex Immunohistochemistry Platforms
| Technology | Principle | Markers per Section | Imaging Area | Key Applications |
|---|---|---|---|---|
| Multiplex IHC | Simultaneous/sequential immunostaining without removal | 3-5 | Whole slide | Clinical validation studies, diagnostic applications |
| MICSSS | Iterative staining, scanning, and removal | 10+ | Whole slide | High-plex discovery on limited samples |
| Multiplex IF | Cyclical staining with signal amplification or DNA barcodes | 5-8 (TSA-based); 30-60 (non-TSA) | Up to whole slide | Comprehensive immune profiling, spatial biology |
| Digital Spatial Profiling | UV-cleavable fluorescent DNA tags | 40-50 | ROI (0.28mm²) | Targeted transcriptomics/proteomics in specific regions |
| Tissue-based Mass Spectrometry | Antibodies tagged with elemental mass reporters | 40 | ROI (1.0mm²) | Ultra-high-plex protein detection |
Each technology offers distinct advantages for specific applications. For whole-slide analysis with moderate plex capacity, multiplex IF methods provide a balanced approach. For discovery-focused research requiring high-plex capability, technologies like Digital Spatial Profiling and tissue-based mass spectrometry enable detection of 40-50 markers, though with limited imaging areas [5].
Standardization and Validation Guidelines
As mIHC technologies mature and move toward clinical application, standardization and validation become increasingly critical. The Society for Immunotherapy of Cancer has convened expert task forces to establish best practice guidelines for both staining/validation and image analysis components of mIHC workflows [5].
Key recommendations for generating robust, reproducible mIHC data include:
Comprehensive Antibody Validation
- Verify specificity using appropriate positive and negative controls
- Optimize dilution and incubation conditions for each antibody within the multiplex panel
- Confirm minimal cross-reactivity between detection systems
Image Analysis Quality Control
- Implement batch-to-batch correction to address technical variability
- Establish criteria for tissue and cell segmentation verification
- Validate phenotyping algorithms against manual assessment
Data Management and Sharing
- Document all analysis parameters and preprocessing steps
- Share raw outputs, processed results, and analysis code where possible
- Include representative photomicrographs in publications
Multi-institutional harmonization efforts are underway to improve comparability across laboratories, with the goal of paving the way for clinical implementation of mIHC-based biomarkers [5]. A comprehensive checklist encompassing guidelines for generating robust data from quantitative mIHC assays is being developed to support these standardization efforts.
Multiplex immunohistochemistry has established itself as an indispensable technology in immuno-oncology and biomarker discovery, providing unprecedented insights into the cellular composition and spatial organization of the tumor microenvironment. The technology's ability to characterize complex immunophenotypes and cellular interaction patterns with single-cell resolution has enabled the development of sophisticated predictive biomarkers for immunotherapy response that outperform conventional single-parameter assays.
As standardization improves and analysis methodologies mature, mIHC is poised to transition from a research tool to clinical application, potentially enabling more precise patient stratification for immunotherapy. The integration of mIHC with artificial intelligence represents a particularly promising direction, combining rich spatial protein data with powerful pattern recognition capabilities to extract clinically actionable insights from complex tissue samples. Through continued methodological refinement and validation, mIHC will undoubtedly play an increasingly critical role in advancing precision immuno-oncology and developing more effective cancer therapies.
Multiplex Immunohistochemistry (mIHC) represents a pivotal advancement in tissue-based protein detection, enabling the simultaneous visualization of multiple antigens within a single tissue section. By moving beyond the "one marker per slide" paradigm of traditional IHC, mIHC provides rich insights into the spatial organization, phenotypic heterogeneity, and functional interplay of diverse cellular populations in their native microenvironment. This capability is particularly transformative in modern oncology, where unraveling the complexity of the TME is essential for understanding disease pathogenesis and therapeutic response [1]. The technology leverages a synergistic set of principles and technologies: highly specific antibodies, advanced labeling and amplification chemistries, diverse detection systems (chromogenic, fluorescent, metal-based, DNA-barcoded), and sophisticated computational analysis workflows [1]. As tumors exhibit significant cellular and spatial heterogeneity, the ability to perform high-resolution, multiplexed analysis across whole-sections of tumors is becoming increasingly important for both research and clinical applications [16].
Key Technological Principles of mIHC
Fundamental Detection Methodologies
mIHC protocols can be broadly classified based on their detection chemistry. The most common approaches include fluorescent detection, chromogenic detection, and emerging technologies utilizing DNA-barcoding or metal isotopes.
Fluorescent Detection: This approach relies on fluorophore-conjugated antibodies (direct) or secondary detection (indirect) to produce discrete emission wavelength signals upon excitation. A vast range of organic dyes is available (e.g., Alexa Fluor, Cyanine, FITC), with typical experiments detecting 4–7 markers per "round," and higher capacity via cyclic or spectral unmixing approaches. Advanced multispectral microscopy and computational unmixing enable analysis of closely related emission spectra, thus increasing plexing potential up to 8–10 or more with cyclic strategies [1].
Chromogenic Detection: Chromogenic multiplex IHC employs enzyme-mediated reactions where horseradish peroxidase (HRP) or alkaline phosphatase (AP) catalyze color precipitation at the antigen-antibody complex site. While simple and compatible with standard light microscopy, chromogen spectral overlap limits plex capacity to approximately 3–5 markers and is considered semi-quantitative at best [1].
Signal Amplification Techniques: Tyramide Signal Amplification (TSA) is a major innovation that provides exceptional sensitivity and spatial resolution. In this method, HRP catalyzes the covalent deposition of tyramide-linked fluorophores or haptens onto electron-rich residues adjacent to the antigen site, resulting in signal amplification up to 100-fold greater than traditional methods. This covalent deposition allows for subsequent rounds of antibody stripping and re-staining, making TSA highly compatible with cyclic multiplexing workflows [1]. Polymer-based amplification systems represent another approach, linking multiple enzyme molecules to backbone structures (often dextran) to increase the number of substrate conversion events per antibody binding event [1].
Research Reagent Solutions and Platform Technologies
Table 1: Essential Research Reagents and Platforms for mIHC
| Reagent/Platform | Type | Primary Function | Key Features |
|---|---|---|---|
| Tyramide Signal Amplification (TSA) | Signal Amplification | Enhances detection sensitivity for low-abundance targets | 100-fold sensitivity increase; covalent deposition; compatible with cyclic staining [1] |
| OPAL Multiplex IHC Kits | Fluorescent Detection | Simultaneous detection of multiple targets with distinct fluorophores | Compatible with automated platforms; enables moderate-plex studies [17] |
| Akoya Biosciences CODEX | High-Plex Platform | Utilizes DNA-barcoded antibodies for high-plex protein detection | High spatial resolution; quantitative analysis; can detect 40+ markers [17] |
| NanoString GeoMx DSP | Spatial Proteomics/Genomics | Combines protein detection with spatial gene expression analysis | Allows correlation of protein localization with transcriptomic data [17] |
| Fluidigm Imaging Mass Cytometry | Mass Spectrometry-Based | Simultaneous detection of metal-labeled antibodies | Minimal spectral overlap; can detect 40+ markers [17] |
| Primary Antibodies (Monoclonal) | Recognition Element | Binds specifically to target antigens | Recombinant monoclonals preferred for specificity and lot-to-lot consistency [1] |
Experimental Protocols for mIHC
Antibody Validation and Panel Design
Rigorous antibody validation is critical to avoid false positives and signal cross-talk in mIHC experiments. Key validation strategies include:
- Control Testing: Antibodies should be tested on positive and negative control tissues or cell lines (with and without antigen expression). Isotype controls and "knockout" validation with genetically modified models provide additional specificity confirmation [1].
- Titration and Single-Plex Testing: Each antibody must be titrated and tested individually under the intended experimental conditions (fixation, antigen retrieval, tissue type) before incorporation into a multiplex panel [13].
- Species and Isotype Compatibility: Panel design must avoid cross-reactivity by utilizing antibodies from different species if employing secondary-detection schemes. Directly conjugated primary antibodies can mitigate species cross-reactivity issues [1].
- Epitope Stability: For sequential staining protocols, epitope stability across staining cycles must be verified, as some antigens may not withstand repeated retrieval steps [1].
Whole-Slide mIHC Staining and Imaging Protocol
The following protocol outlines a comprehensive approach for 8-plex mIHC combining fluorescent and chromogenic detection for whole-slide analysis:
Tissue Preparation: Cut formalin-fixed paraffin-embedded (FFPE) sections at 4-5 μm thickness and mount on charged slides. Bake slides at 60°C for 60 minutes to ensure adhesion [16].
Deparaffinization and Antigen Retrieval:
- Deparaffinize in xylene (3 × 5 minutes) and rehydrate through graded ethanol series (100%, 95%, 70%) to distilled water.
- Perform heat-induced epitope retrieval (HIER) using Tris-EDTA buffer (pH 9.0) at 97°C for 20 minutes in a decloaking chamber [16].
First Staining Cycle (Fluorescence):
- Block endogenous peroxidase with 3% H₂O₂ for 10 minutes.
- Block nonspecific binding with protein block (5% BSA in PBS) for 30 minutes.
- Apply first primary antibody (e.g., anti-CK5, rabbit monoclonal) diluted in antibody diluent overnight at 4°C.
- Detect with species-specific HRP-conjugated secondary antibody (e.g., anti-rabbit-HRP) for 60 minutes at room temperature.
- Apply tyramide-fluorophore conjugate (e.g., Tyramide-AlexaFluor555) for 10 minutes [16].
- Perform heat-induced antibody denaturation in Tris-EDTA buffer (pH 9.0) at 97°C for 20 minutes to inactivate antibodies without removing covalently deposited tyramide signal [16].
Subsequent Staining Cycles:
- Repeat steps 3-5 for additional markers, using different fluorophore conjugates for each cycle.
- For chromogenic detection in final cycles, apply primary antibody followed by enzyme-conjugated secondary and appropriate chromogenic substrate (e.g., DAB) [16].
Counterstaining and Mounting:
- Counterstain with DAPI (0.5 μg/mL) for 5 minutes to visualize nuclei.
- Mount slides with anti-fade mounting medium [16].
Whole-Slide Image Acquisition:
- Acquire images using automated whole-slide fluorescence scanner with appropriate filter sets for each fluorophore.
- Use 20× objective for cellular resolution across entire tissue section.
- Ensure exposure times are optimized for each channel to maximize dynamic range without saturation [16].
Analyzing Cellular Interactions in the TME via mIHC
Computational Analysis of Spatial Relationships
Advanced computational tools are essential for extracting meaningful biological insights from mIHC data:
- Cell Segmentation and Phenotyping: Utilize automated cell segmentation algorithms (e.g., in HALO, Indica Labs) to identify individual cells based on nuclear staining and assign cell phenotypes based on marker expression thresholds [18].
- Spatial Neighborhood Analysis: Construct neighborhood profiles for individual cells by enumerating neighboring cell types within defined radii (e.g., 5-20 μm for juxtracrine signaling, 200-250 μm for paracrine signaling) [18].
- Spatial Co-localization Metrics: Calculate metrics such as Pearson's correlation coefficient or Manders Overlap Coefficient to quantify the degree of co-localization between different cell populations [19].
- Intercellular Communication Inference: Leverage tools that integrate spatial proximity with known ligand-receptor pairs (e.g., CellPhoneDB) to predict potential cell-cell communication events [19].
Application: Revealing CAF and Macrophage Interactions in Gastric Cancer
A recent study exemplifies how mIHC can unravel critical cellular interactions in the TME. Researchers integrated single-cell RNA sequencing with mIHC to investigate heterogeneity in gastric cancer, identifying specialized subpopulations of cancer-associated fibroblasts (CAFs) and tumor-associated macrophages (TAMs) [20].
Table 2: Cellular Subpopulations Identified in Gastric Cancer TME
| Cell Type | Subpopulation | Key Marker | Functional Characteristics | Prognostic Significance |
|---|---|---|---|---|
| Fibroblasts | Inflammatory CAFs (iCAFs) | Not specified | Involved in inflammation regulation [21] | Associated with poor prognosis [21] |
| Matrix CAFs (mCAFs) | Not specified | Extracellular matrix remodeling [21] | Associated with poor prognosis [21] | |
| Antigen-Presenting CAFs (apCAFs) | Not specified | Potential antigen presentation [21] | Associated with poor prognosis [21] | |
| GREM1+ CAFs | GREM1 | Promotes EMT, angiogenesis, M2 macrophage polarization [20] | Shorter overall survival [20] | |
| Macrophages | SPP1+ TAMs | SPP1 | M2-like polarization; pro-angiogenic, pro-fibrotic [20] | Shorter overall survival [20] |
| CXCL9+ Macrophages | CXCL9 | M1-like polarization; anti-tumor functions [20] | Not specified |
The study demonstrated through mIHC that GREM1+ CAFs and SPP1+ TAMs localized in neighboring areas within the TME, suggesting potential functional crosstalk. Patients with high infiltration of both GREM1+ CAFs and SPP1+ TAMs exhibited significantly shorter overall survival, highlighting the clinical relevance of this spatial relationship [20].
The following diagram illustrates the experimental workflow for analyzing cellular interactions using mIHC:
Representative Experimental Data and Analysis
Quantitative Analysis of Cellular Distributions
In a proof-of-concept study of prostate cancer, researchers applied mIHC to classify and quantify immune cell populations across tumor compartments. The analysis of 128,894 cells revealed distinct spatial distributions of T cell subsets between epithelial and stromal compartments [16].
Table 3: Immune Cell Distribution in Prostate Cancer Compartments
| Cell Type | Markers | Epithelial Compartment | Stromal Compartment | Total Cells |
|---|---|---|---|---|
| Cytotoxic T Cells | CD8+, CD3+ | 8,245 (12.8%) | 15,672 (24.3%) | 23,917 (18.6%) |
| Helper T Cells | CD4+, CD3+ | 6,518 (10.1%) | 12,894 (20.0%) | 19,412 (15.1%) |
| Regulatory T Cells | FoxP3+, CD4+, CD3+ | 1,205 (1.9%) | 2,856 (4.4%) | 4,061 (3.2%) |
| Total T Cells | CD3+ | 15,968 (24.8%) | 31,422 (48.8%) | 47,390 (36.8%) |
| B Cells | CD20+ | 3,456 (5.4%) | 8,923 (13.9%) | 12,379 (9.6%) |
| Epithelial Cells | Pan-CK+ | 28,645 (44.5%) | N/A | 28,645 (22.2%) |
This quantitative spatial analysis demonstrated that regulatory T cells were preferentially enriched in stromal regions compared to epithelial compartments, suggesting compartment-specific immune regulation patterns [16].
Cell-Cell Interaction Analysis
The following diagram illustrates the key cellular interactions that can be revealed through mIHC analysis in the tumor microenvironment:
Multiplex immunohistochemistry has emerged as an indispensable tool in spatial biology, providing unprecedented insights into the cellular architecture and interaction networks within the tumor microenvironment. The ability to simultaneously detect multiple protein markers while preserving spatial context enables researchers to move beyond simple cell enumeration to understanding functional relationships between different cell populations. As the technology continues to evolve with improved signal amplification methods, higher plexing capabilities, and more sophisticated computational analysis tools, mIHC is poised to play an increasingly important role in both basic cancer research and clinical translation. The integration of mIHC with other spatial omics technologies will further enhance our understanding of the complex ecosystem of the TME, ultimately leading to more effective therapeutic strategies and improved patient outcomes.
Cancer immunotherapy, particularly the use of immune checkpoint inhibitors (ICIs), has fundamentally transformed oncology care by offering durable responses across multiple malignancies, including non-small cell lung cancer (NSCLC), melanoma, and triple-negative breast cancer [22] [23]. Despite this remarkable progress, a critical challenge persists: only a subset of patients experiences clinical benefit, while others face unnecessary toxicity and cost without therapeutic gain [22] [24]. This variability underscores the urgent need for robust predictive biomarkers to guide patient selection and optimize clinical outcomes.
The current biomarker landscape presents significant limitations. Commonly used biomarkers such as programmed death-ligand 1 (PD-L1) expression and microsatellite instability-high (MSI-H) status demonstrate clinical utility but face constraints including tumor heterogeneity, assay variability, and dynamic expression patterns across tumor sites and disease stages [22] [23]. PD-L1 assessment exemplifies these challenges, with expression varying between primary tumors and metastatic sites and across histological subtypes [23]. Furthermore, the predictive accuracy of existing biomarkers remains inconsistent, with some patients with low or negative PD-L1 expression still responding to treatment, and vice versa [23] [24].
Multiplex immunohistochemistry (mIHC) has emerged as a transformative technology that addresses these limitations by enabling simultaneous detection of multiple biomarkers on a single tissue section. This capability provides deep insights into the cellular composition, functional states, and spatial relationships within the tumor microenvironment (TME) – critical determinants of immunotherapy response [13] [5] [1]. By moving beyond the "one-marker-per-slide" paradigm of traditional IHC, mIHC offers a comprehensive view of the complex immune contexture that single-plex approaches cannot capture. The Society for Immunotherapy of Cancer (SITC) has recognized the potential of these technologies, noting that mIHC/immunofluorescence (IF) assays have demonstrated area under the curve values on the order of 0.8 for predicting response to anti-PD-(L)1 therapies, outperforming other modalities such as PD-L1 IHC alone or gene expression signatures [5].
Fundamental Technical Approaches
Multiplex IHC encompasses several methodological approaches, each with distinct advantages and considerations for biomarker applications. These technologies can be broadly categorized based on their detection chemistry and staining formats [5] [1]:
- Simultaneous Chromogenic mIHC: This approach applies multiple primary antibodies with different enzyme labels (e.g., HRP, AP) simultaneously, followed by sequential chromogen development. While compatible with brightfield microscopy and standard pathology workflows, spectral overlap typically limits plex capacity to 3-5 markers [1].
- Multiplexed Immunohistochemical Consecutive Staining on Single Slide (MICSSS): This iterative method involves cycles of immunostaining, high-resolution scanning, chemical elution of antibodies, and blocking, enabling detection of 10+ markers on a single tissue section [5].
- Tyramide Signal Amplification (TSA)-Based Multiplex IF: This highly sensitive method utilizes HRP-catalyzed deposition of fluorophore-conjugated tyramide molecules, which covalently bind to tyrosine residues near the antigen-antibody complex. The covalent nature of the deposition allows for antibody stripping between cycles without signal loss, enabling medium-to-high plex capacity (typically 5-8 markers for TSA-based approaches) [5] [1].
- DNA-Barcoded Antibody Technologies: Methods such as Digital Spatial Profiling (DSP) utilize antibodies conjugated to UV-cleavable DNA barcodes. After staining, UV illumination releases barcodes from regions of interest for quantitation, enabling high-plex analysis (40-50 markers) from small tissue areas [5].
The selection of an appropriate mIHC platform depends on multiple factors, including the required plex level, tissue availability, equipment capabilities, and analytical requirements [5] [1].
Key Technical Considerations for Validated mIHC
Implementing robust mIHC assays requires careful attention to several technical parameters to ensure reproducible and biologically meaningful results:
- Antibody Validation: Rigorous validation of each antibody clone is essential, including testing on control tissues, verification of specificity using knockout models, and optimization under intended experimental conditions [1].
- Panel Design: Strategic panel construction must consider species/isotype compatibility, epitope stability across staining cycles, and fluorophore spectral separation to minimize cross-talk [13] [1].
- Image Analysis Pipeline: A validated computational workflow is crucial for accurate data extraction, encompassing steps for color deconvolution (chromogenic mIHC) or spectral unmixing (multiplex IF), tissue and cell segmentation, cell phenotyping, and spatial analysis [5].
mIHC as a Predictive Biomarker: Quantitative Evidence
Multiplex IHC has demonstrated significant value in predicting response to immune checkpoint inhibitors across multiple cancer types by enabling precise characterization of the tumor immune microenvironment. The table below summarizes key predictive biomarkers identified through mIHC approaches.
Table 1: mIHC-Derived Predictive Biomarkers for Immunotherapy Response
| Biomarker | Cancer Type | Predictive Value | Reference |
|---|---|---|---|
| CD8+CD39+ T cell proportion | Non-small cell lung cancer | Predictive of therapeutic response with AUC ~0.8 [5] | |
| CD8+FoxP3+ T cell density | Non-small cell lung cancer | Associated with improved outcomes to ICIs [5] | |
| CD8+FoxP3+PD-1low/mid+ & CD163+PD-L1− cell densities | Advanced melanoma | Combinatorial biomarker predicting ICI response [5] | |
| Stromal B cell percentage & aggregates | Melanoma | Associated with clinical benefit from ICIs; B cell aggregates detected via DBSCAN algorithm [25] | |
| PD-1+ to PD-L1+ cell proximity | Merkel cell carcinoma | Predictive of response to immunotherapy [5] | |
| TCF1+ and LAG3− T cell subsets | Melanoma | Enriched near stromal B cells; suggests functional interactions [25] |
The predictive power of mIHC extends beyond single biomarkers to encompass spatial relationships within the TME. For instance, in melanoma, a higher stromal B cell percentage is associated with clinical benefit from ICI therapy, and the automatic detection of B cell aggregates with DBSCAN, a density-based machine learning algorithm, demonstrates enhanced accuracy compared to pathologist assessment of lymphoid aggregates [25]. Furthermore, spatial analysis has revealed enrichment of TCF1+ and LAG3− T cell subpopulations in proximity to stromal B cells, suggesting potential functional interactions that may enhance antitumor immunity [25].
These mIHC-derived biomarkers frequently outperform conventional biomarkers such as PD-L1 expression alone. A meta-analysis comparing mIHC/IF assays to PD-L1 IHC, interferon-gamma-related gene signatures, and mutational density for predicting response to anti-PD-(L)1 therapies showed that mIHC/IF assays had a summary area under the receiver operating characteristic curve of approximately 0.8, while other modalities had AUCs of ∼0.65–0.7 [5]. This performance approaches the range considered potentially suitable for companion diagnostics (AUC ≥0.8) and warrants consideration for biomarker-driven clinical trials [5].
Experimental Protocols: Implementing mIHC for Biomarker Discovery
Protocol: Seven-Color Multiplex Immunofluorescence with TSA Amplification
This protocol provides a detailed methodology for sequential multiplex immunofluorescence using tyramide signal amplification, enabling the simultaneous detection of seven biomarkers on a single formalin-fixed, paraffin-embedded (FFPE) tissue section [5] [1].
Reagent Solutions and Materials
Table 2: Essential Research Reagents for TSA-Based mIHC
| Reagent Category | Specific Examples | Function and Application Notes |
|---|---|---|
| Primary Antibodies | Recombinant monoclonal antibodies preferred (e.g., anti-CD8, anti-CD4, anti-FoxP3, anti-PD-1, anti-PD-L1, anti-CD20, anti-CK) | Highly specific, lot-to-lot consistency; validate individually via single-plex IHC before multiplexing [1] |
| Tyramide Reagents | Fluorophore-conjugated tyramides (e.g., Alexa Fluor 488, 555, 594, 647, 750) | Signal amplification via HRP-catalyzed covalent deposition; provides 100-fold sensitivity increase [1] |
| Detection System | HRP-conjugated secondary antibodies or HRP-polymer systems | Enzyme conjugation for TSA reaction; species-specific secondaries enable signal amplification [1] |
| Antigen Retrieval | pH 6.0 citrate buffer or pH 9.0 EDTA-Tris buffer | Epitope exposure; optimal buffer varies by antibody clone [1] |
| Blocking Reagents | Serum from secondary antibody host species, protein block | Reduce non-specific background staining [1] |
| Mounting Medium | ProLong Diamond Antifade Mountant with DAPI | Fluorophore protection and nuclear counterstain [1] |
Step-by-Step Procedure
- Tissue Section Preparation: Cut 4-5μm FFPE sections onto charged slides. Bake at 60°C for 1 hour, followed by deparaffinization in xylene and rehydration through graded ethanol series to distilled water.
- Antigen Retrieval: Perform heat-induced epitope retrieval using appropriate buffer (citrate pH 6.0 or EDTA-Tris pH 9.0) in a pressure cooker or decloaking chamber for 15-20 minutes. Cool slides to room temperature for 30 minutes.
- Endogenous Peroxidase Blocking: Incubate slides with 3% hydrogen peroxide in methanol for 15 minutes to quench endogenous peroxidase activity.
- Protein Blocking: Apply protein block solution (e.g., 5% normal serum from secondary antibody host species) for 30 minutes to reduce non-specific binding.
- Primary Antibody Incubation: Apply first primary antibody at optimized concentration and incubate for 1 hour at room temperature or overnight at 4°C.
- HRP-Conjugated Secondary Detection: Apply species-specific HRP-conjugated secondary antibody or polymer system for 30 minutes at room temperature.
- Tyramide Signal Amplification: Apply fluorophore-conjugated tyramide working solution (1:50-1:100 dilution in amplification buffer) for 5-10 minutes.
- Antibody Stripping: Perform heat-mediated antibody stripping using antigen retrieval buffer at 95°C for 20 minutes to remove primary and secondary antibodies while leaving covalently deposited tyramide signal intact.
- Cycle Repetition: Repeat steps 5-8 for each subsequent marker in the panel, using different fluorophore-conjugated tyramides for each cycle.
- Counterstaining and Mounting: Apply DAPI nuclear counterstain (1-5μg/mL) for 10 minutes, then mount slides with antifade mounting medium.
- Image Acquisition: Acquire multispectral whole slide images using a calibrated fluorescence slide scanner with appropriate filter sets for each fluorophore.
Protocol: Computational Analysis of mIHC Data
The analysis of mIHC data requires a validated computational pipeline to extract quantitative and spatial information [5].
Image Analysis Workflow
Diagram 1: mIHC Analysis Workflow
- Image Acquisition and Quality Control: Acquire whole slide images or selected regions of interest (ROIs) using calibrated scanners. For fluorescence-based mIHC, capture images using appropriate exposure times for each channel to avoid saturation. Implement quality control measures to ensure proper focus, minimal tissue folds, and absence of significant artifacts [5].
- Color Deconvolution (mIHC) or Spectral Unmixing (mIF): For chromogenic mIHC, apply color deconvolution algorithms to separate overlapping color vectors into individual stain channels [5]. For multiplex IF, perform spectral unmixing to resolve fluorophore emission spectra overlap and eliminate tissue autofluorescence.
- Tissue Segmentation and Region of Interest (ROI) Definition: Use automated algorithms to identify and segment different tissue compartments, including tumor parenchyma, stroma, invasive margin, and tertiary lymphoid structures. ROI selection strategies should be documented, including the number of fields analyzed and criteria for inclusion/exclusion [5].
- Cell Segmentation and Phenotyping: Apply machine learning-based cell segmentation algorithms (e.g., watershed, deep learning models) to identify individual cell boundaries using nuclear (DAPI) and/or membrane markers. Then, classify cells into specific phenotypes based on marker expression thresholds determined from control samples [5].
- Spatial Analysis: Quantify spatial relationships between different cell populations using metrics such as:
- Cell-to-cell proximity: Distance between specific cell types (e.g., CD8+ T cells to cancer cells)
- Neighborhood analysis: Identification of recurrent cellular neighborhoods within the TME
- Spatial clustering: Algorithms such as DBSCAN to identify cellular aggregates (e.g., B cell aggregates) [25]
Integrated Analysis Framework
The true predictive power of mIHC emerges when quantitative cellular data is integrated with spatial relationships to generate comprehensive biomarkers of immune response. The following diagram illustrates the conceptual framework linking specific spatial features to immunotherapy outcomes.
Diagram 2: Spatial Feature Impact on Outcome
This framework demonstrates how specific spatial configurations identified via mIHC contribute to effective antitumor immunity and subsequent response to immunotherapy. For instance, the proximity of effector T cells to tumor cells enables direct cytolytic activity, while stromal B cell aggregates (potentially representing tertiary lymphoid structures) support T cell priming and differentiation through antigen presentation and cytokine signaling [25]. Simultaneously, the relative absence or spatial segregation of immunosuppressive cells (e.g., Tregs, M2 macrophages) creates a permissive microenvironment for productive immune responses [5] [25].
Multiplex immunohistochemistry represents a powerful technological advancement in the quest for reliable predictors of immunotherapy response. By enabling comprehensive profiling of the tumor immune microenvironment at single-cell resolution with spatial context, mIHC moves beyond the limitations of single-marker approaches and provides a more nuanced understanding of treatment determinants. The quantitative biomarkers derived from mIHC analysis – including specific immune cell densities, functional states, and spatial relationships – have demonstrated superior predictive performance compared to conventional biomarkers like PD-L1 expression alone.
As the field advances, standardization of mIHC protocols, validation of analytical pipelines, and integration with other biomarker modalities (e.g., genomic, transcriptomic, and circulating biomarkers) will be crucial for clinical translation. The implementation of the detailed application notes and protocols provided in this document will enable researchers to robustly apply mIHC technology for biomarker discovery and validation, ultimately contributing to more precise patient stratification and optimized immunotherapy outcomes.
A Practical Guide to mIHC Technologies and Workflow Implementation
Multiplex immunohistochemistry (mIHC) and multiplex immunofluorescence (mIF) have revolutionized the study of complex tissue environments by enabling the simultaneous detection of multiple protein markers on a single tissue section. These techniques provide deep insights into cellular composition, spatial relationships, and functional states within preserved tissue architecture. The fundamental advancement over traditional immunohistochemistry lies in moving beyond the "one marker per slide" paradigm, thereby conserving precious tissue samples and providing a systems-level view of cellular interactions. Two principal technological frameworks have emerged for achieving multiplexing: single-shot imaging and multicycle imaging. This application note provides a detailed technical comparison of these approaches, offering structured data, experimental protocols, and practical guidance for implementation within cancer research, immunology, and drug development contexts.
Multiplex imaging technologies are broadly classified into two categories based on their mechanism of signal acquisition. Single-shot imaging methods detect all targets in a single staining and imaging cycle, while multicycle imaging methods employ iterative rounds of staining, imaging, and signal removal or inactivation to build a highly multiplexed dataset from sequential measurements.
Table 1: Core Characteristics of Single-Shot and Multicycle Imaging Approaches
| Characteristic | Single-Shot Imaging | Multicycle Imaging |
|---|---|---|
| Fundamental Principle | Simultaneous staining and parallel signal acquisition in one cycle [26] | Iterative cycles of staining, imaging, and signal removal/inactivation [26] [27] |
| Typical Plex Capacity | ~7 to 40+ markers [26] [28] | ~40 to 60+ markers, potentially up to 100 [26] [1] |
| Key Advantage | Minimal tissue processing; faster acquisition; lower risk of tissue loss [26] | Very high plex capacity; ability to use conventional antibodies and microscopes [29] [27] |
| Primary Limitation | Limited by spectral overlap (fluorescence) or access to specialized, costly instrumentation [26] [29] | Lengthy protocols; potential for tissue damage or loss over multiple cycles [29] [27] |
| Data Acquisition Speed | Fast (single cycle) | Slow (multiple cycles, often over days) |
| Instrumentation Cost | Often high (especially for mass spectrometry) | Variable, can be lower if using adapted conventional microscopes |
The following diagram illustrates the fundamental workflows for these two imaging approaches, highlighting their core operational logic.
Single-Shot Imaging Technologies
Single-shot methods are characterized by their ability to acquire all data in one continuous measurement, preserving tissue integrity and streamlining the workflow.
Mass Spectrometry-Based Imaging
This category includes Multiplexed Ion Beam Imaging (MIBI/MIBIscope) and Imaging Mass Cytometry (IMC/Hyperion). These techniques use antibodies conjugated to heavy metal isotopes instead of fluorophores. The tissue is stained with a full antibody cocktail, and a primary ion beam (MIBI) or UV laser (IMC) ablates the tissue, releasing the metal tags which are then quantified by time-of-flight mass spectrometry [26].
- Key Features: Capable of detecting over 40 targets simultaneously with minimal background because mass spectrometry avoids biological autofluorescence [26] [29].
- Resolution: MIBI achieves ~0.4 µm/pixel, while IMC operates at ~1 µm/pixel [26].
- Considerations: Requires extremely costly, specialized instrumentation and extensive user training. Access is limited to core facilities or well-funded labs [26] [29].
Fluorescence Microscope-Based Imaging
This approach relies on advanced optical systems to discriminate multiple fluorescent signals in one acquisition round.
- PhenoImager HT (Akoya Biosciences): This platform uses tyramide signal amplification (TSA) to enhance fluorescence. Staining is sequential with antibody stripping between cycles, but the final slide with 5-7 markers is imaged in a single shot [26].
- Orion Platform (RareCyte): Represents a significant advancement in one-shot fluorescence multiplexing. The system uses seven excitation lasers and tunable optical filters to achieve whole-slide, 16- to 18-plex imaging at 0.325 µm/pixel resolution [26] [28]. Samples are stained with a mixture of antibodies conjugated to spectrally separated ArgoFluor dyes, and computational unmixing isolates individual fluorophore signals [28].
Multicycle Imaging Technologies
Multicycle methods achieve high plexity through repetition, making them adaptable but often more labor-intensive.
Direct Immunofluorescence-Based Cyclic Methods
These methods use fluorophore-conjugated primary antibodies and chemical bleaching to inactivate fluorescence between cycles.
- Cyclic Immunofluorescence (CyCIF): A prominent open-source method. Each cycle typically labels 4 proteins using direct immunofluorescence, followed by imaging and chemical quenching of the fluorophores with hydrogen peroxide (H₂O₂). This process can be repeated for 10-15 cycles to label 40-60 proteins [27]. Tissue loss is a known challenge, with studies showing ~5% cell loss over 10 cycles [27].
- Iterative Bleaching Extends Multiplexity (IBEX): Uses a similar principle of chemical bleaching (e.g., with LiBH₄) and has been used to label up to 65 markers in immune tissues [26] [29].
Oligonucleotide-Barcoded Antibody Methods
This strategy decouples antibody binding from signal detection using DNA barcodes.
- PhenoCycler (Akoya Biosciences) and CODEX (Akoya Biosciences): Antibodies are conjugated to unique DNA barcodes. The tissue is stained with a complex antibody cocktail. In each cycle, fluorescently labeled oligonucleotides complementary to a subset of barcodes are applied, imaged, and then stripped off without removing the antibodies. This allows for highly multiplexed imaging (50-60+ markers) on custom-built or commercial microscopes [26] [1].
- Digital Spatial Profiling (DSP, NanoString): While not image-based in its final output, DSP uses UV-cleavable DNA barcodes on antibodies. After fluorescence-based selection of regions of interest (ROIs), the barcodes are released and quantified, allowing for high-plex (40-50+) protein (or RNA) measurement from specific tissue locations [29].
Chromogenic and Sequential IHC Methods
These methods use enzymatic reactions for chromogenic detection and sequential staining with antibody elution.
- Multiplexed Immunohistochemical Consecutive Staining on Single Slide (MICSSS): An iterative method using chromogenic detection (e.g., AEC). After imaging each marker, the stain is destained with ethanol, and the antibody is eluted via heat treatment. This cycle repeats, building a multiplex dataset. It is compatible with brightfield microscopy but is limited in throughput (each cycle takes 1-2 days) and is only semi-quantitative [26] [29].
- DISCOVERY ULTRA (Roche): A commercial automated platform that uses tyramide-based signal amplification with a palette of chromogenic dyes to visualize multiple markers (typically 3-5) on a single slide for brightfield analysis [2].
Table 2: Comparative Analysis of Representative Multiplex Imaging Platforms
| Platform/ Method | Approach | Antibody Type | Max Plex | Key Instrument(s) | Primary Use Case |
|---|---|---|---|---|---|
| MIBI / IMC | Single-Shot (Mass Spec) | Metal-conjugated | 40+ | MIBIScope (Ionpath), Hyperion (Standard BioTools) | Deep, high-resolution TME phenotyping in research |
| Orion | Single-Shot (Fluorescence) | Fluorophore-conjugated | 18 | Orion (RareCyte) | Whole-slide, high-plex discovery and biomarker work |
| PhenoImager HT | Single-Shot (Fluorescence) | Unconjugated + TSA | 7 | PhenoImager HT (Akoya) | Mid-plex spatial analysis in clinical research |
| CyCIF / IBEX | Multicycle (Fluorescence) | Fluorophore-conjugated | 60+ | Conventional / adapted microscopes | High-plex research with budget constraints |
| PhenoCycler / CODEX | Multicycle (Oligo Barcode) | DNA-barcoded | 50+ | PhenoCycler (Akoya), custom microscopes | Highly flexible, very high-plex cellular phenotyping |
| MICSSS | Multicycle (Chromogenic) | Unconjugated + Chromogen | ~10 | Conventional brightfield microscopes | Low-plex analysis in labs with only brightfield capability |
| Digital Spatial Profiler (DSP) | Multicycle (Oligo Barcode) | DNA-barcoded | 40-50+ | DSP (NanoString) | Spatially-resolved, high-plex profiling of selected ROIs |
Detailed Experimental Protocols
Protocol: One-Shot 18-Plex Staining for Orion Platform
This protocol outlines the procedure for multiplex staining compatible with the Orion one-shot imaging platform [28].
Research Reagent Solutions & Essential Materials:
- FFPE Tissue Sections: 4-5 µm thick on charged slides.
- ArgoFluor-conjugated Antibodies: A panel of 16-18 antibodies directly conjugated to spectrally distinct ArgoFluor dyes [28].
- Antigen Retrieval Buffer: Tris-EDTA, pH 9.0.
- Blocking Buffer: Protein block (e.g., serum or BSA-based) to reduce non-specific binding.
- Nuclear Counterstain: Hoechst or DAPI for segmentation.
- Mounting Medium: Fluorescence-compatible, anti-fade mounting medium.
Procedure:
- Deparaffinization and Antigen Retrieval: Bake slides at 60°C for 1 hour. Deparaffinize in xylene and rehydrate through a graded ethanol series. Perform heat-induced epitope retrieval in Tris-EDTA buffer (pH 9.0) using a pressure cooker (15 psi, 15 minutes). Cool slides to room temperature.
- Blocking: Apply protein block for 30 minutes at room temperature to minimize non-specific antibody binding.
- Multiplex Antibody Staining: Prepare a master mix containing all 18 ArgoFluor-conjugated primary antibodies diluted in antibody diluent. Apply the cocktail to the tissue section and incubate for 2 hours at room temperature or overnight at 4°C.
- Washing and Mounting: Wash slides 3x in PBS for 5 minutes each. Apply nuclear counterstain (e.g., DAPI) if not included in the antibody cocktail. Wash again and mount with anti-fade mounting medium.
- Imaging: Image the entire slide on the Orion platform using a 20x/0.75 NA objective. The instrument's seven lasers and tunable filters will acquire raw images, which are subsequently processed with spectral extraction software to unmix the individual fluorophore signals.
Protocol: Cyclic Immunofluorescence (CyCIF) for 40-Plex Imaging
This protocol is adapted from the Lin et al. and mplexable pipeline descriptions for performing CyCIF on FFPE tissues [27].
Research Reagent Solutions & Essential Materials:
- FFPE Tissue Sections: 4-5 µm thick on charged slides.
- Directly Conjugated Primary Antibodies: Antibodies conjugated to quenchable fluorophores (e.g., Alexa Fluor 488, 555, 647).
- Quenching Solution: 3% H₂O₂ in 20 mM NaOH.
- Blocking Buffer: 3% BSA in PBS.
- Antigen Retrieval Buffer: Citrate buffer, pH 6.0, or Tris-EDTA, pH 9.0.
- Mounting Medium: Phosphate-buffered glycerol or commercial anti-fade medium.
Procedure:
- Initial Slide Preparation: Deparaffinize and perform antigen retrieval as in Protocol 5.1.
- Pre-Quenching (Optional but Recommended): Incubate the slide in quenching solution (3% H₂O₂ in 20 mM NaOH) for 30 minutes under an incandescent light to reduce tissue autofluorescence. Wash thoroughly with PBS [27].
- Cyclic Staining & Imaging (Repeat for N cycles): a. Staining: Apply a set of 3-4 directly conjugated primary antibodies (diluted in blocking buffer) to the tissue. Incubate for 1-2 hours at room temperature. Wash 3x with PBS. b. Mounting and Imaging: Apply a nuclear stain (if used) and mounting medium. Acquire images for all channels on a fluorescence microscope. c. Signal Quenching: Immerse the slide in quenching solution for 30 minutes under an incandescent light to completely inactivate the fluorophores. The gentle heating from the light accelerates the reaction and ensures complete signal removal [27]. Wash with PBS.
- Data Processing: Use computational pipelines (e.g., mplexable) for image registration, segmentation, and feature extraction to combine data from all cycles into a single multiplexed dataset [27].
The Scientist's Toolkit: Essential Research Reagents
Successful execution of multiplex imaging experiments depends on a carefully selected set of reagents and tools.
Table 3: Key Research Reagent Solutions for Multiplex Imaging
| Reagent / Material | Function | Key Considerations |
|---|---|---|
| Validated Primary Antibodies | Specific binding to target antigens. | Recombinant monoclonals preferred for lot-to-lot consistency. Rigorous validation for IHC/IF on FFPE tissue is critical [1]. |
| Fluorophore Conjugates | Signal generation for fluorescence-based methods. | Must be photostable and spectrally distinct. For cyclic methods, dyes must be quenchable (e.g., Alexa Fluor 488, 555, 647) [27]. |
| Tyramide Signal Amplification (TSA) Reagents | Enzyme-mediated signal amplification for low-abundance targets. | Provides high sensitivity but requires optimization to prevent over-amplification and signal spillover [26] [1]. |
| DNA Barcode Conjugates | Decouple antibody binding from detection for ultra-high plexing. | Used in platforms like CODEX and PhenoCycler. Allows use of a limited set of fluorescent labels to read out many antibodies [26] [1]. |
| Metal-Tagged Antibodies | Enable detection via mass spectrometry. | Used for MIBI and IMC. Avoids biological autofluorescence and spectral overlap [26] [29]. |
| Antigen Retrieval Buffers | Unmask epitopes cross-linked by formalin fixation. | Choice of pH (e.g., pH 6.0 citrate vs. pH 9.0 Tris-EDTA) is antigen-dependent and crucial for signal intensity [30]. |
| Automated Image Analysis Software | Cell segmentation, phenotyping, and spatial analysis. | Tools like MCMICRO, Haloinform, and Visiopharm are essential for objective, quantitative analysis of complex multiplex images [28] [31]. |
The choice between single-shot and multicycle imaging approaches is a strategic decision that balances plex capacity, throughput, tissue preservation, and resource availability. Single-shot methods like Orion and MIBI offer streamlined workflows and are ideal for studies requiring consistent, whole-slide analysis of up to 20-40 markers. In contrast, multicycle methods like CyCIF and PhenoCycler provide unparalleled flexibility and ultra-high plex capability, making them powerful tools for discovery-phase research where the comprehensive characterization of cell types and states is the primary goal. As these technologies continue to mature and become more accessible, they are poised to deepen our understanding of disease biology and accelerate the development of novel biomarkers and therapeutic strategies.
Multiplex immunohistochemistry and immunofluorescence (mIHC/IF) technologies represent a transformative advancement in spatial biology, enabling the simultaneous visualization of multiple biomarkers within a single tissue section. These methods provide critical insights into cellular heterogeneity, cell states, and spatial relationships in the tissue microenvironment, which are essential for understanding disease mechanisms and developing targeted therapies [32]. Among the most powerful and widely adopted approaches are Tyramide Signal Amplification (TSA) and Cyclic Immunofluorescence (CyCIF), which facilitate highly multiplexed protein detection from formalin-fixed, paraffin-embedded (FFPE) samples while preserving tissue architecture [32] [33].
The growing importance of these techniques is evidenced by a dramatic increase in scientific publications, with annual articles on TSA-based mIHC/IF rising rapidly since 2016 [32]. This expansion reflects the critical need in both research and clinical diagnostics to comprehensively profile complex biological systems, particularly in areas such as immuno-oncology, neuroscience, and drug development, where understanding cellular interactions and functional states at single-cell resolution is paramount [32] [34].
Technical Principles and Comparative Analysis
Tyramide Signal Amplification (TSA)
TSA is an enzyme-mediated signal amplification method that utilizes the catalytic activity of horseradish peroxidase (HRP) to achieve high-density labeling of target proteins. The technique employs unconjugated primary antibodies specific to target proteins, followed by species-specific secondary antibodies conjugated to HRP. When fluorophore-conjugated tyramide is applied, HRP converts it to a highly reactive intermediate that covalently binds to electron-rich tyrosine residues on and surrounding the protein epitope [35].
This covalent deposition allows subsequent antibody stripping without signal loss, enabling sequential staining cycles. A significant advantage of TSA is its exceptional sensitivity, requiring 10-5000 times less primary antibody than standard IHC/IF to achieve equivalent signal intensity [35]. This makes it particularly valuable for detecting low-abundance targets and generates photostable signals that can persist for over a year without significant degradation [32].
Cyclic Immunofluorescence (CyCIF)
CyCIF is an iterative multiplexing method that uses conventional fluorescently labeled antibodies in repeated cycles of staining, imaging, and fluorophore inactivation. Unlike TSA, which relies on covalent tyramide deposition, CyCIF typically employs chemical bleaching or fluorophore inactivation between cycles to remove fluorescent signals before subsequent staining rounds [33]. The method can utilize "off-the-shelf" commercially available antibodies without specialized conjugation [36].
A key innovation in advanced CyCIF applications is the adaptation to three-dimensional tissue imaging using thick sections (30-50 μm), which preserves intact cells and enables the detection of subcellular structures and juxtracrine signaling complexes that are obscured in conventional thin sections [34]. This 3D profiling has revealed that standard 5 μm sections contain few intact cells or nuclei, potentially leading to inaccurate cell phenotyping in traditional 2D analysis [34].
Technical Comparison
Table 1: Comparative Analysis of TSA and Cyclic Immunofluorescence
| Parameter | Tyramide Signal Amplification | Cyclic Immunofluorescence |
|---|---|---|
| Multiplexing Capacity | Typically 5-8 markers [32] | Up to 16+ markers demonstrated [36] [34] |
| Signal Mechanism | Enzymatic amplification via HRP-catalyzed tyramide deposition [35] | Direct antibody fluorescence with signal inactivation between cycles [33] |
| Sensitivity | Extremely high (10-5000x amplification) [35] | Standard antibody sensitivity [36] |
| Spatial Resolution | Excellent due to localized deposition [35] | High, especially in 3D implementations [34] |
| Antibody Requirements | Primary + HRP-conjugated secondary antibodies | Fluorescently-labeled primary antibodies or primary + fluorescent secondary antibodies [33] |
| Primary Applications | Detection of low-abundance targets, FFPE tissues [37] | High-plex tissue mapping, 3D tissue architecture [34] [33] |
Research Applications and Advancements
Oncology and Tumor Microenvironment
Both TSA and CyCIF have made significant contributions to cancer research by enabling detailed characterization of the tumor microenvironment. These techniques allow simultaneous assessment of immune cell populations, tumor markers, and functional states within tissue architecture. In melanoma, 3D CyCIF has revealed intricate cellular communities and cell-cell interactions that are obscured in conventional 2D sections [34]. Similarly, TSA-based multiplexing has been applied to profile the immune landscape in head and neck squamous cell carcinoma (HNSCC), demonstrating co-expression patterns of immune markers (CD3, CD8, CD68) with checkpoint regulators like PD-L1 [38].
Neuroscience and Neuropathology
In neuroscience, these methods have enabled sophisticated profiling of neuroglial interactions in Alzheimer's disease and other neurological disorders. Cyclic multiplex fluorescent IHC has been optimized to characterize astrocytic and microglial responses to Aβ plaques and neurofibrillary tangles while preserving spatial context [36]. The ability to detect 16 different markers in FFPE human postmortem brain tissue has facilitated new understanding of glial cell heterogeneity and disease-associated phenotypes [36].
Liquid Biopsy and Extracellular Vesicle Analysis
Recent adaptations have extended TSA to the analysis of circulating tumor cells (CTCs) and extracellular vesicles (EVs) from liquid biopsies. In glioblastoma, TSA has demonstrated superior performance for single-EV analysis, providing amplified signal intensities (>6×), broader dynamic ranges (~3×), and more stable signals compared to conventional fluorescence methods [37]. This application is particularly valuable given the challenging nature of EV analysis due to small size and low marker abundance.
Experimental Protocols
TSA-Based Multiplex IHC Protocol
The following protocol outlines a standard workflow for TSA-based multiplex immunohistochemistry on FFPE tissue sections:
Slide Preparation and Antigen Retrieval
- Deparaffinize slide-mounted FFPE sections in xylene and hydrate through graded ethanol series to distilled water [38].
- Perform heat-induced epitope retrieval (HIER) using citrate buffer (pH 6.0) or Tris-EDTA (pH 9.0) in a microwave, steamer, or dedicated HIER instrument [38]. Heat slides until boiling (~2 minutes), then maintain at sub-boiling temperatures for 15-20 minutes [35].
- Cool slides to room temperature and rinse with appropriate buffer (e.g., TBS or PBS).
Primary and Secondary Antibody Incubation
- Apply protein block (e.g., 10% normal serum from secondary antibody host) for 30 minutes at room temperature to reduce non-specific binding.
- Incubate with species-specific primary antibody diluted in antibody buffer (e.g., 5% normal serum) for 1 hour at room temperature or overnight at 4°C [38]. Optimal concentrations must be determined empirically for each antibody.
- Wash slides and incubate with HRP-conjugated secondary antibody (specific to primary antibody host species) for 30-60 minutes at room temperature [35].
Tyramide Signal Amplification
- Apply fluorophore-conjugated tyramide working solution for 2-10 minutes to achieve optimal signal intensity [35].
- Stop the reaction with appropriate stop solution according to manufacturer recommendations.
Sequential Staining Cycles
- Strip antibodies by performing additional HIER in microwave: heat until boiling (~2 minutes), then maintain at 20% power for 15 minutes [35]. This removes primary and secondary antibodies while leaving covalently deposited tyramide signal intact.
- Repeat steps 5-9 for each additional marker in the panel, using different fluorophore-conjugated tyramides for each cycle.
Final Processing and Imaging
- After all staining cycles are complete, counterstain with DAPI (0.001 mg/mL in TBS) for nuclear visualization [36].
- Apply aqueous mounting medium and coverslip.
- Image using a fluorescence microscope capable of capturing all fluorophores used, preferably with a slide scanning system for whole-slide imaging [36].
Cyclic Immunofluorescence Protocol
This protocol describes t-CyCIF (tissue-based cyclic immunofluorescence) for highly multiplexed imaging:
Sample Preparation and Pre-staining
- Deparaffinize and rehydrate FFPE tissue sections as described in the TSA protocol.
- Perform antigen retrieval using appropriate buffer and method for target epitopes.
- Optionally, pre-stain with fluorescent secondary antibodies to reduce autofluorescence from non-specific binding in subsequent cycles [33].
Staining and Imaging Cycles
- Incubate with primary antibodies (1-4 markers per cycle) for 1 hour at room temperature or overnight at 4°C [33].
- If using indirect detection, incubate with species-appropriate fluorescent secondary antibodies for 30-60 minutes.
- Apply nuclear counterstain (e.g., DAPI, Hoechst) and acquire images using a fluorescence microscope [33].
Fluorophore Inactivation
- Incubate slides with fluorescence quenching solution (0.1M NaHCO3, 3% H2O2, pH 11.2) for 1 hour at room temperature under light protection [36].
- Alternatively, for certain fluorophores, use chemical bleaching with hydrogen peroxide or other oxidizing agents [33].
Cycle Repetition
- Repeat steps 4-8 for each subsequent staining cycle, typically 4-8 cycles total [36] [33].
- After final cycle, optionally stain with hematoxylin and eosin (H&E) for correlative bright-field microscopy [33].
Table 2: Troubleshooting Common Issues in Multiplex Fluorescence IHC
| Problem | Potential Causes | Solutions |
|---|---|---|
| High Background | Incomplete antibody stripping, insufficient blocking, excessive tyramide incubation | Optimize stripping conditions (duration, temperature), increase blocking serum concentration, shorten tyramide reaction time [38] |
| Signal Loss in Later Cycles | Epitope damage from repeated antigen retrieval, fluorophore bleaching | Reorder antibody sequence (high abundance targets first), optimize retrieval conditions, include antioxidant in mounting medium [38] [33] |
| Channel Crosstalk | Spectral overlap, incomplete fluorophore inactivation | Optimize filter sets, validate spectral unmixing, extend inactivation time, include Sudan Black B to reduce autofluorescence [36] |
| Uneven Staining | Inconsistent antibody coverage, drying during incubation | Use humidity chamber, ensure adequate solution volume, optimize antibody dilutions [36] |
Visualization and Data Analysis
Workflow Diagrams
Image Processing and Data Normalization
Advanced computational approaches are essential for analyzing multiplex fluorescence data. The UniFORM (Universal immunofluorescence normalization) pipeline provides a non-parametric method for normalizing both feature-level (cell data) and pixel-level (raw images) MTI data [39]. This approach automatically aligns biologically invariant negative populations across samples while preserving positive population signals, effectively correcting technical variations from staining and imaging conditions without requiring prior cell-type annotations [39].
For 3D CyCIF data, specialized segmentation and reconstruction software such as Imaris is used to identify individual cells, generate spatial embeddings, and distinguish immune and tumor cell populations [34]. The open-source MCMICRO pipeline provides a comprehensive solution for transforming cyclic imaging data into single-cell data with spatial features [33].
The Scientist's Toolkit
Table 3: Essential Research Reagents and Materials
| Reagent/Material | Function | Examples/Specifications |
|---|---|---|
| Tyramide Reagents | Signal amplification for low-abundance targets | Alexa Fluor Tyramide SuperBoost kits (AF350, AF488, AF546, AF647) [35] |
| Primary Antibodies | Target protein recognition | Species-specific, IHC-validated; recommend recombinant monoclonals for batch consistency [38] |
| HRP-Conjugated Secondaries | Enzyme conjugation for TSA | Poly-HRP conjugates for enhanced sensitivity [35] |
| Antigen Retrieval Buffers | Epitope unmasking in FFPE tissue | Citrate pH 6.0, Tris-EDTA pH 9.0 [38] |
| Blocking Buffers | Reduce non-specific binding | 10% normal serum from secondary host species [36] |
| Fluorescence Quenchers | Signal inactivation between CyCIF cycles | 0.1M NaHCO3, 3% H2O2, pH 11.2 [36] |
| Autofluorescence Reducers | Minimize tissue background | Sudan Black B (1% in 70% ethanol) [36] |
| Mounting Media | Preserve fluorescence and tissue integrity | Aqueous mounting medium with DAPI [36] |
TSA and cyclic immunofluorescence represent complementary pillars of modern multiplex tissue imaging, each with distinct advantages for specific research applications. TSA provides exceptional sensitivity for low-abundance targets and robust signal preservation, while CyCIF offers expanded multiplexing capacity and compatibility with conventional antibodies. As these technologies continue to evolve—particularly through integration with 3D imaging and advanced computational analysis—they promise to further transform our understanding of cellular ecosystems in health and disease. The ongoing development of standardized protocols, validation frameworks, and data normalization approaches will be crucial for maximizing the research and potential clinical utility of these powerful spatial proteomics methods.
The comprehensive analysis of the tumor microenvironment (TME) requires technologies that can simultaneously characterize multiple cellular and structural components while preserving spatial context. Mass spectrometry-based imaging technologies, particularly Multiplexed Ion Beam Imaging (MIBI) and Imaging Mass Cytometry (IMC), have emerged as powerful solutions that overcome the limitations of traditional immunohistochemistry (IHC) and fluorescence-based methods [40] [41]. These technologies utilize antibodies conjugated with metal isotopes rather than fluorophores or enzymes, enabling highly multiplexed detection of 40 or more biomarkers on a single tissue section at subcellular resolution [40] [42].
The fundamental advantage of mass spectrometry-based approaches lies in their minimal spectral overlap, as metal isotopes can be distinguished by their distinct atomic masses using time-of-flight mass spectrometry [41] [42]. This eliminates the autofluorescence issues common in formalin-fixed paraffin-embedded (FFPE) tissues and enables more accurate quantification of marker expression compared to conventional methods [42]. For researchers and drug development professionals, MIBI and IMC provide unprecedented insights into cellular interactions, functional states, and spatial relationships within intact tissues, offering critical biomarkers for predicting immunotherapy responses and patient outcomes [40].
Technology Principles and Comparative Analysis
Imaging Mass Cytometry (IMC) Fundamentals
IMC combines the multiplex capacity of mass cytometry with traditional immunohistochemistry principles [42]. The technology utilizes antibodies conjugated to rare earth metal isotopes, which are applied to tissue sections following conventional IHC procedures [40]. After antibody binding, a UV laser system with a 1μm² beam spot ablates the stained tissue in a raster pattern [42]. The ablated material is then ionized by inductively coupled plasma (ICP) and the metal masses are quantified by a time-of-flight (TOF) mass spectrometer [42]. IMC can simultaneously detect up to 43 different markers on the same tissue slide using metal tags in the optimal detection range (141-176 atomic mass units) that exhibit less than 4% signal spillover [42]. A key component is the cation nucleic acid intercalator (191-193 Iridium), which is used to identify nuclei [42].
Multiplexed Ion Beam Imaging (MIBI) Technology
MIBI operates on the principle of secondary ion mass spectrometry (SIMS) [41] [42]. This technology applies an O₂+ duoplasmatron primary ion beam to tissue slides, which releases secondary ions from both metal-tagged antibodies and endogenous tissue elements [42]. These secondary ions are directly introduced into a TOF-MS system for metal detection [41]. Unlike IMC, MIBI causes minimal tissue damage, allowing multiple rounds of acquisition from the same regions of interest [42]. The image resolution in MIBI is adjustable by regulating acquisition time and can reach ~0.4 μm per pixel, providing superior subcellular detail compared to IMC [41]. Recent technological advances have improved MIBI's multiplexing capacity from initially 7 channels to 15-20 and up to 40 channels in a single round [42].
Comparative Technical Specifications
Table 1: Technical comparison between MIBI and IMC platforms
| Parameter | MIBI | IMC |
|---|---|---|
| Resolution | ~0.4 μm per pixel [41] | ~1 μm per pixel [40] [41] |
| Multiplex Capability | Up to ~40 markers [40] [42] | Up to ~43 markers [42] |
| Ionization Source | O₂+ duoplasmatron primary ion beam [42] | UV laser ablation with ICP ionization [42] |
| Tissue Preservation | Minimal damage, allows repeated acquisitions [42] | Destructive method, single acquisition [42] |
| Instrumentation | MIBIScope (IONpath) [41] | Hyperion (Standard BioTools) [41] |
| Spectral Overlap | Minimal (<4% spillover) [40] | Minimal (<4% spillover) [42] |
| Sample Requirements | 4-7 μm FFPE or frozen sections [41] | FFPE or frozen tissues [42] |
Figure 1: Comparative workflows of IMC and MIBI technologies
Research Reagent Solutions and Essential Materials
Successful implementation of MIBI and IMC requires careful selection and validation of research reagents. The core components include metal-tagged antibodies, specialized instrumentation, and tissue processing materials that maintain antigen integrity while minimizing background.
Table 2: Essential research reagents and materials for MIBI and IMC
| Reagent/Material | Function | Technical Considerations |
|---|---|---|
| Metal-tagged Antibodies | Target protein detection | Commercially available or custom-conjugated using metal labeling kits; require rigorous validation for specificity [41] |
| Nucleic Acid Intercalator (191-193 Ir) | Nuclear counterstain | Essential for cell segmentation and identification; intercalates with DNA [42] |
| FFPE Tissue Sections | Sample substrate | Optimal thickness 4-5 μm; requires proper fixation to preserve antigenicity [41] [43] |
| Tissue Digestion Enzymes | Antigen retrieval | Enzyme concentration and incubation time require optimization for different tissue types [44] |
| Signal Amplification Reagents | Enhanced detection | Used for low-abundance targets; improves signal-to-noise ratio [42] |
| Metal Isotopes | Antibody tags | 42 metals commercially available; selection based on mass separation and abundance [42] |
| Cell Segmentation Markers | Cell boundary identification | Pan-cytokeratin, CD45, or membrane-specific markers crucial for accurate single-cell analysis [40] |
Detailed Experimental Protocols
Sample Preparation Protocol
Proper sample preparation is critical for successful MIBI and IMC experiments. The following protocol outlines the essential steps from tissue collection to antibody staining:
Tissue Fixation and Processing:
- For FFPE tissues, use 10% neutral buffered formalin for 24-48 hours fixation followed by standard processing and paraffin embedding [45].
- For frozen tissues, embed in optimal cutting temperature (OCT) compound and flash-freeze in liquid nitrogen-cooled isopentane [42].
- Store FFPE blocks at room temperature in dry conditions; use within 10 years for optimal antigen preservation [43].
Sectioning:
Deparaffinization and Antigen Retrieval (FFPE tissues only):
- Deparaffinize slides in xylene or xylene substitutes (3 changes, 5 minutes each).
- Rehydrate through graded ethanol series (100%, 95%, 70%, 50%) and distilled water.
- Perform heat-induced epitope retrieval using citrate or EDTA-based buffer (pH 6.0 or 9.0) at 95-100°C for 20-40 minutes [45].
- Cool slides to room temperature for 30 minutes before proceeding.
Antibody Staining Procedure
The antibody staining protocol for MIBI and IMC follows principles similar to conventional IHC but requires careful optimization of metal-tagged antibodies:
Blocking:
- Incubate sections with blocking buffer (3% BSA in PBS or TBS) containing 5-10% normal serum of the host species matching the secondary antibody (if used) for 1 hour at room temperature [42].
- For direct staining methods, include 0.1% sodium azide to prevent internalization of metal-tagged antibodies.
Antibody Incubation:
- Prepare antibody cocktail in antibody diluent (1% BSA in PBS) containing 0.1% sodium azide.
- Centrifuge antibody cocktail at 14,000 × g for 10 minutes to remove aggregates.
- Apply optimized dilution of metal-tagged primary antibodies to tissue sections and incubate overnight at 4°C in a humidified chamber [42].
- Include a nuclear intercalator (191-193 Ir, Standard BioTools) in the antibody cocktail at recommended dilution.
Washing and Post-staining Processing:
- Wash slides 3 times (5 minutes each) with PBS containing 0.1% Tween-20.
- Rinse briefly with distilled water to remove residual salts.
- Air-dry slides completely before loading into the mass spectrometer.
Controls:
- Include positive control tissues with known expression of target antigens.
- Use isotype controls or negative control (omission of primary antibody) to assess non-specific binding [43].
- Include a tissue with high autofluorescence to validate signal specificity.
Data Acquisition Parameters
IMC Acquisition (Hyperion System):
- Laser frequency: 200 Hz
- Laser spot size: 1 μm²
- Scan speed: ~33 pixels/second
- Mass calibration: Perform daily using known metal standards
- Resolution: 1 μm/pixel [42]
MIBI Acquisition (MIBIScope):
- Primary ion beam current: Optimize for tissue type (typically 0.5-3 nA)
- Scan size: Adjust based on region of interest
- Dwell time per pixel: 1-20 ms (adjust for signal intensity)
- Resolution: 0.4-0.8 μm/pixel [41]
- Vacuum pressure: Maintain at <5 × 10⁻⁷ Torr
Data Processing and Analytical Workflow
The analysis of MIBI and IMC data requires specialized computational approaches to extract meaningful biological information from the raw mass spectrometry data. The workflow encompasses multiple steps from raw data conversion to spatial analysis.
Figure 2: Data processing workflow for MIBI and IMC analysis
Image Pre-processing and Cell Segmentation
Data Conversion and Pre-processing:
- Convert raw data (.MCD files for IMC, proprietary format for MIBI) to multi-channel TIFF or OME-TIFF files using vendor software or custom scripts [42].
- Remove background noise and correct for tissue artifacts using background subtraction algorithms.
- Apply compensation for minimal signal spillover between channels using single-stained controls [42].
Cell Segmentation:
- Use the nuclear channel (191-193 Ir) to identify individual cell nuclei using watershed algorithms or machine learning approaches [42].
- Define cellular boundaries using membrane or cytoplasmic markers (e.g., pan-cytokeratin, CD45) or expand nuclear masks by a fixed radius (typically 3-5 μm) [40].
- Generate a cell mask that assigns each pixel to a specific cell while excluding extracellular regions.
Single-cell Analysis and Spatial Mapping
Single-cell Feature Extraction:
- Extract expression values for all markers for each segmented cell.
- Calculate morphological features (size, shape, eccentricity) and spatial coordinates (x, y position).
- Export data as a single-cell table for downstream analysis.
Cell Phenotyping:
- Perform dimensionality reduction (PCA, t-SNE, UMAP) to visualize cellular heterogeneity.
- Cluster cells using algorithms (Phenograph, FlowSOM) to identify distinct cell populations [42].
- Annotate cell types based on marker expression patterns (e.g., CD8+ T cells, CD68+ macrophages).
Spatial Analysis:
- Calculate cell-cell proximity metrics to identify interacting cell populations.
- Analyze cellular neighborhoods to identify recurrent tissue microenvironments.
- Quantify distances between specific cell types (e.g., CD8+ T cells to tumor cells) as biomarkers for immunotherapy response [40].
Applications in Cancer Research and Biomarker Discovery
MIBI and IMC have transformed our understanding of the tumor immune microenvironment (TIME) by enabling detailed spatial analysis of cellular interactions that correlate with clinical outcomes. These technologies provide critical insights for drug development and clinical translation:
Predictive Biomarker Discovery
Spatial analysis using MIBI and IMC has identified several biomarkers predictive of immunotherapy response across multiple cancer types:
CD8+ T Cell Spatial Localization:
- Tight spatial colocalization of CD8+ T cells with tumor cells correlates with improved response to immune checkpoint inhibitors in melanoma, NSCLC, and colorectal cancer [40].
- Distance between CD8+ T cells and tumor cells serves as a quantitative biomarker for patient stratification.
Immune Exclusion Patterns:
- Exclusion of T cells from tumor nests despite their presence in the stroma identifies "immune-excluded" phenotypes associated with resistance to immunotherapy [40].
- Multiplexed analysis reveals mechanisms of immune exclusion, including regulatory T cell (FoxP3+) barriers and myeloid cell suppression.
Cellular Neighborhood Analysis:
- Recurrent cellular neighborhoods (e.g., tumor-stromal-immune interfaces) associate with clinical outcomes in breast cancer and hepatocellular carcinoma [40].
- Spatial relationships between cancer-associated fibroblasts (CAFs) and immune cells inform mechanisms of therapy resistance.
Translational Applications in Drug Development
For pharmaceutical researchers, MIBI and IMC offer powerful tools for evaluating drug mechanisms of action, pharmacodynamics, and patient selection strategies:
Preclinical Model Characterization:
- Comprehensive immune profiling of patient-derived xenografts (PDX) and syngeneic models enables better model selection for specific immunotherapy targets.
- Spatial pharmacodynamics assessment reveals drug effects on cellular interactions and microenvironment remodeling.
Biomarker Strategy Implementation:
- Multiplexed spatial biomarkers support patient stratification strategies in clinical trials.
- Analysis of limited biopsy material maximizes information content for precision medicine approaches.
Therapeutic Resistance Mechanisms:
- Spatial analysis of pre- and post-treatment biopsies identifies changes in immune cell composition and localization associated with acquired resistance.
- Characterization of immunosuppressive niches informs rational combination therapy strategies.
Technical Considerations and Limitations
While MIBI and IMC provide unprecedented insights into tissue biology, several technical challenges require consideration in experimental planning:
Instrument Accessibility and Cost:
- Both technologies require specialized instrumentation (Hyperion for IMC, MIBIScope for MIBI) with limited availability in core facilities [41].
- Operational costs remain higher than conventional IHC or immunofluorescence, particularly for MIBI which requires ultra-high vacuum systems.
Antibody Validation:
- Metal-tagged antibodies require rigorous validation for specificity and sensitivity, as commercial options remain limited compared to conventional IHC [41].
- Antibody conjugation processes must be optimized to maintain affinity while achieving sufficient metal labeling.
Data Complexity and Computational Requirements:
- The large multidimensional datasets (up to 40 channels across cm² tissue areas) require significant computational resources for storage and analysis [42].
- Specialized bioinformatics expertise is essential for proper data interpretation and spatial analysis.
Sensitivity Limitations:
- Detection of low-abundance targets can be challenging due to limited signal amplification options compared to enzymatic methods in conventional IHC [42].
- Signal-to-noise ratios may be suboptimal for weakly expressed antigens, requiring careful antibody titration and signal amplification strategies.
Future Perspectives and Technological Developments
The field of mass spectrometry-based imaging continues to evolve with several promising directions that will enhance research applications:
Increased Multiplexing Capacity:
- Development of new metal isotopes and conjugation methods will expand multiplexing beyond 50 markers.
- Combinatorial labeling approaches using different metal ratios on single antibodies could increase marker capacity exponentially.
Multi-omics Integration:
- Combined protein and RNA detection using metal-tagged antibodies and in situ hybridization probes enables integrated spatial multi-omics [42].
- Correlation with spatial transcriptomics data provides comprehensive views of gene expression and protein localization.
Enhanced Resolution and Throughput:
- Improvements in laser and ion beam technology will enhance spatial resolution while maintaining acquisition speed.
- Automated slide handling and processing will increase throughput for larger cohort studies.
Standardization and Clinical Translation:
- Development of standardized panels and analytical pipelines will facilitate clinical validation of spatial biomarkers.
- Integration with digital pathology workflows will enable routine application in clinical trial analysis.
For researchers and drug development professionals, MIBI and IMC represent transformative technologies that provide unprecedented spatial resolution and multiplexing capability for analyzing complex biological systems. As these technologies continue to evolve and become more accessible, they will play an increasingly important role in biomarker discovery, therapeutic development, and precision medicine applications.
Oligonucleotide-barcoded antibody platforms represent a transformative advancement in multiplex immunohistochemistry (IHC), enabling researchers to visualize dozens of protein targets within a single tissue sample while preserving crucial spatial context. These technologies overcome the fundamental limitations of traditional IHC, which is typically restricted to visualizing only 2-3 biomarkers simultaneously. The core principle involves conjugating specific antibodies with unique DNA oligonucleotide barcodes, which are subsequently detected through iterative hybridization with complementary fluorescent probes or other detection systems. This approach has revolutionized spatial biology by providing unprecedented insights into cellular organization, functional states, and intercellular interactions within the tumor microenvironment (TME) and complex tissues [26].
Two leading platforms in this field are the PhenoCycler (formerly known as CODEX) system and SignalStar Multiplex IHC. PhenoCycler, commercialized by Akoya Biosciences, enables ultrahigh-plex imaging of 40-100+ protein markers through iterative cycles of fluorescent oligonucleotide hybridization, imaging, and removal [46] [47]. SignalStar, developed by Cell Signaling Technology (CST), offers a more targeted approach with detection of up to 8 protein targets optimized for faster turnaround times and simplified workflow [48] [49]. Both technologies maintain spatial architecture while dramatically expanding the analytical capabilities for biomarker discovery, drug development, and clinical translation by enabling comprehensive characterization of cellular phenotypes and their spatial relationships.
PhenoCycler Platform
The PhenoCycler platform utilizes a sophisticated DNA barcoding system where each antibody in a panel is conjugated to a unique oligonucleotide sequence. The technology employs an automated fluidics system attached to a fluorescent microscope that performs iterative cycles of "revealing" antibodies by hybridizing complementary fluorescent reporters, imaging, then gently stripping these reporters to enable the next cycle. This cyclic process continues until all antibodies in the panel have been imaged, with the resulting data computationally assembled into a comprehensive multiplexed image [46] [50]. A notable advantage of this system is its single-step staining procedure, where all primary antibodies are applied simultaneously to the tissue, minimizing hands-on time and potential variability [47]. The platform achieves single-cell resolution down to 600 nm with a 20× objective or 250 nm with a 40× objective, providing detailed subcellular localization information [47].
Recent advancements in the PhenoCycler-Fusion 2.0 system have significantly improved throughput and efficiency. The platform now features multi-slide automation with parallel fluidics and imaging, enabling researchers to simultaneously process multiple samples and panels [46]. This enhancement has dramatically reduced experimental timelines, making large-scale spatial phenotyping studies more feasible. The system's flexible design accommodates various sample types, including large tissue sections (up to 1.6 × 1.6 cm) and tissue microarrays (TMAs) with hundreds of cores in a single run [46] [47]. This scalability makes it particularly valuable for comprehensive tissue atlasing projects and large cohort studies in both academic research and drug development pipelines.
SignalStar Platform
SignalStar Multiplex IHC employs a streamlined approach focused on practical implementation with rapid turnaround. The technology uses oligonucleotide-conjugated antibodies that are detected through a two-round imaging process rather than the dozens of cycles required by higher-plex methods. In the SignalStar workflow, all primary antibodies are applied simultaneously in a single cocktail incubation, followed by signal amplification using complementary oligonucleotides coupled with fluorophores [48]. For panels exceeding 4 targets, the first set of fluorophores is gently removed after imaging, and a second round of amplification is performed to visualize the remaining targets [48]. The two images are then computationally aligned to generate the final multiplexed image.
A key advantage of the SignalStar system is its rapid timeline, with results achievable in just two days compared to weeks or months for some other multiplex technologies [48]. The platform incorporates signal amplification technology that enhances detection sensitivity for low-abundance targets, a common challenge in IHC applications [48]. SignalStar panels are designed for compatibility with standard fluorescence imaging systems, requiring only standard filter sets for channels 488, 594, 647, and 750 nm, which increases accessibility for researchers without specialized instrumentation [51]. This practicality, combined with CST's extensive portfolio of pre-validated antibodies, reduces the optimization burden and provides reproducible results across experiments.
Table 1: Technical Comparison of PhenoCycler and SignalStar Platforms
| Parameter | PhenoCycler-Fusion 2.0 | SignalStar Multiplex IHC |
|---|---|---|
| Maximum Targets | 40-100+ markers [46] [47] | 8 markers [48] |
| Resolution | 600 nm (20×), 250 nm (40×) [47] | Standard fluorescence microscope resolution |
| Sample Types | Fresh frozen, FFPE, TMAs [47] | FFPE tissues [48] |
| Assay Timeline | Varies by panel size (typically 1-3 days) | 2 days [48] |
| Antibody Application | Single-step staining [47] | Single cocktail incubation [48] |
| Imaging Approach | Iterative cycles (reveal-image-remove) [46] | Two-round imaging with fluorophore removal [48] |
| Signal Detection | Fluorescent oligonucleotides | Oligonucleotide amplification with fluorophores |
| Instrument Requirements | Specialized PhenoCycler fluidics and imaging [46] | Standard fluorescence microscopes [51] |
| Data Output | High-plex single-cell spatial data | Medium-plex spatial proteomics data |
Key Applications in Research and Drug Development
Both platforms have demonstrated significant utility across various research domains, particularly in cancer immunology and immunotherapy development. PhenoCycler has been successfully employed to characterize complex tissue environments, such as mapping the bone marrow niche in murine models—a challenging tissue due to its gelatinous nature and encasement in hard bone [52]. This application revealed spatial relationships between hematopoietic stem cells, progenitors, and stromal elements that would be impossible to detect with conventional methods [52]. Similarly, in human lymphoid tissues, PhenoCycler has enabled identification of 31 distinct cell types and their organizational patterns through unsupervised clustering of spatial data [50].
SignalStar's optimized workflow makes it particularly valuable for translational research and biomarker validation studies where turnaround time is critical. The technology has proven effective for profiling the tumor microenvironment, analyzing immune cell infiltrates, and detecting protein post-translational modifications that cannot be captured by RNA-based methods [48]. The platform's flexibility in panel redesign allows researchers to rapidly adapt their investigations as new biomarkers emerge, accelerating the iterative process of hypothesis testing in drug development [48]. Both technologies provide critical insights into cellular interactions and spatial organization that inform our understanding of disease mechanisms and therapeutic responses.
Experimental Protocols
PhenoCycler Protocol for FFPE Tissues
Sample Preparation: Begin with formalin-fixed paraffin-embedded (FFPE) tissue sections cut at 4-5 μm thickness and mounted on specially coated coverslips (Vectabond or APES-treated) [47]. Bake slides at 60°C for 30-60 minutes to ensure adhesion, then departaffinize through sequential washes: twice in histochoice clearing agent, twice in 100% ethanol, followed by 90%, 70%, 50%, and 30% ethanol, and finally two washes in distilled water (5 minutes each) [53]. Perform antigen retrieval using Tris-EDTA buffer (pH 9.0) in a pressure cooker at high temperature for 20 minutes, then cool to room temperature [53].
Autofluorescence Quenching and Staining: Prepare a quenching buffer containing 4.5% hydrogen peroxide and 20 mM sodium hydroxide in PBS. Immerse samples in quenching buffer and expose to high-intensity LED light for 45 minutes; repeat this process with fresh buffer [53]. After cooling to room temperature and washing with PBS, block tissues with 4% fetal bovine serum (FBS) in PBS. Prepare the antibody panel by diluting oligonucleotide-conjugated antibodies in 4% FBS-PBS solution according to optimized concentrations. Apply the antibody mixture to tissues and incubate overnight at 4°C in a humidity chamber [53] [47].
Imaging and Data Acquisition: Following staining, assemble the sample into the PhenoCycler chamber with imaging buffer. The automated system will perform iterative cycles of fluorescent reporter addition, imaging, and removal. For optimal results with dim markers, implement interleaved blanks with exposure times matched to corresponding markers to improve signal-to-noise ratio [52]. Imaging parameters should be optimized for each marker based on abundance; for example, high-exposure markers (800 ms) like CD31 require different settings than low-exposure markers (75 ms) like CD41 [52]. Process raw images through the PhenoCycler software to generate aligned, stitched composite images in QPTIFF format for downstream analysis [47].
SignalStar Protocol for FFPE Tissues
Tissue Preparation and Antigen Retrieval: Cut FFPE tissue sections at typical thickness (4-7 μm) and mount on standard slides. Deparaffinize and rehydrate tissues through standard xylene and ethanol series [48]. Perform heat-induced epitope retrieval (HIER) using appropriate buffer (citrate or Tris-EDTA) at optimal pH for the target antigens. The specific retrieval method should be determined based on the primary antibodies used in the panel.
Antibody Incubation: Prepare the primary antibody cocktail containing all DNA-barcoded antibodies (3-8 targets) in the recommended buffer. Apply the cocktail to tissue sections and incubate according to optimized conditions [48]. Unlike cyclic methods, all antibodies are applied simultaneously, eliminating sequential incubation steps. Following primary antibody binding, perform a post-stain fixation with 10% neutral buffered formalin to ensure antibodies remain in place during subsequent processing [48].
Signal Amplification and Imaging: For the first round of imaging, apply complementary oligonucleotides with fluorophores (channels 488, 594, 647, 750) to amplify signals for up to 4 targets. Image the tissue using a fluorescence microscope with appropriate filter sets. For panels larger than 4 targets, gently remove the first set of oligonucleotides and fluorophores without damaging the tissue or bound antibodies [48]. Apply the second set of complementary oligonucleotides with fluorophores to visualize the remaining targets and perform a second round of imaging. Computationally align and fuse the two images to generate the final multiplexed image containing all targets [48].
Table 2: Key Research Reagent Solutions
| Reagent/Category | Function | Platform Application |
|---|---|---|
| Oligonucleotide-Barcoded Antibodies | Specific target detection with DNA barcode identity | Both platforms; pre-conjugated available or custom conjugation [47] |
| Fluorophore-Conjugated Reporters | Visualization via complementary oligonucleotides | PhenoCycler: cyclic imaging; SignalStar: two-round imaging [48] [46] |
| Antigen Retrieval Buffers | Expose epitopes masked by fixation | Both platforms (citrate, Tris-EDTA) [54] [53] |
| Autofluorescence Quenchers | Reduce tissue background fluorescence | Critical for FFPE tissues in both platforms [53] |
| Blocking Buffers | Prevent nonspecific antibody binding | Both platforms (typically serum-based) [53] |
| Hybridization Buffers | Enable specific oligonucleotide binding | Platform-specific formulations [50] |
| Mounting Media | Preserve samples for imaging | PhenoCycler: specific CODEX buffer [53] |
Workflow Visualization
Technical Considerations for Implementation
Panel Design and Optimization
Effective panel design is critical for successful multiplexed imaging experiments. For PhenoCycler, researchers must carefully select antibodies that work effectively under standardized staining conditions, as all antibodies are applied simultaneously. The platform supports up to 40+ markers in a single panel, requiring strategic consideration of cellular compartments, target abundance, and biological questions [47]. Antibodies should be validated for specificity under the platform's specific fixation and staining conditions, which may differ from conventional IHC protocols. For targets not available as pre-conjugated antibodies, custom conjugation requires approximately 70 μg of carrier protein- and glycerol-free antibody, with thorough validation using positive and negative control tissues [47].
SignalStar panel design benefits from CST's online Panel Builder tool, which automatically pairs antibodies with fluorophores and imaging rounds based on protein abundance, autofluorescence patterns, and channel brightness characteristics [51]. The platform assigns brighter channels (594 and 647 nm) to lower abundance targets, while avoiding the 488 nm channel (most affected by autofluorescence) for low-expression markers [51]. Antibodies against lower abundance proteins should typically be placed in the first imaging round, while higher abundance markers can be effectively detected in the second round. This systematic approach minimizes optimization time and ensures reproducible results across experiments.
Image Processing and Data Analysis
Both platforms generate complex multiplexed imaging data requiring specialized computational approaches for extraction of biologically meaningful insights. PhenoCycler data processing involves image alignment, background subtraction, and compensation for any signal crosstalk between channels. Advanced processing techniques, such as interleaved blank cycles with matched exposure times, can significantly improve signal-to-noise ratio for challenging markers like CD117 in bone marrow tissues [52]. Following image processing, cell segmentation identifies individual cells based on nuclear and membrane markers, enabling single-cell analysis of marker expression patterns.
Data analysis typically involves both supervised and unsupervised approaches. Unsupervised clustering can identify novel cell populations and states based on multivariate protein expression patterns, as demonstrated by the identification of 31 distinct cell types in human lymphoid tissues [50]. Spatial analysis examines cellular neighborhoods, interactions, and organizational patterns within tissues, providing insights into tissue architecture and cellular ecosystems. Several commercial and open-source software platforms support these analyses, with HALO image analysis platform being commonly used for both PhenoCycler and SignalStar data [47]. The resulting single-cell data can be exported for further statistical analysis and integration with other omics datasets.
Oligonucleotide-barcoded antibody platforms represent a paradigm shift in spatial biology, enabling comprehensive characterization of cellular environments with unprecedented resolution and multiplexing capability. PhenoCycler and SignalStar offer complementary approaches tailored to different research needs—PhenoCycler for maximum parameter discovery research and SignalStar for focused translational studies requiring rapid turnaround. As these technologies continue to evolve, they are poised to deepen our understanding of complex biological systems, accelerate biomarker discovery, and inform therapeutic development across a wide range of diseases. By maintaining native tissue architecture while expanding analytical capabilities beyond the limitations of traditional IHC, these platforms provide critical tools for unraveling the spatial complexity of biological systems in health and disease.
Multiplex immunohistochemistry (mIHC) represents a significant advancement over traditional IHC, enabling the simultaneous detection of multiple biomarkers on a single tissue section. This powerful technique provides critical insights into cellular interactions, functional states, and spatial relationships within the tissue microenvironment, particularly in complex fields like immuno-oncology [30] [55]. The sequential staining workflow is a cornerstone methodology for mIHC, relying on iterative cycles of staining, imaging, and antibody removal to achieve multiplexing capabilities beyond conventional simultaneous staining approaches.
This application note provides a comprehensive framework for implementing a robust sequential mIHC workflow, detailing every critical phase from initial antibody panel design through final image acquisition and analysis. By standardizing this complex process, researchers can generate high-quality, reproducible spatial biology data essential for understanding disease mechanisms and therapeutic responses.
Antibody Panel Design
The foundation of successful sequential mIHC lies in careful antibody panel design. This process requires strategic selection of biomarkers and their corresponding detection reagents to ensure specific, interpretable results.
Biomarker Selection Strategy
Biomarker panels should be tailored to specific research questions, particularly those investigating the tumor immune microenvironment. Well-designed panels typically include markers for identifying major immune cell populations, functional states, and structural components. The table below outlines essential markers for characterizing the human tumor immune microenvironment:
Table 1: Essential Markers for Tumor Immune Microenvironment Characterization
| Biomarker | Cellular Target | Biological Relevance |
|---|---|---|
| Pan-Keratin | Epithelial cells | Identifies tumor cells [56] |
| CD3 | All T cells | Pan-T cell marker [56] |
| CD8 | Cytotoxic T cells | Cytotoxic T cell subset [56] |
| CD4 | Helper T cells | Helper T cell subset [56] |
| FoxP3 | Regulatory T cells | Immunosuppressive T cells [56] |
| CD20 | B cells | Pan-B cell marker [30] [56] |
| CD68 | Macrophages | Pan-macrophage marker [56] |
| CD163 | Macrophages | M2-polarized macrophages [30] [56] |
| Ki67 | Proliferating cells | Cellular proliferation index [30] |
Panel Design Considerations
Effective panel design requires careful consideration of several technical factors to minimize cross-reactivity and ensure signal specificity:
- Antibody Host Species: Select primary antibodies from different host species (e.g., rabbit, mouse, rat) to prevent cross-reactivity of secondary antibodies [57].
- Antigen Retrieval Compatibility: Ensure all antibodies perform reliably under the chosen antigen retrieval conditions (e.g., pH) [58].
- Signal Separation: For fluorescent detection, choose fluorophores with distinct emission spectra to prevent bleed-through between channels [57]. Chromogenic detection requires chromogens with separable color vectors for deconvolution [5].
- Abundance and Distribution: Staining order should consider target abundance, typically placing brighter fluorophores or stronger chromogens for lower-abundance targets [57].
Sample Preparation
Proper sample preparation preserves tissue architecture and antigen integrity, forming the critical foundation for all subsequent staining steps.
Tissue Fixation and Processing
Consistent fixation is essential for preserving morphology and antigenicity. The most common method uses 10% neutral buffered formalin (approximately equivalent to 4% formaldehyde) for 24-48 hours at room temperature, followed by standard processing and paraffin embedding (FFPE) [59]. While formalin fixation creates methylene cross-links that preserve tissue structure excellently, it can mask some epitopes, necessitating antigen retrieval in later steps [59]. Fresh frozen tissues offer an alternative, providing better preservation of some labile antigens.
Sectioning and Slide Preparation
FFPE blocks should be sectioned at a thickness of 4-5 μm using a microtome [30] [60]. Sections are floated in a water bath (40-50°C) to remove wrinkles, mounted on positively charged glass slides to ensure adhesion, and dried overnight at 37°C or for 1 hour at 60°C [58]. Prior to staining, slides must be deparaffinized and rehydrated through a series of xylene and graded ethanol solutions (100% → 95% → 70%) [57] [58].
Sequential Staining Protocol
The core sequential mIHC workflow involves repeated cycles of staining and signal development. The following diagram illustrates the complete process, with detailed sub-protocols provided in the subsequent sections.
Diagram 1: Sequential mIHC Workflow. The process involves iterative cycles of staining, imaging, and stripping for each marker, culminating in image registration and analysis.
Antigen Retrieval
Formalin fixation masks epitopes, making antigen retrieval a crucial first step. Heat-Induced Epitope Retrieval (HIER) is the most common method.
- Procedure: Immerse slides in antigen retrieval buffer (e.g., citrate pH 6.0 or Tris-EDTA pH 9.0). Heat in a pressure cooker or microwave (e.g., 15 psi for 15 minutes in a pressure cooker, or microwave at medium-high power for 8 minutes, cool, then high power for 4 minutes) [57] [58].
- Cooling: After heating, cool slides to room temperature in the buffer for approximately 20-30 minutes.
- Washing: Rinse slides with distilled water, then transfer to wash buffer (e.g., TBST or PBS).
Blocking
Blocking minimizes non-specific antibody binding and reduces background staining.
- Blocking Solution: Apply 5% Bovine Serum Albumin (BSA) or normal serum from the same species as the secondary antibody. Incubate at room temperature for 30 minutes [58].
- Endogenous Enzyme Block: For enzymatic detection (HRP/AP), block endogenous peroxidases with 3% H₂O₂ for 10 minutes [58].
Antibody Incubation and Detection
This core staining cycle is repeated for each marker in the panel.
- Primary Antibody Incubation: Apply diluted primary antibody to the tissue section. Incubate overnight at 4°C or for 1 hour at 37°C in a humidified chamber to prevent evaporation [57] [58].
- Washing: Wash slides 2-3 times with wash buffer (e.g., PBS or TBS) for 5 minutes each to remove unbound antibody.
- Detection System Incubation: Apply the appropriate detection system (e.g., HRP-conjugated polymer for chromogenic IHC or fluorophore-conjugated secondary antibody for IF). Incubate at room temperature for 30 minutes [57] [58].
- Signal Development:
- Chromogenic IHC: Incubate with chromogen substrate (e.g., AEC, DAB) until desired stain intensity develops. Monitor visually under a microscope [60].
- Immunofluorescence: For fluorescent detection, incubations with fluorophore-conjugated antibodies are performed protected from light to prevent photobleaching [57].
Image Acquisition and Antibody Stripping
After each staining cycle, the slide is imaged, and the antibody complex is removed.
- Image Acquisition: Scan the entire slide at 20x magnification using a brightfield scanner for chromogenic IHC or a fluorescent slide scanner for IF [60]. Ensure consistent focus and exposure settings across all cycles.
- Antibody Stripping: To remove the preceding antibody complex before the next cycle, immerse slides in a stripping buffer. A common method involves heating in a buffer (e.g., Citra solution) [60] or using specialized chemical stripping reagents. This step is critical to prevent cross-talk between staining cycles.
The sequence of Staining → Imaging → Stripping is repeated for every antibody in the panel. The order should be planned during panel design, considering factors like antigen abundance.
Image Acquisition and Analysis
The final stage involves processing the image stack to extract quantitative, single-cell data.
Image Registration and Preprocessing
Individual images from each staining cycle must be aligned to account for any minor tissue shifting.
- Image Registration: Use software (e.g., MATLAB with the SURF algorithm, or FIJI) to align all sequential images to a reference image, typically the first stain or the hematoxylin channel [60].
- Color/Spectral Separation:
Cell Segmentation and Phenotyping
This process identifies individual cells and assigns marker expression.
- Cell Segmentation: Use automated software (e.g., CellProfiler, FIJI) to identify and outline individual cells based on nuclear staining (e.g., DAPI or hematoxylin) [60].
- Phenotyping: Cells are classified into specific populations based on the combination of markers they express (e.g., CD3+CD8+ for cytotoxic T cells) using hierarchical gating strategies similar to flow cytometry [60].
Spatial Analysis
A key advantage of mIHC is the ability to perform spatial analysis, which examines the relationships between different cell types.
- Proximity Analysis: Measures the distance between different cell types (e.g., CD8+ T cells to tumor cells). Close proximity is often associated with better outcomes in immunotherapy [55].
- Cellular Neighborhoods: Identifies recurrent clusters of interacting cells, such as Tertiary Lymphoid Structures (TLS) containing B cells, T cells, and dendritic cells, which are predictive of positive response to immunotherapy [30] [55].
The Scientist's Toolkit
Successful implementation of sequential mIHC requires specific reagents, equipment, and software solutions.
Table 2: Essential Research Reagent Solutions and Materials
| Category | Item | Function/Application |
|---|---|---|
| Sample Prep | Formalin (10% Neutral Buffered) | Tissue fixation [59] |
| Paraffin Embedding Medium | Tissue support for microtomy [58] | |
| Positively Charged Glass Slides | Secure tissue adhesion during processing [30] | |
| Antigen Retrieval | Citrate Buffer (pH 6.0) | HIER buffer for unmasking epitopes [60] |
| Tris-EDTA Buffer (pH 9.0) | HIER buffer for more resistant targets [30] | |
| Blocking & Diluents | Normal Goat/Serum Serum | Reduces non-specific antibody binding [57] [60] |
| Bovine Serum Albumin (BSA) | Protein-based blocking agent and antibody diluent [60] | |
| Detection | HRP-Conjugated Polymers | High-sensitivity secondary detection systems [60] |
| DAB Chromogen | Brown, alcohol-insoluble precipitate for chromogenic IHC [58] | |
| AEC Chromogen | Red, alcohol-soluble precipitate for chromogenic IHC [60] | |
| Fluorophore-Conjugated Antibodies | Signal generation for multiplex immunofluorescence [57] | |
| Image Analysis | CellProfiler | Open-source software for cell segmentation and analysis [60] |
| FIJI/ImageJ | Open-source platform for image processing and analysis [60] |
Technical Specifications for Image Acquisition
Choosing the appropriate imaging platform depends on the detection method and the level of multiplexing.
Table 3: Comparison of Multiplex Imaging Platforms
| Technology | Multiplexing Capacity | Key Features | Best For |
|---|---|---|---|
| Conventional mIHC/mIF | 3-5 markers (mIHC)5-8 markers (mIF, TSA-based) | Whole-slide imaging, clinically accessible [5] | Standard pathology workflows, clinical validation studies [13] |
| MICSSS | 10+ markers | Iterative staining/imaging on a single slide [5] | High-plex protein mapping on a single slide without specialized equipment [5] |
| Imaging Mass Cytometry (IMC) | ~40 markers | Uses metal-tagged antibodies, minimal spectral overlap [5] [55] | Deep, high-plex spatial phenotyping with single-cell resolution [55] |
| Digital Spatial Profiling (DSP) | 40-50 markers (Protein) | ROI-targeted, generates numerical data [5] [55] | Quantifying biomarkers in specific tissue regions without full cell segmentation [55] |
| Cyclic Immunofluorescence (CycIF) | 30-60+ markers | Iterative staining and bleaching/stripping cycles [55] | Ultra-high-plex tissue imaging on fluorescence microscopes [55] |
Multiplex immunohistochemistry (mIHC) and immunofluorescence (mIF) technologies have revolutionized the study of complex biological systems by enabling the simultaneous visualization of multiple protein targets within preserved tissue architecture [5] [61]. These techniques provide unprecedented insights into cellular composition, functional states, and spatial relationships within the tumor microenvironment and other tissue contexts. However, the analytical pipeline from image acquisition to data quantification presents significant challenges that require standardized methodologies to ensure robust, reproducible, and biologically meaningful results. This application note outlines established best practices for the key stages of multiplexed image analysis, with a focus on cell segmentation, phenotyping, and spatial data quantification, providing researchers with a framework for generating reliable quantitative data from complex tissue samples.
Best Practices for Cell Segmentation
Cell segmentation, the process of identifying individual cell boundaries in multiplexed images, represents a critical foundational step that significantly impacts all downstream analyses. Inaccurate segmentation can lead to erroneous cellular phenotypes and compromised spatial data [62] [63].
Segmentation Workflow and Algorithm Selection
Table 1: Cell Segmentation Strategies and Their Applications
| Segmentation Strategy | Key Features | Optimal Use Cases | Considerations |
|---|---|---|---|
| Nuclear Seed-Based with Expansion | Uses nuclear markers to seed cell boundaries, then expands to approximate cytoplasm [63] | High-throughput studies; tissues with clear nuclear staining | Rapid processing but may oversimplify complex cell morphologies [63] |
| Multiplexed Consensus Cell Segmentation (MCCS) | Leverages multiple membrane/cytoplasmic markers to improve boundary detection [63] | Complex tissues with diverse cell morphologies; crowded cellular environments | Computationally intensive; requires optimization but captures morphological diversity [63] |
| Deep Learning-Based (e.g., deep-imcyto) | Utilizes pre-trained models on annotated datasets; adaptable through transfer learning [63] | Large-scale studies; standardized across multiple datasets | Requires significant ground truth data for training; computational resources needed [63] |
Addressing Segmentation Errors
Segmentation errors are inevitable in multiplexed imaging due to limitations in resolution, tissue architecture, and algorithmic performance. Common errors include:
- Spatial spillover: Signal contamination between adjacent cells [62]
- Over-segmentation: Single cells incorrectly divided into multiple objects [62]
- Under-segmentation: Multiple cells merged into single objects (doublets/multiplets) [62]
- Cellular projection misassignment: Incorrect attribution of cellular projections [62]
To mitigate these issues, the STARLING (SegmenTation AwaRe cLusterING) probabilistic model accounts for segmentation uncertainties during phenotyping by modeling per-cell probabilities of segmentation errors [62]. This approach helps distinguish true biological signals from technical artifacts, particularly in densely packed tissues like tonsil or lymphoid aggregates [62] [63].
Figure 1: Comprehensive Cell Segmentation Workflow. This diagram outlines the key steps in cell segmentation, from raw image processing to error assessment prior to downstream analysis.
Quality Control and Validation
Robust segmentation requires comprehensive quality control:
- Manual verification: Compare segmentation results with original images across multiple tissue regions
- Morphological metrics: Assess cell size distributions to identify outliers suggesting segmentation errors
- Neighborhood analysis: Evaluate cell density and adjacency patterns for implausible configurations [62]
- Ground truth datasets: Utilize expertly annotated datasets for algorithm validation and training [63]
Advanced Approaches to Cell Phenotyping
Cell phenotyping involves classifying segmented cells into specific types and states based on their marker expression profiles. This process moves beyond basic segmentation to extract biologically meaningful information from multiplexed imaging data.
Automated Phenotyping Strategies
Table 2: Cell Phenotyping Approaches for Multiplexed Imaging Data
| Phenotyping Method | Implementation | Advantages | Limitations |
|---|---|---|---|
| Unsupervised Clustering | Algorithms such as PhenoGraph or FlowSOM group cells based on marker expression similarity [62] | Discovery of novel cell states; no prior knowledge required | Sensitive to segmentation errors; may produce biologically implausible clusters [62] |
| Probabilistic Models (e.g., STARLING) | Accounts for segmentation errors during clustering [62] | More biologically plausible phenotypes; explicit modeling of technical artifacts | Requires careful parameter tuning; computationally intensive [62] |
| Automated Rule-Based Classification (e.g., TYPEx) | User-defined marker combinations and thresholds for cell type assignment [63] | Interpretable results; direct alignment with biological definitions | Limited to known cell types; depends on threshold selection [63] |
| Deep Learning Approaches | End-to-end classification from image patches [63] | Can capture morphological features beyond marker expression | Requires large training datasets; limited interpretability [63] |
Addressing Phenotyping Challenges
Multiplexed imaging presents specific challenges for accurate phenotyping:
- Signal spillover: Can cause apparent co-expression of markers that are actually in adjacent cells [62]
- Heterotypic doublets: Under-segmented cells containing multiple cell types create artificial phenotypes [62]
- Background noise: Can obscure true signal, particularly for low-abundance markers
- Marker expression heterogeneity: Continuous expression levels require thoughtful thresholding
The TYPEx module addresses these challenges through a tiered stratification approach that differentiates between low-confidence and high-confidence cells based on expression levels of major lineage markers, particularly in densely packed regions where signal spillover is common [63].
Biological Plausibility Assessment
Evaluating the biological plausibility of identified cell phenotypes is essential for validating phenotyping approaches. The plausibility score quantifies cluster quality based on known biological principles [62]:
- Mutually exclusive marker pairs: Identify clusters that co-express markers known to be exclusive (e.g., CD3 in T cells and CD20 in B cells) [62]
- Conditional co-expression requirements: Verify that markers requiring co-expression are consistently found together (e.g., CD3 always with CD45 in leukocytes) [62]
- Spatial consistency: Assess whether identified phenotypes occupy biologically reasonable tissue locations
This scoring system demonstrates that cells without immediate neighbors (less prone to segmentation errors) yield significantly higher plausibility scores than cells with neighbors across multiple datasets and clustering algorithms [62].
Figure 2: Automated Cell Phenotyping Pipeline with Quality Control. This workflow illustrates the sequential steps in cell phenotyping, from initial stratification to final validation through biological plausibility assessment.
Spatial Data Quantification and Analysis
Spatial analysis extracts meaningful quantitative data from the positional information of cells within tissues, enabling researchers to understand tissue organization and cellular interactions.
Spatial Metrics and Their Biological Significance
Table 3: Key Spatial Metrics in Multiplexed Tissue Imaging
| Spatial Metric | Definition | Biological Interpretation | Application Example |
|---|---|---|---|
| Cell Density | Number of specific cell types per unit area | Immune infiltration; tissue cellularity | Tumor-infiltrating lymphocyte density in immunotherapy response [5] [61] |
| Neighborhood Analysis | Recurring combinations of cell types in proximity | Functional cellular communities; microenvironmental niches | Myeloid cell suppression of T cell function in tumors [5] |
| Spatial Clustering | Degree to which cells form aggregates rather than random distributions | Cell-cell cooperation; localized responses | Tertiary lymphoid structure formation in cancer [5] |
| Barrier Scores | Measurement of physical separation between cell populations | Exclusion mechanisms; compartmentalization | CD8+ T cell exclusion from tumor islets [63] [61] |
| Distance to Reference | Minimum distance between cell and reference feature (e.g., tumor boundary) | Zonal distribution; gradient effects | T cell dysfunction with decreasing distance to tumor [61] |
Spatial Heterogeneity Assessment
Tissues exhibit substantial spatial heterogeneity that must be accounted for in sampling and analysis strategies:
- Regional variation: Marker expression and cell densities can vary significantly across different tissue regions [61]
- Hotspot vs. coldspot analysis: Targeted sampling of regions with high and low immune cell densities [5]
- Compartmental analysis: Separate assessment of tumor core, invasive margin, and stromal regions [5]
- Whole-slide vs. ROI approaches: Balance between comprehensive sampling and computational constraints [5]
Studies indicate that analyzing a minimum of five high-power fields (typically 0.33-0.64 mm² each) provides representative sampling for many applications, though extended sampling is necessary for rare cell types or highly heterogeneous tissues [5].
Temporal-Spatial Analysis
In longitudinal studies, spatial analysis can reveal dynamic changes in cellular distributions and interactions:
- Treatment response monitoring: Shifts in immune cell localization following therapy [61]
- Disease progression tracking: Evolution of cellular neighborhoods during cancer development [61]
- Exhaustion marker evolution: Changes in T cell exhaustion markers with disease progression and treatment [61]
For example, spatial analysis of serial samples from maxillary sinus cancer demonstrated increasing T cell exhaustion with metastasis and disease progression, highlighting the value of combined spatial and temporal assessment [61].
Research Reagent Solutions and Essential Materials
Table 4: Essential Research Reagents and Materials for Multiplexed IHC/IF
| Reagent/Material | Function | Application Notes |
|---|---|---|
| Primary Antibody Panels | Target protein detection | Validate clones for multiplex compatibility; optimize concentrations [5] [61] |
| Signal Amplification Systems (e.g., TSA) | Enhance detection sensitivity | Enable high-plex imaging with signal amplification [5] |
| Counterstains (e.g., Hematoxylin) | Nuclear visualization | Critical for segmentation; compatible with multiplex protocols [61] |
| Antigen Retrieval Buffers | Epitope exposure | Standardize for consistent staining across batches [61] |
| Autofluorescence Quenchers | Reduce background fluorescence | Improve signal-to-noise ratio in fluorescence-based methods [5] |
| Multiplex IHC/IF Platforms | Simultaneous or sequential staining | Choose based on plex level needed (3-5 for simultaneous IHC; 10+ for cyclic methods) [5] |
| Cell Type Definition Panels | Cell phenotype identification | User-defined marker combinations tailored to antibody panel [63] |
Experimental Protocol: Comprehensive Workflow for Multiplexed Image Analysis
Sample Preparation and Staining
Tissue Sectioning
Multiplex Staining Optimization
Staining Protocol (Sequential IHC Example)
- Perform heat-mediated antigen retrieval in citrate buffer (pH 6.0) [61]
- Block peroxidase activity with 0.6% hydrogen peroxide [61]
- Apply protein block with 5.0% goat serum, 2.5% BSA, and 0.1% Tween-20 [61]
- Incubate with primary antibody (optimized concentration, 60 minutes, room temperature) [61]
- Detect with appropriate HRP-conjugated polymer and chromogen (AEC or AMEC) [61]
- Scan slide using whole-slide scanner at 20× magnification [61]
- Strip antibody with microwave heat treatment in citrate buffer [61]
- Repeat cycle for subsequent markers [61]
Image Acquisition and Preprocessing
Image Acquisition
Image Preprocessing
Quantitative Analysis Workflow
Figure 3: End-to-End Multiplexed Image Analysis Workflow. This comprehensive diagram outlines the complete process from raw data to quantitative results, highlighting the sequential nature of multiplexed image analysis.
Cell Segmentation Implementation
Cell Phenotyping Execution
- Input cell-by-marker matrix into phenotyping algorithm (e.g., TYPEx) [63]
- Perform cell stratification to identify high-confidence and low-confidence cells [63]
- Determine marker positivity using statistical thresholds [63]
- Assign cell subtypes based on positive marker combinations [63]
- Validate using biological plausibility assessment [62]
Spatial Analysis Implementation
Quality Control and Data Management
Analysis Validation
Data Management and Sharing
By following these comprehensive protocols and best practices, researchers can generate robust, reproducible quantitative data from multiplexed imaging studies, advancing our understanding of cellular organization and interactions in health and disease.
Solving Common mIHC Challenges: From Antibody Stripping to Signal Optimization
Overcoming Antibody Host Species Restrictions in Panel Design
Antibody host species restriction represents a fundamental bottleneck in multiplex immunohistochemistry (mIHC) panel design. This limitation arises when researchers need to use multiple primary antibodies raised in the same host species within a single experimental workflow. In traditional immunohistochemistry approaches, secondary antibodies cannot distinguish between different primary antibodies from the same species, leading to cross-reactivity and erroneous signal detection that compromises experimental outcomes [66]. This technical constraint severely restricts antibody selection, potentially excluding optimal reagents from panel designs and limiting the comprehensive analysis of complex biological systems.
The challenge is particularly pronounced in translational research and clinical applications, where maximizing information from precious tissue samples is paramount [67] [1]. As multiplex immunohistochemistry has evolved to enable simultaneous detection of numerous biomarkers on a single tissue section, overcoming species restrictions has become essential for advancing spatial biology research in fields such as tumor immunology, neuroscience, and developmental biology [66] [68]. This application note details practical strategies and methodologies to bypass these limitations, enabling researchers to design more flexible and comprehensive multiplex panels.
Technical Solutions and Methodologies
Primary Technologies for Overcoming Species Restrictions
Several advanced methodological approaches have been developed to circumvent antibody host species restrictions, each with distinct mechanisms, advantages, and implementation considerations:
Table 1: Comparison of Methods to Overcome Host Species Restrictions
| Method | Mechanism | Maximum Plex Capability | Key Advantages | Technical Considerations |
|---|---|---|---|---|
| Tyramide Signal Amplification (TSA) | Covalent deposition of fluorophores or haptens via HRP catalysis [1] | 40+ markers with cyclic approaches [69] | Compatible with any IHC-validated antibody regardless of host species; enables detection of low-abundance targets [70] | Requires careful optimization of deposition time; potential signal diffusion if over-amplified |
| Direct Conjugate Antibodies | Primary antibodies pre-conjugated to reporters (fluorophores, metals) [1] | 5-7 markers in single-round staining [1] | Eliminates secondary antibodies entirely; minimal cross-reactivity concerns | May require carrier-free antibodies; reduced flexibility for antibody selection |
| Sequential Staining with Elution | Iterative cycles of staining, imaging, and antibody removal [67] | 12+ markers demonstrated in published protocols [67] | Preserves tissue antigenicity; enables validation at each cycle | Extended protocol duration; requires specialized image registration |
| DNA-Barcoded Antibodies | Oligonucleotide-conjugated antibodies detected via hybridization [1] | 60-100+ markers with specialized platforms [1] | Extremely high multiplex capacity; minimal spectral overlap concerns | Requires specialized instrumentation; significant optimization needed |
Tyramide Signal Amplification (TSA) Workflow
The Tyramide Signal Amplification (TSA) method has emerged as a particularly powerful solution for overcoming species restrictions while providing significant signal amplification [1]. This approach utilizes the catalytic activity of horseradish peroxidase (HRP) to generate highly reactive tyramide radicals that covalently bind to electron-rich residues (primarily tyrosine) on proteins in close proximity to the antigen-antibody complex [1]. The covalent nature of this binding enables complete antibody removal between staining cycles without signal loss, allowing sequential labeling with multiple antibodies from the same host species.
Diagram 1: Sequential TSA Staining Workflow. This approach enables multiple antibodies from the same host species to be used sequentially through covalent tyramide deposition and antibody stripping cycles.
The exceptional signal amplification (up to 100-fold compared to conventional IHC) makes TSA particularly valuable for detecting low-abundance targets [1]. The covalent deposition creates a permanent stain that resists fading, ensuring signal stability during extended imaging sessions [66]. Moreover, the spatial confinement of the tyramide reaction provides superior resolution compared to traditional enzymatic detection methods.
Sequential Immunohistochemistry with Antibody Elution
An alternative approach for overcoming species restrictions involves sequential IHC with antibody elution rather than harsh stripping methods. This methodology builds upon techniques originally developed for 5-plex protocols and subsequently expanded to enable 12+ marker detection [67]. The key innovation involves a gentle elution process that removes antibodies without damaging tissue morphology or destroying antigens for subsequent staining cycles.
Table 2: Sequential IHC Protocol for 12-Marker Panel
| Step | Procedure | Duration | Critical Parameters |
|---|---|---|---|
| Initial Staining | Standard IHC with primary antibody, HRP-polymer secondary, and AEC chromogen | 2-3 hours | Optimize antibody titration for each marker individually |
| Digital Imaging | Whole-slide scanning at 20x magnification | Variable | Consistent focus and exposure across all cycles |
| Chromogen Removal | Washing with ethanol to dissolve AEC precipitate | 10-15 minutes | Complete removal verified visually |
| Antibody Elution | Heated citrate buffer (pH 6.0) at sub-boiling temperatures | 15-30 minutes | Temperature optimization critical for tissue preservation |
| Validation | Confirm complete antibody removal before next cycle | - | Stain with secondary antibody only as control |
| Repetition | Repeat cycle for each additional marker | 10-12 cycles possible | Total protocol: 2-3 days for 12-plex panel |
This methodology preserves tissue integrity and antigenicity throughout multiple staining rounds, enabling comprehensive phenotyping of immune cells and other complex cellular populations [67]. The sequential approach also provides opportunities for quality control at each cycle, allowing researchers to verify staining quality before proceeding to subsequent markers—a significant advantage over simultaneous multiplex approaches.
Experimental Protocol: 12-Plex Sequential IHC
Reagent Preparation
The following reagents are required for implementing a 12-plex sequential IHC protocol to overcome species restrictions:
Table 3: Essential Research Reagents for Sequential mIHC
| Reagent Category | Specific Examples | Function | Technical Considerations |
|---|---|---|---|
| Primary Antibodies | CD8, CD4, CD20, CD68, PD-1, etc. | Target antigen detection | Validate each antibody individually; titrate for optimal concentration |
| Detection System | HRP-polymer conjugate (e.g., Histofine Simple Stain MAX PO) | Signal generation | Species-specific polymers reduce background; ready-to-use formulations preferred |
| Chromogen | AEC (3-amino-9-ethylcarbazole) | Visualizing antibody binding | Alcohol-soluble; enables complete removal between cycles |
| Antigen Retrieval | Citrate buffer (pH 6.0) | Epitope exposure | Standardized pH critical for consistent results across cycles |
| Elution Buffer | Citrate buffer (pH 6.0) | Antibody removal | Heated to sub-boiling temperatures; optimized incubation time |
| Blocking Solution | 5% goat serum, 2.5% BSA, 0.1% Tween-20 | Reducing non-specific binding | Consistent blocking between cycles minimizes background |
Step-by-Step Protocol
The following protocol has been optimized for 12-plex sequential IHC based on methodologies demonstrated in peer-reviewed studies [67] [61]:
Tissue Preparation
- Cut 5μm sections from FFPE tissue blocks
- Place slides in 60°C heat chamber for 30 minutes
- Deparaffinize with xylene and rehydrate through graded ethanol series to distilled water
Initial Staining Cycle
- Perform heat-mediated antigen retrieval in citrate buffer (pH 6.0) for 15 minutes
- Block peroxidase activity with 0.6% hydrogen peroxide in PBS for 15 minutes
- Apply protein block (5% goat serum, 2.5% BSA, 0.1% Tween-20) for 10 minutes
- Incubate with first primary antibody for 60 minutes at room temperature
- Detect with species-appropriate HRP-polymer conjugate for 30 minutes
- Visualize with AEC chromogen for 5-10 minutes
- Counterstain with hematoxylin for 1 minute
- Mount with PBS-T buffer and coverslip for digital scanning
Digital Imaging and Image Processing
- Scan slides using whole-slide scanner (e.g., NanoZoomer S60) at 20x magnification
- Decoverslip by agitation in PBS-T buffer
- Remove AEC chromogen through ethanol gradient (70%, 90%, 100%)
- Perform antibody elution in heated citrate buffer (pH 6.0) using microwave heating at high power for 15 minutes
- Validate complete antibody removal by applying HRP-conjugated secondary antibody without primary antibody
Sequential Staining Cycles
- Repeat steps for each additional primary antibody in the panel
- Maintain consistent incubation times and washing procedures across all cycles
- Coregister serial images using computational pipelines (e.g., CellProfiler, ImageJ)
- Apply color deconvolution algorithms to separate chromogen and hematoxylin signals
This protocol enables simultaneous evaluation of 12 biomarkers in a single FFPE tissue section, regardless of the host species of primary antibodies [67]. The iterative approach preserves tissue architecture while providing comprehensive protein expression data at single-cell resolution.
Applications and Validation
Research Applications
Overcoming antibody host species restrictions has enabled sophisticated research applications across multiple disciplines:
Tumor Immunoprofiling: Comprehensive characterization of immune cell populations (T cells, B cells, macrophages, dendritic cells) and their functional states within the tumor microenvironment [67] [61]. This approach has revealed distinct immune profiles correlated with HPV status in head and neck squamous cell carcinoma and response to immunotherapy in pancreatic cancer [67].
T Cell Exhaustion Studies: Simultaneous detection of multiple exhaustion markers (PD-1, TIM-3, LAG-3, CTLA-4) on CD8+ T cells while maintaining spatial context [61]. Research has demonstrated differential exhaustion states between intratumoral and peritumoral T cell populations associated with treatment response.
Spatial Biology Analyses: Mapping complex cellular interactions and neighborhood relationships within intact tissues, enabling discovery of novel cellular niches and functional ecosystems in health and disease [69].
Technical Validation
Rigorous validation is essential when implementing strategies to overcome species restrictions:
Specificity Controls: Include tissues with known expression patterns for each marker, isotype-matched negative controls, and absorption controls with recombinant proteins when available [1].
Sensitivity Assessment: Compare signal intensity and detection threshold for each marker in multiplex versus singleplex formats to identify potential signal reduction in later staining cycles [67].
Reproducibility Evaluation: Process replicate tissue sections in different staining orders to control for potential cycle-dependent effects on antigen detection [67].
Cross-Platform Validation: When possible, compare results with orthogonal methodologies such as flow cytometry or single-cell RNA sequencing to confirm population frequencies and phenotypes [67].
Studies have demonstrated positive correlations between image cytometry data derived from multiplex IHC and flow cytometry analysis of cell suspensions from the same specimens, validating the quantitative nature of these approaches [67].
Overcoming antibody host species restrictions is no longer an insurmountable challenge in multiplex immunohistochemistry. Through methodologies such as tyramide signal amplification, sequential staining with gentle elution, and direct antibody conjugation, researchers can now design comprehensive antibody panels without being constrained by the host species of primary antibodies. These technical advances have opened new possibilities for deep spatial phenotyping of cellular populations in their native tissue context, particularly valuable for precious clinical specimens where material is limited. As these methodologies continue to evolve and become more accessible, they will undoubtedly accelerate discovery in complex fields such as immuno-oncology, neuroscience, and developmental biology, ultimately enhancing our understanding of tissue biology in health and disease.
Within the framework of multiplex immunohistochemistry (mIHC) research, the technique of antibody stripping represents a critical procedural step. Multiplex immunohistochemistry enables the simultaneous detection of multiple biomarkers on a single tissue section, providing invaluable spatial information about the tumor immune microenvironment and cellular interactions that serial staining cannot achieve [71]. A core methodology for mIHC, particularly tyramide signal amplification (TSA)-based approaches, involves sequential cycles of immunostaining followed by the removal of antibody complexes between rounds [72] [73]. The complete and efficient removal of these antibodies is paramount to preventing cross-reactivity and false-positive signals in subsequent staining cycles [74].
The central challenge lies in identifying stripping methods that not only effectively denature and remove immunoglobulins but also do so without compromising the integrity of the underlying tissue architecture or the antigenicity of targets for future rounds. This challenge is especially acute when working with fragile tissues, such as brain sections, which are prone to delamination, or when targeting epitopes that are highly sensitive to harsh physical or chemical conditions [72] [74]. Therefore, optimizing antibody stripping to preserve tissue morphology is a crucial step in ensuring the reliability and quality of mIHC data in both research and clinical diagnostics.
Comparative Analysis of Antibody Stripping Methods
Several antibody stripping methods are currently employed in mIHC workflows, each with distinct mechanisms of action and practical considerations. The following table summarizes the core characteristics of these key methods:
Table 1: Key Antibody Stripping Methods for mIHC
| Method | Mechanism of Action | Typical Conditions | Primary Advantages | Primary Disadvantages |
|---|---|---|---|---|
| Microwave Oven-Assisted Removal (MO-AR) [72] [73] | Denatures antibodies through localized heating in antigen retrieval buffer. | 15 min at 95°C in an 800W microwave [72]. | Highly effective at removing primary and secondary antibodies [72]. | Can compromise tissue integrity, especially in fragile tissues; non-uniform heating [72] [74]. |
| Chemical Reagent-Based Removal (CR-AR) [72] [74] | Uses commercial reagents, often with detergents (SDS) or chaotropic agents, to disrupt protein interactions. | Incubation for 30 min at Room Temperature [72]. | Simple protocol; no specialized equipment needed. | Efficacy can be sensitive to variations in temperature, pH, and concentration [72]; may leave residual signal [74]. |
| Hybridization Oven-Based Removal (HO-AR) [72] [73] | Uses a hybridization oven for uniform, controlled heating in antigen retrieval buffer. | 30 min at 98°C (HO-AR-98), with buffer replenished every 5 min to prevent drying [72]. | Excellent antibody removal with superior preservation of tissue integrity in fragile samples [72]. | Requires access to a specialized hybridization oven. |
| Low-pH Glycine Buffer [74] | Disrupts antigen-antibody binding by creating a low-pH environment. | 30 min at 50°C [74]. | Efficient stripping with minimal signal loss for subsequent markers [74]. | Requires optimization of time and temperature. |
| Chaotropic Reagent (MAX Eraser) [75] | Disrupts antibody-antigen interactions using chaotropic salts at room temperature. | Room temperature incubation [75]. | Simple; no heat denaturation; preserves tissue architecture; suitable for up to ~10 cycles [75]. | Relatively new method; compatibility with all antibody-epitope pairs may require validation. |
Quantitative Comparison of Method Performance
Recent studies have directly compared these methods to quantitatively assess their stripping efficiency and impact on tissue integrity. A 2025 systematic evaluation of four stripping strategies for TSA-based Opal mIHC provides critical performance data [72] [73].
Table 2: Performance Comparison of Key Stripping Methods
| Performance Metric | MO-AR | CR-AR | HO-AR-50 | HO-AR-98 |
|---|---|---|---|---|
| Antibody Removal Efficiency | Most effective [72] | Not specified | Less effective than higher-temperature methods [72] | Most effective [72] |
| Signal Intensity Preservation | Significant signal loss observed in other studies [74] | N/A | N/A | Preserved antigenicity for multiple staining rounds [72] |
| Tissue Integrity (Robust Tissue) | Preserved in mouse kidney [72] | N/A | N/A | Preserved in mouse kidney [72] |
| Tissue Integrity (Fragile Brain Tissue) | Compromised; caused delamination [72] | N/A | N/A | Superior; better preserved tissue integrity [72] |
| Recommended Application | Robust tissues where equipment is available | Requires lab-specific validation | Less effective for complete stripping | Fragile tissues and high-quality mIHC workflows [72] |
Independent research on mouse FFPE tissues aligns with these findings, demonstrating that while microwave treatment is effective, it can significantly reduce signal intensity for subsequent markers. In contrast, a low-pH glycine-based stripping buffer was found to be highly efficient at removing antibodies while minimizing signal loss [74].
Experimental Protocols for Antibody Stripping
Optimized Thermochemical Stripping Protocol (HO-AR-98)
The following protocol is adapted from the 2025 study that established the hybridization oven-based method for fragile tissues [72] [73].
I. Materials and Reagents
- Antigen Retrieval Buffer: Citrate buffer (pH 6.0) or Tris-EDTA buffer (pH 9.0), selected based on the primary antibody specifications.
- Hybridization Oven: Capable of maintaining a stable temperature of 98°C.
- Heating Plate or Water Bath: For use inside the hybridization oven.
- Slide Holder and Glass Container.
- TBST Washing Buffer.
II. Step-by-Step Procedure
- Post-Staining: Following the first round of Opal single-plex staining and image acquisition, wash slides briefly in TBST to remove mounting medium.
- Stripping Buffer Application: Place the slides in a slide holder and transfer to a glass container filled with the pre-warmed antigen retrieval buffer.
- Heat-Induced Stripping: Incubate the slides in the hybridization oven for 30 minutes at 98°C.
- Critical Step: To prevent tissue drying and delamination, replenish the heated retrieval buffer every 5 minutes to ensure the slides remain fully submerged [72].
- Washing: After the incubation, allow the slides to cool to approximately 50°C before transferring them to a wash buffer. Wash the slides thoroughly with TBST.
- Stripping Efficiency Validation:
- To confirm the removal of secondary antibodies, incubate the section with the Opal fluorophore to be used in the next cycle (e.g., Opal 690) for 10 minutes and visualize the signal. No signal should be detected [72].
- To evaluate the stripping efficiency of the primary-secondary antibody complex, re-incubate the section with the HRP-conjugated secondary antibody followed by the Opal fluorophore. The absence of a signal confirms successful removal [72].
- Proceed to Next Cycle: Once stripping is validated, proceed to the next round of immunostaining.
Low-pH Glycine Buffer Stripping Protocol
This protocol, optimized for mouse FFPE tissues, offers an effective alternative without the need for a hybridization oven [74].
I. Stripping Buffer Recipe
- 25 mM Glycine-HCl
- 1% (w/v) Sodium Dodecyl Sulfate (SDS)
- Adjust pH to 2.2 with HCl [74]
II. Step-by-Step Procedure
- Post-Staining Wash: Rinse the slides in deionized water to remove residual substrate.
- Stripping Incubation: Incubate the slides in the low-pH glycine stripping buffer for 30 minutes at 50°C [74].
- Washing: Wash the slides 3 times for 5 minutes each with TBST under agitation.
- Validation: Before proceeding to the next staining round, validate stripping efficiency by applying only the secondary antibody and detection system to check for residual signal.
The Scientist's Toolkit: Essential Research Reagents
Successful implementation of an mIHC workflow with antibody stripping requires a set of core reagents and materials.
Table 3: Key Research Reagent Solutions for mIHC Antibody Stripping
| Item | Function/Application | Examples / Notes |
|---|---|---|
| Opal Fluorophore Kits [72] [74] | Tyramide-conjugated fluorophores for signal amplification in sequential staining. | Opal 520, 570, 620, 690; used at 1:100 dilution [72]. |
| Antigen Retrieval Buffers [72] [74] | Unmask epitopes and serve as the medium for heat-induced stripping. | Citrate Buffer (pH 6.0); Tris-EDTA Buffer (pH 9.0). Choice is antibody-dependent. |
| HRP-Conjugated Secondary Antibodies [72] [73] | Catalyze the deposition of tyramide-fluorophores for signal generation. | HRP-polymer goat anti-rabbit IgG. Part of the detection system before each stripping cycle. |
| Chaotropic Stripping Reagent [75] | Room-temperature antibody removal solution that preserves tissue architecture. | MAX Eraser. An affordable alternative to heat-based methods [75]. |
| Blocking Serum [76] | Reduces non-specific antibody binding, improving signal-to-noise ratio. | 2% Bovine Serum Albumin (BSA) in TBS. |
| Fluorescence Mounting Medium [72] | Preserves fluorescence and allows for imaging. | Antifade mounting medium with DAPI for nuclear counterstaining [72]. |
Workflow and Decision Pathway
The following diagram illustrates the experimental workflow for comparing stripping methods and the decision pathway for selecting an appropriate method based on experimental conditions, as derived from the cited studies [72] [73] [74]:
The optimization of antibody stripping is a cornerstone of robust and reliable multiplex immunohistochemistry. Evidence strongly indicates that method selection must be tailored to specific experimental conditions, particularly the type of tissue being analyzed. For robust tissues like kidney, both MO-AR and HO-AR-98 are highly effective at antibody removal [72]. However, for fragile tissues such as brain, the HO-AR-98 method provides a superior solution by combining excellent stripping efficiency with unparalleled preservation of tissue integrity [72] [73]. The emergence of room-temperature chemical agents like MAX Eraser offers a promising, accessible alternative that avoids thermal stress entirely, though further independent validation is encouraged [75].
By adhering to the detailed protocols and selection guidelines outlined in this application note, researchers can significantly enhance the quality of their mIHC data, enabling more accurate spatial profiling of the tumor microenvironment and advancing both research and clinical diagnostic goals.
Balancing Signal Amplification and Background Noise with TSA
Tyramide Signal Amplification (TSA) is a powerful enzymatic method that significantly enhances the detection sensitivity of immunohistochemistry (IHC) and immunofluorescence (IF) assays [77]. By leveraging the catalytic activity of horseradish peroxidase (HRP) to deposit numerous labeled tyramide molecules at the site of antigen-antibody binding, TSA can increase signal intensity by as much as 100-fold compared to conventional detection methods [77]. This exceptional sensitivity makes TSA particularly valuable for detecting low-abundance targets, enabling multiplexed staining, and facilitating research requiring high-resolution spatial analysis, such as tumor microenvironment characterization [78] [79].
However, the same amplification mechanism that boosts specific signal can also intensify background noise if not properly controlled [78]. Background in TSA-based assays may arise from various sources, including endogenous peroxidase activity, non-specific antibody binding, tissue autofluorescence, and excessive tyramide deposition [77] [80]. Successfully implementing TSA therefore requires a balanced approach that maximizes true signal while minimizing background interference. This application note provides detailed protocols and optimization strategies to achieve this critical balance, specifically within the context of multiplex immunohistochemistry (mIHC) for advanced research and drug development applications.
The Principle of Tyramide Signal Amplification
The TSA mechanism, also known as Catalyzed Reporter Deposition (CARD), relies on an HRP-driven reaction that generates highly reactive tyramide radicals which covalently bind to electron-rich tyrosine residues on nearby proteins [77] [79]. This covalent binding creates a stable, localized signal that remains after antibody removal—a key feature enabling sequential multiplexing [78].
Core Mechanism and Signaling Pathway
The following diagram illustrates the sequential biochemical workflow of TSA, from initial antibody binding to final covalent tyramide deposition:
This covalent deposition mechanism allows TSA to achieve substantial signal amplification. When properly optimized, TSA can enhance detection sensitivity by 10- to 100-fold compared to standard immunohistochemistry methods, making it possible to visualize targets present at very low copy numbers [81] [77]. The covalent nature of the tyramide bonding also enables antibody stripping between sequential staining rounds in multiplex experiments without signal loss, facilitating the detection of multiple markers on a single tissue section [78] [79].
Critical Parameters for Optimization
Successful TSA implementation requires careful optimization of several key parameters to balance signal amplification against background noise. The relationship between these factors directly impacts the signal-to-noise ratio, which is the ultimate determinant of assay quality.
Primary Antibody Concentration
Optimizing primary antibody concentration is fundamental to achieving a favorable signal-to-noise ratio. Excessive antibody increases background, while insufficient antibody yields weak specific signal [78]. As demonstrated in systematic optimization experiments, a dilution series should be performed to identify the concentration that provides strong specific signal with minimal background.
Table 1: Signal-to-Noise Ratio at Various Antibody Dilutions
| Antibody Dilution | Signal Intensity | Background Intensity | Signal-to-Noise Ratio | |------------------------||------------------------|| | 1:250 | High | High | 1.5:1 | | 1:500 | Moderate-High | Moderate | 7:1 | | 1:750 | Moderate | Low | 10:1 | | 1:1000 | Low | Low | 4:1 | | 1:1250 | Very Low | Very Low | <2:1 |
Data adapted from Fortis Life Sciences optimization guidelines [78].
As shown in Table 1, the 1:750 dilution provides the optimal balance with a signal-to-noise ratio of 10:1. Although the 1:250 dilution produces higher absolute signal intensity, its poor signal-to-noise ratio (1.5:1) makes interpretation difficult [78]. The enhanced sensitivity of TSA often allows for higher antibody dilutions than conventional IHC, typically ranging from 2 to 50-fold higher, which can conserve valuable primary antibodies while reducing non-specific binding [77].
Tyramide Reagent Concentration
Tyramide concentration significantly influences background levels. Excessive tyramide leads to non-specific deposition and high background, while insufficient tyramide results in weak amplification [78]. Systematic testing has demonstrated that a 1:250 dilution of tyramide reagent typically provides the optimal signal-to-noise ratio, though this may vary depending on the specific target and tissue type.
Table 2: Impact of Tyramide Concentration on Assay Performance
| Tyramide Dilution | Signal Intensity | Background Level | Recommended Application | |------------------------||| | 1:100 | Very High | Excessive | Not recommended | | 1:250 | High | Low | Standard use | | 1:500 | Moderate | Very Low | High-abundance targets only | | 1:1000 | Low | Minimal | Not recommended for low-abundance targets |
In some cases, a 1:500 tyramide dilution may be appropriate when detecting high-abundance targets or when trying to balance signals between multiple markers in a multiplex panel [78]. The optimal concentration should be determined empirically for each new target.
Fluorophore Selection and Spectral Compatibility
Choosing appropriate fluorophores is crucial for minimizing background and enabling effective multiplexing. Different fluorophores exhibit varying levels of brightness, photostability, and tissue penetration [78]. When designing multiplex panels, consider the following factors:
- Tissue autofluorescence: Fluorophores with longer excitation/emission wavelengths (e.g., 620nm, 690nm) typically exhibit lower background in formalin-fixed paraffin-embedded (FFPE) tissues [78].
- Spectral separation: Ensure sufficient separation between emission spectra to minimize bleed-through between channels.
- Microscope compatibility: Match fluorophores to available laser lines and filter sets.
Pacific Blue, Pacific Orange, and Alexa Fluor 488 tyramides have demonstrated low non-specific binding in permeabilized cells and robust deposition activities [81]. For low-abundance targets, pairing with brighter fluorophores can improve detectability without increasing background.
Staining Order in Multiplex Assays
In sequential TSA multiplexing, staining order significantly impacts results because each cycle of heat-induced epitope retrieval (HIER) can differentially affect various epitopes [78]. Some antigens withstand multiple retrieval cycles well, while others experience substantial signal degradation.
To determine optimal staining order, perform singleplex stains with simulated HIER cycles equivalent to the planned multiplex experiment. For a 7-plex panel, test how each antigen survives through 1, 2, 3, etc., up to 6 preceding HIER cycles. Antibodies showing significant signal reduction after multiple HIER cycles should be placed earlier in the sequence, while robust antibodies can be positioned later [78].
Detailed TSA Protocol for Multiplex Immunohistochemistry
This protocol provides a standardized workflow for TSA-based multiplex immunofluorescence on formalin-fixed, paraffin-embedded (FFPE) tissues, incorporating critical steps for balancing signal and background.
Materials and Reagents
Table 3: Essential Research Reagent Solutions for TSA mIHC
| Reagent Category | Specific Examples | Function/Purpose | |------------------------||| | Tyramide Reagents | Alexa Fluor Tyramides (Thermo Fisher), CF Dye Tyramides (Biotium) | Signal amplification via HRP-mediated deposition | | HRP-Conjugated Secondaries | Goat anti-rabbit-HRP, Goat anti-mouse-HRP | Enzyme conjugation for tyramide activation | | Blocking Solutions | Normal Goat Serum (20%), BSA (1-5%) | Reduce non-specific antibody binding | | Antibody Diluent | TBS with 1% BSA | Optimal antibody stability and binding | | Epitope Retrieval Buffers | Citrate Buffer (pH 6.0), Tris-EDTA (pH 9.0) | Antigen unmasking following FFPE processing | | Peroxidase Block | 0.9% H₂O₂ in methanol | Quench endogenous peroxidase activity | | Wash Buffer | TBST (Tris-Buffered Saline with 0.1% Tween 20) | Remove unbound reagents | | Nuclear Counterstain | DAPI | Nuclear visualization |
Step-by-Step Workflow
The following diagram outlines the complete cyclic workflow for multiplex immunofluorescence using TSA, illustrating the repetitive process of staining, amplification, and antibody removal for each target:
Slide Preparation
Deparaffinization and Rehydration:
- Incubate FFPE sections in xylene (3 changes, 5 minutes each)
- Rehydrate through graded alcohols (100%, 100%, 95%, 70%; 5 minutes each)
- Rinse in distilled water (2 × 5 minutes) [78]
Endogenous Peroxidase Blocking:
- Incubate with 0.9% hydrogen peroxide in methanol for 40 minutes
- This critical step reduces background from endogenous peroxidases [78]
Epitope Retrieval:
- Perform heat-induced epitope retrieval in appropriate buffer (citrate pH 6.0 or Tris-EDTA pH 9.0) at 92-96°C for 20 minutes
- Cool slides on benchtop for 20 minutes before proceeding [78]
Staining Cycle (Repeat for Each Target)
Blocking:
- Apply 20% normal serum from the same species as the secondary antibody for 20 minutes at room temperature to reduce non-specific binding [78]
Primary Antibody Incubation:
- Apply optimized primary antibody dilution in IHC antibody diluent
- Incubate for 20 minutes at room temperature [78]
Secondary Antibody Incubation:
- Apply HRP-conjugated secondary antibody at 1:400 dilution
- Incubate for 20 minutes at room temperature [78]
Tyramide Signal Amplification:
Antibody Removal:
- Perform heat-induced epitope retrieval (92-96°C for 20 minutes) to strip antibodies while leaving covalently-bound tyramide
- This step is crucial for preventing cross-reactivity in subsequent cycles [78]
Finalization
- After all targets are stained, apply DAPI nuclear counterstain (0.01 mg/mL in mounting medium)
- Apply coverslips using appropriate mounting medium
- Store slides protected from light at 4°C until imaging [78]
Troubleshooting Common Issues
High Background Staining
- Cause: Endogenous peroxidase activity not adequately blocked
Solution: Ensure fresh hydrogen peroxide blocking solution is used and extend blocking time to 40 minutes [78]
Cause: Excessive tyramide concentration or incubation time
Solution: Titrate tyramide dilution and reduce incubation time; typically 1:250-1:500 dilution for 2-10 minutes is optimal [78]
Cause: Non-specific antibody binding
- Solution: Increase serum blocking concentration to 20%, include Fc receptor blocking reagents, and use cross-adsorbed secondary antibodies [80]
Weak Specific Signal
- Cause: Inadequate epitope retrieval
Solution: Optimize retrieval buffer pH (6.0 vs 9.0) and duration; ensure temperature maintains 92-96°C throughout retrieval [78]
Cause: Primary antibody concentration too low
Solution: Perform checkerboard titration of primary antibody to identify optimal concentration [78]
Cause: HRP enzyme inactivation
- Solution: Ensure hydrogen peroxide is not present in buffers used with HRP-conjugated antibodies until tyramide incubation step [77]
Signal Loss in Sequential Rounds
- Cause: Over-stripping during heat-induced epitope retrieval
Solution: Reduce retrieval time or temperature; ensure tyramide has covalently bound before retrieval [78]
Cause: Fluorophore bleaching
- Solution: Include antioxidant in mounting medium, minimize light exposure, and use more photostable fluorophores [80]
Tyramide Signal Amplification represents a powerful technology for enhancing detection sensitivity in multiplex immunohistochemistry applications. When properly optimized, TSA can improve measurement resolution by 10-fold or greater relative to standard, non-amplified detection methods while enabling comprehensive analysis of complex biological systems [81]. The key to success lies in systematic optimization of critical parameters—particularly antibody concentrations, tyramide levels, and staining sequence—to maximize signal-to-noise ratio. By following the detailed protocols and troubleshooting guidelines outlined in this application note, researchers can effectively leverage TSA to investigate low-abundance targets, characterize tumor microenvironments, and advance drug discovery efforts with enhanced sensitivity and precision.
In the advancing field of multiplex immunohistochemistry (mIHC), which enables the simultaneous visualization of multiple biomarkers on a single tissue section, robust staining is a fundamental prerequisite for generating reliable, high-quality data [13]. The ability to visualize cellular interactions directly within the tumor microenvironment has made mIHC a powerful tool for both research and clinical applications, including drug development [13] [30]. However, researchers often encounter the significant technical challenge of weak or absent staining, which can compromise data integrity and lead to erroneous conclusions. The complex nature of mIHC, with its sequential staining rounds and potential for antibody cross-reactivity, further amplifies these challenges [13] [82]. Within the context of a broader thesis on mIHC techniques, this application note details the critical, interdependent roles of antigen retrieval and antibody titration in overcoming these obstacles. We provide standardized, actionable protocols and quantitative data to ensure the accuracy and reproducibility of your mIHC experiments.
The mIHC Context and Staining Challenges
Multiplex Immunohistochemistry enhances the amount of information that can be obtained from a single tissue section, providing a powerful tool for direct visualization of cellular interactions in the tumor microenvironment [13] [30]. However, this technique introduces unique complexities. A primary challenge is antigen masking, where formalin fixation creates methylene cross-links that obscure epitopes, making them inaccessible to antibodies [83]. This issue is compounded in mIHC, as the optimal retrieval condition must be determined for multiple antigens simultaneously. Furthermore, the potential for antibody cross-reactivity and non-specific binding increases with each additional marker in the panel [82]. Without proper optimization, including rigorous antibody validation and standardized analytical strategies, heterogeneity between histopathological images can be significant, undermining the validity of the research [13]. The following workflow outlines the core process of an mIHC experiment and pinpoints where the critical optimization steps of antigen retrieval and antibody titration occur.
Core Principles: Antigen Retrieval and Antibody Titration
Antigen Retrieval
Antigen retrieval is a critical step designed to reverse the formalin-induced cross-links that form during tissue fixation, thereby restoring epitope accessibility [83]. The two primary methods are Heat-Induced Epitope Retrieval (HIER) and enzymatic retrieval. HIER, which uses high temperature and specific buffer solutions to break cross-links, is the most widely used and generally effective method [83]. The choice of retrieval buffer and its pH is antigen-dependent and often requires empirical optimization; common buffers include Sodium Citrate (pH 6.0) and Tris-EDTA (pH 9.0) [83].
Antibody Titration
Antibody titration is the process of determining the optimal dilution of a primary antibody that provides a strong, specific signal with minimal background [82]. Using an antibody at too high a concentration is a common cause of non-specific staining and high background, while a concentration that is too low will result in a weak or absent signal [82]. Titration is especially critical in mIHC to ensure that all antibodies in a panel work in harmony without masking each other's signals or cross-reacting.
Quantitative Data and Troubleshooting Guide
The following tables consolidate key quantitative findings and systematic troubleshooting guidance for resolving staining issues.
Table 1: Quantitative Biomarker Expression in Esophageal Squamous Carcinoma (ESCC). This study demonstrates how quantitative IHC (qIHC) can reliably measure protein expression, underscoring the need for precise staining. [84]
| Biomarker | H-Score in ESCC | H-Score in Non-ESCC | P-Value | AUC (Single) | AUC (Combination Panel) |
|---|---|---|---|---|---|
| PCNA | Significantly Higher | Lower | <0.05 | 0.80 | 0.86 (with EGFR, VEGF) |
| EGFR | Significantly Higher | Lower | <0.05 | 0.74 | 0.86 (with PCNA, VEGF) |
| VEGF | Significantly Higher | Lower | <0.05 | 0.70 | 0.86 (with PCNA, EGFR) |
| p53 | Not Significant | Not Significant | NS | N/A | N/A |
Table 2: Systematic Troubleshooting Guide for Weak or No Staining [82]
| Potential Issue | Underlying Cause | Recommended Solution |
|---|---|---|
| No Staining | Epitope not expressed or low levels. | Verify protein expression in tissue; ensure antibody compatibility with species [82]. |
| Primary antibody concentration too low or incubation too short. | Increase antibody concentration/incubation time; perform antibody titration [82]. | |
| Epitope inaccessible due to fixation. | Perform antigen retrieval; optimize HIER conditions [82] [83]. | |
| Ineffective antigen retrieval. | Optimize antigen retrieval conditions (buffer, pH, time); consider different methods [82] [83]. | |
| Weak Staining | Primary antibody concentration is suboptimal. | Titrate antibody to find optimal dilution [82]. |
| Antibody degradation from improper storage. | Aliquot antibodies; avoid freeze-thaw cycles; follow storage instructions [82]. | |
| Suboptimal detection method. | Increase substrate incubation time; ensure reagents are active [82]. | |
| High Background | Primary or secondary antibody concentration too high. | Decrease antibody concentration; titrate antibody [82]. |
| Insufficient blocking. | Use fresh blocking reagents; increase blocking time/concentration [82]. | |
| Secondary antibody cross-reactivity. | Use cross-adsorbed secondary antibodies; include a secondary-only control [82]. |
Detailed Experimental Protocols
Protocol 1: Heat-Induced Epitope Retrieval (HIER)
This protocol is adapted from established methods for reversing formalin cross-links using heat and retrieval buffers [83].
Materials:
- Sodium Citrate Buffer (10 mM, pH 6.0) or Tris-EDTA Buffer (10 mM, pH 9.0)
- Pressure cooker, microwave, or vegetable steamer
- Slide rack and Coplin jar or suitable container
- Hot plate
Method:
- Deparaffinize and Rehydrate: Process tissue sections through xylene and a graded series of alcohols (100%, 95%, 70%) to deparaffinize and rehydrate them in deionized water.
- Prepare Retrieval Buffer: Fill the pressure cooker with an adequate volume of the chosen antigen retrieval buffer (enough to cover slides by a few cm) and begin heating.
- Heat Treatment: Once the buffer is boiling, carefully transfer the slides into the cooker. Secure the lid. Once full pressure is reached, time for 3 minutes [83].
- Cooling: After heating, run cold tap water over the container for 10 minutes to cool the slides and allow epitopes to re-form.
- Proceed with Staining: Continue with the standard IHC/mIHC staining protocol, starting with the blocking step.
Protocol 2: Antibody Titration
This protocol outlines a systematic approach for determining the optimal working concentration for a primary antibody.
Materials:
- Primary antibody
- Positive control tissue sections (FFPE)
- Detection system (e.g., HRP-polymer system with DAB chromogen)
- Phosphate-Buffered Saline (PBS) or antibody diluent
Method:
- Prepare Serial Dilutions: Using the manufacturer's recommended concentration as a midpoint, prepare a series of at least 5-6 doubling dilutions of the primary antibody (e.g., 1:50, 1:100, 1:200, 1:400, 1:800) in an appropriate diluent.
- Standardize Tissue Processing: Use consecutive sections of the same positive control tissue. Perform antigen retrieval simultaneously on all slides under identical, optimized conditions.
- Apply Antibodies: Apply the different antibody dilutions to the respective tissue sections. Incubate according to the standard protocol (e.g., 1 hour at room temperature or overnight at 4°C).
- Complete Staining: Complete the staining procedure using the same detection system and development time for all slides.
- Microscopic Evaluation: Examine all slides under a microscope. The optimal dilution is the one that yields the strongest specific signal with the lowest non-specific background. Use this concentration for all future experiments.
The Scientist's Toolkit: Essential Research Reagents
Table 3: Key Reagent Solutions for mIHC Optimization
| Category | Reagent/Kit | Function and Application |
|---|---|---|
| Retrieval Buffers | Sodium Citrate Buffer (pH 6.0) | A common buffer for HIER, ideal for many nuclear and cytoplasmic antigens [83]. |
| Tris-EDTA Buffer (pH 9.0) | A high-pH buffer often used for more challenging epitopes; essential for optimizing mIHC panels [83] [30]. | |
| Antibodies & Validation | Cell Lines with Known Protein Expression | Serve as critical positive and negative controls for antibody validation during titration [85]. |
| Species-Matched Blocking Serum | Reduces non-specific binding of secondary antibodies, crucial for minimizing background [82]. | |
| Detection & Analysis | Polymer-based HRP Detection System | Provides high sensitivity and low background, preferred for multiplex assays [30]. |
| Computer-Assisted Image Analysis Software | Enables objective, quantitative assessment of staining (e.g., H-score), vital for validation [13] [84]. |
Successfully addressing weak or no staining in multiplex immunohistochemistry hinges on the systematic optimization of antigen retrieval and antibody titration. These are not one-time exercises but foundational steps that must be rigorously performed and documented for every new antibody and mIHC panel. Adherence to the detailed protocols and troubleshooting guidance provided here will significantly enhance staining quality, ensuring that the resulting data is both reliable and reproducible.
Furthermore, as highlighted in the 2024 update to the "Principles of Analytic Validation of Immunohistochemical Assays" from the College of American Pathologists, proper assay validation is a non-negotiable standard for ensuring accuracy and reducing variation [86]. For laboratories, this means that any IHC assay, including mIHC, must undergo a defined validation/verification process before being used for patient specimens or critical research data. This typically involves demonstrating a ≥90% concordance with a validated method or expected results across a set of positive and negative samples [86]. Integrating the optimization strategies outlined in this note into a formal validation framework is the ultimate step toward achieving robust, high-quality mIHC for impactful research and drug development.
Mitigating High Background and Non-Specific Staining
High background and non-specific staining are significant challenges in immunohistochemistry (IHC) and multiplex immunohistochemistry (mIHC) that can compromise experimental validity and data interpretation. These artifacts obscure specific signals, leading to false positives and reduced signal-to-noise ratios, which is particularly problematic in complex multiplex assays where multiple targets are simultaneously detected [87] [88]. In the context of multiplex IHC techniques research, effective mitigation of these issues is paramount for generating reliable, reproducible data on protein localization, abundance, and cellular co-localization within tissue microenvironments [89] [1]. This application note provides a comprehensive framework for identifying, troubleshooting, and preventing common staining artifacts through optimized protocols and reagent selection.
Understanding Staining Artifacts: Causes and Identification
Non-specific staining in IHC experiments manifests as high background that obscures specific antigen detection. This background can result from various factors including hydrophobic and ionic interactions between antibodies and tissue components, endogenous enzyme activity, endogenous biotin, fixative-induced fluorescence, and suboptimal antibody concentrations [87] [88]. In multiplex IHC, these challenges are compounded by the need for multiple antibodies to function simultaneously without cross-reactivity, and by the cumulative effects of repeated staining cycles which can damage tissue morphology and increase non-specific binding [1] [66].
Proper identification of staining artifact patterns provides crucial diagnostic information for troubleshooting. Edge-effect staining, characterized by stronger background at tissue peripheries, often indicates tissue drying during processing [87]. Uniform high background throughout the tissue section typically suggests insufficient blocking, excessive antibody concentration, or inadequate washing [88]. Specific cellular compartment staining in tissues with endogenous enzymes or biotin (e.g., kidney, liver) requires appropriate enzymatic blocking strategies [88]. In multiplex immunofluorescence, fixative-induced autofluorescence from formalin/PFA is most prominent in green wavelengths and may require fluorophore selection in red or infrared ranges to minimize interference [87].
Table 1: Common Staining Artifacts and Their Characteristics
| Artifact Type | Visual Characteristics | Common Causes |
|---|---|---|
| High Background Throughout Tissue | Uniform staining across entire section | Insufficient blocking; Excessive antibody concentration; Inadequate washing |
| Edge Effect | Stronger staining at tissue edges | Tissue drying during processing |
| Endogenous Enzyme Signal | Staining in specific cell types (e.g., RBCs, neutrophils) | Unblocked peroxidase/alkaline phosphatase activity |
| Endogenous Biotin Signal | Staining in tissues like liver, kidney, brain | Unblocked biotin/avidin binding sites |
| Fixative-induced Fluorescence | Green wavelength autofluorescence | Formalin/PFA fixation without appropriate quenching |
Experimental Protocols for Troubleshooting and Optimization
Comprehensive Blocking Protocol
Effective blocking is crucial for reducing non-specific antibody binding. The following protocol addresses multiple sources of non-specific interactions:
- Deparaffinize and rehydrate FFPE sections using standard protocols [90].
- Perform antigen retrieval using appropriate method (heat-induced or enzymatic) for your target antigens [90].
- Block endogenous peroxidases by incubating with 3% H₂O₂ in methanol for 15 minutes at room temperature [88] [90].
- Block endogenous biotin using sequential avidin-biotin blocking:
- Incubate with avidin solution for 15 minutes
- Rinse with buffer
- Incubate with biotin solution for 15 minutes
- Rinse thoroughly [88]
- Block non-specific protein binding by incubating with blocking solution for 1 hour at room temperature. Options include:
- Add non-ionic detergents such as 0.3% Triton X-100 or Tween 20 to the blocking and antibody dilution buffers to reduce hydrophobic interactions [88].
Antibody Optimization and Validation Protocol
Proper antibody validation and titration are essential for specific staining:
- Validate each antibody individually before multiplex application:
- Test on positive and negative control tissues
- Verify subcellular localization matches expected pattern
- Use knockout tissues if available for specificity confirmation [1]
- Perform antibody titration to determine optimal concentration:
- Test a range of concentrations flanking manufacturer's recommendation
- Use the highest dilution that provides specific signal with minimal background [90]
- Incubate at appropriate temperature - higher temperatures can increase non-specific binding:
- Primary antibody incubation is typically performed at 4°C overnight
- Secondary antibody incubation at room temperature for 1-2 hours [87]
- Include rigorous washes between steps:
Multiplex IHC Specific Considerations
For sequential multiplex IHC protocols, additional measures are required:
- Employ gentle elution methods rather than harsh stripping protocols to preserve tissue morphology and antigenicity across cycles [66].
- Use tyramide signal amplification (TSA) with covalent dye deposition to enable complete antibody removal between cycles without signal loss [1] [66].
- Select antibody panels with species/isotype diversity to minimize cross-reactivity, or use detection systems independent of secondary antibody host species [66].
- Include controls for each cycle to verify complete antibody removal and absence of cross-reactivity in sequential rounds [5].
The Scientist's Toolkit: Essential Reagents and Solutions
Table 2: Key Research Reagent Solutions for Mitigating Non-Specific Staining
| Reagent Category | Specific Examples | Function and Application |
|---|---|---|
| Blocking Agents | Normal serum (species-matched), BSA, non-fat dry milk, commercial blockers | Reduce non-specific hydrophobic and ionic interactions |
| Endogenous Enzyme Blockers | 3% H₂O₂ (peroxidase), Levamisole (alkaline phosphatase) | Quench endogenous enzyme activity that causes false positives |
| Endogenous Biotin Blockers | Avidin/Biotin blocking kits | Sequester endogenous biotin to prevent streptavidin binding |
| Detergents | Triton X-100, Tween-20 (0.1-0.3%) | Reduce hydrophobic interactions; improve antibody penetration |
| Antibody Diluents | Commercial IHC antibody diluents with protein stabilizers | Maintain antibody stability while reducing non-specific binding |
| Signal Amplification Systems | Tyramide Signal Amplification (TSA), polymer-based systems | Enhance sensitivity allowing use of lower antibody concentrations |
Visualization of Troubleshooting Workflows
The following diagnostic workflow provides a systematic approach for identifying and resolving common staining artifacts:
Advanced Techniques for Multiplex IHC
Multiplex IHC presents unique challenges for background reduction, requiring specialized approaches beyond standard IHC optimization:
Signal Amplification and Background Reduction
Tyramide Signal Amplification (TSA) provides exceptional sensitivity through covalent deposition of fluorophore-conjugated tyramide molecules catalyzed by horseradish peroxidase (HRP). This enables detection of low-abundance targets while allowing complete antibody removal between staining cycles, eliminating cross-reactivity concerns [1]. TSA generates 100-fold or greater signal amplification over conventional methods, permitting use of highly dilute primary antibodies that reduce non-specific binding [1]. However, TSA requires careful optimization of tyramide concentration and incubation time to prevent excessive deposition and diffusion artifacts that increase background.
Polymer-based detection systems conjugate multiple enzyme molecules to a dextran polymer backbone, significantly increasing sensitivity without the biotin-avidin interactions that contribute to background in tissues with endogenous biotin [1] [90]. These systems are particularly valuable for automated IHC platforms and multiplex applications where consistent performance across multiple targets is essential.
Sequential Staining Optimization
For iterative multiplex IHC methods, the antibody stripping process presents significant challenges for background control and tissue preservation:
- Implement gentle elution protocols that effectively remove antibodies without damaging tissue morphology or destroying epitopes for subsequent rounds [66].
- Validate complete antibody removal after each cycle using appropriate controls to prevent carryover between rounds.
- Employ covalent labeling strategies like TSA that permit mild stripping conditions while preserving signal integrity [1].
- Standardize imaging conditions and perform flat-field correction to ensure consistent quantification across multiple staining cycles [5].
Computational Background Correction
Advanced imaging and computational approaches can mitigate staining artifacts in multiplex IHC:
Spectral unmixing separates overlapping fluorescence signals using reference spectra for each fluorophore, effectively reducing channel cross-talk [5] [28]. This allows more fluorophores to be used simultaneously while maintaining signal specificity.
Color deconvolution algorithms separate chromogenic signals in brightfield IHC, enabling more accurate quantification of individual markers in multiplex assays [5].
Batch correction algorithms address technical variability across multiple staining runs, particularly important for large cohort studies [5].
Effective management of background and non-specific staining in IHC and multiplex IHC requires a systematic approach addressing multiple technical factors from sample preparation through final imaging. Implementation of comprehensive blocking strategies, rigorous antibody validation, optimized staining protocols, and appropriate detection systems enables researchers to achieve high signal-to-noise ratios essential for accurate data interpretation. As multiplex IHC continues to evolve toward higher plex capabilities and clinical applications, robust background mitigation practices will remain fundamental to generating reliable, reproducible tissue-based data for research and diagnostic purposes.
Preventing Tissue Damage and Antigen Loss in Multicycle Protocols
Within the framework of multiplex immunohistochemistry (mIHC) research, the ability to visualize dozens of protein markers on a single tissue section is revolutionizing our understanding of cellular sociology and tissue architecture in health and disease [69]. Techniques such as iterative indirect immunofluorescence imaging (4i) and the more recent Pathology-oriented multiplexing (PathoPlex) rely on performing numerous sequential cycles of staining, imaging, and elution to achieve high-plex protein detection [91]. A fundamental challenge confronting these multicycle protocols is the preservation of both tissue morphological integrity and antigenicity throughout extensive processing rounds. Tissue damage or antigen loss compromises data quality, leading to incomplete or unreliable datasets that can invalidate complex experiments. This application note provides detailed, actionable protocols and data to safeguard these critical elements, ensuring the generation of robust, high-fidelity spatial proteomic data.
The selection of a multiplexing method inherently determines the risk profile for tissue and antigen integrity. Table 1 summarizes key technologies, highlighting their operational limits and specific preservation characteristics. Methods that do not preserve the tissue, such as those using mass spectrometry, circumvent some issues but preclude subsequent re-analysis of the same physical sample [69] [91].
Table 1: Comparative Analysis of Multiplexed Imaging Technologies and Their Impact on Tissue Integrity
| Method Name | Commercial Name | Sample Type | Max. Number of Markers | Signal Removal Technique | Tissue Preservation | Reported Maximum Cycles Demonstrated |
|---|---|---|---|---|---|---|
| MILAN | NA | FFPE | 82 | Antibody Stripping | Yes | Not Specified [69] |
| Cyclic Immunofluorescence (CycIF) | NA | FFPE | 60 | Chemical Bleaching | Yes | Not Specified [69] |
| Multiplexed Chip Cytometry (MICS) | MacSima | FFPE/Frozen | 400 | Bleaching/Fluorochrome Release | No | Not Specified [69] |
| Sequential Immunofluorescence (seqIF) | COMET/Labsat | FFPE | 40 | Antibody Stripping | Yes | Not Specified [69] |
| Iterative Indirect Immunofluorescence Imaging (4i) | NA | FFPE | 150+ | Chemical Elution | Yes | 95 cycles (PathoPlex) [91] |
| Imaging Mass Cytometry (IMC) | Hyperion | FFPE/Frozen | 37 | None (Ablation) | No | Not Specified [69] [91] |
| Co-detection by indexing (CODEX) | CODEX | FFPE/Frozen | 40+ | None (Fluorophore Binding/Release) | No | Not Specified [69] |
Core Experimental Protocol for Tissue-Preserving Multicycle mIHC
The following protocol is adapted from the PathoPlex framework, which has been validated for up to 95 imaging cycles on a single tissue section without significant damage [91].
Specialized Materials and Reagents
- Glass Slide Coating: (3-Aminopropyl)triethoxysilane (APTES) or Poly-D-Lysine [91].
- Validated Primary Antibodies: Use antibodies rigorously validated for IHC on your specific tissue type (FFPE/frozen) [69].
- Fluorophore-conjugated Secondary Antibodies: Highly cross-adsorbed to minimize non-specific binding.
- Elution Buffer: 2% SDS, 100 mM β-Mercaptoethanol, 62.5 mM Tris-HCl (pH 6.8) [91] or similar formulations.
- Blocking Solution: 3-5% serum (from the host species of the secondary antibody) or bovine serum albumin (BSA) in Tris-buffered saline with Tween (TBST).
Step-by-Step Workflow
Step 1: Slide Preparation and Section Adhesion
- Coat glass slides with APTES, which has demonstrated superior efficiency in preventing tissue detachment compared to poly-D-lysine over many cycles [91].
- Cut formalin-fixed paraffin-embedded (FFPE) tissue sections at a standard thickness (e.g., 4-5 µm) and mount on coated slides.
- Dry slides overnight at 37°C or for 1-2 hours at 60°C to ensure maximal adhesion.
Step 2: Deparaffinization, Antigen Retrieval, and Blocking
- Deparaffinize and rehydrate tissue sections using standard xylene and ethanol series.
- Perform heat-induced epitope retrieval (HIER) using a target antigen-specific buffer (e.g., citrate or EDTA, pH 6.0-9.0).
- Block sections for 1 hour at room temperature with blocking solution to minimize non-specific secondary antibody binding.
Step 3: Cyclic Staining, Imaging, and Elution This cycle is repeated for each marker or marker panel in sequence.
- Primary Antibody Incubation: Apply antibody for 1-2 hours at room temperature or overnight at 4°C.
- Secondary Antibody Incubation: Apply fluorophore-conjugated secondary antibody for 1 hour at room temperature in the dark.
- Image Acquisition: Acquire high-resolution (e.g., 80-160 nm/pixel) images using a fluorescence microscope. Ensure all relevant channels are captured.
- Antibody Elution: Incubate the slide in pre-warmed elution buffer at 60°C for 15-30 minutes with gentle agitation. This step removes primary and secondary antibodies without damaging the tissue or destroying most native antigens [91].
- Validation of Elution: Image the slide after elution using the same exposure settings as the original acquisition to confirm the complete removal of fluorescent signal before proceeding to the next cycle [91].
Critical Quality Control Steps
- Secondary-Only Controls: Periodically (e.g., every 10-20 cycles), run an imaging cycle with only the secondary antibody applied. This controls for incomplete elution and identifies any residual viable primary antibodies or non-specific secondary binding [91].
- Baseline Marker Re-staining: After the final cycle, re-stain for a marker imaged in the first cycle. A significant drop in signal intensity indicates cumulative antigen damage.
- Morphological Inspection: Visually inspect the tissue (e.g., using a DAPI or H&E counterstain) after every cycle for signs of lifting, cracking, or holes.
Workflow Visualization
The following diagram illustrates the core cyclical process and the integrated quality control measures essential for preventing tissue and antigen loss.
The Scientist's Toolkit: Essential Reagents for Integrity Preservation
Successful multicycle mIHC relies on a foundation of specific, high-quality materials. Table 2 details key reagent solutions and their functions in preventing tissue damage and antigen loss.
Table 2: Essential Research Reagent Solutions for Tissue and Antigen Preservation
| Reagent / Material | Function / Purpose | Preservation Benefit |
|---|---|---|
| APTES ((3-Aminopropyl)triethoxysilane) | Glass slide coating that covalently binds tissue sections. | Prevents tissue lifting and detachment during repeated fluid exchange and elution steps, a common failure point in long protocols [91]. |
| Validated Primary Antibody Panels | Target epitope detection. | Using antibodies pre-validated for multiplex IHC on specific tissue types (FFPE/frozen) ensures specific binding and reduces need for signal amplification, which can be harsh [69]. |
| Cross-Adsorbed Secondary Antibodies | Amplified detection of primary antibodies. | Minimizes non-specific binding to tissue, reducing background and the need for harsh washing conditions that can damage antigens. |
| Mild Elution Buffer (e.g., SDS + β-Mercaptoethanol) | Removes primary-secondary antibody complexes after imaging. | Efficiently dissociates antibodies without destroying most native protein antigens, allowing for repeated rounds of staining on the same sample [91]. |
| Stabilized Mounting Medium | Protects tissue during imaging. | Prevents photobleaching and physical compression of the tissue during repeated microscopy sessions. |
| Secondary-Only Control Reagents | Quality control for elution efficiency. | Identifies incomplete elution or non-specific secondary antibody binding, which creates false-positive signals in subsequent cycles [91]. |
Multiplex immunohistochemistry (mIHC) has become an indispensable tool in immuno-oncology and translational research, enabling the simultaneous visualization of multiple protein markers on a single tissue section. This provides deep insights into the cellular composition, functional states, and spatial relationships within the tumor microenvironment (TME) [1] [41]. However, a significant barrier to its clinical adoption and routine research use has been the protracted nature of conventional protocols, which often require several days to complete [92] [93].
This application note details a streamlined methodological framework for performing a 6-marker multiplex IHC analysis within a single day. By systematically optimizing key parameters such as reaction temperature, chromogen selection, and washing efficiency, this rapid protocol reduces processing time from days to just 5 hours and 49 minutes while maintaining robust staining quality and analytical validity [92]. The ability to obtain complex spatial protein data on a clinically feasible timescale promises to accelerate biomarker discovery and validation, potentially enabling more personalized therapeutic strategies.
Core Principles of Rapid Multiplex IHC
Traditional multiplex IHC and immunofluorescence (mIHC/IF) workflows can be broadly classified into two categories: single-shot and multi-cycle imaging approaches [41]. Single-shot methods, such as Imaging Mass Cytometry (IMC) and Multiplexed Ion Beam Imaging (MIBI), stain tissues with an antibody cocktail and acquire data in a single session, allowing for 40+ markers but requiring specialized, often inaccessible instrumentation [41]. Multi-cycle methods, which include both chromogenic and fluorescent protocols, achieve multiplexing through iterative rounds of staining, imaging, and signal removal or antibody elution [1] [41].
The rapid protocol described herein is a chromogenic, multi-cycle approach designed for standard clinical and research pathology laboratories. Its development was guided by three core principles:
- Strategic Panel Reduction: A focused marker panel was designed to capture essential immunological features linked to patient prognosis. This reduction in label number directly decreases total processing time [92].
- Process Intensification: Every step of the protocol was scrutinized for acceleration. This included optimizing antigen retrieval conditions, using high-affinity antibodies at optimal concentrations, and employing fast-precipitating chromogens [94] [92].
- Workflow Parallelization: Wherever feasible, procedural steps were re-engineered to occur in parallel rather than in sequence, minimizing idle time and streamlining the overall workflow.
Table 1: Key Advantages of the Single-Day Multiplex IHC Workflow
| Feature | Traditional Multi-Day mIHC | Rapid Single-Day mIHC | Impact on Research/Clinical Use |
|---|---|---|---|
| Protocol Duration | Several days [92] [93] | 5 hours 49 minutes [92] | Enables same-day analysis and decision-making. |
| Throughput | Low due to lengthy process | Significantly higher | Accelerates biomarker validation and preclinical studies. |
| Compatibility | Often requires specialized platforms [93] | Based on standard IHC instrumentation [92] | Accessible to most clinical and research laboratories. |
| Tissue Integrity | Risk of degradation over multiple days [27] | Reduced handling and processing time preserves morphology. | Enhances reliability of spatial and quantitative data. |
Detailed Single-Day Protocol
Research Reagent Solutions and Materials
The successful implementation of this rapid protocol depends on a carefully selected toolkit of reagents and instruments. Validation of all components is critical prior to running the full multiplex panel.
Table 2: Essential Research Reagent Toolkit for Single-Day mIHC
| Item Category | Specific Example(s) | Function and Critical Notes |
|---|---|---|
| Tissue Specimens | Formalin-Fixed Paraffin-Embedded (FFPE) tissue sections (4-5 µm) | Preserves tissue architecture and antigenicity. The protocol is optimized for FFPE, the most common clinical specimen type [95] [92]. |
| Primary Antibodies | Highly validated mouse and rabbit monoclonal antibodies [1] | Binds specifically to target protein antigens. Pre-titration and validation for IHC on FFPE tissue under the intended staining conditions is mandatory [1] [95]. |
| Detection System | ImmPRESS Duet Double Staining Kit (HRP & AP) or similar polymer-based systems [96] | Provides species/isotype-specific secondary antibodies conjugated to enzyme polymers (HRP and AP). Polymer systems enhance sensitivity and reduce staining time compared to traditional methods [1] [94]. |
| Chromogens | Fast-precipitating DAB (brown) and Vector Purple (or equivalent) [94] [92] | Enzyme substrates that produce a colored precipitate at the antigen site. Selecting contrasting colors and optimizing application order is vital for clear signal discrimination [96] [94]. |
| Antigen Retrieval Buffer | EDTA- or citrate-based buffer, pH 6.0 or 9.0 | Reverses formaldehyde-induced cross-links, restoring antibody access to epitopes. A single retrieval condition must be compatible with all antibodies in the panel [95]. |
| Automated Stainer | Automated IHC staining platform (e.g., Leica BOND RX) | Ensures reagent consistency, precise timing, and temperature control, which are crucial for reproducibility and speed [41] [92]. |
Step-by-Step Workflow and Visualization
The following workflow diagram outlines the core sequential and parallel processes involved in the rapid multiplex IHC protocol.
Diagram 1: Single-Day mIHC Workflow. This diagram illustrates the streamlined, sequential process for a 2-plex stain, which is extended for additional markers.
Detailed Experimental Protocol
Sectioning and Deparaffinization:
- Cut FFPE tissue blocks into 4-5 µm sections and mount on charged slides.
- Bake slides at 60°C for 20 minutes to ensure adhesion.
- Dewax in xylene (or substitute) for 5 minutes, twice.
- Rehydrate through graded alcohols (100%, 95%, 70%) for 2 minutes each, followed by a rinse in distilled water. Total Time: ~15 min
Antigen Retrieval:
- Perform heat-induced epitope retrieval using a pre-heated (95-100°C) EDTA or citrate-based buffer in a decloaking chamber or pressure cooker.
- Incubate slides for 10 minutes at 95°C, then allow to cool for 20 minutes at room temperature.
- Critical Note: The retrieval buffer and pH must be pre-validated for compatibility with the entire antibody panel in a single retrieval step [95]. Total Time: ~30 min
Endogenous Enzyme Blocking:
- Rinse slides in wash buffer.
- Incubate with dual endogenous enzyme block (for HRP and AP) for 10 minutes at room temperature. Total Time: ~15 min
Sequential Immunostaining (Repeat for each marker):
- Cycle 1 - Primary Antibody: Apply the first optimized primary antibody (e.g., mouse anti-CD8) and incubate for 30 minutes at room temperature. Wash slides for 5 minutes in buffer [92].
- Cycle 1 - Detection: Apply the corresponding HRP-conjugated polymer secondary antibody for 15 minutes. Wash for 5 minutes.
- Cycle 1 - Chromogen Development: Incubate with DAB chromogen for 5-10 minutes. Monitor development microscopically. Rinse with water to stop the reaction [94] [92].
- Cycle 2 - Primary Antibody: Without stripping, apply the second primary antibody from a different host species/isotype (e.g., rabbit anti-FoxP3). Incubate for 30 minutes. Wash.
- Cycle 2 - Detection: Apply the AP-conjugated polymer secondary antibody for 15 minutes. Wash.
- Cycle 2 - Chromogen Development: Incubate with a contrasting chromogen (e.g., Vector Purple) for 5-10 minutes. Rinse with water [96] [94].
- Total Staining Time for 2-plex: ~2 hours 30 min
Counterstaining and Mounting:
- Apply hematoxylin counterstain for 30-60 seconds. Rinse in water.
- Rapid Dehydration: Pass slides through 70%, 95%, and 100% alcohol baths for 1 minute each.
- Clear in xylene for 2 minutes and mount with a permanent mounting medium.
- Total Time: ~10 min
Image Acquisition and Analysis:
- Scan slides using a whole-slide brightfield scanner.
- Employ digital image analysis software for color deconvolution (to separate chromogen signals), cell segmentation, and quantitative phenotyping [5].
- The entire protocol from section to analyzable digital data is completed in under 6 hours.
Validation and Quality Control
To ensure that the accelerated protocol does not compromise data integrity, rigorous validation against the traditional gold standard is essential.
- Staining Correlation: The rapid 6-marker protocol demonstrated a significant correlation with conventional multi-day multiplex IHC in terms of staining intensities, densities of key immune cells (e.g., T cells, macrophages), and critical spatial profiles of intratumoral immune infiltrates [92].
- Immune Classification: The simplified 6-marker panel was sufficient to recapitulate the same immunological features and patient stratification linked to prognosis that were identified using a more complex 14-marker panel [92].
- Specificity Controls: Standard IHC controls must be included: isotype controls for each primary antibody, omission of primary antibodies to test for secondary antibody specificity, and single-plex stains to verify the expected localization and lack of cross-reactivity after panel integration [1] [97].
This application note provides a validated and detailed framework for reducing multi-day multiplex IHC protocols to a single-day workflow. By focusing on a strategically selected marker panel and intensifying key procedural steps, this method achieves a dramatic reduction in turnaround time without sacrificing the quality or biological relevance of the data. This advancement makes complex spatial biomarker analysis feasible on a clinically relevant timescale, paving the way for its integration into diagnostic practice and accelerating the development of biomarker-driven therapeutic strategies.
Ensuring Rigor and Reproducibility: mIHC Validation and Regulatory Pathways
The transition of multiplex immunohistochemistry (mIHC) from a research tool to a clinically applicable technology requires rigorous analytical validation to ensure reliable, reproducible, and accurate results. For researchers and drug development professionals, navigating the complex landscape of regulatory standards is paramount for developing robust mIHC assays that can support diagnostic claims and therapeutic decisions. The primary frameworks governing this space include the Clinical Laboratory Improvement Amendments (CLIA), standards from the Clinical and Laboratory Standards Institute (CLSI), and the International Organization for Standardization (ISO) standards, particularly ISO 15189 [98] [99]. These frameworks collectively establish requirements for quality management, method evaluation, and laboratory competence, providing the structural foundation for validating complex multiplex assays that simultaneously detect multiple biomarkers on a single tissue section [13] [99].
The integration of mIHC in spatial biology has highlighted critical limitations of traditional chromogenic IHC methods, particularly when incorporating more than three biomarkers, driving the need for standardized validation approaches for fluorescence-based multiplex methods [99]. For immuno-oncology, where multiplexed panels are crucial for understanding the tumor microenvironment, properly validated assays provide essential information on spatial phenotypic signatures that can predict response to immune checkpoint inhibitors [13] [99]. This document outlines detailed application notes and protocols for aligning mIHC assay validation with established regulatory frameworks, enabling researchers to generate clinically actionable data from these powerful spatial biology tools.
Core Standards and Regulatory Frameworks
CLIA (Clinical Laboratory Improvement Amendments)
CLIA establishes the federal standards for all U.S. facilities that test human specimens for health assessment, diagnosis, prevention, or treatment of disease [98] [100]. CLIA regulations are based on test complexity and create a baseline for laboratory operation. A key aspect of CLIA compliance is meeting specific performance criteria for proficiency testing (PT), which has been updated with new acceptance criteria fully implemented in January 2025 [101].
Table 1: Selected CLIA Proficiency Testing Acceptance Criteria (2025 Implementation)
| Analyte or Test | NEW Criteria for Acceptable Performance (AP) | OLD AP |
|---|---|---|
| Creatinine | Target value (TV) ± 0.2 mg/dL or ± 10% (greater) | TV ± 0.3 mg/dL or ± 15% (greater) |
| Hemoglobin A1c | TV ± 8% | None |
| Potassium | TV ± 0.3 mmol/L | TV ± 0.5 mmol/L |
| Total Cholesterol | TV ± 10% | Same |
| Leukocyte Count | TV ± 10% | TV ± 15% |
| Cell Identification | 80% or greater consensus | 90% or greater consensus |
For IHC assays specifically, CLIA does not define specific validation protocols but requires laboratories to establish and verify performance specifications for all tests [98] [102]. When modifications are made to a previously validated IHC assay, CLIA allows for a verification process rather than full re-validation under certain conditions, such as when changing antibody vendors while maintaining the same antibody clone [102].
CLSI (Clinical and Laboratory Standards Institute)
CLSI develops international standards and guidelines recognized by laboratories, accreditors, and government agencies as best practices for improving medical laboratory testing [103] [98]. CLSI's Evaluation Protocol (EP) standards provide detailed explanations and instructions for assessing test method performance characteristics such as precision, accuracy, and detection limits [104]. These standards are particularly valuable for developers of both commercially available in vitro diagnostic devices (IVDs) and laboratory-developed tests (LDTs) [104].
The CLSI framework follows a "Test Life Phase Model," guiding test development from establishment through implementation and ongoing quality assurance [104]. Key CLSI standards relevant to mIHC validation include:
- CLSI EP10: Preliminary Evaluation of Quantitative Medical Laboratory Measurement Procedures [103]
- CLSI EP19: A framework for all CLSI evaluation protocol standards [104]
- CLSI I/LA28-A2: Quality Assurance for Design, Control, and Implementation of Immunohistochemistry Assays [102]
CLSI's recently updated Method Navigator helps developers identify, understand, and meet regulatory requirements throughout the life cycle of a test, providing checklists and navigation to specific guidance documents [104].
ISO (International Organization for Standardization)
ISO standards provide an international framework for quality management and laboratory competence. The most directly relevant standard for medical laboratories is ISO 15189, which specifies requirements for quality and competence [105] [98]. The 2022 version of ISO 15189 has strengthened requirements for several key concepts, including impartiality and confidentiality, while addressing ethical considerations related to laboratory users [105].
Other important ISO standards for IVD and mIHC development include:
- ISO 13485: Requirements for a quality management system for the medical device industry (soon to be integrated into FDA regulations) [98]
- ISO 14971: Application of risk management to medical devices [98]
- ISO 17025: General requirements for the competence of testing and calibration laboratories
The recent comparative analysis of ISO 15189:2022 with earlier versions notes the strengthened emphasis on ethical commitments and requirements for achieving reliable results in laboratory medicine, although several key concepts related to new technologies may need further emphasis in future revisions [105].
Table 2: Comparison of Key Regulatory Frameworks for mIHC Assays
| Framework | Primary Focus | Key Applications for mIHC | Regulatory Authority |
|---|---|---|---|
| CLIA | Laboratory quality standards | Proficiency testing, quality control, test verification | CMS (Centers for Medicare & Medicaid Services) |
| CLSI | Best practice guidelines | Method validation protocols, performance characterization | Voluntary consensus standards |
| ISO 15189 | Quality and competence | Laboratory management system, technical competence | International Standard |
| FDA/IVD | Premarket approval | Companion diagnostics, IVD kits | FDA (Food and Drug Administration) |
Analytical Validation Protocols for mIHC
Experimental Design and Pre-Analytical Considerations
The validation of mIHC assays begins with robust experimental design that accounts for pre-analytical variables, which are particularly crucial for multiplex assays detecting multiple biomarkers simultaneously. For spatial biology applications using mIHC, proper tissue handling and processing are essential, as formalin-fixed paraffin-embedded (FFPE) tissue preparation significantly impacts the quality of intercellular and intracellular components [99]. Key considerations include:
- Tissue Collection and Processing: Standardize fixation protocols, as variations in formalin fixation time can dramatically affect antigen preservation and autofluorescence levels, which is particularly problematic for fluorescence-based mIHC [99].
- Control Selection: Identify appropriate positive and negative control tissues that express varying levels of all targets in the multiplex panel. For verification of modified assays, CAP guidelines recommend testing at least 2 known positive and 2 known negative cases when changing antibody vendors (same clone) [102].
- Antibody Validation for Multiplex Panels: Each antibody must be validated both individually and in combination to identify potential cross-reactivity or steric interference. For mIHC, this includes verifying that epitopes remain accessible when multiple antibodies are applied simultaneously or sequentially [13] [99].
- Panel Design: Consider the biological context and co-expression patterns when designing multiplex panels. The dynamic range of detection becomes increasingly important as the number of targets increases, with fluorescence-based methods typically offering 3-log dynamic range compared to 1-log for brightfield methods [99].
Performance Characterization Experiments
The core analytical validation of mIHC assays requires establishing multiple performance characteristics through structured experiments. The following protocols are adapted from CLSI guidelines and recent publications on mIHC validation [13] [104] [99].
Protocol 1: Precision and Reproducibility Testing
- Experimental Design: Prepare serial sections from 3-5 different FFPE tissue blocks representing different expression levels of each marker. Include both high and low expressors.
- Repeatability (Intra-assay Precision): Run the full mIHC protocol on all tissues in triplicate within the same run, using the same operator, equipment, and reagents.
- Intermediate Precision (Inter-assay Precision): Run the full mIHC protocol on three separate days by two different operators using different reagent lots.
- Reproducibility: If applicable, perform testing across multiple sites or instruments.
- Data Analysis: Calculate coefficients of variation (CV) for quantitative measurements (e.g., cell counts, staining intensity) for each marker. For categorical data, calculate percent agreement. CLSI recommends CVs <15-20% for quantitative assays, though this may vary by analyte [104].
Protocol 2: Analytical Sensitivity (Limit of Detection)
- Cell Line Dilution Series: Create cell pellets with known ratios of positive and negative cells for each marker. If suitable cell lines are unavailable, use tissue microarrays with serial dilutions of known positive tissue.
- Sample Preparation: Prepare FFPE blocks from the dilution series, ensuring a range from high expression to near-negative levels.
- Staining and Analysis: Process all samples through the full mIHC workflow. Use image analysis to quantify marker expression at each dilution level.
- Data Analysis: Determine the lowest expression level that can be reliably distinguished from background. Establish the limit of detection (LOD) and limit of quantification (LOQ) for each marker.
Protocol 3: Analytical Specificity
- Cross-reactivity Assessment: Test the mIHC panel on tissues known to express phylogenetically or structurally similar proteins to each target.
- Interference Testing: Evaluate potential interference from endogenous tissue components (e.g., hemoglobin, bilirubin), necrotic areas, and edge artifacts.
- Marker Co-localization Verification: For multiplex panels, verify appropriate cellular and subcellular localization of each marker using known positive tissues with well-characterized expression patterns.
- Data Analysis: Document any unexpected cross-reactivity or interference patterns and optimize the protocol to minimize these effects.
The workflow for analytical validation incorporates multiple parallel tracks to establish comprehensive assay performance characteristics, as illustrated below:
Figure 1: Comprehensive mIHC Analytical Validation Workflow
Image Analysis Validation for mIHC
The integration of image analysis (IA) solutions with mIHC requires separate validation, as algorithms can generate erroneous data due to staining variability, biological heterogeneity, and image capture differences [99]. For regulatory submissions, particularly for companion diagnostics, the FDA may require studies that exceed CLIA requirements, with CLSI guidelines providing recommendations on study designs, requirements, statistical methods, and acceptance criteria [98].
Protocol 4: Image Analysis Algorithm Validation
- Ground Truth Establishment: Create a manually annotated "gold standard" dataset for algorithm training and validation. This should include diverse tissue types, staining intensities, and expression patterns representative of real-world clinical samples.
- Algorithm Training: Train the IA algorithm using a portion of the annotated dataset, ensuring proper representation of all expected staining patterns and potential artifacts.
- Performance Assessment: Test the algorithm on the independent validation set. Compare algorithm outputs with manual annotations for:
- Cell segmentation accuracy
- Marker classification correctness
- Co-expression pattern identification
- Robustness Testing: Evaluate algorithm performance across different sample preparation batches, staining runs, and scanning systems to assess robustness to technical variations.
- Acceptance Criteria: Establish predefined acceptance criteria for accuracy metrics (typically >90% concordance with manual counting for cell segmentation and classification) [99].
For spatial biology applications, additional validation should include:
- Satial Resolution Verification: Confirm the algorithm accurately captures spatial relationships between different cell types.
- Multiplex Signal Separation: Verify appropriate unmixing of overlapping fluorescence signals, particularly for spectrally similar fluorophores.
- Quantitative Linearity: Establish linearity of quantitative outputs across a range of expression levels.
Regulatory Strategy and Commercialization Pathways
Risk Classification and Submission Pathways
The regulatory strategy for mIHC assays depends on their intended use and associated risk. When an assay is used for prospective patient stratification or clinical decision-making, a Study Risk Determination (SRD) is necessary to evaluate if an Investigational Device Exemption (IDE) is required [98]. The FDA is the ultimate arbiter of significant risk, and this determination is independent of the phase of the clinical trial [98].
Table 3: Risk Assessment and Regulatory Pathways for mIHC Assays
| Intended Use Context | Risk Assessment | Regulatory Pathway | Key Requirements |
|---|---|---|---|
| Research Use Only | No immediate clinical impact | No specific regulatory oversight | Research validation only |
| Clinical Decision-Making | Significant Risk (SR) | IDE required | CLSI standards, CLIA validation, pre-submission meeting |
| Ancillary Diagnostic | Non-Significant Risk (NSR) | No IDE required | CLIA validation, CAP guidelines |
| Companion Diagnostic | High Risk (Class II/III) | PMA or De Novo | Modular PMA, BIMO audit, 21 CFR Part 820 |
For companion diagnostic (CDx) commercialization in the U.S., the FDA favors a modular Premarket Approval (PMA) process where each module is reviewed independently [98]. The overall timeline for PMA review is approximately 12 to 24 months, and compliance with 21 CFR Part 820 and a Bioresearch Monitoring (BIMO) audit of the facility are required prior to approval [98].
Global Validation Strategy
Developing a global validation strategy requires planning for both U.S. and international regulatory requirements. Key differences exist between the U.S. and European Union (EU) regulatory frameworks [98]:
- In the U.S., CDx may be classified as either Class II or Class III devices, while in the EU, they are uniformly classified as Class C devices under the In Vitro Diagnostic Regulation (IVDR) [98].
- The regulatory authority in the EU is the notified body, whereas in the U.S., it is the FDA [98].
- If the assay has a medical purpose in a clinical trial in the EU, it requires an Annex XIV submission to the national competent authority and ethics committee approval prior to use in each country where samples are being collected [98].
To streamline global commercialization, validation studies performed in U.S.-based laboratories can be designed to meet both CLIA and CLSI standards while simultaneously supporting EU regulatory submissions under ISO 13485 and Good Clinical Laboratory Practice (GCLP) guidelines [98]. Building a comprehensive validation package from the outset avoids duplicating efforts and facilitates more efficient regulatory review across multiple jurisdictions.
Research Reagent Solutions and Essential Materials
The successful development and validation of mIHC assays requires careful selection of reagents and materials that meet quality standards appropriate for the intended regulatory pathway. The following table outlines key components of the mIHC research toolkit:
Table 4: Essential Research Reagent Solutions for mIHC Validation
| Reagent/Material | Function | Validation Considerations | Quality Standards |
|---|---|---|---|
| Primary Antibodies | Target antigen detection | Specificity, sensitivity, cross-reactivity, lot-to-lot consistency | Certificates of Analysis, ISO 13485 |
| Fluorophore Conjugates | Signal generation | Brightness, photo-stability, spectral separation, quenching resistance | Validation in multiplex panels |
| Tissue Sections | Analytical substrate | Fixation time, processing consistency, antigen preservation | CAP guidelines for tissue handling |
| Automation Platforms | Assay standardization | Reproducibility, precision, minimal manual intervention | 21 CFR Part 820 (if IVD) |
| Image Analysis Software | Data quantification | Algorithm validation, reproducibility, linearity, accuracy | ISO 14971 risk management |
For antibody selection specifically, when changing vendors for the same antibody clone, CAP guidelines recommend verifying assay performance with at least 2 known positive and 2 known negative cases, rather than conducting a full re-validation [102]. This streamlined verification process can significantly reduce the burden of reagent optimization while maintaining compliance with regulatory standards.
The analytical validation of multiplex immunohistochemistry techniques within the frameworks of CLIA, CLSI, and ISO standards requires a systematic approach that addresses both technical and regulatory considerations. As mIHC technologies continue to evolve, providing increasingly sophisticated insights into spatial biology, robust validation protocols become essential for translating these research tools into clinically applicable assays. By implementing the application notes and protocols outlined in this document, researchers and drug development professionals can build a solid foundation for generating reliable, reproducible data that meets regulatory requirements across multiple jurisdictions. The integration of proper validation strategies from assay conception through commercialization ensures that promising mIHC biomarkers can successfully navigate the path from research discoveries to clinically impactful diagnostic applications.
Within the rapidly advancing field of multiplex immunohistochemistry (mIHC), the rigorous validation of analytical performance is a critical prerequisite for generating robust, reproducible, and clinically meaningful data. mIHC technologies, which enable the simultaneous detection of multiple antigens on a single tissue section, are transforming our understanding of complex biological environments, such as the tumor microenvironment in immuno-oncology [5] [93] [1]. The move beyond single-marker analysis to highly multiplexed panels demands equally advanced validation frameworks to ensure data quality and reliability. This document outlines detailed protocols and application notes for establishing the key performance metrics—Analytical Sensitivity, Analytical Specificity, and Reproducibility—that underpin the credibility of any mIHC assay. Adherence to these guidelines, as championed by leading organizations like the Society for Immunotherapy of Cancer (SITC), is essential for the successful translation of mIHC from research into clinical diagnostics [5].
Core Performance Metrics: Definitions and Quantitative Assessment
The following metrics form the foundation of a robust mIHC assay validation. The quantitative targets summarized in the table below should be used as benchmarks during protocol development.
Table 1: Key Performance Metrics for mIHC Assay Validation
| Metric | Definition | Key Parameters | Target Benchmark |
|---|---|---|---|
| Analytical Sensitivity | The lowest amount of an analyte that can be accurately detected by an assay. | Limit of Detection (LOD) [5] [1], Limit of Blank (LOB), Antibody Titration, Signal-to-Noise Ratio | LOD established via titration; high signal-to-noise via TSA [1] |
| Analytical Specificity | The ability of an assay to detect only the intended target, without cross-reactivity or interference. | Cross-reactivity, Cross-talk, Ant Retrieval Optimization, Antibody Validation (KO tissue) [1] | No cross-reactivity; minimal spectral cross-talk; validation with controls [5] [1] |
| Reproducibility | The degree of agreement between results when the same assay is performed multiple times. | Intra-run, Inter-run, Inter-operator, Inter-instrument, Inter-site Precision [5] | CV < 10-15% for cell count data; high inter-site concordance [5] |
Analytical Sensitivity
Analytical sensitivity determines the detection threshold of your assay, which is crucial for identifying low-abundance targets.
- Antibody Titration and LOD Determination: For each antibody in the panel, perform a checkerboard titration against a range of antigen retrieval conditions. The LOD is defined as the lowest antibody concentration that yields a specific, reproducible signal significantly above the negative control (background) [5] [1]. Using tissues or cell lines with known, varying expression levels of the target is ideal for this process.
- Signal Amplification: For targets with low expression, employ signal amplification techniques such as Tyramide Signal Amplification (TSA). TSA can provide a 100-fold or greater increase in sensitivity by covalently depositing multiple fluorophore-labeled tyramide molecules at the antigen site [1].
- Image Analysis Verification: Sensitivity is not solely wet-lab based. Verify that your image analysis pipeline can reliably segment and identify cells stained at the LOD. This may involve adjusting cell segmentation and intensity thresholding parameters [5].
Analytical Specificity
Analytical specificity ensures that the signal generated originates exclusively from the intended target antigen.
- Antibody Validation: The cornerstone of specificity is using highly validated antibody clones. Whenever possible, validate antibodies using knockout (KO) tissue or cell lines as negative controls to confirm the absence of off-target binding [1].
- Minimizing Cross-reactivity: In multiplex panels, use primary antibodies from different host species to prevent cross-reactivity of secondary antibodies. If this is not feasible, sequential staining with intermediate antibody stripping steps, as in cyclic protocols, is necessary [36] [1].
- Spectral Unmixing and Cross-talk: For fluorescent mIHC, carefully select fluorophores with minimal spectral overlap. Use single-stained control slides to create a spectral library for your imaging system. This library is used for computational spectral unmixing, a process that mathematically separates the individual signal of each fluorophore from the composite image, thereby eliminating cross-talk [5].
Reproducibility
Reproducibility measures the precision of the entire mIHC workflow, from staining to quantitative analysis, across different runs, operators, and sites.
- Precision Studies: Design experiments to assess different types of precision:
- Intra-assay Precision: Stain the same sample multiple times in a single run.
- Inter-assay Precision: Stain the same sample across different days and by different operators.
- Inter-instrument Precision: Use the same protocol on different, but comparable, imaging and analysis platforms.
- Quantitative Outputs: Reproducibility should be measured using the final quantitative outputs of the assay, such as cell density (cells/mm²), percentage of positive cells, or spatial metrics (e.g., distances between cell types). Calculate the coefficient of variation (CV) for these metrics, with a typical target of <10-15% for cell count data [5].
- Multi-institutional Harmonization: For clinical translation, inter-site reproducibility is critical. The SITC task force recommends harmonization efforts where multiple laboratories analyze the same set of samples using a standardized protocol to align their results [5].
Experimental Protocols
Protocol 1: Determining Limit of Detection (LOD) for a Single Antibody
This protocol outlines the steps to establish the analytical sensitivity for an individual antibody.
- Materials:
- FFPE tissue sections with known, heterogeneous expression of the target.
- Primary antibody of interest.
- Compatible detection system (e.g., HRP-conjugated polymer and TSA-compatible fluorophore).
- Standard IHC reagents (buffer, blocking serum, etc.).
- Method:
- Cut serial sections from the same FFPE block.
- Perform antigen retrieval under standardized conditions.
- Titrate the primary antibody. Prepare a dilution series (e.g., 1:50, 1:100, 1:200, 1:500, 1:1000).
- Apply the detection system according to manufacturer instructions, keeping all other steps constant.
- Image slides using standardized acquisition settings (exposure time, gain).
- Using image analysis software, quantify the signal intensity and the number of positive cells for each dilution.
- Analysis:
- Plot the mean signal intensity (or positive cell count) against the antibody concentration.
- The LOD is the lowest concentration where the signal is both morphologically plausible and statistically significant above the signal from a no-primary antibody control (background).
Protocol 2: Validating Specificity in a Multiplex Panel via Cyclic mIHC
This protocol for a cyclic fluorescent mIHC approach incorporates steps to ensure specificity for each marker [36].
- Materials:
- FFPE tissue sections.
- Primary antibodies from different host species or validated for sequential staining.
- Fluorescently-conjugated secondary antibodies.
- Reagents for antibody stripping/denaturing (e.g., citrate buffer, microwave) [36].
- Reagents for fluorescence quenching (e.g., 3% H₂O₂ in alkaline buffer) [36].
- Mounting medium with DAPI.
- Method:
- Cycle 1: Deparaffinize and perform antigen retrieval. Apply first set of primary antibodies, followed by species-matched fluorescent secondary antibodies.
- Image Acquisition: Image the entire slide or predefined regions of interest (ROIs).
- Stripping and Quenching: Place the slide in citrate buffer and microwave to denature and remove antibodies [36]. Then, incubate with the fluorescence quenching solution to eliminate any residual fluorescent signal [36].
- Cycle 2: Apply the next set of primary antibodies, followed by their respective secondary antibodies. The fluorescent channels used must be the same as in Cycle 1.
- Image Acquisition: Re-image the exact same slide areas.
- Repeat steps 3-5 for all planned cycles (up to 8 or more).
- Image Alignment: Use software to align all images from different cycles based on the tissue morphology and DAPI signal.
- Specificity Controls:
- Single-plex Stains: Perform a complete single-plex stain for each antibody to build a spectral library and check for off-target binding.
- No-primary Controls: Include a control where the primary antibody is omitted in one cycle to confirm the absence of non-specific secondary antibody binding.
- KO Tissue Control: Stain a tissue section known to lack the target antigen (e.g., from a KO model) to confirm the specificity of the signal.
The Scientist's Toolkit: Research Reagent Solutions
A successful mIHC assay relies on a carefully selected set of reagents and tools.
Table 2: Essential Research Reagents and Materials for mIHC
| Item | Function/Description | Example Application |
|---|---|---|
| Validated Primary Antibodies | High-specificity, monoclonal antibodies are preferred for lot-to-lot consistency. Must be validated for IHC on FFPE tissue [1]. | Detecting target proteins (e.g., CD3, CD8, FoxP3, SOX10) in the tissue [106] [1]. |
| Tyramide Signal Amplification (TSA) Reagents | Enzyme-mediated system that covalently deposits fluorophores, greatly enhancing sensitivity for low-abundance targets [1]. | Cyclic mIHC protocols to enable high-plex staining with same-species antibodies [36] [1]. |
| Fluorescence Quenching Buffer | An oxidizing alkaline solution (e.g., H₂O₂ in NaHCO₃) used to eliminate residual fluorescence between staining cycles [36]. | Critical for reducing background in cyclic mIHC protocols like t-CyCIF [36]. |
| Spectral Library | A set of reference images from single-stained controls used to define the spectral signature of each fluorophore [5]. | Essential for computational spectral unmixing to eliminate cross-talk in multispectral imaging [5]. |
| Automated Image Analysis Software | Software capable of cell segmentation, phenotyping, and spatial analysis to generate quantitative data from mIHC images [5] [106]. | Quantifying immune cell densities and spatial relationships in the tumor microenvironment [5] [106]. |
Workflow and Data Analysis Diagrams
The following diagram outlines the key stages in a comprehensive mIHC assay validation, from initial setup to final performance verification.
Cyclic mIHC Staining and Analysis Pathway
This diagram details the iterative process of a cyclic mIHC protocol, which allows for high-plex staining through sequential rounds of labeling, imaging, and signal removal.
Specificity and Cross-talk Evaluation
This flowchart depicts the control experiments required to confidently establish the analytical specificity of a multiplex panel and minimize spectral cross-talk.
Quality Control and Quality Assurance for Image Analysis Pipelines
The advancement of multiplex immunohistochemistry (mIHC) and immunofluorescence (mIF) technologies has profoundly enhanced our ability to characterize the tumor microenvironment (TME) with single-cell resolution and spatial context [5]. These techniques enable the simultaneous detection of multiple biomarkers on a single tissue section, providing invaluable insights into complex immunophenotypes, immune cell subsets, and cellular spatial relationships that are crucial for immuno-oncology research and drug development [5]. However, the rich, high-dimensional data generated by these technologies necessitates sophisticated computational pipelines for image analysis, making robust quality control (QC) and quality assurance (QA) practices essential for generating reproducible and biologically meaningful results [5] [107]. The integrity of these analyses is particularly critical as the field moves toward clinical application, where biomarkers derived from mIHC/IF assays have demonstrated area under the curve (AUC) values on the order of 0.8 for predicting response to anti-PD-(L)1 therapies, performance that may warrant consideration for companion diagnostic development [5].
This application note outlines a comprehensive framework for implementing QC and QA throughout the image analysis workflow, from pre-analytical sample preparation to final data interpretation. By establishing standardized procedures and validation checkpoints, researchers can ensure the reliability, reproducibility, and translational potential of their multiplex image analysis data.
Foundational Principles of QA/QC in Image Analysis
Quality in image analysis extends beyond technical performance to encompass a comprehensive ecosystem spanning data integrity, harmonization across platforms, algorithmic robustness, and reproducibility of research outputs [108]. For mIHC/IF analysis, QA involves proactive, system-oriented processes that establish the overall framework for quality, while QC represents reactive, product-oriented techniques that verify specific outputs meet predefined standards [5]. A fundamental principle is that "quality" must be context-dependent—what qualifies as high-quality for biomarker discovery may differ from requirements for clinical triage, but all applications benefit from clear definitions and reproducible standards [108].
Effective QA/QC strategies must address several interconnected domains: analytical validity (ensuring the pipeline accurately measures what it intends to measure), technical robustness (maintaining performance across variations in input samples and processing conditions), and biological relevance (verifying that outputs meaningfully reflect biological phenomena) [5] [107]. This multi-dimensional approach is particularly crucial for spatial biology applications, where the quantitative distribution of cell populations and their spatial relationships can have direct translational implications [107].
Pre-Analytical QC Considerations
Sample Preparation and Staining Validation
Prior to image analysis, rigorous validation of multiplex staining protocols is essential. The Society for Immunotherapy of Cancer recommends concerted optimization efforts to establish performance characteristics including specificity, sensitivity, and reproducibility for each marker within the multiplex panel [5]. Key considerations include:
- Antibody Validation: Verify specificity of each primary antibody using appropriate controls (e.g., knockout tissues, isotype controls).
- Multiplex Panel Optimization: Establish staining order and conditions that minimize cross-reactivity and epitope damage during sequential staining cycles.
- Signal-to-Noise Optimization: Determine optimal antibody concentrations and amplification conditions that maximize specific signal while minimizing background.
- Batch-to-Batch Consistency: Implement procedures to monitor and control variation between different staining batches.
Image Acquisition QC
The foundation of reliable image analysis begins with standardized image acquisition. Variations in scanning parameters can introduce significant technical artifacts that confound biological interpretation [5].
Table 1: Quality Control Parameters for Image Acquisition
| Parameter | Quality Standard | Verification Method |
|---|---|---|
| Focus Quality | Sharp focus throughout entire tissue region | Automated focus metrics, visual inspection |
| Illumination Uniformity | <5% variance across field of view | Flat-field correction, background intensity measurement |
| Color Calibration | Consistent across all scans | Reference standards, color calibration slides |
| Spatial Resolution | Appropriate for analysis question (typically 20x for cellular analysis) | Resolution target verification |
| Signal Saturation | <2% saturated pixels in any channel | Histogram analysis of pixel intensities |
| Tile Stitching | Seamless integration without artifacts | Visual inspection of tile boundaries |
For whole-slide imaging, consistent focus and illumination across the entire sample are critical. When analyzing specific regions of interest (ROIs), the selection strategy must be documented and justified, as ROI selection can introduce bias [5]. Studies have generally sampled a minimum of five high-power fields (HPFs), though extended sampling may be necessary for rare or heterogeneous markers [5]. Whole-slide imaging reduces selection bias and is becoming increasingly feasible with computational advances [5].
Image Processing and Analysis QC
Color Deconvolution and Spectral Unmixing
For both mIHC and mIF, accurate separation of signals from different markers is essential for downstream analysis. Color deconvolution (for brightfield mIHC) and spectral unmixing (for fluorescence mIF) transform complex multichannel images into distinct channels representing individual markers [5].
Table 2: QC Metrics for Signal Separation Processes
| Process | Potential Artifact | QC Check | Acceptance Criteria |
|---|---|---|---|
| Color Deconvolution | Cross-channel bleed-through | Single-stain control analysis | <5% cross-channel signal contamination |
| Spectral Unmixing | Incomplete separation | Reference spectrum validation | >95% purity in separated channels |
| Background Subtraction | Over-/under-subtraction | Negative control assessment | Signal in negative controls <2% of positive signal |
Validation should include analysis of single-stain control slides to verify minimal cross-talk between channels and appropriate extraction of each marker's signal [5].
Tissue and Cell Segmentation
Accurate identification of cells and tissue regions is fundamental to quantitative analysis. Nuclear segmentation serves as the foundation for most mIHC/IF analyses, with subsequent classification of cellular phenotypes based on marker expression patterns [107].
Segmentation QC Protocols:
- Visual Inspection: Manually review segmentation results across multiple representative regions, including areas of varying cell density and tissue integrity.
- Quantitative Metrics: Calculate segmentation accuracy using metrics such as:
- Dice coefficient comparing automated to manual segmentation
- Cell detection rate in high-density versus low-density regions
- Segmentation consistency across different tissue types
- Sensitivity Analysis: Evaluate how segmentation parameters affect downstream analysis results by testing a range of values for critical parameters [107].
Advanced segmentation tools like StarDist, which is based on deep learning, have demonstrated robust performance for nuclear segmentation in complex tissue environments [107]. The integration of such tools into open-source platforms like QuPath enables reproducible segmentation workflows [107].
Cell Phenotyping and Classification
Once cells are segmented, they must be classified into specific phenotypes based on marker expression patterns. This process requires establishing appropriate threshold values for determining positive versus negative expression.
Threshold Setting Methodologies:
- Percentile-Based Propagation: To address staining intensity variations across slides, implement a statistical strategy that translates classification thresholds by propagating a chosen reference percentile across the distribution of marker-related cell measurements in each image [107]. This approach improves consistency across heterogeneous datasets.
- Machine Learning Classification: Train supervised classifiers using representative annotated cells, followed by cross-validation to assess classification accuracy [107].
- Sensitivity Analysis: Systematically evaluate how classification thresholds affect the resulting cell counts and spatial patterns to ensure robustness [107].
Table 3: Cell Classification Validation Approaches
| Validation Method | Implementation | Interpretation |
|---|---|---|
| Manual Verification | Expert review of 100-500 randomly selected cells per phenotype | >90% agreement between automated and manual classification |
| Cross-Validation | Train/test split or k-fold cross-validation | <5% variation in phenotype frequencies between splits |
| Marker Co-expression Logic | Verify mutually exclusive patterns where biologically appropriate | Consistent with known biological patterns |
| Batch Effect Monitoring | Compare classification results across processing batches | Non-significant batch effects (p>0.05) |
Experimental Protocol: Spatial Analysis in Stroma-Rich Tumors
The following protocol describes a robust, open-source pipeline for quantifying the spatial distribution of cell markers relative to stromal borders in tumor tissues, adapted from published methodologies [107]. This workflow integrates nuclei segmentation, machine learning-based cell classification, stromal region modeling, and spatial distance measurements.
Step-by-Step Protocol
Image Acquisition and Preprocessing
- Tissue Staining: Perform multiplex immunofluorescence staining with markers of interest (e.g., pan-cytokeratin, fibronectin, pNDRG1 or Ki67) plus DAPI for nuclear counterstaining [107].
- Whole-Slide Scanning: Acquire images using a slide scanner equipped with appropriate filters for each fluorophore. Recommended parameters:
- Resolution: 0.3215 µm/pixel (20x objective)
- Image dimensions: ~30,000 × 30,000 pixels
- File format: Native format with metadata preservation
- Quality Assessment:
- Verify focus quality across entire slide
- Check for saturation in any channel (<2% saturated pixels)
- Confirm registration accuracy between channels
Nuclear Segmentation with StarDist
Implementation:
- Execute StarDist nuclei segmentation in QuPath using the
StarDist2Dextension [107] - Use appropriate pre-trained model (e.g.,
dsb2018_heavy_augment.pb) for fluorescence images - Adjust probability threshold (default: 0.5) and overlap threshold (default: 0.3) based on visual inspection
- Execute StarDist nuclei segmentation in QuPath using the
QC Measures:
- Randomly select 5-10 regions and manually verify segmentation accuracy for ≥100 cells
- Calculate Dice coefficient comparing automated to manual segmentation in representative regions
- Check for consistent performance across tissue regions with different cellular densities
Cell Classification Using Multiplexed Marker Expression
Intensity Measurement:
- For each segmented nucleus, measure mean and max intensity for each marker in the corresponding cytoplasmic and/or membrane compartments
- Record measurements for all cells across all images
Threshold Setting via Percentile Propagation:
- Select a reference image with representative staining
- Manually identify clearly positive and negative cells for each marker
- Establish intensity threshold corresponding to a specific percentile (e.g., 90th percentile of negative population) in the reference image
- Propagate this percentile across all images in the dataset rather than using a fixed intensity value [107]
Phenotype Assignment:
- Apply classification logic based on combination of markers
- Example classification scheme:
- Cancer cells: Pan-cytokeratin+
- pNDRG1+ cancer cells: Pan-cytokeratin+ and pNDRG1+
- Ki67+ cancer cells: Pan-cytokeratin+ and Ki67+
Stromal Region Modeling
Fibronectin Channel Processing:
- Apply Gaussian filter to fibronectin channel to reduce noise (sigma: 2-5 μm, empirically determined) [107]
- Implement threshold-based pixel classifier to identify stromal regions
- Convert binary classification to annotation objects representing stromal compartments
Stromal Border Definition:
- Create stromal border by generating a contour line at the interface between stromal and non-stromal regions
- Apply smoothing to eliminate jagged edges from pixel-level classification
Spatial Distance Quantification
Distance Measurement:
- For each cell, calculate the minimum distance to the stromal border
- Export distance measurements for all cells along with their phenotypic classifications
Spatial Distribution Analysis:
- Bin cells based on distance from stromal border (e.g., 0-50μm, 50-100μm, etc.)
- Calculate the proportion of positive cells (e.g., pNDRG1+ or Ki67+) in each distance bin
- Perform statistical tests to identify significant spatial patterns
QC Checkpoints and Acceptance Criteria
Segmentation QC:
- Dice coefficient >0.8 compared to manual segmentation
- Consistent cell detection across tissue regions (<10% variation in cell density estimates)
Classification QC:
- >90% agreement with manual classification for each phenotype
- <5% variation in phenotype frequencies when re-running analysis with slightly adjusted thresholds
Spatial QC:
- Valid distance measurements for >95% of cells
- Consistent spatial patterns across biological replicates
The Scientist's Toolkit: Essential Research Reagents and Computational Tools
Table 4: Research Reagent Solutions for mIHC/IF Image Analysis
| Category | Specific Tools/Reagents | Function | Application Notes |
|---|---|---|---|
| Open-Source Analysis Platforms | QuPath, CellProfiler, Fiji, Napari | Image analysis, segmentation, and quantification | QuPath excels in whole-slide image analysis with extensibility via Groovy scripting and Java [107] |
| Segmentation Tools | StarDist, CellPose | Deep learning-based nuclei/cell segmentation | StarDist provides robust nuclear segmentation in complex tissues [107] |
| Spectral Unmixing Libraries | scikit-image, OpenCV | Separation of overlapping signals in multiplex images | Essential for accurate marker quantification in highly multiplexed panels |
| Spatial Analysis Packages | Squidpy, Giotto, SPASCA | Spatial pattern analysis and neighborhood quantification | Enable advanced spatial statistics beyond simple distance measurements |
| Quality Control Tools | Napari with QC plugins, Acapella | Visualization and monitoring of analysis quality | Critical for identifying processing failures and batch effects |
| Data Management Systems | OME-NGFF, customized databases | Storage and organization of large image datasets | Ensure FAIR (Findable, Accessible, Interoperable, Reusable) data principles |
Data Management and Reporting Standards
Comprehensive documentation and data sharing are essential components of QA for image analysis pipelines. The Society for Immunotherapy of Cancer recommends sharing raw outputs, processed results, key analysis programs and source code, and representative photomicrographs from mIHC/IF assays [5].
Minimum Reporting Standards
When publishing results derived from mIHC/IF image analysis, include the following methodological details:
Image Acquisition:
- Scanner model and objective magnification
- Resolution (μm/pixel) and bit depth
- Number of fields/ROIs analyzed per specimen and ROI selection criteria
Image Processing:
- Software tools and versions used
- Segmentation algorithm and parameters
- Threshold determination method for cell classification
Quality Control:
- QC metrics and acceptance criteria used
- Results of validation studies (e.g., segmentation accuracy, classification concordance)
- Approach to handling batch effects
Data Analysis:
- Statistical methods for spatial analysis
- Normalization approaches
- Methods for addressing multiple comparisons
Multi-Institutional Harmonization
For studies involving multiple sites or datasets, implement harmonization strategies to minimize technical variation:
Prospective Harmonization:
- Standardize staining protocols across sites
- Use reference standards for scanner calibration
- Implement centralized QC review
Retrospective Harmonization:
- Apply statistical corrections for batch effects
- Use phantom samples to characterize inter-site variability
- Implement traveling-heads studies to benchmark harmonization success [108]
Robust quality control and quality assurance practices are fundamental to generating reliable, reproducible results from multiplex immunohistochemistry image analysis pipelines. By implementing the systematic approaches outlined in this application note—including standardized pre-analytical procedures, rigorous validation of image processing steps, comprehensive documentation, and multi-institutional harmonization strategies—researchers can enhance the translational potential of their spatial biology research. As the field advances toward clinical application, these QA/QC frameworks will play an increasingly critical role in ensuring that analytical results accurately reflect underlying biology and support confident decision-making in drug development.
The integration of multiplex immunohistochemistry (mIHC) into companion diagnostic (CDx) development represents a significant advancement in precision medicine, enabling simultaneous visualization of multiple biomarkers within the tumor immune microenvironment (TIME) [30] [13]. These sophisticated techniques provide crucial spatial information on immune cell distribution, functional states, and cellular interactions that predict therapeutic response [55]. However, the regulatory pathway for bringing these complex assays to market requires careful navigation of both U.S. Food and Drug Administration (FDA) and European Union In Vitro Diagnostic Regulation (IVDR) requirements. This application note provides a structured framework for developing regulatory strategies for mIHC-based CDx, addressing technical validation, clinical evidence generation, and regulatory submission processes essential for successful approval.
FDA Premarket Approval (PMA) for Companion Diagnostics
The FDA defines a companion diagnostic as a medical device that provides information essential for the safe and effective use of a corresponding therapeutic product [109]. For Class III medical devices, which include most companion diagnostics, the Premarket Approval (PMA) pathway is required [110]. This process demands scientific evidence to demonstrate the device's safety and effectiveness for its intended use.
The FDA encourages early collaboration between therapeutic and diagnostic sponsors, as outlined in the 2014 guidance "In Vitro Companion Diagnostic Devices" and the 2016 draft guidance "Principles for Codevelopment of an In Vitro Companion Diagnostic Device with a Therapeutic Product" [109] [111]. This co-development approach ensures that the diagnostic and therapeutic products are developed in parallel, with the goal of simultaneous approval.
European Union In Vitro Diagnostic Regulation (IVDR)
The European Union's new regulatory framework for in vitro diagnostics, Regulation (EU) 2017/746 (IVDR), became fully applicable in May 2022 [112]. This regulation introduces stricter requirements for clinical evidence, performance evaluation, and post-market surveillance compared to the previous Directive. The transition periods have been extended, with deadlines of December 2029 for lower-risk IVDs and 2027-2028 for medium- and high-risk devices [113].
However, industry reports indicate that IVDR implementation faces challenges, including limited Notified Body capacity and significant bureaucratic burden, which have led to reduced IVD innovation in Europe [113]. A 2025 survey found that 53% of manufacturers reported reductions in R&D activities due to the new regulations, while 60% are launching innovative IVDs in the US or Asia instead [113].
Strategic Approach to CDx Development
Integrated Evidence Generation
Successful CDx development requires an integrated evidence architecture that aligns diagnostic and therapeutic development from initial protocol through commercialization [114]. This approach includes:
- Biomarker Context Definition: Clearly define the biomarker context of use and the specific clinical question the test must answer [114]
- Analytical Validation Plan: Establish comprehensive testing for sensitivity, specificity, limit of detection, linearity, precision, and reproducibility [114]
- Clinical Validation Strategy: Anchor clinical validation to patient outcomes and treatment decision impact, not just biomarker correlation [114]
- Specimen Lifecycle Control: Standardize preanalytical variables including collection methods, transport, storage, and stability [114]
Codevelopment Principles
The FDA recommends codevelopment principles for companion diagnostics and their corresponding therapeutic products [111]. This involves parallel development of both products with coordinated timelines and evidence generation. Key considerations include:
- Joint Development Planning: Align protocols, endpoints, and sample handling procedures early in development [111]
- Cross-Functional Collaboration: Engage both drug and device reviewers through presubmission meetings and integrated regulatory interactions [114]
- Risk Management: Maintain a single risk management file that addresses both therapy and test hazards, with clear mitigation strategies [114]
Table 1: Key Regulatory Guidance Documents for Companion Diagnostic Development
| Document Title | Issuing Authority | Year | Key Focus Areas |
|---|---|---|---|
| In Vitro Companion Diagnostic Devices [109] | FDA | 2014 | Identifying need for CDx early in drug development process |
| Principles for Codevelopment of an In Vitro Companion Diagnostic Device with a Therapeutic Product (Draft) [111] | FDA | 2016 | Practical guide for codevelopment processes |
| Developing and Labeling In Vitro Companion Diagnostic Devices for a Specific Group or Class of Oncology Therapeutic Products [109] | FDA | 2020 | Class labeling for oncology CDx |
| Regulation (EU) 2017/746 on in vitro diagnostic medical devices [112] | European Commission | 2017 | Comprehensive IVD regulatory framework for EU market |
Multiplex IHC Experimental Protocol for CDx Development
Sample Preparation and Staining Workflow
The following protocol details a sequential multiplex staining method that enables visualization of five biomarkers within a single tissue section, adapted from validated research methods [30]:
Materials and Reagents:
- Formalin-fixed, paraffin-embedded (FFPE) tissue sections (4µm)
- Positively charged microscope slides
- Tissue adhesion promoter (e.g., Tissue Glue)
- Antigen retrieval solution (Tris-EDTA, pH 9.0)
- Primary antibodies (validated for multiplex IHC)
- Chromogen detection system (HRP-based with distinct chromogens)
- Hematoxylin counterstain
Procedure:
- Sectioning and Deparaffinization
- Cut FFPE tissue blocks at 4µm thickness and mount on charged slides
- Deparaffinize through graded xylene and alcohol series
- Rehydrate in deionized water
Antigen Retrieval
- Submerge slides in Tris-EDTA buffer (pH 9.0)
- Heat in pressure cooker at 15 psi for 15 minutes
- Cool slides to room temperature
Sequential Multiplex Immunostaining
- Apply primary antibody for first target (e.g., CD20 for B-cells)
- Incubate with HRP-conjugated secondary antibody
- Develop with first chromogen (e.g., HRP-Green)
- Apply antibody elution step to remove primary-secondary complex
- Repeat process for subsequent targets (CD3, CD163, Cytokeratin, Ki67)
- Counterstain with hematoxylin
Microscopic Evaluation
- Evaluate stained slides under brightfield microscopy at 100× and 400× magnification
- Grade specific and background staining on a scale of 0-3 (0=no staining, 3=intense staining) [30]
- For Ki67, estimate percentage of stained tumor cells, rounded to nearest quartile
Research Reagent Solutions for mIHC
Table 2: Essential Research Reagents for Multiplex IHC Development
| Reagent Category | Specific Examples | Function | Validation Parameters |
|---|---|---|---|
| Primary Antibodies | CD20, CD3, CD163, Cytokeratin (AE1/AE3), Ki67 [30] | Cell type identification | Target specificity, optimal dilution, cross-reactivity |
| Detection System | HRP-conjugated secondaries with distinct chromogens [30] | Signal amplification and visualization | Sensitivity, signal-to-noise ratio, non-overlapping spectra |
| Antigen Retrieval | Tris-EDTA, pH 9.0 [30] | Epitope unmasking | Buffer pH, heating time, temperature optimization |
| Tissue Preservation | Formalin-fixed, paraffin-embedded (FFPE) blocks [30] | Tissue architecture maintenance | Fixation time, processing conditions, storage duration |
Analytical Validation Requirements
Performance Characteristics
For regulatory approval, mIHC-based CDx must demonstrate robust performance across multiple parameters. The validation should include:
- Analytical Sensitivity: Limit of detection for each biomarker in the panel
- Analytical Specificity: Including cross-reactivity with similar epitopes
- Precision: Repeatability and reproducibility across operators, instruments, and days
- Linearity: Dynamic range of detection for quantitative biomarkers
- Robustness: Performance under varying preanalytical conditions [114]
Sample Requirements
Validation studies must account for tissue heterogeneity and include appropriate sample types:
- Sample Size: Statistically justified number of specimens
- Tissue Types: Representation of intended use populations and conditions
- Controls: Appropriate positive, negative, and process controls
- Preanalytical Variables: Delineation of acceptable specimen collection, transport, storage, and fixation conditions [114]
Table 3: Comparative Regulatory Requirements for FDA PMA and EU IVDR
| Requirement Category | FDA PMA Pathway | EU IVDR |
|---|---|---|
| Clinical Evidence | Scientific evidence demonstrating safety and effectiveness [110] | Clinical performance studies with scientific validity [112] |
| Technical Documentation | Non-clinical and clinical data sections [110] | Technical documentation per Annexes II and III of IVDR [112] |
| Quality Management | Quality System Regulation (21 CFR Part 820) | Quality Management System per Article 10(8) of IVDR |
| Post-Market Surveillance | PMA Annual Reports [110] | Post-Market Performance Follow-up (PMPF) plan [112] |
| Review Timeline | 180-day review clock (with possible extensions) [110] | Varies based on device class and Notified Body workload [113] |
Regulatory Strategy and Global Considerations
FDA Submission Pathways
For companion diagnostics, the FDA offers several regulatory pathways:
- Therapeutic-Led Submission: Through NDA or BLA with cross-reference to diagnostic file
- Device-Led Submission: Through PMA, De Novo, or 510(k) when the diagnostic controls therapeutic use [114]
- Joint Review: Collaborative assessment by relevant FDA centers (CDER, CBER, CDRH) [109]
The Office of Combination Products assigns primary jurisdiction but sponsors must satisfy requirements for both therapeutic and diagnostic components [114].
International Harmonization
Global CDx commercialization requires strategic planning for regional requirements:
- United States: FDA sets initial pace with emphasis on integrated evidence [114]
- European Union: Drugs follow centralized review while diagnostics must meet IVDR requirements [112] [114]
- Japan and China: PMDA and NMPA maintain co-approval expectations and frequently require local data [114]
Successful global programs implement a unified evidence strategy with modular technical documentation that can be adapted for regional requirements [114].
Navigating the regulatory landscape for mIHC-based companion diagnostics requires a comprehensive strategy that integrates advanced technical capabilities with rigorous regulatory planning. The successful development and approval of these complex assays depends on early engagement with regulatory agencies, robust analytical validation, and strategic evidence generation that addresses both FDA and IVDR requirements. As multiplex imaging technologies continue to evolve, maintaining a focus on clinical utility and patient outcomes will ensure that these sophisticated tools can effectively guide precision immunotherapy treatments. By implementing the frameworks and protocols outlined in this application note, researchers and drug development professionals can accelerate the translation of mIHC biomarkers into clinically valuable companion diagnostics that improve patient care.
US vs. EU Regulatory Requirements for IHC Assay Commercialization
The commercialization of immunohistochemistry (IHC) assays, particularly advanced multiplex formats, requires navigating distinct regulatory landscapes in the United States (US) and European Union (EU). For researchers and drug development professionals, understanding these differences is crucial for successful global market entry. Multiplex IHC/immunofluorescence (mIHC/IF) technologies enable the simultaneous detection of multiple biomarkers on a single tissue section, providing critical insights into complex immunophenotypes and spatial relationships within the tumor microenvironment [5]. These advanced assays require robust validation and compliance with evolving regulatory frameworks that differ substantially between regions. This document outlines the key regulatory requirements, validation protocols, and strategic considerations for commercializing IHC assays in both markets.
Comparative Analysis of US and EU Regulatory Frameworks
The regulatory pathways for IHC assays differ fundamentally between the US and EU, with variations in classification systems, approval processes, and oversight bodies.
Table 1: Key Regulatory Body Comparison
| Regulatory Aspect | United States | European Union |
|---|---|---|
| Primary Authority | Food and Drug Administration (FDA) [98] | Notified Bodies [98] |
| Governing Regulations | Clinical Laboratory Improvement Amendments (CLIA), FDA Device Regulations [98] | In Vitro Diagnostic Regulation (IVDR) [98] |
| Companion Diagnostic Classification | Class II or III devices [98] | Uniformly Class C devices [98] |
| Quality System Standard | 21 CFR Part 820 (transitioning to incorporate ISO 13485) [98] | ISO 13485 [98] |
| Risk Classification Basis | Intended use, patient risk [98] | Medical purpose, risk-based [98] |
Table 2: Premarket Review Requirements Timeline (2025 onward)
| Requirement | United States | European Union |
|---|---|---|
| High-Risk Devices | Premarket review required by November 6, 2027 for LDTs [115] | Notified Body application for Class D by May 26, 2025 [116] |
| Moderate/Low-Risk Devices | Premarket review required by May 6, 2028 for LDTs [115] | Class C: May 26, 2026; Class B/A sterile: May 26, 2027 [116] |
| Quality Management System | Phased compliance with QS requirements [115] | IVDR-compliant QMS required by May 26, 2025 [116] |
The US FDA employs a risk-based approach where assays used for patient management decisions typically require premarket approval [98]. The recent FDA final rule on Laboratory Developed Tests (LDTs) outlines a phased approach to enforcement discretion withdrawal, with specific timelines based on device risk classification [115]. Notably, "1976-Type LDTs" utilizing manual techniques without automation may remain under enforcement discretion [115].
The EU's IVDR establishes a four-tier risk classification system (A-D) with Class C for companion diagnostics [98]. Under extended transitional periods, legacy IVDs must have IVDR-compliant Quality Management Systems by May 2025 and adhere to staggered deadlines for notified body applications based on risk class [116].
Figure 1: US vs EU Regulatory Pathway Comparison for IHC Assays. The US pathway involves FDA review with timelines of 12-24 months, while the EU pathway utilizes Notified Bodies with timelines of 12-18 months [98].
Analytical Validation Requirements and Protocols
Robust analytical validation is fundamental for IHC assay commercialization, with requirements guided by CLSI standards in the US and IVDR requirements in the EU [98]. The College of American Pathologists (CAP) recently updated their guidelines in February 2024, harmonizing validation requirements for predictive markers to 90% concordance [86].
Multiplex IHC Validation Protocol
For multiplex IHC/IF assays, validation requires additional steps to ensure each marker performs reliably within the multiplex environment. The Society for Immunotherapy of Cancer (SITC) has established best practice guidelines for mIHC/IF staining and validation [5].
Experimental Protocol: Analytical Validation for mIHC/IF Assays
Assay Design and Optimization
- Primary Antibody Validation: Verify specificity of each primary antibody individually using appropriate controls (knockout tissues, isotype controls) [5].
- Multiplex Panel Configuration: Determine optimal marker sequence and antibody combinations to minimize steric hindrance and cross-reactivity [5].
- Staining Protocol Optimization: Establish optimal antigen retrieval conditions, antibody concentrations, incubation times, and detection system parameters for each marker in the multiplex context [5].
Precision and Reproducibility Testing
- Intra-run Precision: Analyze ≥3 samples with low, medium, and high expression levels in replicates of ≥3 within the same run [86].
- Inter-run Precision: Analyze the same samples across ≥3 separate runs by different operators on different days [86].
- Inter-site Reproducibility (for IVD kits): Validate across multiple sites using standardized protocols and scoring criteria [98].
Accuracy and Concordance Validation
- Comparator Method: Compare results with a validated method (e.g., flow cytometry, another IHC assay) or expected expression patterns [86].
- Clinical Concordance: Achieve ≥90% positive and negative agreement with the comparator method using ≥60 cases [86].
- Limit of Detection: Establish the lowest antigen concentration that can be reliably detected using cell line dilutions or tissues with known expression levels [86].
Multiplex-Specific Validation
- Spectral Unmixing Validation (for mIF): Verify the accuracy of fluorescence separation algorithms using single-stained controls [5].
- Cross-reactivity Assessment: Confirm absence of signal interference between markers in the multiplex panel [5].
- Batch-to-Batch Consistency: Validate consistency across different reagent lots using standardized controls [5].
Figure 2: Multiplex IHC Analytical Validation Workflow. The validation process progresses from initial design through precision and accuracy testing to multiplex-specific validation and image analysis verification [5] [86].
Image Analysis and Data Management for Multiplex IHC
For mIHC/IF assays, the image analysis pipeline requires separate validation to ensure accurate and reproducible results. The SITC task force emphasizes that "the digital image processing pipeline for mIHC/IF assays must also be validated and optimized, with quality assurance and quality controls applied to all steps from image acquisition and processing through final data output" [5].
Table 3: Essential Image Analysis Validation Parameters
| Validation Parameter | Requirement | Purpose |
|---|---|---|
| Color Deconvolution/Spectral Unmixing | Validate separation accuracy using single-stained controls [5] | Ensure accurate marker-specific signal separation |
| Tissue Segmentation | Verify accurate identification of tissue regions and compartments [5] | Enable compartment-specific analysis (tumor vs stroma) |
| Cell Segmentation | Validate cell boundary detection accuracy [5] | Ensure precise cell-based quantification |
| Phenotyping Algorithms | Confirm correct cell classification based on marker expression [5] | Enable accurate immune cell quantification |
| Batch Effect Correction | Implement and validate normalization methods [5] | Minimize technical variation between runs |
Experimental Protocol: Image Analysis Validation
Image Acquisition Standardization
Signal Separation Validation
Cell Segmentation and Phenotyping Accuracy
Algorithm Verification and Reproducibility
The Scientist's Toolkit: Essential Research Reagent Solutions
Table 4: Essential Research Reagents for Multiplex IHC Development
| Reagent Category | Specific Examples | Function | Validation Requirements |
|---|---|---|---|
| Primary Antibodies | Rabbit monoclonal, mouse monoclonal | Target antigen recognition | Specificity, sensitivity, optimal dilution [59] |
| Detection Systems | Polymer-based systems, tyramide signal amplification (TSA) | Signal amplification and detection | Linearity, dynamic range, minimal background [5] |
| Fluorophores | Alexa Fluor series, Cy dyes | Multiplex detection | Spectral separation, photostability [5] |
| Chromogens | DAB, Vector Red, Vector Blue | Chromogenic detection | Contrast, precipitation characteristics [59] |
| Antigen Retrieval Reagents | Citrate buffer, EDTA, Tris-EDTA | Epitope unmasking | Retrieval efficiency, tissue preservation [59] |
| Blocking Reagents | Normal serum, protein blocks, Fab fragments | Reduce non-specific binding | Background reduction without target masking [59] |
| Fixatives | Neutral buffered formalin, PFA, ethanol | Tissue preservation | Morphology preservation, antigen retention [59] |
| Counterstains | Hematoxylin, DAPI | Nuclear visualization | Contrast optimization, multiplex compatibility [5] |
Strategic Implementation for Global Commercialization
Successfully commercializing IHC assays in both US and EU markets requires parallel planning and strategic resource allocation.
Table 5: Strategic Considerations for US and EU Markets
| Strategic Element | United States Approach | European Union Approach |
|---|---|---|
| Regulatory Strategy | Engage FDA via pre-submission meetings; consider LDT phaseout timeline [98] [115] | Select Notified Body early; prepare for IVDR Class C requirements [98] |
| Clinical Validation | Focus on clinical trial context and intended use statement [98] | Align with EMA consultation process for companion diagnostics [98] |
| Quality Management | Implement 21 CFR Part 820 with transition to integrated ISO 13485 [98] | Establish ISO 13485 system with IVDR-specific requirements [98] |
| Post-Market Changes | Submit premarket submission for significant modifications [115] | Follow Team NB guidance for change notification to Notified Body [117] |
Figure 3: Parallel Regulatory Strategy for Global IHC Commercialization. Successful global market entry requires developing parallel regulatory strategies that address both FDA and IVDR requirements simultaneously [98].
The successful commercialization of IHC assays in both US and EU markets demands a comprehensive understanding of distinct regulatory frameworks and meticulous validation approaches. For multiplex IHC technologies, particularly those intended for companion diagnostic use, researchers must implement robust analytical validation following CAP guidelines and SITC best practices [5] [86]. Strategic planning should account for the FDA's phased LDT oversight implementation and the EU's IVDR transitional periods, with particular attention to quality system requirements and premarket review timelines [98] [115] [116]. By adopting parallel validation strategies and maintaining rigorous documentation practices, researchers can navigate these complex regulatory landscapes efficiently, accelerating global access to advanced multiplex IHC technologies for precision medicine applications.
Multi-Institutional Harmonization Efforts for Standardized mIHC Outputs
Multiplex immunohistochemistry (mIHC) and immunofluorescence (mIF) have emerged as transformative technologies for comprehensive spatial analysis of the tumor immune microenvironment (TIME), enabling simultaneous detection of multiple protein markers on a single tissue section [5] [1]. As these technologies mature from research tools toward clinical applications, the lack of standardization in image analysis and data management has emerged as a critical barrier to reproducibility and cross-study comparison [5] [40]. The Society for Immunotherapy of Cancer (SITC) has recognized this challenge, convening a task force of pathologists, academic laboratory leaders, and industry experts to establish best practice guidelines for quantitative image analysis of mIHC/IF output and data management considerations [5] [118]. This application note synthesizes these multi-institutional harmonization efforts, providing researchers, scientists, and drug development professionals with standardized protocols and analytical frameworks to ensure robust, comparable data generation across laboratories.
The Imperative for Standardization in mIHC
The analytical pipeline for mIHC/IF extends from tissue preparation through image analysis to data interpretation, with variability at any stage compromising result reliability. Traditional biomarkers like PD-L1 expression and tumor mutational burden have proven insufficient to fully capture TIME complexity, driving adoption of multiplexed approaches that can characterize spatial relationships with predictive value for immunotherapy response [40]. Spatial immune signatures derived from mIHC, such as CD8+ T-cell density and proximity to tumor cells, have demonstrated area under the curve (AUC) values of approximately 0.8 for predicting response to anti-PD-(L)1 therapies, outperforming conventional modalities [5]. However, comparative analysis across institutions remains challenging due to differences in platform selection, analytical approaches, and data reporting practices [5] [40].
The SITC task force emphasizes that harmonization efforts must address both technical variability (staining, image acquisition) and analytical variability (segmentation, phenotyping algorithms) [5]. As mIHC technologies advance toward clinical implementation, standardized workflows become essential for regulatory approval and clinical adoption of mIHC-derived biomarkers [98].
Table 1: Comparison of Multiplex Imaging Platforms
| Technology | Resolution | Multiplex Capability | Key Advantages | Limitations |
|---|---|---|---|---|
| Imaging Mass Cytometry (IMC) | ~1 µm | Up to ~40 markers | High-dimensional data, minimal spectral overlap | Specialized instrumentation, costly reagents |
| Multiplexed Ion Beam Imaging (MIBI) | ~0.4 µm | Up to ~40 markers | Subcellular resolution, minimal spectral overlap | Complex data processing, specialized equipment |
| Cyclic Immunofluorescence (CycIF) | ~0.5-1 µm | 30-50 markers | Broad accessibility, standard workflow integration | Potential tissue degradation over multiple cycles |
| CODEX | ~0.5-1 µm | 40-60 markers | Maintains tissue integrity, high multiplexing capacity | Complex optimization, extensive image processing |
| Digital Spatial Profiling (DSP) | Region-specific | Dozens of markers | Targeted profiling, biomarker validation | Lacks single-cell resolution, requires ROI selection |
| Multiplex IHC (mIHC) | Light microscopy | 3-5 markers | Clinical accessibility, familiar workflow | Limited multiplexing capacity, needs standardization |
Standardized Image Analysis Workflows
Image Acquisition and Region of Interest Selection
The initial step in digital pathology analysis involves acquiring high-quality images of stained tissue sections. The SITC task force recommends that acquisition protocols explicitly define microscope objectives, exposure times for each filter set, and whether whole-slide imaging or region of interest (ROI) sampling will be employed [5]. For ROI selection, which significantly influences analytical outcomes, studies should sample a minimum of five high-power fields (HPFs), typically ranging from 0.33-0.64 mm² each [5]. The methodology for ROI selection must be clearly documented, including whether regions were selected based on morphological features, immune cell densities ("hotspots" and "coldspots"), or specific anatomical compartments (e.g., tumor core versus invasive margin) [5].
Whole-slide imaging, while computationally intensive, reduces sampling bias and is particularly valuable when analyzing heterogeneous markers or tissues [5]. Advances in automated ROI detection have demonstrated improved signal-to-noise ratio for certain mIF assays, enhancing their predictive value [5].
Image Preprocessing and Spectral Unmixing
For both mIHC and mIF, color deconvolution and spectral unmixing are essential preprocessing steps that enable accurate assignment of marker expression [5]. In chromogenic mIHC, color deconvolution algorithms separate overlapping color vectors from red, green, blue (RGB) images into individual chromogen channels, generating 8-bit images for each immunostain [5]. For fluorescent multiplexing, spectral unmixing distinguishes fluorophore signals based on their emission spectra, mitigating issues of autofluorescence and spectral overlap [5]. These processes profoundly impact downstream analysis including cell segmentation and phenotyping, necessitating rigorous validation and quality control.
Cell Segmentation and Phenotyping Algorithms
Cell segmentation represents a critical juncture in the analytical pipeline where nuclear, cytoplasmic, and membrane compartments are identified for subsequent marker quantification [5]. The SITC guidelines emphasize that segmentation algorithms must be verified against manual annotations to ensure accuracy across diverse tissue morphologies [5]. Following segmentation, phenotyping algorithms assign cell identities based on marker expression thresholds, which should be established through iterative optimization and validated using control tissues with known cell population distributions [5]. The task force recommends implementing quality control measures such as batch-to-batch correction to address technical variability across experimental runs [5].
Diagram 1: Comprehensive mIHC Harmonization Workflow. This diagram outlines the standardized workflow from tissue processing through data sharing, with integrated quality assurance measures at critical stages.
Multi-Institutional Harmonization Protocols
Antibody Validation and Panel Optimization
Harmonization begins with rigorous antibody validation to ensure specificity, sensitivity, and reproducibility across institutions [5] [1]. The SITC task force recommends that antibody validation include testing on positive and negative control tissues, titration optimization under intended experimental conditions, and verification of expected subcellular localization patterns [1]. For panel design, careful consideration must be given to species/isotype compatibility, epitope stability across staining cycles, and fluorophore/chromogen compatibility to avoid spectral overlap [1]. For tyramide signal amplification (TSA)-based approaches, antibody stripping efficiency between cycles must be optimized to prevent signal cross-reaction while preserving tissue integrity [73].
Experimental Protocol: TSA-Based Opal mIHC with Optimized Antibody Stripping
The following protocol details a harmonized approach for TSA-based Opal mIHC, incorporating an optimized antibody stripping method that preserves tissue integrity in fragile specimens [73]:
Materials and Reagents:
- Opal 6-Plex Manual Detection Kit (NEL811001KT, Akoya Biosciences)
- Primary antibodies validated for multiplex IHC
- Opal fluorophores (520, 570, 620, 690)
- HRP-polymer secondary antibody (anti-rabbit/mouse)
- Antigen retrieval buffers (citrate pH 6.0, Tris-EDTA pH 9.0)
- Hybridization oven or microwave
- DAPI counterstain
- Antifade mounting medium
Staining Procedure:
- Tissue Preparation: Cut 5μm sections from FFPE tissue blocks. Deparaffinize with xylene and rehydrate through graded ethanol series.
- Antigen Retrieval: Perform heat-induced epitope retrieval in appropriate buffer using microwave treatment (15 min at 50% power in 800W microwave).
- Primary Antibody Incubation: Apply optimized concentration of primary antibody diluted in antibody diluent. Incubate at 37°C for 40 minutes.
- Signal Detection: Apply HRP-polymer secondary antibody for 10 minutes at room temperature. Incubate with Opal fluorophore (1:100 dilution) for 10 minutes at room temperature.
- Antibody Stripping: For delicate tissues (e.g., brain), implement hybridization oven-based antibody removal at 98°C (HO-AR-98) by incubating slides in antigen retrieval buffer for 30 minutes, replenishing buffer every 5 minutes to prevent drying. For robust tissues, microwave-assisted antibody removal (15 min at 50% power) may be used.
- Cycle Repetition: Repeat steps 2-5 for each additional marker in the panel, with antibody stripping between cycles.
- Counterstaining and Mounting: Apply DAPI for nuclear counterstaining and mount with antifade mounting medium.
Quality Control:
- Verify stripping efficiency by incubating with Opal 690 fluorophore after stripping and confirming absence of signal.
- Assess tissue integrity by comparing pre- and post-staining morphology, calculating ratio of missing tissue area to total tissue area.
- Validate staining specificity through isotype controls and single-plex reference slides.
Image Analysis and Algorithm Verification
Standardized image analysis requires verification of each computational step using representative test images and manual annotations [5]. The SITC guidelines recommend that algorithm verification include assessment of segmentation accuracy against pathologist-annotated regions, phenotyping concordance with manual cell counts, and spatial analysis validation using control tissues with known spatial distributions [5]. For multi-institutional studies, reference standards such as standardized control tissues and algorithm benchmarking datasets should be exchanged between participating laboratories to ensure analytical consistency [5].
Table 2: Essential Research Reagent Solutions for Standardized mIHC
| Reagent Category | Specific Examples | Function | Validation Requirements |
|---|---|---|---|
| Primary Antibodies | Anti-CD3, Anti-CD8, Anti-PD-L1, Anti-panCK | Target protein detection | Specificity, sensitivity, optimal dilution, retrieval condition |
| Detection System | Opal fluorophores (520, 570, 620, 690), TSA reagents | Signal amplification and visualization | Spectral separation, amplification linearity, cross-reactivity testing |
| Tissue Preservation | Formalin, paraffin embedding media, antifade mounting medium | Tissue architecture maintenance | Fixation time standardization, embedding consistency, fading prevention |
| Nuclear Counterstain | DAPI, Hematoxylin | Cell identification and segmentation | Concentration optimization, spectral compatibility with markers |
| Antigen Retrieval | Citrate buffer (pH 6.0), Tris-EDTA (pH 9.0) | Epitope exposure | Buffer selection based on antibody requirements, heating method optimization |
| Antibody Stripping | Microwave-assisted removal, Chemical denaturants | Inter-cycle antibody removal | Efficiency verification, tissue integrity preservation assessment |
Data Management and Sharing Standards
Minimum Information Reporting Requirements
To enable cross-study comparison and meta-analysis, the SITC task force has established minimum information that should be reported with all mIHC/IF studies [5]. This includes detailed methodologies for ROI selection (number, size, selection criteria), image acquisition parameters (resolution, exposure times), preprocessing steps (deconvolution, unmixing algorithms), segmentation approaches (algorithm, verification method), and phenotyping strategies (marker combinations, threshold determinations) [5]. Additionally, quality metrics such as staining intensity coefficients of variation, signal-to-noise ratios, and cell segmentation accuracy should be documented [5].
Data Sharing and Multi-Institutional Collaboration
The SITC guidelines provide specific recommendations for data sharing to facilitate collaboration and reproducibility [5]. These include sharing raw image outputs, processed results, key analysis programs with source code, and representative photomicrographs [5]. For multi-institutional studies, the task force recommends implementing harmonization exercises where participating laboratories stain and analyze standardized tissue sections, followed by comparison and alignment of results to establish inter-laboratory reproducibility [5].
Diagram 2: Comprehensive Quality Control Pipeline for mIHC. This diagram illustrates the multi-stage quality control process incorporating standardized controls, reference algorithms, and shared data resources to ensure inter-laboratory reproducibility.
Implementation and Regulatory Considerations
Clinical Translation and Regulatory Strategy
As mIHC assays progress toward clinical application, regulatory strategy becomes increasingly important [98]. Developers must determine whether Clinical Laboratory Improvement Amendments (CLIA) validation alone will suffice or if pre-market approval (PMA) submission will be required based on the assay's intended use [98]. The risk classification of an in vitro diagnostic (IVD) depends on how results inform treatment decisions, with assays used for patient stratification generally requiring investigational device exemption (IDE) [98]. For global implementation, parallel validation strategies satisfying both U.S. Food and Drug Administration (FDA) and European In Vitro Diagnostic Regulation (IVDR) requirements must be developed [98].
Emerging Technologies and Future Directions
Artificial intelligence approaches are showing promise for enhancing mIHC analysis and standardization. Deep learning frameworks like HistoPlexer can generate spatially resolved protein multiplexes directly from H&E histopathology images, potentially expanding access to multiplexed tissue analysis [119]. Additionally, multi-modality integration of H&E-stained images with mIHC data through ensemble modeling approaches has demonstrated improved prognostic stratification in gastric cancer, highlighting the value of combining morphological context with immunophenotyping [120]. As these technologies evolve, harmonization efforts must expand to encompass these innovative approaches.
Multi-institutional harmonization of mIHC outputs represents a critical pathway toward reliable, reproducible tissue-based biomarker development. The standardized protocols and analytical frameworks presented in this application note provide researchers and drug development professionals with practical tools to implement these harmonization efforts. By adopting these best practices for image analysis, data management, and quality control, the research community can accelerate the clinical translation of mIHC technologies, ultimately enhancing patient stratification and personalized immunotherapy strategies. Continued collaboration through consortia and professional societies like SITC will be essential to refine these standards as multiplex imaging technologies continue to evolve.
The advent of highly multiplexed technologies has revolutionized our ability to characterize cellular environments within tissues. While single-cell RNA sequencing (scRNA-seq) provides deep transcriptional profiling, it loses crucial spatial context. Multiplex immunohistochemistry (mIHC) and related spatial profiling techniques bridge this gap by enabling the simultaneous detection of dozens of biomarkers within the native tissue architecture. This application note provides a comparative analysis of mIHC against other multiplexed and single-cell technologies, detailing protocols and applications for researchers and drug development professionals working in the field of immuno-oncology and translational medicine. The integration of these data types is critical for a holistic understanding of complex biological systems, such as the tumor microenvironment (TME), where cellular spatial organization is a key determinant of disease progression and treatment response [121] [61] [28].
Technology Landscape and Quantitative Comparison
Multiplexed techniques can be broadly categorized by their detection method—optical (chromogenic/fluorescent) or mass-based—and their throughput, which dictates their suitability for different research or clinical applications.
Table 1: Comparative Analysis of Multiplexed Spatial Profiling Technologies
| Technology | Principle | Max Markers | Imaging Area | Quantitation | Key Advantages | Key Limitations |
|---|---|---|---|---|---|---|
| Multiplexed Chromogenic IHC [29] [122] | Enzyme-based color deposition (e.g., DAB). | 3-5 | Whole slide | Semi-quantitative | Low cost, familiar workflow, permanent slides, standard brightfield microscopes. | Limited dynamic range, challenging co-expression analysis. |
| Multiplexed IF (Tyramide-based) [29] [5] | Fluorescently-labeled antibodies with signal amplification. | 5-8 | Whole slide or ROI | Quantitative | Higher plex than chromogenic, good for co-expression, linear dynamic range. | Signal fading, autofluorescence, requires specialized fluorescence scanners. |
| Cyclic Multiplexed IF (e.g., CODEX, t-CyCIF) [29] [28] | Iterative staining, imaging, and dye inactivation or removal. | 30-60 | ROI or Tiled Whole Slide | Quantitative | Very high plex, uses conventional fluorophores. | Lengthy process, complex data management, potential tissue damage from cycling. |
| Tissue-based Mass Spectrometry (MIBI-TOF, IMC) [29] [5] | Antibodies labeled with metal tags and detected by mass spectrometry. | 40+ | ROI (~1 mm²) | Quantitative | No autofluorescence or signal fading, extremely high plex. | Extremely high instrument cost, requires extensive training, destructive to sample. |
| Digital Spatial Profiling (DSP) [29] [5] | Antibodies with UV-cleavable DNA barcodes; counts are read via NGS. | 40-50 (theoretically ~800) | ROI (0.28 mm²) | Quantitative | Extremely high plex, very fast staining (~1 hour), digital readout. | No direct image-based validation, ROI-dependent, lower spatial resolution. |
| Single-Cell RNA-seq (e.g., 10x Genomics, BD Rhapsody) [123] [124] | Single-cell dissociation and barcoding of mRNA for sequencing. | Entire transcriptome | N/A (dissociated cells) | Quantitative | Unbiased discovery of cell states and types, deep phenotypic resolution. | Loss of native spatial information, requires cell suspension. |
Detailed Experimental Protocols
Protocol 1: Sequential Multiplex IHC for T Cell Phenotyping
This protocol, adapted from a study analyzing spatiotemporal T cell heterogeneity in head and neck cancer, allows for the detection of 12+ markers on a single FFPE tissue section [61].
Key Research Reagent Solutions:
- Primary Antibodies: A pre-optimized panel against T cell markers (e.g., CD3, CD8, PD-1, TIM3, Ki-67, Eomes). Antibodies must be validated for IHC and compatibility with the stripping protocol [61].
- Detection System: Anti-mouse/rabbit Histofine Simple Stain MAX PO (HRP-conjugated polymer) [61].
- Chromogens: AEC or AMEC for peroxidase-based color development [61].
- Antigen Retrieval Buffer: Citrate buffer, pH 6.0.
- Blocking Solution: 5.0% goat serum, 2.5% BSA, and 0.1% Tween-20.
Step-by-Step Workflow:
- Sectioning and Deparaffinization: Cut 5 μm FFPE sections. Heat at 60°C for 30 minutes, deparaffinize in xylene, and rehydrate through a graded ethanol series to distilled water.
- Initial Hematoxylin Staining and Scanning: Stain with hematoxylin for 1 minute to visualize nuclei. Coverslip and scan the entire slide using a high-resolution digital slide scanner (e.g., Hamamatsu NanoZoomer) to create a reference image. Decoverslip by agitation in PBS-T.
- Peroxidase Blocking and Antigen Retrieval: Block endogenous peroxidase activity with 0.6% H₂O₂ in PBS for 15 minutes. Perform heat-mediated antigen retrieval in citrate buffer (pH 6.0) for 15 minutes.
- Sequential Staining Cycles: For each marker in the panel, perform the following cycle [61]: a. Protein Block: Apply blocking solution for 10 minutes. b. Primary Antibody Incubation: Apply unconjugated primary antibody for 60 minutes. c. Polymer Detection: Apply HRP-conjugated polymer for 30 minutes. d. Chromogen Development: Visualize with AEC/AMEC chromogen. e. Scanning: Coverslip and digitally scan the slide. f. Destaining and Stripping: Decoverslip, destain in an alcohol gradient, and strip the antibody-chromogen complex by microwave boiling in citrate buffer for 15 minutes.
- Image Processing and Co-registration: Use specialized software (e.g., in-house tools or commercial packages) to accurately align all sequentially scanned images to the original hematoxylin reference. Convert images to monochromatic channels for quantitative analysis [61].
Diagram 1: Sequential mIHC staining workflow.
Protocol 2: STvEA for Transcriptome-Guided Annotation of mIHC Images
This computational protocol enhances the annotation of mIHC data by integrating it with a matched CITE-seq (cellular indexing of transcriptomes and epitopes by sequencing) dataset, overcoming limitations in antibody panel design [121].
Key Research Reagent Solutions:
- CITE-seq Antibody Panel: A panel of oligo-tagged antibodies targeting the same protein markers used in the mIHC/CODEX experiment.
- Single-Cell Suspension: Viable single-cell suspension from the same tissue type as the mIHC sample.
- scRNA-seq Reagents: Depending on the platform (10x Chromium or BD Rhapsody), the appropriate cell partitioning and barcoding reagents are required [123].
Step-by-Step Workflow:
- Generate a CITE-seq Reference Atlas: a. Stain a single-cell suspension from the target tissue (e.g., murine spleen) with the oligo-tagged antibody panel. b. Perform single-cell RNA sequencing using a platform like 10x Chromium or BD Rhapsody to simultaneously capture the transcriptome (mRNA) and surface protein (Ab-derived tags - ADT) data for each cell [121] [123]. c. Perform clustering and differential expression analysis on the mRNA data to identify and annotate cell populations at high resolution.
- Data Normalization and Background Removal: a. Process both the CITE-seq (ADT) and mIHC (e.g., CODEX) protein expression data using a two-component mixture model to separate signal from background and normalize the measurements, creating a consolidated protein expression space [121].
- Mutual Nearest Neighbors (MNN) Anchoring: a. Use the MNN algorithm to find pairs of cells across the CITE-seq and mIHC datasets that are most similar in the consolidated protein expression space. These "anchors" define a mapping function between the two datasets [121].
- Feature Transfer and Annotation: a. Transfer the cell type labels and other transcriptomic features (e.g., gene expression scores) from the CITE-seq atlas to the cells in the mIHC images based on the established anchors. This allows for the identification of nuanced cell populations in the mIHC data that lack specific antibody markers [121].
Diagram 2: STvEA data integration and annotation.
The Scientist's Toolkit: Essential Research Reagent Solutions
Table 2: Key Reagents and Resources for Multiplexed Analysis
| Item | Function | Application Notes |
|---|---|---|
| Validated Primary Antibodies [29] [61] | Binds specifically to target protein epitopes. | Critical to use antibodies validated for IHC/IF on FFPE tissue. Adherence to the "Hallmarks of Antibody Validation" ensures specificity and reproducibility [29]. |
| Tyramide Signal Amplification (TSA) Reagents [29] [122] | Amplifies weak signals, enabling detection of low-abundance targets. | Essential for high-plex fluorescent mIHC. Requires careful optimization to rule out non-specific signal blocking [29]. |
| DNA-Barcoded Antibodies (e.g., Ultivue InSituPlex) [2] | Enables highly multiplexed staining via DNA barcode hybridization. | Key for technologies like DSP and some cyclic IF methods. Allows for extreme multiplexing without spectral overlap. |
| Metal-Tagged Antibodies [29] | Antibodies conjugated to pure metal isotopes for mass spectrometry detection. | Required for tissue-based mass spectrometry (MIBI-TOF, IMC). Eliminates issues with spectral overlap and autofluorescence. |
| CITE-seq Antibody Panels [121] | Oligo-tagged antibodies for concurrent protein and mRNA measurement at single-cell level. | Used to generate a high-quality reference atlas for integration with and annotation of mIHC data via methods like STvEA. |
| Cell Segmentation & Phenotyping Software (e.g., inForm, MCMICRO) [5] [28] | Automated identification of single cells and assignment of marker-based phenotypes. | Crucial for quantitative, high-throughput analysis. Algorithms must be verified and optimized for each specific tissue and staining protocol [5]. |
The choice between mIHC and other single-cell technologies is not a matter of selecting a superior tool, but of identifying the right tool for the specific biological question. mIHC and its advanced multiplexed counterparts excel in providing spatial context that is indispensable for understanding cellular ecosystems like the TME. The future of the field lies in the seamless integration of these spatial data with dissociative single-cell omics, as exemplified by the STvEA protocol, and in the standardization of analytical workflows to ensure reproducibility and clinical translation [5]. As these technologies mature and become more accessible, they are poised to unlock deeper insights into disease mechanisms and power the development of next-generation biomarkers and therapeutics.
Conclusion
Multiplex immunohistochemistry has firmly established itself as an indispensable tool for decoding the spatial architecture of tissues, particularly within the complex tumor microenvironment. The maturation of various technological platforms, coupled with standardized image analysis and rigorous validation frameworks, is steadily bridging the gap between research and clinical application. As best-practice guidelines become more widely adopted and multi-institutional harmonization efforts progress, mIHC is poised to deliver increasingly robust and reproducible data. The future of mIHC lies in its integration into clinical trials for patient stratification, the development of companion diagnostics for targeted immunotherapies, and its continued role in unveiling novel biological insights that will shape the next generation of biomedical research and therapeutic strategies.
References
- 1. Multiplex immunohistochemistry (mIHC): A technical deep ... [https://www.abcam.com/en-us/knowledge-center/immunohistochemistry/multiplex-immunohistochemistry-mihc]
- 2. Overview of multiplex immunohistochemistry ... [https://pmc.ncbi.nlm.nih.gov/articles/PMC7170662/]
- 3. Exploring the Benefits of Multiplex Immunohistochemistry ... [https://www.celnovte.com/solution/exploring-the-benefits-of-multiplex-immunohistochemistry-over-conventional-ihc/]
- 4. Multiplexing Resources [https://diagnostics.roche.com/us/en/products/product-category/immunohistochemistry--ihc-/multiplexing-resources.html]
- 5. Society for Immunotherapy of Cancer - PubMed Central - NIH [https://pmc.ncbi.nlm.nih.gov/articles/PMC11749220/]
- 6. A Comprehensive Analysis of the Combined Application of ... [https://www.absin.net/article-1385.html]
- 7. Challenges and Opportunities in the Statistical Analysis of ... [https://www.mdpi.com/2072-6694/13/12/3031]
- 8. 11.7A: Antibody Proteins and Antigen Binding [https://bio.libretexts.org/Bookshelves/Microbiology/Microbiology_(Boundless)/11%3A_Immunology/11.07%3A_Antibodies/11.7A%3A_Antibody_Proteins_and_Antigen_Binding]
- 9. The interaction of the antibody molecule with specific antigen [https://www.ncbi.nlm.nih.gov/books/NBK27160/]
- 10. Intro to Immunohistochemistry (IHC) Staining: Steps & Best ... [https://www.leicabiosystems.com/us/knowledge-pathway/immunohistochemistry-an-overview-steps-to-better-ihc-staining/]
- 11. Modern Multiplex Staining Solutions for IHC Labs [https://www.leicabiosystems.com/us/life-sciences-and-research-solutions/application/modern-multiplex-staining-solutions-for-the-ihc-research-lab/]
- 12. Overview of Immunohistochemistry (IHC) [https://www.thermofisher.com/us/en/home/life-science/protein-biology/protein-biology-learning-center/protein-biology-resource-library/pierce-protein-methods/overview-immunohistochemistry.html]
- 13. Current Practice and Potential for Clinical Incorporation [https://pubmed.ncbi.nlm.nih.gov/39764760/]
- 14. Characterization of tumor microenvironment and cell ... [https://haematologica.org/article/view/11869]
- 15. Synergistic H&E and IHC image analysis by AI predicts ... [https://www.nature.com/articles/s43856-025-01045-9]
- 16. Systems pathology by multiplexed immunohistochemistry ... [https://www.nature.com/articles/s41598-017-15798-4]
- 17. Advancing Cellular Research through Multiplex ... [https://imaging.nd.edu/news-and-events/news/advancing-cellular-research-through-multiplex-immunohistochemistry/]
- 18. A flexible systems analysis pipeline for elucidating spatial ... [https://www.frontiersin.org/journals/immunology/articles/10.3389/fimmu.2025.1642527/full]
- 19. Cell–cell interactions as predictive and prognostic markers for ... [https://genomemedicine.biomedcentral.com/articles/10.1186/s13073-025-01518-5]
- 20. Multi-omics analyses reveal interactions between GREM1+ ... [https://www.nature.com/articles/s41698-025-00967-w]
- 21. Single-cell RNA sequencing and spatial transcriptomics ... [https://pubmed.ncbi.nlm.nih.gov/40102930/]
- 22. Predictive Biomarkers in Cancer Immunotherapy [https://pmc.ncbi.nlm.nih.gov/articles/PMC12289453/]
- 23. Overcoming resistance to anti-PD-L1 immunotherapy [https://molecular-cancer.biomedcentral.com/articles/10.1186/s12943-025-02400-z]
- 24. Recent advances in biomarkers for predicting the efficacy ... [https://www.frontiersin.org/journals/immunology/articles/10.3389/fimmu.2025.1554871/full]
- 25. Report Quantitatively defined stromal B cell aggregates are ... [https://www.sciencedirect.com/science/article/pii/S2211124725003250]
- 26. Spatial analysis by current multiplexed imaging ... [https://pmc.ncbi.nlm.nih.gov/articles/PMC11589153/]
- 27. A framework for multiplex imaging optimization and ... [https://www.nature.com/articles/s42003-022-03368-y]
- 28. High-plex immunofluorescence imaging and traditional ... [https://www.nature.com/articles/s43018-023-00576-1]
- 29. Multiplexing Techniques for IHC and IF | CST Blog [https://blog.cellsignal.com/pros-and-cons-of-different-multiplexing-techniques]
- 30. Unlocking the Tumor Microenvironment: Innovations in ... [https://www.mdpi.com/2073-4409/14/22/1819]
- 31. Multiplexed immunohistochemistry, imaging, and quantitation [https://www.sciencedirect.com/science/article/pii/S1046202314002837]
- 32. Research progress and perspectives on the application of ... [https://pmc.ncbi.nlm.nih.gov/articles/PMC11804208/]
- 33. About CyCIF [https://www.tissue-atlas.org/cycif-method]
- 34. Highly multiplexed 3D profiling of cell states and immune ... [https://www.nature.com/articles/s41592-025-02824-x]
- 35. Tyramide Signal Amplification with SuperBoost Kits [https://www.thermofisher.com/us/en/home/life-science/cell-analysis/cellular-imaging/immunofluorescence/tyramide-signal-amplification-tsa.html]
- 36. Cyclic Multiplex Fluorescent Immunohistochemistry ... [https://pmc.ncbi.nlm.nih.gov/articles/PMC9900949/]
- 37. Signal Amplification for Fluorescent Staining of Single ... [https://pmc.ncbi.nlm.nih.gov/articles/PMC12508258/]
- 38. Practical TSA Multiplex IHC Overview [https://www.fortislife.com/resources/antibody-resources/practical-overview-of-multiplex-immunohistochemistry-using-tsa-part-2-of-4]
- 39. Toward universal immunofluorescence normalization for ... [https://pmc.ncbi.nlm.nih.gov/articles/PMC12539234/]
- 40. Multiplex imaging analysis of the tumor immune ... [https://pmc.ncbi.nlm.nih.gov/articles/PMC12289683/]
- 41. Spatial analysis by current multiplexed imaging ... [https://www.nature.com/articles/s41416-024-02882-6]
- 42. From surfing to diving into the tumor microenvironment ... [https://www.frontiersin.org/journals/immunology/articles/10.3389/fimmu.2025.1544844/full]
- 43. 如何零基础开展多重荧光免疫检测业务?-系列1 [https://www.ihuakong.com/bbs/article/566967/view/ding.html]
- 44. Multiplexed Imaging Mass Spectrometry of Histological ... [https://pubmed.ncbi.nlm.nih.gov/34331294/]
- 45. Review of immunohistochemistry techniques: Applications, ... [https://www.sciencedirect.com/science/article/abs/pii/S0740257024000467?utm_source=chatgpt.com]
- 46. PhenoCycler Instrument | Akoya Bioscience [https://www.akoyabio.com/phenocycler/instrument/]
- 47. PhenoCycler (formerly known as CODEX) - SpITR [https://spitr.ccr.cancer.gov/technologies/codex-co-detection-by-indexing/]
- 48. Spatial Profiling with SignalStar ® Multiplex IHC [https://www.cellsignal.com/applications/signalstar-multiplex-ihc-overview?srsltid=AfmBOoqRetdfoNAyYqBSRGhaakQmgvhFd1GcjaDnIPNhNkqtjATNArVv]
- 49. SignalStar™ Multiplex IHC for Spatial Biology [https://www.cellsignal.com/applications/signalstar-multiplex-ihc?srsltid=AfmBOorV2lEtRgl7kv2xvsmKQdhq1rIq6xqHWZHS9Ri2dZk0O-AIPo75]
- 50. Highly multiplexed tissue imaging using repeated ... [https://pmc.ncbi.nlm.nih.gov/articles/PMC8251877/]
- 51. SignalStar™ Multiplex IHC for Spatial Biology [https://awsprod-www.cellsignal.com/applications/signalstar-multiplex-ihc]
- 52. Multiplex imaging of murine bone marrow using ... [https://www.nature.com/articles/s41375-025-02596-5]
- 53. Making Multiplexed Imaging Flexible - PubMed Central - NIH [https://pmc.ncbi.nlm.nih.gov/articles/PMC11421402/]
- 54. Parhelia Spatial Station™ [https://www.parheliabio.com/spatial-station]
- 55. Multiplex imaging analysis of the tumor immune ... [https://www.frontiersin.org/journals/immunology/articles/10.3389/fimmu.2025.1617906/full]
- 56. Simplifying Multiplex IHC Panel Design for Spatial Biology [https://www.cellsignal.com/applications/signalstar-panel-design?srsltid=AfmBOoriHdwfO-5OalmHz9Ry5SnjvAxG9gGiXTyWwfrcwkJTzwV2RrEf]
- 57. IHC Protocol [https://www.bostonbioproducts.com/resources/ihc-protocol/]
- 58. IHC Protocol | Step-by-Step Immunohistochemistry Guide [https://www.bosterbio.com/protocol-and-troubleshooting/ihc-protocol?srsltid=AfmBOor8gU0Olow1TlNxs49bno460uVBauduSVIviH7H5lygV72VrHpv]
- 59. Immunohistochemistry (IHC): The Complete Guide [https://www.antibodies.com/applications/immunohistochemistry]
- 60. Multiplex Immunohistochemistry, Image Acquisition, and ... [https://bio-protocol.org/exchange/minidetail?id=9657850&type=30]
- 61. Applications of Multiplex Immunohistochemistry in ... [https://www.mdpi.com/2673-5601/5/1/7]
- 62. Segmentation aware probabilistic phenotyping of single ... [https://www.nature.com/articles/s41467-024-55214-w]
- 63. Deep cell phenotyping and spatial analysis of multiplexed ... [https://pmc.ncbi.nlm.nih.gov/articles/PMC11180132/]
- 64. Best Practices for Image Analysis and Data Submission. [https://www.licorbio.com/empiria-studio/best-practices]
- 65. Basic guidelines [https://biof-imagewiki.colorado.edu/books/image-analysis/page/basic-guidelines]
- 66. Overcoming the 4 Key Challenges in Multiplex IHC [https://www.atlasantibodies.com/knowledge-hub/blog/multiplex-ihc-workflow-solutions/]
- 67. Quantitative multiplex immunohistochemistry reveals ... [https://pmc.ncbi.nlm.nih.gov/articles/PMC5564306/]
- 68. Overview of multiplex immunohistochemistry ... [https://pubmed.ncbi.nlm.nih.gov/32301585/]
- 69. Mapping Tissue Architecture at Single-Cell Level - PMC [https://pmc.ncbi.nlm.nih.gov/articles/PMC9389457/]
- 70. Multiplex IHC [https://www.cellsignal.com/applications/immunohistochemistry/fluoresence-mihc?srsltid=AfmBOooxpMHvbt4SWSQr7cJhHMWQpT63IBVyCIjFr8ppnnCnKoa162YR]
- 71. Multiplex Immunohistochemistry/Immunofluorescence ... [https://www.frontiersin.org/research-topics/14950/multiplex-immunohistochemistryimmunofluorescence-technique-the-potential-and-promise-for-clinical-application/magazine]
- 72. Optimization of a thermochemical antibody stripping ... [https://pmc.ncbi.nlm.nih.gov/articles/PMC12117710/]
- 73. Optimization of a thermochemical antibody stripping method ... [https://bmcresnotes.biomedcentral.com/articles/10.1186/s13104-025-07301-4]
- 74. Development of a Multiplex Immunohistochemistry ... [https://www.mdpi.com/1422-0067/22/20/11001]
- 75. MAX Eraser: An affordable and simple reagent for antibody ... [https://www.sciencedirect.com/science/article/pii/S305056232500087X]
- 76. Multiplex Staining by Sequential Immunostaining and ... [https://pmc.ncbi.nlm.nih.gov/articles/PMC5533273/]
- 77. Protocol for Enhancing Immunofluorescence Signals with Tyramide - Creative Diagnostics [https://www.creative-diagnostics.com/making-immunofluorescence-signals-stronger-using-tyramide-protocol.htm]
- 78. TSA Multiplex Immunofluorescence [https://www.fortislife.com/resources/antibody-resources/tyramide-signal-amplification-tsa-based-immunofluorescent-multiplex-mif-assays]
- 79. Practical Overview of Multiplex Immunohistochemistry ... [https://www.celnovte.com/solution/practical-overview-of-multiplex-immunohistochemistry-using-tsa/]
- 80. Amplification and Background Reduction Techniques | FluoroFinder [https://fluorofinder.com/amplification-and-background-reduction-techniques/]
- 81. Tyramide signal amplification for analysis of kinase activity by intracellular flow cytometry - PMC [https://pmc.ncbi.nlm.nih.gov/articles/PMC3036012/]
- 82. Immunohistochemistry Troubleshooting [https://www.antibodies.com/applications/immunohistochemistry/ihc-troubleshooting]
- 83. IHC antigen retrieval protocol [https://www.abcam.com/en-us/technical-resources/protocols/ihc-antigen-retrieval]
- 84. Quantitative immunohistochemistry (IHC) analysis of ... [https://pmc.ncbi.nlm.nih.gov/articles/PMC8339853/]
- 85. A novel quantitative immunohistochemistry method for ... [https://www.nature.com/articles/modpathol2016176]
- 86. Principles of Analytic Validation of Immunohistochemical ... [https://www.cap.org/protocols-and-guidelines/cap-guidelines/current-cap-guidelines/principles-of-analytic-validation-of-immunohistochemical-assays]
- 87. High background in immunohistochemistry [https://www.abcam.com/en-us/technical-resources/troubleshooting/high-background-in-immunohistochemistry]
- 88. ICC/IHC Non-Specific Binding / Staining Prevention Protocol [https://www.rndsystems.com/resources/protocols/preventing-non-specific-staining]
- 89. Recent developments in multiplexing techniques for ... [https://pmc.ncbi.nlm.nih.gov/articles/PMC4810438/]
- 90. An Introduction to the Performance of Immunohistochemistry [https://pmc.ncbi.nlm.nih.gov/articles/PMC6749998/]
- 91. Pathology-oriented multiplexing enables integrative ... [https://www.nature.com/articles/s41586-025-09225-2]
- 92. Rapid multiplex immunohistochemistry for characterizing ... [https://www.sciencedirect.com/science/article/pii/S240584402409861X]
- 93. A Practical Update for Pathologists [https://www.sciencedirect.com/science/article/pii/S0893395223001023]
- 94. How to choose chromogen colors for multiplex [https://www.leicabiosystems.com/us/articles/ls-articles/tips-tricks-to-multiplexing-how-to-choose-chromogen-colors-for-multiplex-and/]
- 95. Multiplex Immunohistochemistry (IHC) Guide [https://www.antibodiesinc.com/pages/multiplex-immunohistochemistry-ihc-guide?srsltid=AfmBOoqWty6nV4jicRnJAsnsYjIfYxXk7QQz-PFVm4YOhMoqlWN-xl3O]
- 96. Getting Started With Multiplex Immunohistochemistry [https://vectorlabs.com/blog/getting-started-with-multiplex-immunohistochemistry/?srsltid=AfmBOor1VARVbQIxDIpmTkaWHGJUEAOpwxgryr5Z_pa0mHEK5BmYe10N]
- 97. Antibodies 101: Multiplex Immunofluorescence [https://blog.addgene.org/antibodies-101-multiplex-immunofluorescence]
- 98. Optimizing Immunohistochemistry Validation and ... [https://www.precisionformedicine.com/blog/optimizing-ihc-validation-regulatory-strategies]
- 99. Companion diagnostic requirements for spatial biology using ... [https://pmc.ncbi.nlm.nih.gov/articles/PMC9948403/]
- 100. 42 CFR Part 493 -- Laboratory Requirements [https://www.ecfr.gov/current/title-42/chapter-IV/subchapter-G/part-493]
- 101. 2025 CLIA Acceptance Limits for Proficiency Testing [https://www.westgard.com/clia-a-quality/quality-requirements/2024-clia-requirements.html]
- 102. Simplifying the Process of 'Switching' Antibodies and ... [https://biocare.net/media/white-papers/simplifying-the-process-of-switching-antibodies-and-verifying-the-performance-of-a-modified-ihc-procedure/]
- 103. CLSI: Clinical & Laboratory Standards Institute [https://clsi.org/]
- 104. Method Evaluation | Areas of Focus [https://clsi.org/standards-development/specialty-areas/method-evaluation/]
- 105. Comparative analysis of ISO 15189:2022 with earlier ... [https://pubmed.ncbi.nlm.nih.gov/40985154/]
- 106. Multiplex immunohistochemistry accurately defines the ... [https://www.nature.com/articles/s41598-018-28944-3]
- 107. An image analysis pipeline to quantify the spatial ... [https://www.frontiersin.org/journals/bioinformatics/articles/10.3389/fbinf.2025.1619790/full]
- 108. ESMRMB 2025 focus topic: cycle of quality—from concept to ... [https://pmc.ncbi.nlm.nih.gov/articles/PMC12255560/]
- 109. Companion Diagnostics [https://www.fda.gov/medical-devices/in-vitro-diagnostics/companion-diagnostics]
- 110. Premarket Approval (PMA) [https://www.fda.gov/medical-devices/premarket-submissions-selecting-and-preparing-correct-submission/premarket-approval-pma]
- 111. Principles for Codevelopment of an In Vitro Companion ... [https://www.fda.gov/regulatory-information/search-fda-guidance-documents/principles-codevelopment-in-vitro-companion-diagnostic-device-therapeutic-product]
- 112. New Regulations - Public Health - European Commission [https://health.ec.europa.eu/medical-devices-sector/new-regulations_en]
- 113. IVDR having detrimental effect on Europe's IVD innovation [https://www.medicaldevice-network.com/news/medica-2025-ivdr-having-detrimental-effect-on-ivd-innovation-in-europe/]
- 114. The Companion Diagnostic Strategy That Combination ... [https://www.drugdeliveryleader.com/doc/the-companion-diagnostic-strategy-that-combination-product-leaders-need-0001]
- 115. Phaseout Policy and Enforcement Discretion Policies [https://www.fda.gov/medical-devices/laboratory-developed-tests-faqs/phaseout-policy-and-enforcement-discretion-policies-laboratory-developed-tests-faqs]
- 116. IVDR 2025 Deadline: Key Requirements for Legacy IVDs ... [https://www.obelis.net/news/ivdr-2025-legacy-deadline/]
- 117. EU IVDR 2025 Update: New Guidance Clarifies Change ... [https://www.pureglobal.com/news/eu-ivdr-2025-update-new-guidance-clarifies-change-requirements-for-companion-diagnostics]
- 118. "Society for Immunotherapy of Cancer: updates and best ... [https://digitalcommons.providence.org/publications/9577/]
- 119. Histopathology-based protein multiplex generation using ... [https://www.nature.com/articles/s42256-025-01074-y]
- 120. Enhancing gastric cancer prognosis prediction via multi ... [https://www.sciencedirect.com/science/article/abs/pii/S0169260725003888]
- 121. Single-cell transcriptomic analysis of mIHC images via ... [https://pmc.ncbi.nlm.nih.gov/articles/PMC7935366/]
- 122. Chromogenic vs. Fluorescent Techniques [https://www.celnovte.com/solution/multiplex-immunohistochemistry-chromogenic-vs-fluorescent-techniques/]
- 123. Performance comparison of high throughput single-cell ... [https://www.sciencedirect.com/science/article/pii/S2405844024132161]
- 124. Comparison of methods and resources for cell ... [https://www.nature.com/articles/s41467-022-30755-0]