Tissue Fixation Methods for Immunohistochemistry: A Complete Guide for Researchers
This article provides a comprehensive overview of tissue fixation methodologies for immunohistochemistry (IHC), a cornerstone technique in biomedical research and drug development.
Tissue Fixation Methods for Immunohistochemistry: A Complete Guide for Researchers
Abstract
This article provides a comprehensive overview of tissue fixation methodologies for immunohistochemistry (IHC), a cornerstone technique in biomedical research and drug development. It covers fundamental principles of fixation, detailed protocols for various sample types, advanced troubleshooting strategies for common issues, and comparative validation of methods for specific research applications. Aimed at scientists and researchers, this guide synthesizes current best practices and emerging trends to enable robust, reproducible, and high-quality IHC results, facilitating accurate protein localization and analysis in tissue contexts.
Understanding IHC Fixation: Core Principles and Reagent Selection
The Critical Role of Fixation in Preserving Morphology and Antigenicity
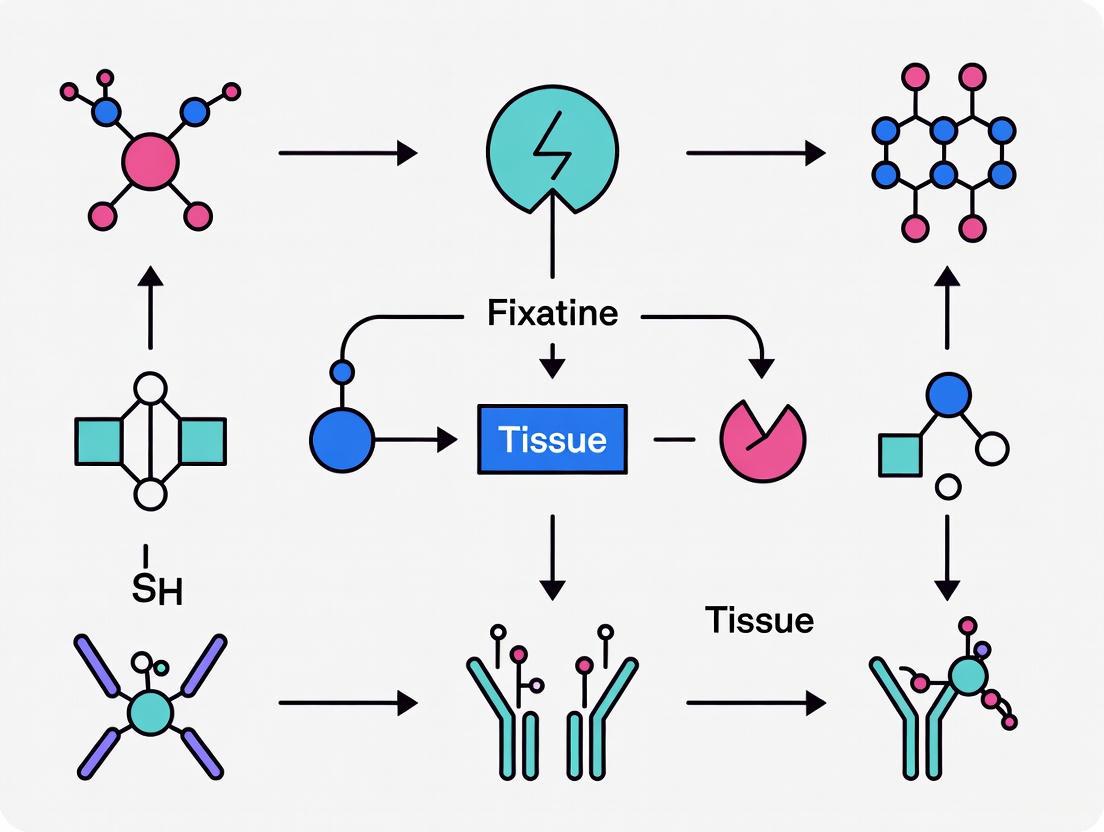
In the field of immunohistochemistry (IHC), fixation represents the foundational step upon which all subsequent analysis is built. This process stabilizes biological tissues by arresting cellular degradation and preserving structural integrity, thereby enabling accurate microscopic examination [1]. The fundamental challenge in fixation lies in achieving a delicate balance: preserving native tissue morphology while simultaneously maintaining target antigenicity for antibody binding [2] [3]. Inadequate fixation compromises this balance, leading to cellular degradation, loss of fine detail, and unreliable immunostaining results [1]. As the initial and irreversible step in tissue processing, fixation quality decisively impacts the entire IHC workflow, making its optimization critical for both research and clinical diagnostics [2].
The principle of fixation extends beyond simple preservation; it fundamentally alters the chemical nature of biomolecules within the tissue. Proteins, sugars, and nucleic acids are rendered insoluble through various mechanisms, while lipids typically require specific handling as they are often removed during routine processing [2]. Understanding these chemical interactions is essential for selecting appropriate fixation strategies that align with experimental objectives, whether for diagnostic pathology, drug development, or basic research applications [1].
Fundamental Principles of Tissue Fixation
Chemical Mechanisms of Fixation
Fixation methods operate through two primary mechanistic principles: precipitation and cross-linking. Each approach differentially affects tissue components and has distinct implications for IHC outcomes [2].
Precipitating Fixation works by disrupting the hydrogen bonding networks that maintain protein solubility and structure. This category includes:
- Organic solvents such as acetone, methanol, and ethanol, which reduce the dielectric constant of the medium, leading to protein denaturation and precipitation [2] [4].
- Acid fixation that alters the charge environment through low pH, causing protein denaturation similar to culinary processes like pickling fish in vinegar [2].
- Heat fixation that induces coagulation through thermal denaturation, effectively inactivating degradative enzymes [2].
Cross-linking Fixation creates covalent bonds between biomolecules, effectively stabilizing the tissue architecture. Key agents include:
- Formaldehyde and its derivatives, which primarily form methylene bridges between amino groups of proteins, creating a stable molecular network [2] [3].
- Glutaraldehyde, a dialdehyde that creates more extensive cross-links than formaldehyde, providing superior structural preservation but potentially reducing antigen accessibility [3].
- Glyoxal, a dialdehyde recently investigated as a formaldehyde alternative, though studies show variable performance depending on tissue type and antigen target [5].
Table 1: Comparison of Common Fixative Types and Their Properties
| Fixative Type | Primary Mechanism | Morphology Preservation | Antigen Preservation | Common Applications |
|---|---|---|---|---|
| Formaldehyde/PFA | Cross-linking | Excellent | Good (with retrieval) | General histology, FFPE samples [6] [3] |
| Glutaraldehyde | Extensive cross-linking | Superior | Often reduced | Electron microscopy [3] |
| Methanol | Precipitation | Moderate | Variable | Frozen sections, cytology [4] [3] |
| Acetone | Precipitation | Moderate to poor | Good for some epitopes | Frozen sections, cell smears [4] |
| Glyoxal | Cross-linking | Good | Variable (target-dependent) | Specialized applications [5] |
Formaldehyde Chemistry and Its Implications
Formaldehyde-based fixatives remain the gold standard in histopathology due to their effective penetration and reliable preservation characteristics [5]. Understanding their chemical behavior is essential for optimizing IHC protocols.
Formaldehyde exists in aqueous solutions as a dynamic equilibrium of monomers and polymers. Paraformaldehyde (PFA) represents the polymerized form that must be depolymerized through heating to generate active formaldehyde monomers for fixation [3]. Formalin typically contains 37-40% formaldehyde in water, often with methanol added to slow repolymerization [3]. Standard 10% neutral buffered formalin (approximately 4% formaldehyde) provides effective fixation for most applications [6].
The fixation process begins when formaldehyde reacts with amino groups to form carbonyl compounds, leading to initial insolubilization [2]. Subsequently, these compounds form stable methylene cross-links between amino residues, creating a rigid molecular network that preserves tissue architecture [2]. However, this cross-linking activity presents the primary challenge for IHC: excessive fixation can mask epitopes by incorporating them into these cross-linked networks, rendering them inaccessible to antibodies [2] [6]. This phenomenon necessitates the development of antigen retrieval techniques to reverse the effects of over-fixation [6].
Several factors influence formaldehyde fixation quality:
- pH environment: Lower pH accelerates cross-linking formation [2]
- Temperature: Higher temperatures increase fixation rate but may promote excessive cross-linking [2]
- Fixation duration: Insufficient time leads to underfixation, while excessive time causes overfixation [3]
- Tissue size: Thicker specimens require longer fixation times for complete penetration [1]
Diagram 1: Formaldehyde fixation and antigen masking dynamics.
Comparative Analysis of Fixation Methods
Aldehyde-Based Cross-linking Fixatives
Formaldehyde and Paraformaldehyde (PFA) remain the most widely used fixatives in IHC due to their excellent penetration and relatively balanced preservation of morphology and antigenicity [3]. The cross-linking nature of formaldehyde creates a molecular scaffold that maintains cellular architecture with high fidelity, making it particularly valuable for diagnostic applications where morphological detail is paramount [1]. However, the same cross-linking activity that preserves structure can compromise immunoreactivity by obscuring antibody epitopes, necessitating the implementation of antigen retrieval techniques for many targets [6].
Glyoxal has emerged as a potential formaldehyde alternative, with several studies investigating its performance characteristics. A comprehensive 2025 evaluation of glyoxal fixation for retinal immunohistochemistry tested 50 antibodies and compared results to formaldehyde fixation [5]. The study found that glyoxal fixation produced fragile tissue that was difficult to handle for wholemount preparations, and for the majority of antibodies tested, formaldehyde provided equivalent or superior immunolabeling [5]. This suggests that while glyoxal may offer benefits for specific applications, it does not consistently outperform formaldehyde as a general-purpose fixative for IHC.
Glutaraldehyde creates more extensive and stable cross-links than formaldehyde, resulting in superior ultrastructural preservation that makes it invaluable for electron microscopy applications [3]. However, this enhanced cross-linking typically produces such significant epitope masking that antigenicity is substantially reduced for light microscopy-based IHC [3]. Additionally, glutaraldehyde penetrates tissues more slowly than formaldehyde and can increase autofluorescence, further limiting its utility for routine immunofluorescence applications [3].
Precipitating Fixatives and Their Applications
Precipitating fixatives operate through fundamentally different mechanisms than cross-linking agents, offering distinct advantages and limitations for specific research applications.
Acetone fixation dehydrates tissues and disrupts hydrogen bonds between proteins, effectively precipitating cellular components without creating covalent cross-links [4]. This approach preserves epitope accessibility for many targets that might be masked by aldehyde fixation, particularly in challenging cellular compartments like the post-synaptic density [4]. However, acetone fixation generally provides inferior morphological preservation compared to formaldehyde-based methods, with increased potential for tissue disruption and architectural distortion [4].
Methanol operates through similar precipitation mechanisms but is considered a harsher reagent due to its more effective competition for hydrogen bonds [4]. This increased denaturation potential can further compromise cellular morphology while potentially improving antigen accessibility for certain challenging targets [4]. Methanol:acetone mixtures (1:1) are sometimes employed to balance the effects of both fixatives when multiple targets with different fixation requirements are being investigated simultaneously [4].
Table 2: Performance Comparison of Fixatives in Recent Research Applications
| Fixative | Tissue Type | Morphology Rating | Antigenicity Success Rate | Key Findings | Source |
|---|---|---|---|---|---|
| Formaldehyde/PFA | Rat retina | Excellent | 88% (44/50 antibodies) | Gold standard; reliable for most targets | [5] |
| Glyoxal (pH 5.0) | Rat retina | Good (but fragile) | 72% (36/50 antibodies) | Weaker signal for multiple targets | [5] |
| Davidson's Solution | Rat retina | Excellent | 82% (41/50 antibodies) | Superior histological preservation | [5] |
| Acetone (-20°C) | Brain cryosections | Moderate | Variable (target-dependent) | Superior for Shank proteins in PSD | [4] |
| Methanol (-20°C) | Brain cryosections | Moderate to poor | Variable (target-dependent) | Harsher fixation; useful for some epitopes | [4] |
Fixation Protocol Variations and Their Impacts
Beyond fixative selection, specific protocol parameters significantly influence IHC outcomes:
Perfusion vs. Immersion Fixation: Perfusion fixation delivers fixative through the vascular system of an anesthetized animal prior to tissue collection, providing rapid and uniform fixation that minimizes hypoxic artifacts and reduces non-specific staining in blood vessels [3]. This method is technically challenging but offers superior preservation for sensitive tissues. Immersion fixation, where dissected tissues are placed directly into fixative, is more practical for human samples and larger tissue specimens but requires careful attention to fixative volume and penetration time to ensure complete fixation without surface artifacts [3].
Fixation Duration and Temperature: Standard formaldehyde fixation typically ranges from 24-48 hours at room temperature, though specific requirements vary by tissue type and size [1]. Underfixation fails to stabilize tissues completely, leading to autolysis and antigen degradation, while overfixation creates excessive cross-linking that masks epitopes despite antigen retrieval attempts [3]. Different tissues may require optimization of these parameters; for example, retinal research often employs shorter fixation times (1-2 hours for PFA) to balance preservation needs with antigen accessibility requirements [5].
Experimental Protocols for Optimal Fixation
Standard Formaldehyde Fixation Protocol for FFPE Tissues
This protocol provides a standardized approach for formaldehyde fixation followed by paraffin embedding, suitable for most routine histopathology and IHC applications [6] [3].
Materials Required:
- 10% Neutral Buffered Formalin (NBF) or 4% Paraformaldehyde (PFA)
- Tissue processing cassettes
- Phosphate Buffered Saline (PBS)
- Ethanol series (70%, 95%, 100%)
- Xylene or xylene substitutes
- Molten paraffin wax
- Embedding molds
Procedure:
- Tissue Collection: Dissect tissue promptly after death or surgery, minimizing delay to prevent degradation. For immersion fixation, tissue thickness should not exceed 10mm to ensure adequate fixative penetration [3].
- Fixation: Immerse tissue in ≥10 volumes of 10% NBF or 4% PFA relative to tissue size. Fixation time should be optimized for specific tissues but typically ranges from 24-48 hours at room temperature with gentle agitation [1] [3].
- Rinsing: After fixation, rinse tissues in PBS or running water for 30 minutes to several hours to remove excess fixative [6].
- Dehydration: Process tissues through a graded ethanol series: 70% ethanol (1-2 hours), 95% ethanol (1-2 hours), 100% ethanol (2 changes, 1 hour each) [6].
- Clearing: Transfer tissues to xylene or xylene substitute (2 changes, 1 hour each) to remove alcohol and prepare for wax infiltration [6].
- Infiltration: Place tissues in molten paraffin wax (2-3 changes, 1-2 hours each) at 55-60°C in an embedding oven [6].
- Embedding: Orient tissues in embedding molds filled with fresh paraffin, then cool rapidly to form blocks [6].
Critical Considerations:
- Maintain consistent fixation conditions (time, temperature, pH) for reproducible results [7]
- Avoid extreme temperatures during fixation that may promote excessive cross-linking [2]
- Ensure adequate fixative volume (≥10:1 fixative:tissue ratio) for complete penetration [1]
- Document fixation duration precisely for future reference and troubleshooting [7]
Alternative Fixative Protocol for Challenging Antigens
This protocol utilizes precipitating fixatives for targets that are poorly preserved with formaldehyde-based methods, particularly applicable to frozen sections and specialized research applications [4].
Materials Required:
- Cold acetone (pre-chilled to -20°C)
- Cold methanol (pre-chilled to -20°C)
- Acetone:methanol mixture (1:1, pre-chilled to -20°C)
- Tris-buffered saline (TBS)
- Normal serum from secondary antibody host
- Triton X-100
- Cryostat or freezing microtome
Procedure:
- Tissue Preparation: Snap-freeze fresh tissue in liquid nitrogen-cooled isopentane or embed in OCT compound and section using a cryostat (8-12μm thickness) [4].
- Section Mounting: Mount sections on charged or adhesive-coated slides and air-dry for 3-5 minutes at room temperature [4].
- Fixation: Immerse slides in pre-chilled fixative for 10 minutes at -20°C:
- Washing: Rinse slides in TBS (3 changes, 10 minutes each) to remove fixative [4].
- Optional Permeabilization: For formaldehyde-fixed frozen sections, permeabilize with 0.3% Triton X-100 in TBS for 10-15 minutes [4]. Note: This step is often unnecessary with alcohol-based fixatives due to their inherent permeabilization effects.
- Blocking: Incubate sections with blocking buffer (10% normal serum, 0.3% Triton X-100 in TBS) for 1 hour at room temperature to reduce non-specific binding [4].
- Immunostaining: Proceed with standard IHC protocols for primary and secondary antibody incubation [4].
Applications and Limitations:
- Particularly effective for post-synaptic density proteins and other challenging targets [4]
- May produce inferior morphological preservation compared to aldehyde fixation [4]
- Generally incompatible with antigen retrieval techniques [3]
- Suitable for multiplexed molecular studies requiring DNA, RNA, or protein analysis from same tissue [4]
Diagram 2: Fixation method selection workflow.
The Scientist's Toolkit: Essential Research Reagents and Materials
Table 3: Essential Reagents for Tissue Fixation and Processing
| Reagent/Material | Function/Purpose | Application Notes | Quality Considerations |
|---|---|---|---|
| Paraformaldehyde (PFA) | Cross-linking fixative | Requires fresh preparation; 4% solution common | High purity; minimal methanol content [3] |
| Neutral Buffered Formalin | Standardized fixative | Ready-to-use; 10% solution standard | Consistent buffering prevents acid formation [2] |
| Glyoxal (40% stock) | Alternative cross-linker | Must be freshly prepared at specific pH | Check for oxidation products; aliquot storage [5] |
| Acetone (Molecular Grade) | Precipitating fixative | Pre-chill to -20°C for optimal results | Anhydrous grade minimizes water content [4] |
| Methanol (HPLC Grade) | Precipitating fixative | Harsher than acetone; useful for some epitopes | High purity reduces background staining [4] |
| Ethanol Series | Dehydration for FFPE | Gradual concentration (70%, 95%, 100%) | Avoid hydration from atmosphere [6] |
| Xylene or Substitutes | Clearing agent | Removes ethanol prior to paraffin infiltration | Proper ventilation required; substitutes less hazardous [6] |
| Low-Melt Paraffin | Embedding medium | Optimal melting point ~56-58°C | Polymer-free for uniform sectioning [6] |
| Charged Microscope Slides | Section adhesion | Prevents tissue detachment during staining | Positively charged surfaces enhance adhesion [7] |
| Antigen Retrieval Buffers | Epitope unmasking | Citrate (pH 6.0) or EDTA (pH 8.0/9.0) | pH selection antibody-dependent [6] |
The critical role of fixation in IHC cannot be overstated, as it establishes the foundation for all subsequent analysis and interpretation. Successful fixation requires a strategic approach that balances morphological preservation with antigen accessibility, taking into account the specific requirements of the target epitopes, tissue type, and research objectives [2] [3].
While formaldehyde-based methods remain the gold standard for most applications, emerging research continues to refine our understanding of alternative fixatives and their specialized uses [5] [4]. The methodological rigor applied during fixation directly correlates with the reliability and reproducibility of IHC results, emphasizing the need for standardized protocols, careful documentation, and appropriate quality control measures [7]. By understanding the fundamental principles and practical considerations outlined in this application note, researchers can optimize fixation strategies to maximize both the structural fidelity and immunoreactivity of their tissue specimens, thereby ensuring the highest quality data for scientific investigation and diagnostic applications.
Tissue fixation is a critical first step in immunohistochemistry (IHC) that aims to preserve cellular morphology and tissue architecture in a "life-like state" while preventing degradation by autolysis or putrefaction [8]. Among the various fixation methods, cross-linking fixatives represent the gold standard for many applications due to their ability to create stable covalent bonds between biomolecules, thereby forming an insoluble macromolecular network that stabilizes tissue structure and antigenicity [9] [8]. The three most prominent cross-linking fixatives—formaldehyde, paraformaldehyde, and glutaraldehyde—serve as fundamental tools in biomedical research and diagnostic pathology.
These aldehydes function by forming bridges between proteins, nucleic acids, and other cellular components, effectively "gluing" them together into a hardened matrix that can withstand subsequent processing and staining procedures [10] [11]. While this cross-linking action excellently preserves morphological detail, it can also mask antigenic epitopes by altering protein conformation or creating steric hindrances that prevent antibody binding [12]. This dual nature of providing structural preservation while potentially compromising antigen detection creates a fundamental tension in IHC workflow, necessitating careful optimization of fixation protocols based on the specific antigens and tissue types under investigation [10] [13].
Understanding the distinct mechanisms, advantages, and limitations of each cross-linking fixative is therefore essential for researchers and drug development professionals seeking to generate reproducible, high-quality IHC data. The following sections provide a detailed examination of the chemical properties, cross-linking mechanisms, and practical applications of formaldehyde, paraformaldehyde, and glutaraldehyde, supported by experimental data and optimized protocols for IHC research.
Chemical Properties and Cross-Linking Mechanisms
Formaldehyde and Paraformaldehyde Chemistry
Formaldehyde (HCHO) is a pungent, water-soluble gas that exists in aqueous solutions primarily as methylene hydrate (HO-CH₂-OH) [11]. Commercial formaldehyde solutions, known as formalin, typically contain 37-40% formaldehyde by weight, with most formaldehyde existing as low-molecular-weight polymers (n = 2-8) and approximately 10% methanol added to prevent polymerization and precipitation [11]. The terms "formalin" and "formaldehyde" are often used interchangeably, though their concentrations differ significantly; 10% neutral-buffered formalin (NBF) actually contains approximately 4% formaldehyde by volume [10].
Paraformaldehyde (PFA) represents the solid, polymeric form of formaldehyde, consisting of long chains (n up to 100) of formaldehyde units [11]. To generate an effective fixative solution, paraformaldehyde must be "depolymerized" by heating to 60-65°C in slightly alkaline aqueous buffer, which hydrolyzes the polymers to release monomeric formaldehyde [11]. Solutions prepared from PFA are preferred for many research applications because they lack the methanol and formate ions found in commercial formalin, which can potentially interfere with certain histological procedures [11].
The cross-linking mechanism of formaldehyde involves a two-step process. Initially, formaldehyde molecules rapidly form hydroxymethyl adducts by reacting with primary amines (e.g., lysine side chains), sulfhydryl groups (cysteine), amide groups (glutamine, asparagine), guanidine groups (arginine), and aromatic ring structures (tyrosine, phenylalanine) [12] [11]. Subsequently, these adducts slowly form methylene bridges (-CH₂-) between closely spaced reactive groups, with the most common cross-link occurring between the nitrogen of a lysine side chain and the nitrogen of a peptide linkage [11]. This cross-linking process continues for days to weeks, with initial protein binding largely completed within 24 hours [11].
Table 1: Fundamental Properties of Cross-Linking Fixatives
| Property | Formaldehyde | Paraformaldehyde | Glutaraldehyde |
|---|---|---|---|
| Chemical Formula | HCHO (monomer) | (HCHO)ₙ (polymer) | OHC-(CH₂)₃-CHO |
| Typical Fixative Concentration | 4% (as in 10% NBF) [10] | 4% [10] | 0.5-4% [10] |
| Molecular Size | Small (30 Da monomer) | Small (when depolymerized) | Larger (100 Da) [11] |
| Penetration Rate | Fast [11] | Fast | Slow [11] |
| Cross-linking Type | Monofunctional, forming methylene bridges [11] | Identical to formaldehyde | Bifunctional, extensive cross-links [11] |
| Primary Targets | Amino groups, sulfhydryl groups, amides, aromatic rings [12] | Identical to formaldehyde | Amino groups, sulfhydryl groups [10] |
Glutaraldehyde Chemistry and Mechanisms
Glutaraldehyde (OHC-(CH₂)₃-CHO) is a dialdehyde compound with substantially different chemical properties and cross-linking capabilities compared to formaldehyde. In aqueous solutions, glutaraldehyde exists as a complex mixture of monomers, hydrates, and cyclic hemiacetals of varying polymerization states [11]. The biological activity and fixation quality depend critically on the molecular composition, with "EM grade" glutaraldehyde containing predominantly small monomers and oligomers that can penetrate tissues effectively, unlike "technical grade" preparations that contain larger polymers unsuitable for microscopic fixation [11].
The cross-linking mechanism of glutaraldehyde involves both aldehyde groups reacting with primary amines and other nucleophilic sites on proteins [10]. Each glutaraldehyde molecule can form bridges between protein chains, with the flexible 3-carbon spacer allowing connections over variable distances [11]. This results in more extensive and stable cross-linking compared to formaldehyde, as glutaraldehyde can create a dense network of interconnected proteins through both ends of its molecule and through aldehyde side chains present in polymeric forms [11]. The cross-linking reaction occurs relatively quickly (minutes to hours) compared to formaldehyde, leading to rapid tissue stabilization [11].
A significant consequence of glutaraldehyde fixation is the introduction of numerous unreacted aldehyde groups that remain in the tissue after fixation [11]. These free aldehydes can cause problematic background staining in subsequent histochemical procedures by reacting with amine-containing detection reagents such as antibodies or Schiff's reagent [11]. Therefore, additional processing steps—either quenching with inert amine-containing molecules like ethanolamine or lysine, or blocking with sodium borohydride—are typically required before immunohistochemical staining of glutaraldehyde-fixed tissues [10].
Diagram 1: Glutaraldehyde creates extensive protein networks but leaves free aldehyde groups that require blocking before IHC.
Comparative Analysis of Fixative Properties
Structural Preservation and Antigenicity
The cross-linking fixatives vary significantly in their ability to preserve tissue structure while maintaining antigen recognition. Formaldehyde and paraformaldehyde provide a balanced approach, offering reasonable morphological preservation while retaining sufficient antigenicity for most IHC applications, particularly after appropriate antigen retrieval [10] [12]. The cross-links formed by formaldehyde are partially reversible through heat-induced epitope retrieval (HIER), which explains why antigens in formalin-fixed, paraffin-embedded (FFPE) tissues can often be successfully detected after such treatment [12].
In contrast, glutaraldehyde's extensive cross-linking creates superior ultrastructural preservation, making it the fixative of choice for electron microscopy studies [10] [11]. However, this same property severely compromises antigenicity by creating significant steric hindrance and conformational changes that prevent antibody binding [11]. The dense network of cross-links also impedes penetration of large molecules, including antibodies and even paraffin wax during tissue processing, leading to potential cutting difficulties and artifactual staining patterns [11].
Table 2: Functional Properties in Immunohistochemistry Applications
| Property | Formaldehyde/PFA | Glutaraldehyde |
|---|---|---|
| Structural Preservation | Good for light microscopy [10] | Excellent, ideal for electron microscopy [10] [11] |
| Antigen Preservation | Variable, often requires antigen retrieval [12] | Poor due to extensive cross-linking and epitope masking [11] |
| Penetration Rate | Rapid penetration (small molecules) [11] | Slow penetration (larger molecules) [11] |
| Fixation Time | Cross-linking continues for days [11] | Rapid action (minutes to hours) [11] |
| Post-Fixation Processing | Standard processing usually sufficient | Often requires aldehyde blocking/quenching [10] |
| Compatibility with IHC | Good to excellent after optimization [10] | Poor to fair, severely compromises many antigens [11] |
Mechanical and Physical Changes to Tissues
Cross-linking fixatives significantly alter the mechanical properties of cells and tissues. Recent quantitative studies using atomic force microscopy (AFM) have demonstrated that PFA fixation dramatically increases cellular stiffness in a concentration-dependent manner [14]. Mouse fibroblast cells showed a gradual increase in Young's modulus from approximately 3.5 kPa in live cells to 18 kPa after treatment with 4% PFA, with the most dramatic changes occurring between 0.1% and 4% PFA concentrations [14]. Concurrent measurements of cell membrane fluctuation amplitude revealed a complementary decrease from approximately 43 nm in live cells to 12 nm after 4% PFA treatment, indicating restricted membrane mobility due to protein cross-linking [14].
These mechanical changes follow a distinct transition pattern, with minimal effects below 0.001% PFA, a dramatic transition between 0.1% and 4% PFA where cellular stiffness increases and membrane fluctuations decrease significantly, and a stabilization plateau above 4% PFA where additional cross-linking provides diminishing returns [14]. This concentration-dependent relationship validates the empirical standardization of 4% PFA for cell fixation protocols while providing a quantitative framework for understanding the cross-linking process.
Similar effects occur with glutaraldehyde fixation, though the extent of cross-linking and consequent tissue hardening is substantially more pronounced [15] [11]. The increased rigidity of glutaraldehyde-fixed red blood cells has been utilized to mimic the mechanical properties of malaria-infected cells in hydrodynamic studies [15]. However, researchers must be aware that glutaraldehyde addition significantly alters the osmolality of fixation buffers in a concentration-dependent manner, potentially inducing artifactual shape changes in sensitive cell types [15].
Experimental Protocols and Methodologies
Preparation of Fixative Solutions
4% Paraformaldehyde in 0.1 M Phosphate Buffer
This widely used fixative provides excellent preservation for many IHC applications while avoiding the methanol and formate ions present in commercial formalin [10] [11].
- Reagents Required: Paraformaldehyde powder (40 g), 0.1 M phosphate buffer (1 L; prepared with 3.2 g NaH₂PO₄ and 10.9 g Na₂HPO₄ in 1 L distilled water) [10]
- Preparation Protocol:
- Add 40 g paraformaldehyde to 1 L of 0.1 M phosphate buffer [10]
- Heat the mixture to 60°C while stirring on a hot plate, working in a fume hood [10]
- Add 1-2 drops of 1 N NaOH to clarify the solution—this alkaline catalyst promotes depolymerization [10] [11]
- Continue stirring until the solution becomes clear (typically 30-60 minutes)
- Cool the solution to room temperature and filter through Whatman No. 1 filter paper
- Adjust pH to 7.2-7.4 if necessary and store at 4°C for up to one week
4% Paraformaldehyde - 1% Glutaraldehyde Combination
This combination fixative provides enhanced structural preservation for challenging applications, balancing the rapid penetration of PFA with the superior cross-linking of glutaraldehyde [10].
- Reagents Required: Prepared 4% PFA in 0.1 M phosphate buffer (as above), 25% glutaraldehyde stock solution (EM grade) [10]
- Preparation Protocol:
- Prepare 4% PFA in 0.1 M phosphate buffer as described above
- Add 20 mL of 25% glutaraldehyde stock solution per 500 mL of 4% PFA solution to achieve final concentration of 1% glutaraldehyde [10]
- Mix thoroughly and adjust pH to 7.2-7.4 if necessary
- Use immediately for optimal results
10% Neutral-Buffered Formalin (NBF)
The standard fixative in pathology laboratories, providing consistent results for routine histology and many IHC applications [10].
- Reagents Required: Formalin (37-40% formaldehyde), sodium phosphate dibasic (anhydrous, 6.5 g), sodium phosphate monobasic (4.0 g), distilled water (900 mL) [10]
- Preparation Protocol:
- Dissolve phosphate salts in 900 mL distilled water
- Add 100 mL formalin (37-40% formaldehyde) to bring final volume to 1 L [10]
- Mix thoroughly and check pH (should be 7.0-7.4)
- Stable for several months when stored in sealed containers at room temperature
Tissue Fixation Protocol for IHC
Proper tissue fixation requires careful attention to timing, temperature, and specimen size to achieve optimal results. The following protocol outlines a standardized approach for perfusion and immersion fixation of tissue specimens for IHC research.
Diagram 2: Standard tissue fixation workflow begins with vascular perfusion followed by immersion post-fixation.
Materials and Reagents:
Perfusion Fixation Procedure:
- Anesthetize animal according to approved institutional protocol
- Perfuse transcardially with 30-50 mL cold saline containing 17 U/mL heparin at rate of 5 mL/min until tissue is cleared of blood [16]
- Immediately perfuse with 30-50 mL fixation buffer at same flow rate [16]
- Rapidly dissect tissues of interest and place in fresh fixation buffer
Immersion Fixation Procedure:
- Trim tissue to dimensions not exceeding 4 mm thickness to ensure adequate fixative penetration [13]
- Immerse tissues in 20x volume of fixation buffer relative to tissue size
- Fix for 24 hours at 4°C for optimal results [16]
- For formaldehyde fixation, avoid overfixation beyond 24-48 hours as this can mask antigens and require more vigorous antigen retrieval [13]
Post-fixation Processing:
- Rinse tissues in TBS and incubate in TBS for 24 hours at 4°C to stop fixation process [16]
- For cryostat sections, incubate tissue in 30% sucrose in PBS for 1-3 days for cryoprotection [16]
- Freeze tissue on dry ice and store at -80°C until sectioning
- For paraffin embedding, process through graded alcohols, clearing agents, and infiltrate with paraffin using standard protocols
Effect of Fixation Time on Antigen Detection
Fixation duration significantly impacts antigen preservation and detectability in IHC. A systematic study investigating neutrophil extracellular traps (NETs) demonstrated that fixation time with 4% PFA differentially affected various markers [17]. While staining intensity for myeloperoxidase (MPO) and DNA/histone-1-complexes showed no significant change with fixation times ranging from 15 minutes to 5 days, citrullinated histone H3 (H3cit) detection was severely compromised after 24 hours of fixation compared to 30 minutes [17]. This epitope-specific sensitivity to cross-linking duration underscores the importance of optimizing fixation time for each target antigen.
Similar time-dependent effects have been observed with glutaraldehyde fixation, where extended fixation times progressively reduce antigenicity due to increased cross-linking density [11]. For this reason, brief glutaraldehyde fixation (15-30 minutes) followed by thorough washing and aldehyde blocking may preserve some antigenicity while providing superior morphological preservation compared to formaldehyde-based fixatives [17].
The Scientist's Toolkit: Essential Research Reagents
Table 3: Key Reagents for Cross-Linking Fixation Protocols
| Reagent | Function/Purpose | Application Notes |
|---|---|---|
| Paraformaldehyde (PFA) | Primary cross-linking fixative | Prepare fresh from powder; 4% solution standard for most applications [10] |
| Glutaraldehyde (EM grade) | Strong cross-linking for ultrastructure | Use at 0.5-4%; requires quenching of free aldehydes post-fixation [10] [11] |
| Phosphate Buffered Saline (PBS) | Physiological buffer for fixatives | Maintains pH and osmolarity; standard at 0.1 M concentration [10] |
| Sodium Hydroxide (NaOH) | Catalyst for PFA depolymerization | Add 1-2 drops of 1N NaOH when preparing PFA solutions [10] |
| Sucrose | Cryoprotectant for frozen sections | Use 15-30% for light microscopy; 60% for ultrastructural studies [11] |
| Ethanolamine/Lysine | Aldehyde quenching agents | Block free aldehyde groups after glutaraldehyde fixation [10] |
| Sodium Borohydride | Reducing agent for aldehyde blocking | Alternative quenching method; use at 0.1% concentration [11] |
| Optimal Cutting Temperature (OCT) Compound | Embedding medium for frozen sections | Provides support for cryostat sectioning [10] |
Antigen Retrieval Strategies for Cross-Linked Tissues
The cross-links introduced by aldehyde fixatives frequently mask antigenic epitopes, necessitating retrieval methods to reverse some cross-links and restore antibody accessibility. Heat-induced epitope retrieval (HIER) has revolutionized IHC on formalin-fixed tissues by using high temperature treatment in specific buffers to break methylene bridges and other formaldehyde-induced modifications [12]. The effectiveness of HIER depends on multiple factors including buffer composition, pH, temperature, and duration of heating [12].
Comparative studies of crosslinking (formalin) and non-crosslinking fixatives have demonstrated that formalin-fixed tissues generally require more vigorous HIER conditions (longer microwave treatment duration) compared to tissues fixed with non-crosslinking agents [12]. For most antibodies tested, HIER at pH 9 yielded superior results compared to pH 6, though optimal conditions must be determined empirically for each antigen-antibody combination [12].
For glutaraldehyde-fixed tissues, antigen retrieval is significantly more challenging due to the more stable nature of the cross-links formed [11]. Extended protease digestion or highly aggressive HIER conditions may partially recover antigenicity, but often at the expense of morphological preservation [11]. This limitation reinforces the recommendation to avoid glutaraldehyde fixation when conducting IHC studies unless absolutely necessary for correlative ultrastructural analysis.
Formaldehyde, paraformaldehyde, and glutaraldehyde represent fundamental tools in the IHC researcher's arsenal, each offering distinct advantages and limitations based on their cross-linking mechanisms. Formaldehyde and paraformaldehyde provide a practical balance between morphological preservation and antigen accessibility, particularly when fixation time is carefully controlled and appropriate antigen retrieval methods are employed. Glutaraldehyde delivers superior ultrastructural preservation but severely compromises antigen detection, limiting its utility in routine IHC applications.
The selection of an appropriate cross-linking fixative must be guided by the specific research objectives, giving consideration to the required structural detail, antigen sensitivity to cross-linking, and compatibility with downstream detection methods. As personalized medicine increasingly relies on biomarker detection in tissue specimens, standardized fixation protocols that preserve both morphology and antigenicity become increasingly critical for reproducible research and accurate diagnostic outcomes.
Future developments in fixation chemistry may provide enhanced alternatives that better balance these competing demands, but the fundamental principles of cross-linking fixation—as exemplified by formaldehyde, paraformaldehyde, and glutaraldehyde—will continue to underpin tissue preparation for immunohistochemistry research and diagnostic applications.
Precipitative fixatives, including acetone, methanol, and ethanol, are essential reagents in immunohistochemistry (IHC) and immunocytochemistry (ICC) research. Unlike cross-linking fixatives such as formalin, these solvents act by dehydrating samples and precipitating cellular proteins through disruption of hydrogen bonds and hydrophobic interactions, thereby denaturing proteins and exposing epitopes. This application note provides a detailed examination of precipitative fixatives' mechanisms, applications, and optimized protocols for drug development and research scientists. The content includes structured quantitative comparisons, standardized experimental methodologies, and visual workflows to support reproducible results in tissue fixation for biomarker research and diagnostic applications.
Precipitative fixatives, classified as coagulant or denaturing fixatives, represent a fundamental category of tissue preservation agents distinct from cross-linking alternatives. These solvents, primarily acetone, methanol, and ethanol, function by rapidly removing water from biological specimens, disrupting the tertiary structure of proteins and leading to their irreversible precipitation. The molecular structures of methanol and ethanol closely resemble water, enabling them to compete for protein hydrogen bonds and effectively replace water molecules in tissues. This action reduces the dielectric constant, causing proteins to precipitate at their isoelectric points while potentially stabilizing protein secondary structures. Acetone operates similarly but exhibits stronger dehydration properties and more extensive lipid extraction, which can impact morphological preservation but enhances permeability for antibody access. In contemporary IHC/ICC workflows, these fixatives offer significant advantages for labile antigens, frozen sections, and surface marker detection, though they present challenges in architectural preservation that require careful protocol optimization.
Mechanisms of Action
Molecular Interactions
Precipitative fixatives exert their effects through physicochemical interactions with cellular components. Methanol and ethanol, due to their structural similarity to water, effectively displace water molecules from protein structures, disrupting hydrogen bonding networks and hydrophobic interactions that maintain native protein conformation. This displacement alters the solvation environment, reducing the dielectric constant and promoting protein aggregation through exposure of internal hydrophobic regions. Acetone, a stronger dehydrating agent, additionally extracts lipid components from cellular membranes, creating pores that enhance antibody penetration but may compromise structural integrity. Unlike cross-linking fixatives that create covalent methylene bridges between proteins, precipitative fixatives cause protein coagulation without molecular bridging, thereby preserving antigenic sites from structural masking while potentially altering conformational epitopes through denaturation.
Structural Consequences
The biochemical interactions of precipitative fixatives produce characteristic morphological outcomes in processed tissues. The dehydration process typically results in varying degrees of tissue shrinkage, with alcohol-based fixatives causing more pronounced contraction than aldehyde-based alternatives. Cellular architecture generally remains recognizable, though cytoplasmic and extracellular elements may exhibit reduced detail, particularly following acetone fixation which extracts lipid components. Nuclear preservation is typically fair, with chromatin patterns remaining discernible, though formalin generally provides superior nuclear detail. The precipitation of proteins creates a porous matrix that facilitates antibody penetration, often enhancing immunoreactivity for many epitopes, particularly large protein antigens and immunoglobulins that may be obscured by formalin-induced cross-links.
Comparative Analysis of Precipitative Fixatives
Table 1: Characteristic Comparison of Common Precipitative Fixatives
| Fixative | Mechanism | Penetration Rate | Tissue Effects | Optimal Applications | Key Limitations |
|---|---|---|---|---|---|
| Acetone | Protein precipitation & lipid extraction | Very fast | Extensive dehydration & lipid loss; poor morphology preservation | Snap-frozen tissues; cytological smears; cell surface antigens | Significant tissue shrinkage; compromised ultrastructural detail |
| Methanol | Protein denaturation & dehydration | Fast | Moderate shrinkage; nuclear preservation fair; harsher than acetone | Blood films; cultured cells; DNA/RNA preservation | Reduced cytoplasmic detail; increased brittleness |
| Ethanol | Protein precipitation & dehydration | Moderate | Comparable to methanol; causes tissue distortion | Cytology smears; glycogen preservation; enzyme histochemistry | Nuclear & cytoplasmic distortion; soluble component loss |
| Alcohol-Based Formulations | Combined precipitation & coagulation | Variable | Balanced effects; customizable for specific needs | Routine histopathology; specialized IHC applications | Formulation-dependent artifacts; requires optimization |
Table 2: Performance Metrics in Immunohistochemistry Applications
| Fixative | Antigen Preservation | Morphology Quality | Staining Intensity | Background Staining | Antigen Retrieval Compatibility |
|---|---|---|---|---|---|
| Acetone | Excellent for many epitopes | Fair | Strong | Low | Not recommended |
| Methanol | Good for large proteins | Fair to poor | Strong | Low to moderate | Not recommended |
| Ethanol | Good for enzymes | Fair | Moderate | Low | Not recommended |
| Formalin | Variable (epitope masking) | Excellent | Moderate to strong | Higher | Required (HIER/PIER essential) |
Experimental Protocols
Standard Fixation Protocol for Frozen Tissue Sections
Principle: This protocol optimizes the preservation of antigenicity while maintaining adequate morphology in unfixed, snap-frozen tissues, which are particularly susceptible to degradation.
Materials:
- Research Reagent Solutions:
- Acetone (100%, pre-cooled): Primary precipitative fixative
- Methanol (100%, pre-cooled): Alternative precipitative fixative
- Tris-buffered saline (TBS): Washing buffer
- Normal goat serum: Blocking agent
- Triton X-100: Permeabilization detergent
- Primary antibodies: Target-specific immunoprobes
- Fluorescent-conjugated secondary antibodies: Detection reagents
- DAPI solution: Nuclear counterstain
- Aqua-Poly/Mount: Aqueous mounting medium
Procedure:
- Tissue Preparation: Extract fresh tissue and immediately embed in optimal cutting temperature (OCT) compound. Snap-freeze in liquid nitrogen-cooled isopentane and store at -80°C until sectioning.
- Sectioning: Cut tissue into 12 μm thick sections using a cryostat maintained at -18°C to -20°C. Mount sections on Superfrost Plus microscope slides.
- Drying: Air-dry mounted sections for 3-5 minutes at room temperature to enhance adhesion.
- Fixation: Immerse slides in pre-cooled (-20°C) fixative for 10 minutes:
- For acetone fixation: Transfer to -20°C acetone for 10 minutes, then air-dry for 10-20 minutes
- For methanol fixation: Transfer to -20°C methanol for 10 minutes
- For acetone:methanol mixture: Transfer to -20°C 1:1 acetone:methanol for 10 minutes, then air-dry for 10-20 minutes
- Washing: Rinse slides three times in TBS for 10 minutes each at room temperature.
- Permeabilization and Blocking: Encircle tissue with hydrophobic pen. Apply blocking buffer (10% normal goat serum, 0.3% Triton X-100 in TBS) for 1 hour at room temperature.
- Primary Antibody Incubation: Apply optimized primary antibody dilution in blocking buffer and incubate overnight at 4°C in a humidified chamber.
- Secondary Antibody Incubation: Wash slides (3×10 minutes in TBS) and apply appropriate fluorescent-conjugated secondary antibodies for 1 hour at room temperature, protected from light.
- Counterstaining and Mounting: Wash slides, incubate with DAPI solution (1:20,000 in PBS) for nuclear staining, rinse, and mount with aqueous mounting medium.
- Imaging: Acquire images using fluorescence microscopy with standardized exposure settings across compared samples.
Troubleshooting Notes:
- Incomplete fixation: Ensure fixative is fresh and tissue sections are completely immersed
- Excessive morphology loss: Reduce fixation time or consider alcohol-based formulations
- High background: Optimize blocking conditions and antibody concentrations
- Poor antigen preservation: Test alternative precipitative fixatives or consider cross-linking fixatives with antigen retrieval
Protocol for Cell Culture and Cytological Preparations
Principle: This method preserves cellular architecture and antigen accessibility in monolayer cultures and cytological smears where rapid fixation is critical.
Materials:
- Research Reagent Solutions:
- Ice-cold acetone (100%): Primary fixative for cell surface antigens
- Methanol (100%): Alternative fixative for intracellular targets
- Phosphate-buffered saline (PBS): Washing and dilution buffer
- Bovine serum albumin (BSA): Blocking agent
- Paraformaldehyde (4%): Optional mild cross-linking fixative for comparison
- Appropriate primary and secondary antibodies: Target-specific detection system
Procedure:
- Cell Preparation: Culture cells on sterile glass coverslips or prepare cytological smears on charged slides.
- Fixative Selection: Choose fixative based on target antigen:
- For large protein antigens (e.g., immunoglobulins): Use ice-cold acetone (100%) or methanol (100%)
- For membrane surface antigens: Prefer acetone fixation
- For combined preservation: Test methanol:acetone (1:1) mixture
- Fixation:
- Direct method: Aspirate culture medium and immediately add pre-cooled fixative for 10 minutes at -20°C
- Gentle method: For delicate cells, add equal volume of 4% paraformaldehyde to culture medium for 2 minutes pre-fixation, then replace with 2% fixative for 20 minutes
- Post-fixation Processing: Wash cells three times with PBS (5 minutes each). Permeabilize if needed (0.1% Triton X-100 for 10 minutes) and block with 3% BSA for 30 minutes.
- Immunostaining: Proceed with standard immunostaining protocol appropriate for the detection system.
Applications in IHC/ICC Research
Specialized Research Applications
Precipitative fixatives enable specific research applications where cross-linking fixatives prove suboptimal. For snap-frozen tissues, acetone and methanol fixation preserve enzyme activity and maintain antigenicity for targets compromised by formalin cross-linking. In neuroscience research, particularly for post-synaptic density proteins like Shank1, Shank2, and Shank3, precipitative fixatives outperform formaldehyde by avoiding epitope masking in densely packed protein assemblies with high molecular dynamics. Cytological smears and blood films benefit from rapid methanol or acetone fixation, which preserves cellular morphology while permitting accurate immunophenotyping. Large protein antigens, including immunoglobulins, demonstrate enhanced immunoreactivity following alcohol-based fixation due to reduced conformational masking. When combining protein detection with nucleic acid analysis, precipitative fixatives preserve RNA and DNA integrity better than formalin, enabling multi-omics approaches from single specimens.
Comparative Performance in Diagnostic Applications
Recent comparative studies demonstrate the strategic value of precipitative fixatives in diagnostic histopathology. Research evaluating formalin versus alcohol-based fixatives (70% ethanol-methanol-acetic acid mixture) revealed significantly stronger IHC staining intensity in alcohol-fixed tissues for both cytokeratin (86.6% with 3+ staining vs. 63.3% in formalin-fixed) and CD3 markers (83.3% with 3+ staining vs. 66.6% in formalin-fixed). Background staining was substantially reduced in alcohol-fixed specimens (13.3% for cytokeratin vs. 36.7% with formalin), enhancing signal-to-noise ratio. However, morphological evaluation confirmed superior nuclear and cytoplasmic detail preservation in formalin-fixed tissues (mean score 2.7±0.3 vs. 2.3±0.4 for alcohol-fixed), highlighting the critical trade-off between optimal morphology and maximal antigen preservation that guides fixative selection.
Integrated Workflow for Method Selection
Technical Considerations and Limitations
Optimization Strategies
Successful implementation of precipitative fixatives requires systematic optimization of several parameters. Fixation duration must be balanced to achieve complete preservation without excessive hardness or brittleness; typically 10-15 minutes for acetone and methanol at -20°C. Temperature control is critical, with pre-cooled fixatives (-20°C) generating superior morphology compared to room temperature applications. Tissue thickness limitations apply, particularly for alcohol-based formulations which penetrate more slowly than formalin; sections should not exceed 10mm thickness for uniform fixation. Antibody compatibility must be empirically determined, as some epitopes may not withstand the denaturing conditions of precipitative fixation. Post-fixation processing should avoid antigen retrieval techniques, which are generally too harsh for precipitative-fixed tissues and may compromise structural integrity. For challenging targets, sequential or combination fixation approaches may be beneficial, beginning with mild formalin fixation followed by brief alcohol treatment.
Limitations and Alternative Approaches
Despite their advantages for specific applications, precipitative fixatives present significant limitations. Structural preservation remains inferior to cross-linking fixatives, with particular deficiency in maintaining cytoplasmic detail and extracellular matrix relationships. Tissue shrinkage represents a consistent challenge, potentially reaching 20-30% volume reduction in alcohol-fixed specimens, complicating morphometric analyses. Long-term storage of precipitative-fixed tissues proves problematic due to continued dehydration and increased brittleness over time. Inconsistency in penetration may create fixation gradients in thicker specimens, producing variable staining results. For applications requiring superior ultrastructural preservation, alternate approaches including mild formaldehyde fixation with optimized antigen retrieval or specialized non-aldehyde cross-linking agents (e.g., carbodiimides, diimidoesters) may provide superior alternatives while maintaining epitope accessibility.
Precipitative fixatives, including acetone, methanol, and alcohol-based formulations, represent essential tools in the IHC/ICC research arsenal, offering distinct advantages for antigen preservation, particularly for labile epitopes compromised by formalin cross-linking. Their mechanism of action through protein precipitation and dehydration maintains immunologic competence while enabling rapid processing of frozen sections and cytological preparations. The experimental protocols and decision frameworks presented in this application note provide researchers with standardized methodologies for implementing these fixatives in drug development and diagnostic applications. While morphological preservation remains superior with cross-linking alternatives, the enhanced antigenicity achieved with precipitative fixation ensures their continued relevance in advanced biomarker research and specialized diagnostic applications requiring maximal epitope accessibility.
The foundational step of tissue fixation is critical for the success of any immunohistochemistry (IHC) research project, directly influencing the preservation of morphology and the accessibility of antigenic epitopes. This application note provides a detailed comparative analysis of the two principal fixation mechanisms—cross-linking and precipitation. Within, researchers will find structured data on the properties of common fixatives, detailed protocols for their application in IHC, and visual guides to inform experimental design. The objective is to equip scientists and drug development professionals with the knowledge to select and optimize fixation strategies that ensure reliable and reproducible results for both research and diagnostic purposes.
In the field of immunohistochemistry, fixation is the indispensable process that stabilizes biological tissue, halting degradation and preserving cellular structure in a "life-like state" [8]. Its primary roles are to: (1) preserve cell morphology and tissue architecture, (2) inactivate proteolytic enzymes (autolysis), (3) protect against microbial contamination, and (4) strengthen the sample to withstand subsequent processing and staining steps [10] [8]. The choice of fixation method has a decisive impact on the outcome of IHC, as it affects every downstream process, including antigen retrieval and the binding efficiency of antibodies [2] [18]. Incorrectly performed fixation is often irreversible and can lead to significant artefacts, compromising data integrity [2]. The two overarching mechanisms by which fixatives achieve this stabilization are cross-linking and precipitation, each with distinct advantages and limitations for specific research applications [2] [8] [19].
Core Mechanisms of Action
Cross-linking Fixation
Cross-linking fixatives, primarily aldehyde-based, function by creating covalent chemical bonds (methylene bridges) between reactive groups of adjacent biomolecules, particularly the amino groups of lysine residues in proteins [10] [2] [8]. This action creates a three-dimensional molecular meshwork that traps cellular constituents within a stable gel, thereby preserving ultrastructural detail with high fidelity [8] [19]. A key consideration is that this extensive cross-linking can mask the target epitopes recognized by antibodies, often necessitating an antigen retrieval step to reverse the masking and restore immunoreactivity [2] [18] [20].
Precipitating Fixation
Precipitating (or coagulant) fixatives, which include organic solvents like alcohols and acetone, operate by removing water from the tissue and disrupting the hydrogen bonds and hydrophobic interactions that maintain a protein's native tertiary structure [8] [3] [19]. This disruption leads to the denaturation and precipitation of soluble proteins, forming a permeable meshwork of protein strands [8]. While these fixatives can be excellent for preserving antigenicity for certain targets, they generally provide inferior cytological preservation compared to cross-linkers, often causing significant tissue shrinkage and hardening [10] [19].
The following diagram illustrates the fundamental differences in how these two fixative types interact with proteins at a molecular level.
Comparative Analysis of Fixative Properties
Selecting an appropriate fixative requires a balanced consideration of its impact on morphology, antigenicity, and practical handling. The tables below summarize the key characteristics and recommendations for common cross-linking and precipitating agents.
Table 1: Properties and Applications of Common Cross-linking Fixatives
| Fixative | Mechanism | Preservation of Morphology | Antigenicity Impact | Penetration Rate | Primary Applications |
|---|---|---|---|---|---|
| Formaldehyde/ Formalin [10] [8] [3] | Forms reversible methylene bridges between amino acids. | Good to excellent for light microscopy. | Can mask epitopes; often requires antigen retrieval. [18] | Slow to moderate, but deep. | Universal fixative for most proteins; standard for FFPE. [10] |
| Paraformaldehyde (PFA) [10] [3] | Same as formaldehyde; prepared without methanol. | Superior to formalin due to lack of methanol and polymers. | Similar to formaldehyde; epitope masking is common. | Moderate. | Ideal for perfusion and immunofluorescence; gold standard for research. |
| Glutaraldehyde [10] [8] [3] | Stronger, more extensive cross-links than formaldehyde. | Excellent; preferred for electron microscopy. | High degree of masking; often destroys antigenicity for IHC. | Very slow. | Primarily for electron microscopy; requires aldehyde quenching. [10] |
Table 2: Properties and Applications of Common Precipitating Fixatives
| Fixative | Mechanism | Preservation of Morphology | Antigenicity Impact | Penetration Rate | Primary Applications |
|---|---|---|---|---|---|
| Ethanol [8] [19] | Dehydration and protein denaturation/coagulation. | Moderate; can cause shrinkage and hardening. [10] | Good for many large protein antigens; may denature sensitive epitopes. | Fast. | Cytological smears; frozen sections; combined in mixtures. |
| Methanol [10] [3] [4] | Dehydration and denaturation; harsher than ethanol. | Poorer than formaldehyde; can reduce tissue quality. [4] | Can be superior for certain antigens (e.g., immunoglobulins). [10] | Fast. | Blood smears; frozen sections; acetone mixtures. |
| Acetone [10] [3] [4] | Precipitates proteins and extracts lipids. | Poor; adversely affects morphology. [10] | Excellent for many labile antigens; no cross-linking. | Very fast. | Frozen sections; post-fixation; cell smears. |
Table 3: Quantitative Comparison of Fixative Actions
| Parameter | Cross-linking Fixatives | Precipitating Fixatives |
|---|---|---|
| Effect on Soluble Proteins | Cross-links to insoluble network | Precipitates and coagulates |
| Tissue Hardening | Moderate | Significant [10] |
| Tissue Shrinkage | Initial swelling, then ~20-30% volume loss during processing [8] | Significant and immediate |
| Compatibility with Antigen Retrieval | High (often essential) [18] [20] | Low to none [3] |
| Suitability for Long-term Storage | Excellent (FFPE blocks) | Good (frozen tissues) |
| Impact on Nucleic Acids | Cross-links, complicating extraction [2] [4] | Minimal, better preservation for molecular studies [4] |
Detailed Experimental Protocols
Protocol A: Standard Fixation of Tissue for Paraffin Embedding (Cross-linking)
This protocol outlines the immersion fixation of tissue specimens using neutral buffered formalin (NBF), the standard for creating Formalin-Fixed Paraffin-Embedded (FFPE) tissue blocks for IHC [10] [20].
Research Reagent Solutions:
- 10% Neutral Buffered Formalin (NBF): 100 mL 37-40% formaldehyde, 4 g sodium phosphate monobasic, 6.5 g sodium phosphate dibasic, 900 mL distilled water. The methanol in commercial formalin slows polymerization. [10]
- Phosphate Buffered Saline (PBS): A standard isotonic buffer for washes and dilutions.
- Ethanol Series: 70%, 95%, and 100% ethanol for dehydration.
Methodology:
- Tissue Harvesting: Dissect tissue promptly and place into a volume of 10% NBF that is 15-20 times greater than the tissue volume.
- Fixation: Fix for 24-48 hours at room temperature. For uniform penetration, ensure tissue thickness does not exceed 3-5 mm. [19]
- Rinsing: Following fixation, rinse tissues thoroughly in PBS to remove excess fixative.
- Dehydration and Processing: Process tissues through a series of graded alcohols (70% → 95% → 100%) to dehydrate, followed by a clearing agent (e.g., xylene), and finally infiltrate with molten paraffin wax using an automated tissue processor. [20]
- Embedding and Sectioning: Embed the processed tissue in a paraffin block. Section at 4-5 µm thickness using a microtome and mount on charged glass slides.
- Deparaffinization and Staining: Prior to IHC, deparaffinize slides in xylene and rehydrate through a graded alcohol series to water.
Protocol B: Fixation of Fresh Frozen Tissue Sections (Precipitating)
This protocol is ideal for preserving antigenicity for targets that are sensitive to formalin cross-linking and is commonly used for subsequent immunofluorescence staining. [3] [21] [4]
Research Reagent Solutions:
- Ice-cold Acetone: Store at -20°C for fixation.
- Ice-cold Methanol: Store at -20°C for fixation.
- Tris-Buffered Saline with Triton (TBS-T): Used for washing and as a buffer component.
- Blocking Buffer: 5-10% normal serum (e.g., goat serum) in TBS-T.
Methodology:
- Tissue Freezing: Embed fresh, unfixed tissue in an Optimal Cutting Temperature (OCT) compound. Snap-freeze by immersing in liquid nitrogen-cooled isopentane. Store at -80°C. [10] [21]
- Sectioning: Cut tissue into thin sections (5-12 µm) using a cryostat and mount onto charged slides.
- Post-fixation: Air-dry slides for 5-10 minutes. Immerse slides in ice-cold acetone, methanol, or a 1:1 acetone:methanol mixture for 5-10 minutes at -20°C. [4]
- Drying: For acetone and acetone-containing fixatives, air-dry the slides for 10-20 minutes after fixation. [4]
- Washing: Wash slides three times for 5 minutes in TBS or PBS to remove the fixative.
- Immunostaining: Proceed directly to blocking and antibody incubation steps. Permeabilization is often unnecessary with alcohol/acetone fixation. [4]
The following workflow diagram provides a visual guide for selecting the appropriate fixation path based on research objectives.
The Scientist's Toolkit: Essential Research Reagents
Table 4: Key Reagents for Fixation and Associated Protocols
| Item | Function/Description | Application Notes |
|---|---|---|
| Paraformaldehyde (PFA) [10] | A polymer of formaldehyde; dissolved and hydrolyzed to create a pure, methanol-free formaldehyde fixative. | Gold standard for perfusion and research IHC; provides consistent, high-quality fixation. |
| 10% Neutral Buffered Formalin (NBF) [10] | A stable, buffered 4% formaldehyde solution, often with methanol to prevent polymerization. | The universal standard for clinical histopathology and diagnostic FFPE tissue blocks. |
| Glutaraldehyde [10] [3] | A dialdehyde that creates strong, extensive protein cross-links. | Used primarily for electron microscopy to preserve ultrastructural detail. |
| Acetone & Methanol [10] [4] | Organic solvents that precipitate proteins via dehydration and denaturation. | Ideal for fresh frozen sections and antigens destroyed by cross-linking; poor morphology. |
| Periodate-Lysine-Paraformaldehyde (PLP) [2] | A specialized fixative that cross-links carbohydrates via amino groups. | Excellent for preserving glycoprotein antigens. |
| Sodium Citrate Buffer (pH 6.0) [10] [20] | A common buffer for Heat-Induced Epitope Retrieval (HIER). | Effective for unmasking a wide range of epitopes in FFPE tissues. |
| EDTA Buffer (pH 8.0-9.0) [19] [20] | A basic buffer for HIER. | Often more effective for phosphorylated epitopes and over-fixed tissues. |
| Proteinase K [19] [21] | An enzyme for Protease-Induced Epitope Retrieval (PIER). | An alternative to HIER for some specific antigens; can damage morphology. |
| Ethanolamine or Lysine [10] | Amine-containing quenching agents. | Used to block free aldehyde groups after glutaraldehyde fixation to prevent non-specific antibody binding. |
The strategic selection between cross-linking and precipitating fixation is a critical determinant of success in immunohistochemistry. Cross-linking fixatives, led by formaldehyde, offer superior morphological preservation and are the bedrock of clinical diagnostics, albeit often at the cost of requiring antigen retrieval to uncover masked epitopes. In contrast, precipitating fixatives like acetone and methanol provide superior antigenicity for many labile targets and are more amenable to concurrent nucleic acid analysis, but they sacrifice fine cellular detail. There is no universal "ideal" fixative; the optimal choice is dictated by a careful balance of the research question, the nature of the target antigen, and the required level of structural preservation. A deep understanding of the comparative actions of these fixatives, as outlined in this application note, empowers researchers to make informed decisions, optimize their protocols, and generate robust, reliable, and interpretable data.
Choosing Between Perfusion and Immersion Fixation Techniques
Tissue fixation is a critical first step in immunohistochemistry (IHC) that preserves cellular morphology, prevents autolysis, and protects tissues from microbial contamination [10] [22]. The choice between perfusion and immersion fixation represents a significant methodological crossroads for researchers studying tissue architecture, particularly in neuroscience and drug development. This decision directly impacts the reliability of experimental outcomes through its effects on antigen preservation, structural integrity, and staining quality. While perfusion fixation offers rapid and uniform preservation through vascular delivery of fixatives, immersion fixation provides a simpler approach where tissues are submerged in fixative solution post-dissection [10]. Understanding the strengths, limitations, and appropriate applications of each method is essential for designing robust experimental protocols in immunohistochemistry research.
Core Principles and Comparative Analysis
Fundamental Mechanisms
Perfusion fixation involves the pressure-driven delivery of fixative through the vascular system, most commonly via transcardiac perfusion in experimental animals. This method utilizes the natural circulatory pathways to achieve rapid and uniform tissue preservation, effectively clearing blood from the vasculature while simultaneously fixing cellular structures [23] [24]. The procedure typically begins with a brief saline flush to remove blood components, followed by delivery of aldehyde-based fixatives that crosslink proteins throughout the tissue bed.
Immersion fixation relies on the passive diffusion of fixative into dissected tissue samples submerged in solution. The rate of preservation is governed by Fick's law of diffusion, where fixation time increases proportionally with tissue depth rather than with the square root of depth as seen with many other chemicals [25]. This fundamental physical limitation means that surface regions fix more rapidly than deep structures, potentially creating preservation gradients throughout the tissue.
Quantitative Comparison of Method Performance
Table 1: Direct comparison of perfusion and immersion fixation characteristics
| Parameter | Perfusion Fixation | Immersion Fixation |
|---|---|---|
| Fixation uniformity | High - relatively homogeneous staining throughout tissue [26] | Variable - optimal immunoreaction may be limited to 1-2mm depth in some antigens [26] |
| Structural preservation | Superior for deep brain structures and fragile cellular elements [23] [24] | Adequate for surface regions; may show vacuolization and myelin disbanding in deeper areas [25] |
| Processing time | Faster fixation (15-20 minutes for human hemispheres) [24] | Slower fixation (days to weeks for complete penetration) [25] [24] |
| Technical difficulty | High - requires surgical skill and specialized equipment [23] | Low - simple protocol requiring only tissue dissection and submersion [27] |
| Tissue size limitations | Suitable for whole organs and large specimens [24] | Limited by diffusion; better for small tissue blocks (<10mm) [27] |
| Impact on animal welfare | Terminal procedure in anesthetized animals [23] | Can be performed post-euthanasia, reducing potential suffering [23] |
| Antigen preservation | Variable - may require optimization for specific epitopes [28] | Can preserve some antigens damaged by perfusion [28] |
Table 2: Impact on specific neuronal structures based on fixation method
| Cellular Structure | Perfusion Fixation Performance | Immersion Fixation Performance |
|---|---|---|
| Axonal integrity | Minimal fragmentation when properly executed [23] | Increased fragmentation in sub-optimal conditions [23] |
| Dendritic spines | Well-preserved density and morphology [23] | Comparable density observed when fixation is adequate [23] |
| Mitochondrial morphology | Better preservation of structural integrity [23] | Alterations and swelling more likely [23] [25] |
| Synaptic ultrastructure | Excellent preservation for electron microscopy [28] | Can be visualized but with potential qualitative artifacts [25] |
| Extracellular space | May be increased in some brain regions [28] | Reduced in areas close to tissue surface [28] |
Decision Framework and Protocol Selection
The choice between fixation methods should be guided by research objectives, tissue characteristics, and practical constraints. The following diagram illustrates the key decision-making workflow:
Diagram 1: Fixation method decision workflow. This flowchart illustrates the key considerations when selecting between perfusion and immersion fixation, including research objectives, tissue characteristics, and practical constraints.
Method-Specific Applications
Perfusion fixation is particularly advantageous for:
- Whole-brain studies where uniform preservation of deep structures is essential
- Electron microscopy requiring optimal ultrastructural preservation [28]
- Labile antigens that degrade rapidly without immediate fixation
- Quantitative analyses of delicate structures like dendritic spines and mitochondria [23]
Immersion fixation may be preferable for:
- Human brain banking where perfusion is often impractical [25]
- Small tissue samples like dorsal root ganglia [29]
- Postmortem studies with extended postmortem intervals
- Pilot studies where technical simplicity is prioritized
- Antigens sensitive to aldehyde cross-linking [28]
Detailed Experimental Protocols
Transcardiac Perfusion Fixation Protocol
This protocol for transcardiac perfusion fixation is adapted from established methodologies [23] [30] and optimized for consistent results in rodent models.
Reagent Preparation
- Phosphate-buffered saline (PPS): 0.1M, pH 7.4
- Paraformaldehyde (PFA) fixative: 4% (w/v) in PBS, prepared fresh from powder
- Anesthetic: Isoflurane or injectable ketamine/xylazine
- Analgesic: Buprenorphine (administered 30min-2h pre-procedure) [23]
Procedure
- Anesthesia: Induce deep anesthesia using isoflurane (5% for induction, 1-2% for maintenance) or injectable anesthetics. Confirm absence of pedal and corneal reflexes.
- Surgical exposure: Pin animal to dissection board, make midline incision through skin and muscle to expose thoracic cavity.
- Cardiac cannulation: Carefully insert perfusion needle into left ventricle, secure with clamp.
- Vascular flush: Immediately open right atrium with fine scissors, perfuse with 50-100mL PBS at physiological pressure to clear blood.
- Fixative perfusion: Switch to 4% PFA, perfuse with 100-200mL at steady flow rate. Observe rigidification of limbs and tail indicating successful fixation.
- Tissue extraction: Dissect brain carefully, post-fix in 4% PFA for 2-4 hours at 4°C.
- Cryoprotection: Transfer to 30% sucrose in PBS until tissue sinks (typically 2-3 days) [30].
Critical Optimization Steps
- Flow rate control: Maintain consistent 5-10mL/min flow using perfusion pump [23]
- Fixative temperature: Use ice-cold (4°C) PFA to reduce enzymatic degradation
- pH stability: Maintain physiological pH (7.2-7.4) throughout procedure
- Post-fixation timing: Limit to 2-4 hours to prevent over-fixation and antigen masking
Immersion Fixation Protocol
This protocol provides guidelines for consistent immersion fixation of various tissue types [27] [25].
Reagent Preparation
- Fixative solution: 4% PFA in PBS or 10% neutral-buffered formalin
- Cryoprotection solution: 30% sucrose in PBS
- Processing solutions: Ethanol series (50%, 70%, 80%, 95%, 100%), xylene, paraffin
Procedure
- Tissue collection: Rapidly dissect tissue, place in ice-cold PBS during collection.
- Sample sizing: Trim tissue to <10mm thickness for adequate fixative penetration [27].
- Primary fixation: Immerse in 10-20 volumes of 4% PFA, incubate at 4°C for 24-48 hours with gentle agitation.
- Rinsing: Wash in PBS (3 × 15 minutes) to remove excess fixative.
- Cryoprotection (for frozen sections): Infiltrate with 30% sucrose in PBS until tissue sinks (24-72 hours).
- Freezing and sectioning: Embed in OCT, snap-freeze in isopentane cooled by dry ice [27].
Critical Optimization Steps
- Refrigeration: Maintain 4°C throughout fixation to slow autolysis [25]
- Tissue dimension: Limit thickness to <10mm to ensure complete fixation [27]
- Agitation: Use gentle orbital shaking to enhance fixative exchange
- Time optimization: Determine ideal duration for specific antigens to prevent over-fixation
Research Reagent Solutions
Table 3: Essential reagents for fixation protocols
| Reagent | Function | Application Notes |
|---|---|---|
| Paraformaldehyde (PFA) | Primary crosslinking fixative that preserves structure while maintaining some antigenicity [10] | Prepare fresh from powder; 4% concentration standard for IHC [27] |
| Glutaraldehyde | Strong crosslinker for superior ultrastructural preservation [10] [28] | Use at low concentrations (0.1-0.5%); may require antigen retrieval [28] |
| Sucrose | Cryoprotectant that prevents ice crystal formation during freezing [27] [30] | 30% solution in PBS; tissue sinking indicates complete infiltration [30] |
| OCT Compound | Water-soluble embedding medium for frozen sectioning [27] | Provides structural support during cryostat sectioning |
| Sodium Citrate Buffer | Antigen retrieval solution for unmasking epitopes [27] [10] | pH 6.0; used in heat-induced epitope retrieval (HIER) |
| Triton X-100 | Surfactant for membrane permeabilization [27] [30] | Typical concentration 0.1-0.3%; concentration varies by application |
Impact on Immunohistochemical Outcomes
Antigen Preservation and Staining Quality
The fixation method significantly influences immunohistochemical staining quality through its effects on antigen accessibility and structural preservation. Research demonstrates that perfusion fixation produces relatively homogeneous staining throughout tissue sections, while immersion-fixed tissues may show depth-related variations in staining intensity [26]. For some antigens like tyrosine hydroxylase and glutamate decarboxylase, optimal immunoreaction in immersion-fixed brains is limited to 1-2mm from the tissue surface, creating significant limitations for quantitative studies [26].
Certain antigens show particular sensitivity to fixation methods. Studies investigating β-endorphin in rat hypothalamus found that positive immunostaining of perikarya occurred only in tissue fixed with periodate-lysine-paraformaldehyde, with glutaraldehyde concentrations above 1% abolishing all positive staining regardless of delivery method [28]. These findings emphasize the need for antigen-specific fixation optimization that considers both chemical composition and delivery mechanism.
Structural Preservation at Cellular and Subcellular Levels
The fixation technique profoundly impacts the preservation of delicate cellular structures, with differential effects observed across various neuronal components:
- Axonal integrity: Sub-optimal perfusion conditions and immersion fixation are associated with increased axon fragmentation, potentially compromising quantitative analyses of axonal projections [23]
- Mitochondrial morphology: Proper perfusion fixation better preserves mitochondrial structural integrity, while immersion fixation more frequently results in alterations and swelling [23] [25]
- Synaptic ultrastructure: Both methods can preserve synapses, but perfusion fixation provides superior results for detailed electron microscopy studies [28] [25]
Ethical and Practical Considerations
The ethical dimensions of fixation methods warrant careful consideration, particularly in animal research. Perfusion fixation is typically performed as a terminal procedure in deeply anesthetized animals, raising concerns about potential discomfort during the procedure [23]. Recent studies have investigated post-mortem perfusion as an alternative that may reduce animal suffering while attempting to maintain tissue quality [23].
However, the ethical imperative to refine procedures must be balanced with scientific requirements. Research demonstrates that ante-mortem perfusion generally provides superior preservation of fragile cellular structures compared to post-mortem approaches [23]. This creates a responsibility for researchers to carefully justify their chosen method based on scientific necessity while actively implementing refinements that minimize potential suffering.
Practical considerations including technical expertise, equipment availability, and processing time also influence method selection. Perfusion fixation requires specialized equipment such as perfusion pumps and significant technical skill, while immersion fixation can be performed with basic laboratory equipment [23]. For human tissue studies, immersion fixation remains the standard approach in brain banking, though some institutions utilize perfusion fixation when possible to accelerate processing [25] [24].
The selection between perfusion and immersion fixation represents a critical methodological decision that significantly influences immunohistochemistry outcomes. Perfusion fixation generally provides superior preservation of tissue architecture and antigen accessibility throughout large specimens, while immersion fixation offers technical simplicity and may be preferable for specific applications or antigen types. Researchers must consider their specific scientific questions, tissue characteristics, and practical constraints when selecting an appropriate fixation method. As research continues to evolve, ongoing optimization of both approaches will further enhance our ability to accurately visualize and quantify tissue structures and molecular targets.
Impact of Fixation on Downstream Molecular Analysis (RNA, DNA)
Within immunohistochemistry (IHC) research, the pre-analytical phase of tissue fixation is a critical determinant of success for downstream molecular analyses. While fixation preserves tissue morphology, the chemical processes involved can significantly compromise the integrity of nucleic acids (DNA and RNA), impacting the reliability of subsequent molecular profiling [31]. With the growing integration of genomic techniques in research and drug development, understanding and optimizing fixation protocols is paramount. This application note details the tangible effects of various fixation parameters on RNA and DNA quality and provides validated protocols to maximize nucleic acid recovery for advanced molecular applications.
The Critical Role of Fixation in Nucleic Acid Preservation
Chemical fixation, primarily with formalin, preserves tissue architecture by forming protein cross-links that stabilize cellular components [10]. However, this process also poses major challenges for molecular biology:
- Nucleic Acid Fragmentation and Degradation: Standard formalin fixation can cause extensive fragmentation of DNA and RNA, which hinders the amplification of long fragments required for sequencing [32].
- Formaldehyde-Induced Crosslinks: Formaldehyde reacts with nucleic acids, creating covalent modifications and crosslinks with proteins. This can physically block enzyme access for reverse transcription and polymerase chain reaction (PCR), leading to false-negative results or quantification inaccuracies [32].
- Altered Antigen Accessibility: While the primary focus here is on nucleic acids, it is important to note that over-fixation can also mask epitopes, requiring antigen retrieval steps that may further damage already vulnerable RNA and DNA [33].
The pre-analytical variables—including cold ischemia time, fixation duration, temperature, and fixative type—introduce significant variability that can affect the reproducibility and accuracy of molecular data, a critical concern for drug development and biomarker validation [31].
Quantitative Impact of Fixation on RNA and DNA Quality
Effects of Fixation Temperature on Nucleic Acids
A systematic study on 97 colorectal cancer (CRC) samples compared four formalin-based fixation protocols, analyzing 23 metrics of nucleic acid quality using spectrophotometric, fluorimetric, electrophoretic, and PCR platforms [32]. The key findings are summarized in the table below.
Table 1: Impact of Formalin Fixation Protocol on Nucleic Acid Quality Metrics
| Fixation Protocol | Key Positive Coefficients (Improved Metrics) | Key Negative Coefficients (Impaired Metrics) |
|---|---|---|
| Cold Formalin Fixation (CFF)(24h in pre-cooled 4°C formalin) | DNA: DV1000-60000, DV2/DV1, λ 260/230 ratioRNA: ABL gene expression absolute copies | DNA: DV150-1000 |
| Standard Formalin Fixation (SFF)(24h at room temperature) | DNA: DV150-1000 | DNA: DV1000-60000, DV2/DV1RNA: λ 260/230 ratio, Qubit concentration, DV100/200, electrophoresis concentration, ABL copies |
The data demonstrates that Cold Formalin Fixation (CFF) consistently yielded superior results for both DNA and RNA quality compared to standard room temperature fixation. The positive coefficients for CFF, such as higher DV1000-60000 and DV2/DV1 values, indicate a greater proportion of longer, less fragmented DNA fragments. Conversely, SFF was associated with metrics indicative of higher fragmentation and lower yields [32].
Performance of Alternative Fixatives in DNA Sequencing
A study on 9 colorectal cancers compared four parallel fixations for their impact on next-generation sequencing (NGS) performance using two large panels [34]. The findings highlight how fixative choice directly influences sequencing data quality.
Table 2: DNA Sequencing Performance Across Different Fixation Protocols
| Fixation Protocol | Library Read Length | Data Uniformity & Noise | Evaluable Microsatellite Loci | FFPE Artifact-Related Mutations |
|---|---|---|---|---|
| Neutral Buffered Formalin (NBF) | Shorter | Lower uniformity, higher noise | Significantly lower | Significantly higher (37%) |
| Acid-Deprived Formalin (ADF) & Cold ADF | Significantly longer with Cold ADF | Highest uniformity, lowest noise | Higher | Lower (17% for Cold ADF) |
| Glyoxal Acid Free (GAF) | - | Intermediate performance | - | - |
The study concluded that acid-deprived fixatives (ADF and Cold ADF) guaranteed the highest DNA preservation and sequencing performance, enabling more complex molecular profiling. Libraries from NBF samples showed poorer performance, including a significantly higher level of mutational signature 1, which is associated with FFPE artifacts and aging [34].
Variability in RNA Recovery from FFPE Samples
The choice of RNA extraction kit introduces another layer of variability. A systematic comparison of seven commercial FFPE RNA extraction kits using standardized tonsil, appendix, and B-cell lymphoma samples revealed significant disparities [35].
Table 3: Comparison of Commercial FFPE RNA Extraction Kits
| Kit Performance Group | Representative Kits | Key Findings |
|---|---|---|
| High Quantity & Quality | ReliaPrep FFPE Total RNA Miniprep (Promega) | Provided the highest RNA concentration recovery for most samples and yielded high-quality RNA based on RQS and DV200 values. |
| High Quality | Roche FFPE RNA Kit | Provided systematically better-quality recovery (RQS and DV200) than most other kits. |
| Variable Performance | Kits from other manufacturers | Showed notable differences in both the quantity and quality of RNA recovered. |
This study underscores that despite using identical FFPE samples, the quantity and quality of recovered RNA varied greatly across kits, emphasizing the need for careful kit selection based on the specific tissue type and downstream application [35].
Recommended Protocols for Optimal Nucleic Acid Preservation
Protocol for Cold Formalin Fixation (CFF) for Enhanced Nucleic Acids
This protocol is adapted from a study that demonstrated superior DNA and RNA yield using cold formalin fixation [32].
- Step 1: Sample Preparation. Immediately upon resection, place tissue in a pre-cooled (4°C) container. For fixation to be effective, tissue slices should not exceed 5 mm in thickness to ensure rapid and uniform penetration of the fixative [31].
- Step 2: Cold Fixation. Submerge the tissue completely in a volume of pre-cooled (4°C) 4% neutral-buffered formalin that is 10-20 times the tissue volume. Fix for 24 hours at 4°C [32].
- Step 3: Cold Dehydration. Transfer the tissue to pre-cooled (4°C) 95% ethanol for 4 hours [32].
- Step 4: Automated Processing. Process the tissue through an automated processor, omitting the first 95% ethanol step to accommodate the prior cold dehydration [32].
- Key Considerations:
- Cold Ischemia Time: Minimize the delay between tissue resection and immersion in fixative; the target should be under 30 minutes [32].
- Fixation Duration: Standardize fixation time based on tissue type and size. Over-fixation (beyond 48 hours) can create excessive crosslinking, while under-fixation (less than 6 hours) fails to stabilize nucleic acids [31].
The following workflow diagram illustrates the optimized CFF protocol:
Protocol for RNA Extraction from FFPE Tissues
This methodology is derived from a systematic comparison of RNA extraction kits [35].
- Step 1: Deparaffinization. Add 300 µL of mineral oil (or xylene, if recommended by the kit manufacturer) to the FFPE sections in a tube. Incubate at 56°C, followed by a second incubation at 80°C [32].
- Step 2: Tissue Lysis and Digestion. Add a proprietary lysis buffer and proteinase K solution to the sample. Incubate first at 56°C for 30 minutes, then at 80°C for 4 hours to reverse formalin crosslinks [35] [32].
- Step 3: Automated Nucleic Acid Extraction. Transfer the aqueous phase containing the nucleic acids to the cartridge of an automated nucleic acid extractor, such as the Promega Maxwell RSC. Elute the purified RNA in 55 µL of nuclease-free water [32].
- Quality Control:
- RNA Quality Score (RQS): Use a nucleic acid analyzer to determine the RQS, which assesses RNA integrity on a scale of 1 (highly degraded) to 10 (intact) [35].
- DV200 Value: This metric represents the percentage of RNA fragments longer than 200 nucleotides. A higher DV200 is generally indicative of better-quality RNA suitable for sequencing [35].
The Scientist's Toolkit: Essential Reagents and Solutions
The following table lists key reagents and their critical functions in tissue fixation and nucleic acid analysis protocols.
Table 4: Essential Research Reagents for Fixation and Molecular Analysis
| Reagent / Kit | Function / Application |
|---|---|
| Neutral Buffered Formalin (NBF) | Standard cross-linking fixative for tissue morphology preservation. |
| Pre-cooled (4°C) Formalin | Core reagent for Cold Formalin Fixation (CFF) to improve nucleic acid integrity. |
| Proteinase K | Enzyme that digests proteins and assists in breaking formalin-induced crosslinks during RNA/DNA extraction. |
| Maxwell RSC RNA/DNA FFPE Kits (Promega) | Automated system for standardized and efficient nucleic acid extraction from challenging FFPE samples. |
| ReliaPrep FFPE Total RNA Miniprep (Promega) | Manual extraction kit identified as providing a superior ratio of RNA quantity and quality. |
| Roche FFPE RNA Kit | Manual extraction kit noted for providing systematically high-quality RNA recovery. |
| Sodium Citrate Buffer (pH 6.0) | Common buffer used for Heat-Induced Epitope Retrieval (HIER), which can also aid in reversing crosslinks. |
| EDTA-Based Decalcifying Reagent | Used for decalcifying bone marrow biopsies; less destructive to nucleic acids than acid-based reagents. |
The choice of fixation protocol is a pre-analytical factor of paramount importance for the success of downstream DNA and RNA analysis. Evidence strongly indicates that moving away from standard room temperature formalin fixation towards optimized methods like Cold Formalin Fixation (CFF) and the use of acid-deprived fixatives can dramatically improve the quantity, quality, and reliability of nucleic acids recovered from tissue samples. For researchers and drug development professionals, adopting these standardized protocols and carefully selecting extraction reagents are essential steps toward generating robust, reproducible, and high-quality molecular data that can confidently inform research conclusions and therapeutic discoveries.
Practical IHC Fixation Protocols: From Standard Tissues to Challenging Samples
Standard Operating Procedure for Formalin-Fixed Paraffin-Embedded (FFPE) Tissues
Within immunohistochemistry (IHC) research, the quality of tissue preservation is paramount to the reliability and reproducibility of experimental outcomes. Formalin-Fixed Paraffin-Embedding (FFPE) remains the cornerstone technique for preserving tissue morphology and antigenicity for pathological examination and biomarker research [1]. This standard operating procedure (SOP) delineates a detailed protocol for the generation of high-quality FFPE tissue blocks, a process foundational to any robust IHC workflow. Proper execution of this pre-analytical phase is critical, as variations in fixation and processing can significantly impact protein preservation, antigen availability, and the subsequent interpretation of staining results in a research or drug development context [36] [37]. The following sections provide a comprehensive guide, from tissue acquisition to final embedding, designed to ensure the production of optimal FFPE samples for IHC analysis.
Principles and Rationale
The fundamental principle of the FFPE technique is the permanent preservation of tissue architecture and biomolecules through a series of chemical and physical steps. Fixation, primarily with formalin, creates covalent cross-links between proteins, thereby stabilizing the tissue structure and preventing degradation [1] [38]. Following fixation, dehydration removes water from the tissue using a graded series of alcohols. A clearing agent, typically xylene, is then used to remove the alcohol and make the tissue miscible with molten paraffin wax, which infiltrates and supports the tissue for microtomy [39]. The final embedded block allows for the sectioning of thin slices that can be mounted on slides for a variety of stains, including IHC.
The choice of fixative is a critical decision point. While 10% Neutral Buffered Formalin (10% NBF) is the most universally used fixative due to its excellent preservation of morphology and compatibility with a wide range of antibodies, alternative fixatives may be superior for specific tissues or research goals [38]. For instance, Bouin's Fluid (BF) and Modified Davidson's Fluid (mDF) have been demonstrated to provide superior morphological detail for challenging tissues like the testis [38]. A comparative analysis of common fixatives is provided in Table 1.
Table 1: Comparative Analysis of Common Tissue Fixatives for FFPE
| Fixative | Key Components | Advantages | Disadvantages | Best Use Cases |
|---|---|---|---|---|
| 10% NBF [37] [38] | 4% Formaldehyde, phosphate buffer | Excellent general morphology; widely established and validated. | Over-fixation can mask antigens; can cause tissue shrinkage. | Standardized IHC protocols; general histopathology. |
| Bouin's Fluid (BF) [38] | Picric acid, formaldehyde, acetic acid | Superior nuclear detail; excellent for decalcification. | Destroys some antigens; picric acid requires special disposal. | Testis, embryos; tissues requiring sharp nuclear detail. |
| Modified Davidson's (mDF) [38] | Formaldehyde, ethanol, acetic acid | Excellent morphology with better IHC efficiency than BF. | Requires preparation or commercial sourcing. | Recommended for testis and delicate tissues [38]. |
| B5 [36] | Mercuric chloride, formaldehyde, sodium acetate | Superior for hematopoietic tissues. | Highly toxic; requires specific disposal protocols. | Bone marrow biopsies; lymphoid tissues [36]. |
Materials and Reagents
The Scientist's Toolkit: Essential Reagents for FFPE Processing
The following table lists key reagents and their specific functions in the FFPE workflow, which researchers must have on hand before initiating the protocol.
Table 2: Essential Reagents for FFPE Tissue Processing
| Reagent / Solution | Function / Purpose | Key Considerations |
|---|---|---|
| 10% Neutral Buffered Formalin (NBF) [37] | Primary fixative; cross-links proteins to preserve tissue architecture. | Use a 20:1 volume ratio of fixative to tissue; cold ischemia time should not exceed 1 hour [37]. |
| Ethanol Series (70%, 95%, 100%) [39] [27] | Dehydrating agent; removes water from the tissue. | Use a graded series (e.g., 70%->95%->100%) to prevent excessive tissue shrinkage and distortion. |
| Xylene [39] [27] | Clearing agent; removes alcohol and makes tissue miscible with paraffin. | Toxic; use in a fume hood. Less toxic alternatives like isopropanol exist [39]. |
| Paraffin Wax [39] [37] | Embedding medium; infiltrates tissue to provide support for thin sectioning. | Maintain at ~60°C for infiltration; use high-quality, high-purity wax for optimal sectioning. |
| EDTA-based Decalcification Solution [36] | Chelating agent; gently removes calcium from bony tissues. | Slower than strong acids but better preserves tissue antigenicity for IHC [36]. |
Step-by-Step Experimental Protocol
Tissue Acquisition and Fixation
- Dissection and Trimming: Immediately upon resection, place the tissue in a labeled container. Using a sharp blade, trim the tissue to a thickness of 2-3 mm to ensure rapid and uniform penetration of fixatives [37].
- Immersion Fixation: Submerge the tissue in a large volume of 10% NBF, using a fixative-to-tissue volume ratio of at least 20:1 [37].
- Fixation Duration: Fixation time should be determined by tissue thickness. For most tissues trimmed to 2-3 mm, fixation for 6-24 hours at room temperature is sufficient. Prolonged fixation (e.g., beyond 72 hours) can lead to excessive cross-linking and mask antigens, complicating subsequent IHC [37].
- Special Considerations: For tissues containing bone, a decalcification step is required post-fixation. An EDTA-based decalcifying solution is recommended over strong inorganic acids for IHC applications, as it better preserves tissue antigenicity [36].
Tissue Dehydration, Clearing, and Infiltration
After fixation, tissues must be processed to replace water with paraffin. This is typically performed using an automated tissue processor. The following workflow outlines the sequence and purpose of each step.
Diagram 1: FFPE Tissue Processing Workflow
The specific protocol for processing can vary, but a general schedule is as follows [27] [37]:
- 70% Ethanol: 60-120 minutes
- 95% Ethanol: 60-120 minutes
- 100% Ethanol: 60-120 minutes (2-3 changes)
- Xylene: 30-60 minutes (1-2 changes)
- Molten Paraffin Wax: 45-90 minutes (2-3 changes) at ~60°C
Embedding and Sectioning
- Orientation and Embedding: Place the processed tissue into a mold filled with molten paraffin. Carefully orient the tissue using warm forceps to ensure the plane of sectioning will reveal the desired anatomical structures. Common orientations (e.g., based on RITA and NACAD guidelines for rodent tissues) should be followed for consistency [37].
- Blocking: Affix a labeled cassette on top of the mold and fill it with more paraffin. Allow the block to cool completely on a cold plate until the wax is solid.
- Sectioning: Use a microtome to cut 4-7 μm thick sections. Float the ribbons on a warm water bath (40-45°C) to remove wrinkles before carefully mounting them on positively charged or silanized glass slides [27].
- Drying: Dry the mounted slides overnight at room temperature or for 30-60 minutes in a 37-60°C oven. Properly prepared FFPE blocks and sections can be stored at room temperature for years [27].
Quality Control and Troubleshooting
Rigorous quality control is essential. Always include control tissues of known antigen expression when validating new IHC assays on FFPE sections [40] [1]. A major challenge in IHC with FFPE tissues is antigen masking due to formalin-induced cross-links. This is overcome by Antigen Retrieval, a critical step prior to immunostaining.
The two primary methods are Heat-Induced Epitope Retrieval (HIER) and Protease-Induced Epitope Retrieval (PIER). HIER is generally preferred and involves heating slides in a buffer (e.g., 10 mM Sodium Citrate, pH 6.0) using a microwave, pressure cooker, or steamer [40] [27]. The choice of buffer, pH, and retrieval method must be optimized for each specific antibody-antigen combination.
Table 3: Common FFPE Artifacts and Corrective Actions
| Problem | Potential Cause | Corrective Action |
|---|---|---|
| Poor / No IHC Staining | Over-fixation; inadequate antigen retrieval; expired antibodies. | Optimize HIER method and buffer; include positive control; verify antibody potency [40] [41]. |
| High Background Staining | Inadequate blocking; endogenous enzyme activity; primary antibody concentration too high. | Quench endogenous peroxidases with H₂O₂; use appropriate serum blocking; titrate primary antibody [40] [41]. |
| Tissue Morphology Damage | Incomplete or delayed fixation; improper dehydration/clearing. | Ensure cold ischemia time <1hr; use fresh ethanol and xylene; follow standardized processing schedule [37]. |
Applications in Research and Drug Development
The FFPE technique is indispensable in both basic research and the pharmaceutical industry. Its primary application in IHC allows for the spatial localization and quantification of specific biomarkers within the context of intact tissue architecture, a feature not provided by techniques like Western blotting [1]. In drug development, IHC on FFPE tissues is crucial for:
- Target Validation: Identifying the presence and distribution of a drug target in diseased tissues.
- Pharmacodynamic Biomarker Assessment: Demonstrating target engagement and measuring the biological response to a therapeutic agent.
- Companion Diagnostic Development: Identifying which patients are most likely to respond to a targeted therapy based on biomarker expression in their FFPE tissue samples [42].
This SOP provides a rigorous framework for the preparation of FFPE tissues, a foundational methodology in IHC research. Adherence to standardized protocols for fixation, processing, and embedding, as detailed herein, is a critical determinant of success in downstream analytical techniques. By minimizing pre-analytical variables, researchers and drug development professionals can ensure the generation of high-quality, reproducible data, thereby strengthening the validity of their scientific findings and supporting the advancement of biomarker discovery and therapeutic development.
Within the broader investigation of tissue fixation methods for immunohistochemistry (IHC), the selection of an appropriate tissue preservation and processing strategy is paramount. While formalin-fixed, paraffin-embedded (FFPE) tissues are the historical mainstay for morphological studies, their crosslinking nature often masks epitopes, complicating antigen detection. This application note details a robust alternative protocol for frozen tissue sectioning, a method that superiorly preserves native protein antigenicity, making it indispensable for studying labile epitopes, post-translational modifications, and other targets sensitive to chemical fixation. The protocol encompasses the critical stages of snap-freezing, cryosectioning, and post-fixation, providing researchers and drug development professionals with a standardized methodology to maximize data integrity in IHC research.
Immunohistochemistry research requires a delicate balance between optimal tissue morphology and the preservation of antigen immunoreactivity. Formalin fixation and paraffin embedding (FFPE), the standard in histopathology, provides excellent tissue architecture and easy storage but involves protein crosslinking that can severely compromise the detection of many antigens [43] [44]. For a broad spectrum of research applications, particularly those involving sensitive epitopes, frozen tissue specimens are the gold standard for molecular and protein analysis [43] [45].
The process of preparing frozen tissues for IHC involves three critical, interdependent stages: snap-freezing to rapidly preserve tissue in its native state, cryosectioning to obtain thin slices, and post-fixation to stabilize the sectioned tissue for staining. Each step must be meticulously optimized to minimize ice crystal artifacts that can damage cellular morphology [46] while maximizing the retention of antigenicity. This protocol is designed to guide users through this process, ensuring high-quality results for downstream IHC applications.
Snap-Freezing Methodologies
Snap-freezing is the rapid solidification of tissue to preserve its biochemical state at the moment of collection. The speed of freezing is critical; slow freezing allows for the formation of large, destructive ice crystals that puncture cellular membranes and create a "swiss cheese" effect, severely compromising tissue integrity [46]. The goal is to achieve vitreous (non-crystalline) ice formation.
Optimal Snap-Freezing Protocol
The following method, utilizing pre-cooled isopentane, is recommended for most tissues to ensure rapid and uniform freezing while minimizing freezing artifacts [4] [47] [48].
Materials Required:
- Fresh tissue sample (optimally ≤ 1 cm³)
- Isopentane (2-methylbutane)
- Dry ice
- Optimal Cutting Temperature (OCT) compound
- Tissue embedding molds
- Insulated container (e.g., polystyrene box)
- Forceps
- Liquid nitrogen (optional for storage)
Step-by-Step Procedure:
- Prepare a Cold Isopentane Bath: Partially fill a small, metal container with isopentane. Place this container into an insulated box filled with powdered dry ice. Allow the isopentane to chill for 5-10 minutes until it reaches approximately -80°C. A white precipitate may form, but the isopentane should not freeze completely [48].
- Embed Tissue in OCT: Place the fresh, dissected tissue into an embedding mold. Completely surround the tissue with OCT compound, ensuring no air bubbles are trapped and the tissue is oriented as desired for sectioning.
- Snap-Freeze the Tissue: Using forceps, firmly hold the mold and submerge it into the pre-cooled isopentane bath for 10-20 seconds, or until the OCT block turns opaque white. Avoid getting isopentane into the OCT compound.
- Storage: Immediately transfer the snap-frozen tissue block to a -80°C freezer for long-term storage. Tissue blocks stored this way are stable for up to one year [49].
Troubleshooting:
- Tissue Cracking: This indicates that the inner part of the tissue froze slowly and crystallized, expanding inside a vitreous outer shell. This is common when using liquid nitrogen directly on larger samples due to vapor barrier formation [46]. Always use an intermediary coolant like isopentane for samples larger than a few millimeters.
- Poor Morphology After Sectioning: This is often due to slow freezing or prolonged storage in the cryostat. Tissue should be sectioned as soon as it equilibrates to the cryostat temperature and should not be left in the cryostat for extended periods (e.g., overnight) to prevent ice crystal growth [46].
Comparison of Freezing Methods
The choice of coolant and method significantly impacts tissue quality. The table below summarizes key approaches.
Table 1: Quantitative Comparison of Tissue Freezing Methods
| Method | Coolant Temperature | Freezing Rate | Key Advantage | Key Disadvantage | Ideal Use Case |
|---|---|---|---|---|---|
| Isopentane on Dry Ice | ~ -80°C | Very High | Minimal ice crystal artifacts; no insulating vapor barrier [46]. | Requires preparation of coolant bath. | Most routine applications; larger tissues (up to 1 cm³). |
| Liquid Nitrogen (Direct Immersion) | -196°C | Variable (can be slow) | Readily available in many labs. | Boiling nitrogen creates an insulating vapor barrier, leading to cracking [46]. | Small biopsies (e.g., clinical samples). |
| Cryostat Chamber | -20°C | Slow | Convenient. | Promotes large ice crystals and poor morphology [46]. | Not recommended for snap-freezing. |
Cryosectioning
Once the tissue is frozen, it can be sectioned using a cryostat. The objective is to obtain thin, intact sections that adhere well to microscopy slides.
Materials Required:
- Snap-frozen tissue block
- Cryostat
- Cryostat blades
- Gelatin- or poly-lysine-coated microscope slides
- Fine brush or toothpick
Step-by-Step Procedure:
- Equilibration: Transfer the frozen tissue block from -80°C storage to the cryostat chamber (typically set between -15°C and -23°C) and allow it to equilibrate for at least 20-30 minutes [48].
- Mounting and Trimming: Secure the block to the cryostat specimen head. Trim the block face at a thicker section (10-30 µm) to fully expose the tissue.
- Sectioning: Set the cryostat to cut sections at a thickness of 5-8 µm [48]. Use the anti-roll plate or a fine brush to carefully collect the sections.
- Mounting: Gently touch the section with a room-temperature slide, or use the brush to maneuver it onto the slide. The slight thawing upon contact will promote adhesion.
- Drying: Air-dry the mounted sections at room temperature for 15-30 minutes. This step is crucial for the sections to adhere properly during subsequent staining steps [47] [48].
Post-Fixation for Frozen Sections
Post-fixation is applied after sectioning to stabilize the thin tissue slices, preserve morphology during the staining procedure, and prevent the diffusion of soluble antigens. The choice of fixative is antigen-dependent.
Fixative Selection and Protocol
The most common post-fixatives for frozen sections are precipitating solvents and aldehydes.
Materials Required:
- Air-dried cryosections on slides
- Chilled Acetone, Methanol, or 4% Paraformaldehyde (PFA)
- Coplin jars or slide-staining chambers
- Wash buffer (e.g., PBS)
Step-by-Step Procedure:
- Select Fixative: Choose a fixative based on your target antigen (see Table 2).
- Fixation: Immerse the air-dried slides in the chosen fixative.
- Washing: Wash the slides three times for 5 minutes each in wash buffer (e.g., PBS) to remove all traces of the fixative.
Table 2: Guide to Post-Fixative Selection for Frozen Sections
| Fixative | Mechanism | Incubation | Key Advantages | Antigen Targets | Considerations |
|---|---|---|---|---|---|
| Acetone | Precipitates proteins, dehydrates | 10 min @ -20°C [48] | Preserves many antigenic epitopes; can permeabilize cells [4] [49]. | Large proteins, immunoglobulins, many cell surface markers [10] [48]. | Can extract lipids, impairing morphology [10]. |
| Methanol | Precipitates proteins, dehydrates | 10 min @ -20°C [48] | Similar to acetone; good for many antigens. | Large protein antigens [10]. | Considered harsher than acetone; can reduce morphology further [4]. |
| 4% PFA / 10% NBF | Crosslinks proteins | 15 min @ RT [48] | Excellent preservation of tissue morphology and structure. | Small molecules, peptides, low MW enzymes [10] [48]. | Crosslinking can mask some epitopes, potentially requiring antigen retrieval [4]. |
The following workflow diagram summarizes the complete protocol from tissue harvesting to the completion of post-fixation.
Diagram 1: Complete workflow for frozen tissue preparation and post-fixation.
The Scientist's Toolkit: Essential Research Reagents
A successful frozen tissue IHC experiment relies on a suite of specialized reagents. The table below details key solutions and their functions.
Table 3: Essential Reagents for Frozen Tissue IHC
| Reagent / Solution | Composition / Example | Primary Function in Protocol |
|---|---|---|
| OCT Compound | Polyvinyl alcohol, polyethylene glycol | Water-soluble embedding matrix that supports tissue during freezing and sectioning [45]. |
| Snap-Freezing Coolant | Isopentane chilled on dry ice | Rapidly extracts heat from tissue to achieve vitreous ice state, minimizing crystal artifacts [46]. |
| Precipitating Fixative | 100% Acetone or Methanol | Denatures and precipitates proteins, preserving antigenicity without crosslinking [10] [49]. |
| Crosslinking Fixative | 4% Paraformaldehyde (PFA) | Creates methylene bridges between proteins, providing superior morphological preservation [10]. |
| Blocking Buffer | 1-10% Normal Serum, 1% BSA in PBS | Occupies non-specific binding sites on tissue to reduce background staining [47] [48]. |
| Wash Buffer | PBS with 0.05-0.1% Triton X-100 (PBST) | Removes unbound reagents; low detergent concentration aids in permeabilization [48]. |
Concluding Remarks
The protocol outlined herein for snap-freezing, cryosectioning, and post-fixation provides a foundational and reliable methodology for preparing tissue samples for IHC where the preservation of native antigenicity is critical. The choice of post-fixative remains a key variable that must be empirically optimized for each target antigen. When executed with precision, this approach enables researchers to generate high-quality, reproducible data, particularly for challenging targets like post-translationally modified proteins and labile epitopes, thereby advancing discovery in immunohistochemistry research and drug development.
Within the framework of a broader thesis on advanced tissue fixation methods for immunohistochemistry (IHC), this application note addresses the critical role of specialized fixatives in modern research and drug development. While neutral buffered formalin (NBF) serves as the ubiquitous gold standard in histopathology, its cross-linking mechanism often obscures or denatures particularly labile epitopes and phospho-epitopes, rendering them undetectable by conventional IHC [50]. This limitation presents a significant barrier in preclinical and translational research, where the accurate visualization of specific protein states is paramount. Consequently, specialized fixatives such as Zenker's, Bouin's, and Methacarn have retained their vital niche, offering complementary mechanisms of action that can superiorly preserve challenging molecular targets. The selection of a fixative is not merely a technical step but a fundamental determinant that dictates the success of downstream analytical techniques, including IHC, nucleic acid extraction, and spatial biology protocols [51]. This document provides a comparative analysis and detailed, standardized protocols for these three fixatives, enabling researchers to make informed decisions that enhance antigen detection, ensure reproducibility, and ultimately drive more reliable scientific discovery.
Comparative Analysis of Specialized Fixatives
The efficacy of a fixative is governed by its chemical composition, which directly impacts tissue morphology, antigen preservation, and compatibility with molecular analyses. The following table summarizes the key characteristics, advantages, and limitations of Zenker's, Bouin's, and Methacarn fixatives.
Table 1: Key Characteristics of Specialized Fixatives
| Fixative | Chemical Composition | Key Advantages | Primary Limitations | Best Applications |
|---|---|---|---|---|
| Zenker's | Mercuric chloride, potassium dichromate, glacial acetic acid [52] | Excellent nuclear detail, good for trichrome stains, recommended for hematopoietic and lymphoid tissues [52] | Mercury pigment requires removal; corrosive and toxic; requires careful disposal [52] | Bone marrow trephine biopsies, congested specimens, reticuloendothelial tissues [52] |
| Bouin's | Picric acid, formaldehyde, glacial acetic acid [52] | Superior morphology for testes, gastrointestinal tract, and endocrine tissues; excellent for trichrome staining [38] [52] | Picric acid stains tissue yellow and is explosive when dry; lyses RBCs; acidic nature can leach minerals [53] [52] | Testes, GI tract biopsies, endocrine tissues, animal embryos [38] [52] |
| Methacarn | Methanol, chloroform, glacial acetic acid [54] [52] | Superior RNA yield from FFPE-type samples; good nuclear preservation; less shrinkage than Carnoy's [54] [52] | Dissolves lipids; can cause excessive hardening with prolonged fixation [52] | Combined histological/IHC and biomolecular (RNA) analysis; laser microdissection [54] |
The performance of these fixatives against specific biomarkers can be quantitatively assessed. The following table summarizes experimental IHC results from comparative studies, providing a data-driven basis for fixative selection.
Table 2: Comparative IHC Performance for Key Biomarkers Across Fixatives
| Biomarker | Zenker's / B-5 | Bouin's | Methacarn | 10% NBF (Reference) | Study Context |
|---|---|---|---|---|---|
| General IHC (25 biomarkers) | 5/25 inadequate stains (B-5 + EDTA) [36] | Not Tested | Not Tested | Benchmark for comparison [36] | Bone marrow trephine surrogate model [36] |
| Synaptonemal Complex Protein 3 (Sycp3) | Not Tested | Very low IHC efficiency [38] | Superior staining quality [38] | Not Tested | Mouse testis fixation [38] |
| EGFR | Not Tested | Not Tested | More intense staining vs. NBF [50] | Standard, less intense staining [50] | Mouse xenograft models [50] |
| Phospho-HER2 | Not Tested | Not Tested | Not noteworthy vs. NBF [50] | Standard staining [50] | Mouse xenograft models [50] |
| RNA Quality & Purity | Not Tested | Not Tested | High concentration and purity, suitable for RT-qPCR [54] | Statistically significantly lower quality/quantity [54] | Rat femur bone cores [54] |
Detailed Protocols and Methodologies
Zenker's Fixative Protocol
Zenker's fixative, particularly in its B-5 formulation for hematopoietic tissues, is renowned for providing exceptional nuclear detail.
Formulation:
- Zenker's Stock Solution: Mercuric chloride (HgCl₂): 50 g, Potassium dichromate: 25 g, Distilled water: 950 ml. Store in the dark [52].
- Working Zenker's Solution: Zenker's stock solution: 95 ml, Glacial acetic acid: 5 ml. Add acetic acid immediately before use [52].
- B-5 Fixative (Working Solution): Stock solution (Mercuric chloride: 12 g, Sodium acetate: 2.5 g, Distilled water: 200 ml): 20 ml, 40% formaldehyde: 2 ml. Prepare immediately before use [52].
Fixation Workflow:
Critical Protocol Notes:
- Fixation Time: 4-8 hours for B-5; 4-24 hours for Zenker's. Do not store tissues in Zenker's long-term, as they will become brittle [52].
- Post-Fixation Handling: Transfer tissues directly to 70% ethanol. Washing in water can precipitate chrome pigments [52].
- Mercury Pigment Removal: Before staining, sections must be treated to remove mercury precipitate. This is typically done with an iodine solution (e.g., Lugol's iodine) followed by sodium thiosulfate [52].
- Safety: Mercuric chloride is highly toxic. Use appropriate personal protective equipment (PPE) and follow hazardous waste disposal regulations.
Bouin's Fluid Protocol
Bouin's fluid is the historical fixative of choice for exquisite morphological preservation in delicate tissues like testis and gastrointestinal tract.
Formulation:
- Saturated aqueous picric acid: 750 ml, 40% formaldehyde: 250 ml, Glacial acetic acid: 50 ml [52].
Fixation Workflow:
Critical Protocol Notes:
- Fixation Time: 4-18 hours is standard. For mouse testes, a 12-hour fixation has been quantitatively shown to provide optimal morphology while minimizing damage from over-fixation [38].
- Post-Fixation Washing: Tissues must be washed in running tap water for 2-4 hours to remove excess picric acid, which otherwise causes brittleness [53]. The yellow color can be washed out with several changes of 70% ethanol.
- IHC Limitations: Be aware that despite excellent morphology, Bouin's fixation can result in very low IHC staining efficiency for certain antigens, such as Sycp3 in testis, where mDF is superior [38].
- Safety: Picric acid in its dry state is explosive. It must always be kept moist with water or ethanol.
Methacarn Protocol
Methacarn is a non-crosslinking fixative that offers a unique advantage for studies requiring both high-quality histology and biomolecular analysis.
Formulation:
- Methanol (absolute): 60 ml, Chloroform: 30 ml, Glacial acetic acid: 10 ml [52].
Fixation and Combined Analysis Workflow:
Critical Protocol Notes:
- Fixation Time: 1-4 hours for most tissues. For small bone cores, fixation for 1 week prior to decalcification has been used successfully [54].
- Decalcification: For bone, use EDTA decalcification to preserve nucleic acids. Strong acids will compromise RNA integrity [54].
- RNA Extraction: The non-crosslinking nature of Methacarn allows for the isolation of high-quality RNA from paraffin-embedded tissues, comparable to unfixed frozen tissue (UFT) or RNAlater, and suitable for downstream applications like RT-qPCR [54].
The Scientist's Toolkit
Table 3: Essential Reagents and Materials for Specialized Fixation Protocols
| Item | Function / Application | Notes |
|---|---|---|
| Mercuric Chloride (HgCl₂) | Component of Zenker's and B-5; provides excellent nuclear fixation [52] | Highly toxic. Requires special disposal. Mercury pigment must be removed from sections post-staining. |
| Picric Acid | Component of Bouin's and Hollande's; fixes cytoplasm and connective tissue [52] | Explosive when dry. Must be stored wet. Imparts yellow color to tissue. |
| Methacarn (Methanol:Chloroform:Acetic Acid) | Non-crosslinking fixative; preserves proteins, some lipids, and nucleic acids [54] [52] | Superior for combined IHC and RNA analysis. Causes less shrinkage than Carnoy's. |
| EDTA (Ethylenediaminetetraacetic acid) | Mild chelating decalcifying agent [36] | Preferred for preserving antigenicity and RNA integrity in bone samples vs. strong acids [36] [54]. |
| Lugol's Iodine / Sodium Thiosulfate | Used sequentially to remove mercury pigment from Zenker's-fixed sections prior to staining [52] | Essential for clearing artifacts in Zenker's/B-5 fixed tissues. |
| RNase-free Tubes and Reagents | For processing tissues destined for RNA extraction (e.g., with Methacarn fixation) [54] | Critical to prevent RNA degradation during post-fixation processing. |
Within the evolving thesis of tissue fixation, it is clear that no single fixative is universally optimal. The choice between Zenker's, Bouin's, and Methacarn represents a strategic trade-off, dictated by the specific experimental endpoints. Zenker's and its variants remain powerful for diagnostic clarity in hematopoietic tissues where nuclear detail is paramount. Bouin's fluid continues to be the benchmark for superlative morphological preservation in specific organs like the testis, though its utility in modern IHC is limited. Methacarn emerges as a uniquely versatile fixative for the era of molecular pathology, enabling a unified workflow that bridges classic histology with robust genomic and proteomic analyses from a single specimen. As spatial biology and multi-omics approaches continue to transform research [51], the role of these specialized fixatives will be redefined, necessitating continued rigorous validation and protocol optimization to ensure that the foundation of tissue preparation supports the cutting-edge superstructures of scientific inquiry.
Tissue fixation serves as the foundational step in immunohistochemistry (IHC) research, profoundly influencing morphological preservation, antigen integrity, and ultimately, experimental validity. While basic fixation principles apply broadly, tissue-specific architectural and compositional demands necessitate customized approaches. This application note provides detailed, evidence-based protocols for the fixation of three particularly challenging tissue types: mineralized bone, delicate bone marrow, and lipid-rich neural tissues. Proper fixation balances the competing demands of structural preservation and biomolecule integrity, with implications for both basic research and drug development. The protocols presented herein are framed within a comprehensive thesis on tissue fixation, emphasizing how tailored pre-analytical methods enable superior morphological and molecular analyses across diverse tissue contexts.
Neural Tissue Fixation and Processing
The high lipid content and exquisite cellular architecture of neural tissue demand fixation protocols that preserve delicate structures while maintaining antigen accessibility for a wide range of neuronal and glial markers.
Protocol: Transcardial Perfusion and Freezing for Mouse Brain Tissue
This protocol, adapted from Mendelsohn et al. (2025), is optimized for preserving cellular morphology and antigenicity in mouse brain for immunohistochemistry [30].
- Reagents Required: PBS (ice-cold), 4% Paraformaldehyde (PFA) in PBS (ice-cold), 30% sucrose in PBS, OCT compound, isoflurane.
- Equipment Required: Perfusion pump, styrofoam plate, surgical tools (forceps, scissors), cryostat.
| Step | Procedure | Duration | Temperature | Critical Parameters |
|---|---|---|---|---|
| 1 | Anesthesia & Setup | Deep anesthesia | Room Temp | Confirm absence of pedal reflex |
| 2 | Perfusion: PBS Flush | ~5-10 min | Room Temp | Perfuse until liver and effluent clear |
| 3 | Perfusion: 4% PFA Fixation | ~10-15 min | 4°C | Observe mild body stiffening |
| 4 | Brain Dissection | - | 4°C | Handle tissue gently to avoid compression |
| 5 | Post-fixation | Overnight | 4°C | Gently agitate on a rocking platform |
| 6 | Cryoprotection | 3 days | 4°C | Tissue sinks when equilibrated |
| 7 | Embedding & Storage | - | -80°C | Ensure complete OCT encapsulation |
Following fixation and cryoprotection, tissue is sectioned using a cryostat. For IHC, sections are incubated with primary antibodies for 48 hours at 4°C, followed by appropriate secondary antibodies and DAPI counterstaining [30]. This extended primary incubation enhances antibody penetration and signal intensity in thick sections.
Visualization: Neural Tissue Workflow
The following diagram summarizes the key decision points and steps in the neural tissue processing workflow.
Bone and Bone Marrow Fixation and Decalcification
Bone and bone marrow present unique challenges due to their mineralized matrix, which requires decalcification after fixation—a process that can damage morphology and antigenicity if not carefully controlled.
Comparative Data: Fixation and Decalcification for Optimal IHC
A 2025 pilot study systematically evaluated fixation and decalcification protocols for bone marrow trephine biopsies, using IHC yield of 25 biomarkers as the primary outcome measure [36]. The table below summarizes key findings.
Table 1: Comparison of Bone Marrow Fixation/Decalcification Protocols and IHC Performance [36]
| Fixation Protocol | Decalcification Protocol | Total Inadequate IHC Stains (out of 25) | Key Characteristics & Recommendations |
|---|---|---|---|
| B5 (Commercial) | EDTA (In-house) | 5 | Best overall performance. Good morphology and antigen preservation. |
| B5 (In-house) | EDTA (In-house) | 8 | Poorest performance. Potential inconsistency in "in-house" reagent preparation. |
| Acetic Acid-Zinc-Formalin (AZF) | EDTA (In-house) | 7 | Moderate performance; zinc-formalin benefits nuclear morphology. |
| Mielodec A (B5-based) | Mielodec B (EDTA-based) | 6 | Commercial kit; provides standardized workflow and reliable results. |
| 10% Buffered Formalin | Mielodec B (EDTA-based) | 6 | Suitable for standard formalin-fixed specimens. |
| 10% Buffered Formalin | None | 5 (Reference) | Baseline for non-decalcified tissue; not applicable for mineralized bone. |
The study concluded that the choice of fixative has a greater impact on final IHC quality than the decalcifying agent, and that commercial, standardized reagents generally outperform "in-house" preparations [36]. Another study confirmed that methacarn fixation provided superior RNA quality and quantity compared to formalin in bone samples, enabling combined histological and biomolecular analysis [55].
Protocol: Bone Marrow Core Biopsy for Histology and IHC
This protocol integrates findings from recent studies and standard practices for handling bone marrow trephine biopsies [56] [36].
- Reagents Required: Commercial B5 fixative (e.g., Mielodec A) or 10% NBF, EDTA-based decalcifier (e.g., Mielodec B), 70% ethanol, PBS, automated tissue processor, paraffin.
- Equipment Required: Bone marrow biopsy needle (e.g., Jamshidi), specimen capsule, rocker.
| Step | Procedure | Duration | Temperature | Critical Parameters |
|---|---|---|---|---|
| 1 | Biopsy Collection | - | Room Temp | Use intact, unfragmented core for optimal morphology. |
| 2 | Primary Fixation | 1.5-2.5 hours | Room Temp | Agitate gently. B5 fixative is preferred for superior nuclear detail [36]. |
| 3 | Wash | 15-30 min | Room Temp | Use 70% ethanol for B5; distilled water for AZF [36]. |
| 4 | Decalcification | 1.5 hours (or until soft) | Room Temp | EDTA is preferred over strong acids for IHC antigen preservation [55] [36]. |
| 5 | Post-Decalcification Wash | 15 min | Room Temp | 70% ethanol to remove reagent excess. |
| 6 | Tissue Processing & Embedding | Overnight | - | Standard paraffin embedding. Section at 4 µm for IHC [57]. |
The Scientist's Toolkit: Key Reagents for Bone and Bone Marrow
Table 2: Essential Reagents for Bone and Bone Marrow Processing
| Reagent / Solution | Function / Purpose | Application Note |
|---|---|---|
| B5 Fixative (Commercial) | Mercury-based fixative. Excellent preservation of nuclear detail and cell morphology. | First-choice fixative for hematopoietic tissues when morphology is critical [36]. |
| 10% Neutral Buffered Formalin (NBF) | Crosslinking fixative. Standard all-purpose fixative. | Widely available; suitable if combined with gentle decalcification [57] [36]. |
| EDTA Decalcifier | Chelating agent. Slowly removes calcium by binding calcium ions. | Preferred for IHC and molecular studies; preserves antigenicity and nucleic acids [55] [36]. |
| Mielodec Kit | Commercial kit. Combined B5-based fixative and EDTA-based decalcifier. | Provides standardized, reliable performance and simplifies workflow [36]. |
| 70% Ethanol | Dehydrant & washing solution. Removes excess fixative/decalcifier. | Critical step after B5 fixation and decalcification to prepare tissue for processing [36]. |
Advanced and Emerging Fixation Technologies
Dynamic Fixation Monitoring
A groundbreaking approach to standardization involves real-time monitoring of fixative diffusion. Bauer et al. (2021) developed a system using acoustic time-of-flight (TOF) technology to detect formalin diffusion into tissue in real-time [58]. A predictive algorithm determined the optimal endpoint for fixation, which was significantly shorter than standard protocols while producing superior and more consistent IHC staining for biomarkers like FOXP3 and bcl-2 compared to underfixed controls [58].
Alternative Methods for Virtual Histology
For non-destructive 3D visualization, X-ray micro-tomography (micro-CT) offers a "virtual histology" solution. A 2016 study demonstrated that ethanol fixation alone, without additional contrast agents, provides sufficient contrast for high-resolution micro-CT of soft-tissue murine organs when used with large-area photon-counting detectors [59]. This method preserves samples for subsequent standard histological processing.
Optimal tissue fixation is not a one-size-fits-all process but a tissue-specific strategic endeavor. For neural tissues, transcardial perfusion with PFA followed by sucrose cryoprotection is the gold standard for structural and antigenic preservation. For bone and bone marrow, the combination of a B5-based fixative with an EDTA-based decalcifier provides the best compromise between exquisite morphological detail and preservation of antigenicity for IHC. Emerging technologies, such as dynamic fixation monitoring and virtual histology via micro-CT, promise greater standardization and new dimensions of analysis. Adhering to these tissue-tailored protocols ensures the highest quality specimens, forming a reliable foundation for rigorous immunohistochemistry research and confident data interpretation in both basic science and drug development.
In immunohistochemistry (IHC) research, the paramount importance of tissue fixation is counterbalanced by a significant technical challenge: the masking of antigenic epitopes. Formalin fixation, the cornerstone of tissue preservation for pathological examination, creates methylene bridges that cross-link proteins, thereby obscuring the very antigenic sites that antibodies are designed to detect [60] [61]. This compromise between morphological preservation and immunoreactivity necessitates a critical intermediary step—antigen retrieval. Within the context of a broader thesis on tissue fixation methods, this application note details the two principal techniques for recovering antigenicity: Heat-Induced Epitope Retrieval (HIER) and Protease-Induced Epitope Retrieval (PIER). The selection and optimization of these methods are fundamental to achieving specific, reproducible, and high-quality staining results, which underpin both basic research and drug development efforts [62] [63].
Core Principles and Mechanisms of Antigen Retrieval
The fundamental goal of antigen retrieval is to reverse the cross-links formed during formalin fixation, thereby unmasking epitopes and restoring antibody-binding capability. The two primary methods achieve this through distinct mechanisms.
Heat-Induced Epitope Retrieval (HIER) utilizes elevated temperatures, typically delivered via a pressurized or water bath system, to break the methylene cross-links. The prevailing hypothesis is that the application of heat causes the cross-linked proteins to unfold, restoring the epitope to a conformation recognizable by its specific antibody [61]. The efficacy of HIER is highly dependent on the buffer solution's pH and chemical composition, which facilitates the hydrolytic cleavage of formaldehyde cross-links [62] [64].
Protease-Induced Epitope Retrieval (PIER) employs proteolytic enzymes such as proteinase K, trypsin, or pepsin to digest the protein cross-links that mask the epitope [61] [63]. This method is generally considered gentler than HIER and is often preferred for more sensitive tissues or specific antigens [60]. However, a significant drawback is the potential for excessive digestion, which can damage tissue morphology and destroy the antigen of interest itself [63].
A critical consideration for researchers is that frozen tissue sections typically do not require an antigen retrieval step. For these samples, a simple post-thaw acetone fixation is usually sufficient before proceeding with immunohistochemical staining [60] [65].
Comparative Analysis of Antigen Retrieval Methods
The choice between HIER and PIER is not universal and depends on factors including the target antigen, tissue type, and fixation history. Empirical optimization is often required to determine the optimal protocol.
Table 1: Characteristics of Heat-Induced vs. Protease-Induced Epitope Retrieval
| Feature | Heat-Induced Epitope Retrieval (HIER) | Protease-Induced Epitope Retrieval (PIER) |
|---|---|---|
| Primary Mechanism | Breakage of cross-links via heat-induced protein unfolding [61] | Enzymatic digestion of cross-linking proteins [61] |
| Typical Conditions | 95-120°C for 3-20 min in specific buffer [66] [65] [64] | 37°C for 10-90 min with enzyme solution [60] [66] [67] |
| Key Advantages | Higher success rate for many antigens; more universally applicable [63] | Gentler process; superior for certain sensitive antigens or tissues [60] [66] |
| Key Limitations | Can destroy some heat-labile epitopes; risk of tissue detachment [66] | Technically demanding; risk of tissue and antigen damage [60] [63] |
| Optimal For | Most formalin-fixed, paraffin-embedded (FFPE) tissues; general use [65] | Highly masked epitopes; specific antigens like CILP-2 in cartilage [66] |
Recent research underscores the necessity for method-specific optimization. A 2024 study investigating the detection of CILP-2 in osteoarthritic cartilage found that PIER using proteinase K and hyaluronidase yielded the most abundant and specific staining. Conversely, HIER alone was less effective, and the combination of HIER followed by PIER actually reduced staining quality and frequently led to section detachment from the slides [66]. This highlights that combining methods is not always beneficial and that the retrieval protocol must be carefully adapted to the specific experimental system.
Detailed Experimental Protocols
The following protocols are standardized for formalin-fixed, paraffin-embedded (FFPE) tissue sections mounted on adhesive (e.g., APES-coated) slides. A universal initial step involves deparaffinization and rehydration: three 3-minute washes in xylene, followed by three 3-minute washes in graded alcohols (e.g., IMS or methanol), and a final rinse in cold running tap water. From this point onward, slides must not be allowed to dry out [60] [65].
Protocol A: Heat-Induced Epitope Retrieval (HIER)
This protocol outlines the pressure cooker method, which is efficient and widely used.
- Reagents Required: Sodium citrate buffer (10 mM, pH 6.0) or Tris-EDTA buffer (10 mM Tris, 1 mM EDTA, pH 9.0); 0.1 N Sodium Hydroxide; 0.1 N Hydrochloric Acid (for pH adjustment) [65] [64].
- Procedure:
- Deparaffinize and Rehydrate: Complete the standard deparaffinization and rehydration steps as described above.
- Prepare Buffer: Add the chosen antigen retrieval buffer to a pressure cooker. Heat on a hot plate until boiling.
- Heat Retrieval: Transfer the slide rack from tap water into the boiling buffer. Secure the lid and heat until full pressure is achieved. Once pressurized, process the slides for 3 minutes [64].
- Cool: Turn off the heat and run cold water over the pressure cooker to depressurize and cool it. Once safe to open, run cold tap water over the slides in the cooker for 10 minutes to cool and allow epitopes to re-form.
- Stain: Proceed with the standard IHC staining protocol.
Protocol B: Protease-Induced Epitope Retrieval (PIER)
This protocol utilizes proteinase K, a commonly used enzyme for epitope retrieval.
- Reagents Required: Proteinase K Stock Solution (20X); TE Buffer (pH 8.0); Calcium Chloride; 0.1 N Sodium Hydroxide; 0.1 N Hydrochloric Acid [60] [67].
- Procedure:
- Deparaffinize and Rehydrate: Complete the standard deparaffinization and rehydration steps.
- Prepare Enzyme Solution: Prepare a 1X Proteinase K working solution (20 µg/mL) by diluting the stock in TE Buffer. Pre-warm the solution to 37°C in a water bath or humidified chamber [67].
- Enzymatic Digestion: Transfer the slides to the pre-warmed Proteinase K working solution. Incubate for 10-20 minutes at 37°C.
- Terminate Reaction: Remove the slides and place them in cold running tap water for 3 minutes to stop the enzymatic activity [60].
- Stain: Continue with the standard IHC staining protocol.
Note: Optimal incubation time for PIER is highly variable and depends on tissue type and fixation duration; it must be determined empirically by the user [67].
Visual Workflow and Decision Framework
The following decision tree outlines a logical workflow for selecting and optimizing an antigen retrieval method, based on antibody specifications and preliminary experimental results.
The Scientist's Toolkit: Essential Reagents and Materials
Successful antigen retrieval requires precise reagents and equipment. The following table details key solutions and their functions for setting up and optimizing these protocols.
Table 2: Key Research Reagent Solutions for Antigen Retrieval
| Reagent / Solution | Function / Application | Example Preparation |
|---|---|---|
| Sodium Citrate Buffer (pH 6.0) | A common HIER buffer, ideal for a wide range of antigens [64]. | 2.94 g Tri-sodium citrate in 1L dH₂O, pH to 6.0 with HCl. Add 0.5 mL Tween 20 [65] [64]. |
| Tris-EDTA Buffer (pH 9.0) | A high-pH HIER buffer, often used for more challenging or phosphorylated antigens [64]. | 1.21 g Tris, 0.37 g EDTA in 1L dH₂O, pH to 9.0. Add 0.5 mL Tween 20 [64]. |
| Proteinase K Solution | A robust protease used in PIER to digest cross-linking proteins [66] [67]. | 20 µg/mL in TE Buffer (pH 8.0); incubate 10-20 min at 37°C [67]. |
| Trypsin Working Solution | An alternative enzyme for PIER, effective for certain tissue types [67]. | 0.05% trypsin, 0.1% CaCl₂ in dH₂O, pH to 7.8; incubate 10-20 min at 37°C [60] [67]. |
| Antigen Retrieval Reagent Kits | Pre-formulated acidic, neutral, or basic solutions for systematic HIER optimization [63]. | Commercial kits (e.g., R&D Systems #CTS013, #CTS014, #CTS015) for testing pH efficacy [63]. |
Heat-induced and protease-induced epitope retrieval are both indispensable techniques in the modern IHC workflow, enabling researchers to fully leverage the vast archives of FFPE tissues for both diagnostic and research applications. The choice between HIER and PIER is antigen- and tissue-specific, requiring systematic optimization of parameters such as time, temperature, and pH. As IHC continues to evolve towards more quantitative applications [68], the precision and reproducibility of the antigen retrieval step will become even more critical. By integrating these detailed protocols and optimization strategies into a broader thesis on tissue fixation, researchers can ensure maximal antibody binding and staining quality, thereby generating reliable and impactful data for scientific and drug development endeavors.
Systematic Optimization Scheme for Novel Antibodies or Labile Epitopes
The success of immunohistochemistry (IHC) in research and diagnostics hinges on the effective recognition of target epitopes by antibodies following tissue fixation and processing. A significant challenge emerges when investigating novel antibodies or labile epitopes, as standard formaldehyde-based fixation can chemically modify and mask target structures, rendering them undetectable [69] [3]. This application note delineates a systematic optimization scheme for generating and validating antibodies capable of recognizing fixation-sensitive epitopes, with a specific focus on methodologies compatible with formaldehyde-fixed paraffin-embedded (FFPE) tissues. The protocol is framed within a broader thesis on advancing tissue fixation methods to enhance biomarker detection reliability.
The Impact of Fixation on Epitope Integrity
Tissue fixation is essential for preserving tissue architecture but fundamentally alters the protein landscape that antibodies are designed to detect.
Chemical Mechanisms of Epitope Alteration
Formaldehyde, the most common fixative, acts by creating methylene bridges (-CH2-) between proteins, or between proteins and nucleic acids. This cross-linking stabilizes tissue morphology but can physically obscure the three-dimensional conformation of epitopes, particularly those that are sequential [3]. Over-fixation can exacerbate this masking effect, while under-fixation risks proteolytic degradation and loss of epitope integrity [3].
Comparative Analysis of Fixation Methods
The table below summarizes the effects of different fixatives on downstream analyses, based on comparative studies.
Table 1: Comparison of Common Tissue Fixation Methods
| Fixative | Mechanism | Effect on Morphology | Effect on Epitopes/RNA | Compatibility with Antigen Retrieval |
|---|---|---|---|---|
| Formalin/PFA | Cross-linking | Excellent preservation | Epitope masking; RNA degradation [54] | High [3] |
| Methacarn | Precipitation | Good preservation [54] | Improved RNA yield; reduced epitope masking for some targets [54] | Low [54] |
| Ethanol/Methanol | Precipitation | Moderate preservation | Variable epitope retention; antigen retrieval not typically applicable [3] | Low [3] |
Systematic Optimization Scheme
The following integrated protocol provides a roadmap for developing and applying antibodies for labile or fixation-sensitive epitopes.
The diagram below outlines the core experimental workflow for generating FFPE-specific monoclonal antibodies.
Key Experimental Protocols
Protocol 1: Antigen Display on Virus-Like Particles (VLPs)
For membrane-anchored or labile antigens, display on VLPs provides a highly immunogenic presentation system that preserves native conformation [69].
- Objective: To present the target antigen in a repetitive, membrane-bound context that mimics its native state.
- Materials:
- Expression Plasmids: Plasmids encoding HIV-1 Gag (e.g., pPB-mos1.gag-IpW) and a C-terminally truncated target antigen (e.g., trNGFR in pSB-cHS4-trNGFR-IhW) [69].
- Cell Line: Human suspension cells (e.g., 293-F cells).
- Transfection Reagent: Suitable for the chosen cell line.
- Method:
- Co-transfect 293-F cells with the Gag and antigen-expression plasmids using standard methods.
- Cultivate the cells for 48-72 hours to allow VLP assembly and budding.
- Harvest the cell culture supernatant and purify VLPs via ultracentrifugation (e.g., through a 20% sucrose cushion at 28,000 rpm for 2 hours).
- Resuspend the VLP pellet in a suitable buffer (e.g., PBS) and characterize by Dynamic Light Scattering (DLS) and Transmission Electron Microscopy (TEM) to confirm size and morphology [69].
Protocol 2: Simplified FFPE-Mimetic Fixation (FF90)
A simplified fixation protocol using formaldehyde and heat effectively mimics the epitope alterations of standard FFPE processing [69].
- Objective: To fix VLPs or cells in a manner that recapitulates the epitope masking and modification of full FFPE processing.
- Materials:
- Fixative: 4% Formaldehyde in PBS.
- Equipment: Heat block or water bath capable of maintaining 90°C.
- Method:
- Incubate VLPs or antigen-expressing cells with 4% formaldehyde for 24 hours at room temperature.
- Subject the fixed samples to heat at 90°C for 30 minutes.
- Wash the samples with PBS to remove residual fixative. Fixed VLPs are now ready for immunization [69].
Protocol 3: Hybridoma Generation and Selective Screening
This critical step involves immunizing animals with fixed antigens and screening for hybridomas that secrete antibodies selective for the fixed epitope.
- Objective: To generate monoclonal antibodies that selectively bind the fixation-modified target antigen.
- Materials:
- Animals: Female Balb/c mice (6-8 weeks old).
- Myeloma Cells: SP2/0 or P3X63Ag8.653 non-secreting cell lines.
- Screening Cells: Cell lines expressing the native and FF90-fixed target antigen.
- Immunization Method:
- Immunize mice intraperitoneally with 50-100 µg of fixed, antigen-displaying VLPs emulsified in Freund's Complete Adjuvant.
- Administer two booster injections at 3-week intervals with the same dose of VLPs in Freund's Incomplete Adjuvant.
- Test serum titers by flow cytometry on fixed antigen-expressing cells. Perform a final intravenous boost three days before fusion [69].
- Hybridoma Generation & Screening:
- Fuse splenocytes from immunized mice with myeloma cells using polyethylene glycol (PEG).
- Culture fused cells in HAT selection medium to select for hybridomas.
- Primary Screening: Screen supernatant from growing hybridoma clones for binding to FF90-fixed antigen-expressing cells via flow cytometry or ELISA. Critical Step: Use fixed cells as the primary screen to immediately exclude clones that only recognize the native antigen [69].
- Secondary Screening: Test positive clones from the primary screen for binding to native, non-fixed antigen. The desired clones will show strong binding to the fixed antigen and weak or no binding to the native antigen.
- Subclone positive candidates by limiting dilution to ensure monoclonality.
The Scientist's Toolkit: Essential Research Reagents
Table 2: Key Reagents for Antibody Optimization against Labile Epitopes
| Reagent / Solution | Function / Explanation |
|---|---|
| Virus-Like Particles (VLPs) | Highly immunogenic scaffold for displaying membrane-anchored or labile antigens in a native-like conformation, eliciting a strong B-cell response [69]. |
| Truncated Antigen Constructs | Antigen engineered to remove hydrophobic transmembrane domains, facilitating display on VLPs while aiming to preserve the structure of the extracellular ectodomain [69]. |
| Methacarn Fixative | Precipitative fixative ( Methanol:Chloroform:Acetic Acid) often used as an alternative to formalin, resulting in less epitope masking and superior RNA preservation for combined analyses [54]. |
| Hybridoma Cell Lines | Fused cells resulting from the combination of antibody-producing B-cells and immortal myeloma cells, allowing for the continuous production of monoclonal antibodies [69]. |
| Antigen Retrieval Reagents | Solutions (e.g., citrate buffer, EDTA) and methods (heat-induced, enzyme-induced) used to break methylene cross-links in FFPE tissue, reversing formaldehyde-induced epitope masking [3]. |
The systematic scheme outlined herein, centered on immunization with fixed antigen-displaying VLPs and a selective screening strategy, provides a robust proof of concept for generating FFPE-specific monoclonal antibodies [69]. This methodology directly addresses the core challenge in IHC research: the structural disparity between native and fixed epitopes.
The integration of VLP technology ensures a high-density, immunogenic presentation of the target antigen. The critical element of screening first against the fixed version of the antigen enables the deliberate selection of clones that recognize the fixation-modified state, bypassing the common pitfall of discovering post-hybridoma that a valuable antibody fails on FFPE tissues. This approach is particularly powerful for drug development professionals and researchers validating novel biomarkers, as it de-risks the antibody generation process and increases the likelihood of successful IHC assay development. Furthermore, the comparative data on fixatives empowers scientists to make informed decisions when designing experiments for combined histological and biomolecular analysis.
In conclusion, this optimization scheme, framed within the context of modern tissue fixation methodologies, offers a reliable pathway to overcome the significant obstacle of epitope labiality, thereby accelerating research and diagnostic capabilities in immunohistochemistry.
IHC Fixation Troubleshooting: Solving Poor Staining and Artifacts
Diagnosing and Resolving Weak or Absent Signal
In the context of immunohistochemistry (IHC) research, particularly studies focused on evaluating tissue fixation methods, the occurrence of weak or absent target signals presents a significant challenge. IHC is an important auxiliary method that allows for the confirmation of target molecule expressions within the specific context of the tissue microenvironment [57]. The technique combines principles from histology, immunology, and biochemistry to detect specific antigens or proteins within tissue samples, providing a unique advantage over other molecular biology techniques by precisely locating target proteins without tissue digestion [1]. However, the reliability of IHC results is highly dependent on numerous technical factors throughout the experimental workflow, with tissue fixation representing one of the most critical variables. improper fixation techniques can mask epitopes, alter protein conformation, or introduce artifacts that ultimately lead to signal detection failures. This application note provides a systematic framework for diagnosing and resolving issues related to weak or absent IHC signals, with special emphasis on optimization within fixation research paradigms.
The fundamental principle of IHC relies on the specific binding of antibodies tagged with detectable labels to target antigens within tissues, thus enabling visualization of the localization and distribution of these antigens [1]. This antigen-antibody reaction forms the basis for signal generation, which can be visualized using various labels including fluorescent compounds, enzymes, and metals [1]. The IHC process can be performed using either direct methods, where the primary antibody is directly conjugated to a detectable label, or indirect methods, which utilize a labeled secondary antibody that recognizes the primary antibody, thereby amplifying the signal [1].
Within fixation research, the chemical cross-linking introduced by aldehyde-based fixatives like formalin and paraformaldehyde can mask epitopes by forming methylene bridges between amino groups on adjacent molecules [57]. This underscores the critical importance of understanding how different fixation parameters – including fixation duration, fixative concentration, pH, and tissue penetration – impact antigen availability for antibody binding. The unique feature that makes IHC stand out among many other laboratory tests is that it is performed without destruction of histologic architecture, allowing assessment of expression patterns in the context of microenvironment [57].
Troubleshooting Framework: Systematic Diagnosis
When encountering weak or absent signals, researchers should systematically investigate potential causes across the entire IHC workflow. The table below outlines common issues and their solutions, with particular attention to fixation-related variables.
Table 1: Troubleshooting Guide for Weak or Absent IHC Signals
| Potential Issue | Possible Solution | Fixation Research Context |
|---|---|---|
| The epitope recognized by the primary antibody is not expressed, or expressed at very low levels in the tissue sample | Ensure the antibody is compatible with the species of the tissue sample. Verify protein expression using Western blotting or existing protein/RNA databases [70]. | Use positive control tissues fixed with different methods to confirm preservation of epitopes of interest. |
| The primary antibody cannot access its epitope in the tissue sample due to the fixation conditions | Perform antigen retrieval before immunostaining. Use alternative fixatives to maintain antigen availability [70]. | Compare multiple antigen retrieval methods (HIER, enzymatic) across different fixation protocols. |
| The concentration of primary antibody was too low or the incubation time was too short | Increase antibody concentration and/or perform antibody titration. Increase incubation time [70]. | Titrate antibodies separately for each fixation condition as epitope accessibility may vary. |
| The primary antibody does not recognize the target protein in its native state | Refer to the antibody's data sheet to determine whether it is appropriate or has been validated for IHC [70]. | Validate antibody performance on tissues fixed using different methods. |
| If antigen retrieval was performed, the epitope recognized by the primary antibody was destroyed | Optimize antigen retrieval conditions, or consider not performing this step [70]. | Systematically test retrieval time, temperature, and pH for each fixation condition. |
| Fixation method inappropriate for antigen | Optimize fixation conditions. Try an alternative fixative [70]. | Implement fixation screening studies to identify optimal fixative-epitope pairs. |
| Antigen has diffused due to a delay in fixation | Fix tissue as soon as possible after dissection. Try a cross-linking fixative rather than an organic fixative [70]. | Standardize ischemia time and document fixation delays as experimental variables. |
| Fixation is introducing artifacts | Optimize fixation conditions. Try an alternative fixative [70]. | Compare artifacts across different fixatives and fixation durations. |
Fixation-Specific Considerations
Tissue handling and fixation are crucial steps in preserving cellular integrity and preventing degradation during sample processing [1]. Fixation stabilizes cells and tissues, preserving morphological detail for diagnosis and specialized testing [1]. In fixation research, several specific parameters must be carefully controlled and documented:
Fixation Timing
Ischemia time before fixation significantly impacts protein integrity. Alteration in the results of biomarkers including Ki-67 due to variable ischemic times has been reported [57]. To avoid ischemic effects resulting in degeneration of protein or tissue enzymes, rapid fixation is important [57]. For phosphorylation studies, include protein phosphatase inhibitors in fixative to prevent dephosphorylation [70].
Fixation Duration and Penetration
For surgical specimens, fixation in 10% neutral buffered formalin for 24 hours at room temperature is typically recommended [57]. The appropriate tissue to fixative ratio is 1:1 to 1:20 [57]. Overfixation can cause irreversible damage to some epitopes, while underfixation may permit antigen diffusion or degradation [57].
Alternative Fixatives
While 10% neutral buffered formalin is standard, research comparing fixation techniques may employ alternatives including acetone, trichloroacetic acid, or other specialized fixatives [71]. When using non-additive fixatives such as acetone, the target antigen will normally be fully available, but with compromised morphology [57].
Experimental Protocols
Protocol 1: Antigen Retrieval Optimization
Purpose: To determine optimal antigen retrieval conditions for different fixation methods.
Reagents:
- Citrate buffer (pH 6.0)
- Tris-EDTA buffer (pH 9.0)
- Proteinase K (for enzymatic retrieval)
- 3% hydrogen peroxide
- Blocking serum
Methodology:
- Cut tissue sections from differently fixed tissue blocks (4μm thickness).
- Deparaffinize and rehydrate through xylene and graded alcohols.
- Perform heat-induced epitope retrieval (HIER) using:
- Compare with enzymatic retrieval: incubate in trypsin or proteinase K for 10-20 minutes at 37°C [57].
- Continue with standard IHC protocol.
Evaluation: Compare signal intensity, background staining, and morphological preservation across retrieval conditions and fixation methods.
Protocol 2: Antibody Titration for Fixed Tissues
Purpose: To determine optimal primary antibody concentration for specific fixation conditions.
Reagents:
- Primary antibody
- Antibody diluent
- Detection system
- Chromogen
Methodology:
- Prepare serial dilutions of primary antibody (e.g., 1:100, 1:500, 1:1000, 1:2000).
- Apply to tissue sections from different fixation conditions.
- Incubate for consistent time (30-60 minutes at room temperature or overnight at 4°C).
- Complete IHC staining with consistent detection method.
- Evaluate staining intensity and signal-to-noise ratio.
Evaluation: Select the dilution that provides strong specific signal with minimal background across different fixation conditions.
Visualization and Analysis
Figure 1: Troubleshooting workflow for weak or absent IHC signals, highlighting fixation-related issues and solutions.
Quantitative Analysis Methods
For objective assessment of signal optimization, digital image analysis offers advantages over traditional pathologist visual scoring. Digital methods allow algorithm parameters to be locked, yielding more reproducible data, especially when staining is weak and most linearly related to antigen concentration [72]. These methods output continuous variable data, unlike the ordinal or quasi-continuous data from visual scoring [72]. Studies demonstrate that IHC cut-points of biomarkers with prognostic relevance may be identified using continuous variable digital imaging data that were either undetected or not as strongly associated using visual scoring data [72].
Table 2: Research Reagent Solutions for IHC Signal Optimization
| Reagent Category | Specific Examples | Function in IHC | Fixation Considerations |
|---|---|---|---|
| Fixatives | 10% Neutral Buffered Formalin, Paraformaldehyde, Acetone | Preserve tissue architecture and antigen integrity | Different fixatives require specific antigen retrieval optimization |
| Antigen Retrieval Reagents | Citrate buffer (pH 6.0), Tris-EDTA buffer (pH 9.0), Proteinase K | Reverse formaldehyde-induced epitope masking | pH and method must be optimized for specific fixation conditions |
| Blocking Agents | Normal serum, Bovine serum albumin, Commercial protein blocks | Reduce non-specific background staining | Choice should match secondary antibody species; critical for highly fixed tissues |
| Detection Systems | Avidin-Biotin Complex (ABC), Polymer-based systems, Tyramide signal amplification | Amplify primary antibody signal | Sensitivity varies; higher amplification may be needed for masked epitopes |
| Chromogens | DAB, Vector Red, NovaRed | Visualize antibody binding | Different chromogens offer varying sensitivity and contrast |
Effective diagnosis and resolution of weak or absent IHC signals requires systematic investigation of multiple technical parameters, with special attention to fixation variables in methodological research. By implementing the structured troubleshooting framework and optimization protocols outlined in this document, researchers can significantly improve signal detection while advancing our understanding of how fixation methods impact antigen preservation. Future integration of digital analysis and artificial intelligence with standardized fixation protocols will further enhance reproducibility and quantitative assessment in IHC research [1].
Reducing High Background and Non-Specific Staining
In immunohistochemistry (IHC) research, the clarity of specific staining is paramount for accurate data interpretation. High background and non-specific staining represent significant challenges that can compromise experimental validity, particularly within studies focused on optimizing tissue fixation methods. The fixation process itself, while essential for preserving tissue architecture and antigenicity, can be a primary contributor to these staining artifacts if not properly optimized [3]. Non-specific staining obscures target signals through interactions unrelated to specific antibody-epitope binding, while high background manifests as diffuse, low-level staining across the tissue section [73]. For researchers and drug development professionals, mastering the control of these artifacts is not merely a technical exercise but a fundamental requirement for producing reliable, reproducible, and interpretable data that can inform diagnostic and therapeutic development. This application note provides a comprehensive framework for identifying, troubleshooting, and preventing these issues, with particular emphasis on their relationship to tissue fixation variables.
Effective troubleshooting requires a systematic understanding of the potential sources of non-specific staining. These artifacts generally arise from five principal categories, each with distinct mechanisms and solutions.
Table 1: Common Sources of Non-Specific Staining and Background
| Source | Mechanism | Primary Tissues Affected |
|---|---|---|
| Endogenous Enzyme Activity [57] [73] | Endogenous peroxidases or phosphatases react with chromogenic substrates, generating precipitate. | Peroxidases: Blood-rich tissues (spleen, kidney). Phosphatases: Kidney, intestine, liver. |
| Endogenous Biotin [57] [73] | Endogenous biotin binds to avidin/streptavidin from detection systems, creating false positives. | Tissues with high mitochondrial activity (liver, kidney, certain tumors). |
| Endogenous Immunoglobulins [73] | Secondary antibodies bind to endogenous immunoglobulins present in the tissue. | Lymphoid tissues (tonsil, spleen); critical in "mouse-on-mouse" or "human-on-human" models. |
| Non-Specific Antibody Binding [74] [57] | Antibodies (primary or secondary) bind to charged groups, Fc receptors, or other non-target sites via hydrophobic/ionic interactions. | Collagen-rich tissues; frozen sections; Fc receptor-rich tissues (lymphoid tissue, bone marrow). |
| Autofluorescence [73] | Molecules in the tissue naturally emit fluorescence upon light excitation, mimicking positive signals in IF. | Tissues with heme groups (RBCs), collagen, elastin, NADH, and lipofuscin. |
A critical relationship exists between tissue fixation and the propensity for these artifacts. Over-fixation, particularly with aldehyde-based fixatives, can increase background by enhancing the hydrophobicity of proteins, thereby promoting non-specific antibody binding [3] [75]. Conversely, under-fixation fails to adequately preserve tissue architecture and can allow for the diffusion of soluble antigens, leading to diffuse, non-specific staining patterns [3]. Furthermore, the choice of fixative directly influences the need for and efficacy of antigen retrieval, a process that can itself exacerbate background if not carefully controlled [57].
Pre-Staining Considerations: The Role of Fixation and Sample Preparation
The foundation for clean IHC staining is laid during the initial sample preparation stages. Proactive optimization of these pre-analytical phases can prevent the introduction of artifacts that are difficult to rectify later.
Fixation Method Selection and Optimization
Fixation is a primary determinant of IHC quality, striking a balance between preserving morphology and maintaining antigen accessibility.
Table 2: Impact of Common Fixatives on IHC Staining Artifacts
| Fixative Type | Mechanism | Advantages | Disadvantages & Artifact Risks |
|---|---|---|---|
| Aldehydes (e.g., Formaldehyde/PFA) [3] [76] | Cross-links proteins via amine groups. | Excellent morphology preservation; good tissue penetration. | Over-fixation causes excessive cross-linking, masking epitopes and increasing hydrophobic non-specific binding [3] [75]. |
| Precipitating (e.g., Methanol, Acetone) [3] [76] | Dehydrates and precipitates proteins. | Fast; often preserves antigenicity well; less epitope masking. | Can disrupt cellular morphology and membrane integrity; generally unsuitable for phospho-specific antibodies [76]. |
Protocol 3.1: Standardized Immersion Fixation for Optimal Antigen Preservation
- Objective: To achieve complete fixation without introducing high background due to over- or under-fixation.
- Reagents: 10% Neutral Buffered Formalin (NBF) or 4% Paraformaldehyde (PFA); Ethanol series (70%, 95%, 100%); Xylene.
- Procedure:
- Tissue Preparation: Immediately following dissection, immerse tissue in a volume of fixative that is 10-20 times the tissue volume [57].
- Fixation Time: Fix for 18-24 hours at room temperature for most tissues. Note: Optimal time depends on tissue size and density; small biopsies require less time, while larger specimens may need longer periods. [57] [76].
- Post-Fixation Processing: Rinse tissue thoroughly with buffer to remove excess fixative.
- Dehydration & Embedding: Process through a graded series of ethanol, clear with xylene, and embed in paraffin.
- Sectioning: Cut sections at a thickness of 4 μm [57]. Thicker sections contribute to higher background signal.
- Storage: Use freshly cut sections for best results. If storage is necessary, keep slides at 4°C in a vacuum-sealed container to prevent antigen degradation and oxidization [57].
- Troubleshooting:
Core Blocking and Staining Protocols
After proper fixation, the application of specific blocking steps is the most direct method for suppressing non-specific staining during the staining procedure itself.
Antigen Retrieval
For formalin-fixed, paraffin-embedded (FFPE) tissues, antigen retrieval is often essential to reverse the methylene bridge cross-links formed during fixation [57].
Protocol 4.1: Heat-Induced Epitope Retrieval (HIER)
- Objective: To unmask epitopes cross-linked by aldehyde fixation, thereby restoring antibody binding.
- Reagents: Antigen retrieval buffer (e.g., citrate buffer pH 6.0, Tris-EDTA buffer pH 9.0), slide-coping vessel, heat source (microwave, pressure cooker, or water bath).
- Procedure:
- Deparaffinize and Hydrate: Deparaffinize slides in fresh xylene and rehydrate through a graded ethanol series to water [75].
- Buffer Application: Place slides in a coplin jar filled with antigen retrieval buffer.
- Heating: Heat the slides using one of the following methods:
- Autoclave: 120°C for 10 minutes.
- Microwave: 750-800 W for 10 minutes, ensuring slides do not dry out.
- Heating Plate: 100°C for 30 minutes [57].
- Cooling: Allow the slides to cool in the buffer to room temperature (approximately 20-30 minutes).
- Rinse: Rinse slides gently with distilled water followed by wash buffer (e.g., TBS-T or PBS).
Comprehensive Blocking Procedure
A robust blocking protocol addresses multiple potential sources of non-specific staining simultaneously. The following workflow and protocol provide a systematic approach.
Diagram 1: Sequential blocking workflow for clean IHC
Protocol 4.2: Integrated Blocking and Antibody Application
- Objective: To eliminate major sources of non-specific staining prior to antibody incubation.
- Reagents:
- Protein Block: 5-10% Normal serum from the secondary antibody species, OR 2-5% BSA, OR a commercial protein-free blocking mix [74] [57].
- Endogenous Peroxidase Block: 3% Hydrogen Peroxide (H₂O₂) in methanol or aqueous solution.
- Endogenous Biotin Block: Sequential avidin-biotin blocking kit.
- Antibody Diluent: PBS or TBS with 1% BSA.
- Procedure:
- Block Endogenous Peroxidases: Apply 3% H₂O₂ to the tissue sections for 10-15 minutes at room temperature. Wash thoroughly with wash buffer (e.g., TBS-T or PBS) [57] [77].
- Block Endogenous Biotin (if using avidin-biotin detection): Apply avidin solution for 15 minutes, wash. Then apply biotin solution for 15 minutes, and wash again [75].
- Block Non-Specific Protein Binding: Apply the chosen protein blocking solution for 30 minutes at room temperature. Do not rinse with buffer after this step; simply tap off the excess blocking serum [74] [57].
- Apply Primary Antibody: Dilute the primary antibody in an appropriate diluent. Apply to the section and incubate for the optimized time and temperature (e.g., 30-60 minutes at room temperature or overnight at 4°C). Critical: Titrate the antibody concentration to find the optimal dilution that provides strong specific signal with minimal background [77] [75].
- Wash: Wash slides 3 times for 5 minutes each with TBS-T or PBS [57].
- Apply Secondary Antibody: Apply the enzyme- or fluorophore-conjugated secondary antibody for 30-60 minutes at room temperature. Wash again 3 times for 5 minutes each [57].
- Troubleshooting Notes:
- If background persists, consider using F(ab')₂ fragments of the primary or secondary antibody to avoid binding to Fc receptors, especially in Fc receptor-rich tissues like spleen and lymph nodes [57].
- Avoid using non-fat dry milk as a blocker in avidin-biotin systems, as it contains biotin [74] [57].
The Scientist's Toolkit: Key Reagents for Background Reduction
Table 3: Essential Reagents for Minimizing Non-Specific Staining
| Reagent | Function & Mechanism | Application Notes |
|---|---|---|
| Normal Serum [74] | Blocks non-specific binding to Fc receptors and other tissue proteins via competitive inhibition. | Use serum from the same species as the secondary antibody. Incompatible with secondary antibody species. |
| Bovine Serum Albumin (BSA) [74] [57] | Inert protein that blocks hydrophobic and charged sites on the tissue, reducing ionic interactions. | Common concentrations: 0.1% - 5%. An economical and effective general-purpose blocker. |
| Hydrogen Peroxide (H₂O₂) [57] [77] | Blocks endogenous peroxidase activity by irreversibly inhibiting the enzyme. | Standard concentration: 3%. Essential for HRP-based chromogenic detection. |
| Levamisole [57] | Inhibitor of endogenous alkaline phosphatase (AP) activity. | Used at 1-10 mM concentration to block AP in tissues like intestine and kidney. |
| Avidin/Biotin Blocking Kit [75] | Sequential application of avidin (to bind endogenous biotin) and biotin (to block avidin binding sites). | Critical for tissues with high endogenous biotin (liver, kidney) when using ABC detection methods. |
| F(ab')₂ Fragments [57] | Secondary antibodies with the Fc portion enzymatically removed, preventing binding to Fc receptors. | Ideal for staining tissues rich in Fc receptors or for applications like "mouse-on-mouse" staining. |
| Non-Ionic Detergents (e.g., Tween 20) [57] | Reduces hydrophobic interactions by disrupting micelle formation and washing away unbound antibody. | Typical concentration: 0.05% - 0.1% in wash buffers (e.g., TBS-T, PBS-T). |
Reducing high background and non-specific staining in IHC is an achievable goal that hinges on a meticulous and systematic approach, starting with optimized tissue fixation. The interplay between fixation chemistry, epitope masking, and subsequent retrieval and blocking steps is complex but manageable through empirical optimization of the protocols detailed herein. By understanding the sources of artifacts—ranging from endogenous enzymes and immunoglobulins to non-specific protein interactions—researchers can deploy targeted strategies to suppress them. The consistent application of these methods, including proper controls and reagent titration, is fundamental for generating high-quality, publication-ready IHC data that reliably informs both basic research and drug development efforts.
Addressing Epitope Masking from Over-fixation and Cross-linking
In immunohistochemistry (IHC) research, the preservation of tissue morphology through chemical fixation must be carefully balanced with the maintenance of antigen detection capability. Epitope masking represents a significant challenge in this process, primarily resulting from over-fixation and excessive protein cross-linking, which can compromise the accuracy of protein detection and quantification in research and diagnostic applications [78] [3]. This phenomenon occurs when the physicochemical modifications during tissue processing obscure or alter the mostly linear epitopes recognized by antibodies, leading to potentially false-negative results or inaccurate protein expression data [78].
The chemistry of epitope masking is complex and involves both intramolecular and intermolecular mechanisms. When formaldehyde-based fixatives contact tissue components, they initially form highly reactive hydroxymethyl groups that lead to methylene bridges between amino groups of proteins [78]. These cross-links can be partially resolved through antigen retrieval techniques, though some bonds become less reversible after transfer of the specimen to ethanol [78]. Recent research has documented that a second round of epitope masking occurs upon entering clearing agents, mostly at the paraffin embedding step, an effect that may depend on the removal of non-freezable water [78]. Understanding and addressing these mechanisms is crucial for researchers and drug development professionals who rely on accurate protein localization and quantification for their investigative and diagnostic work.
Understanding Epitope Masking Mechanisms
Molecular Basis of Cross-linking Induced Masking
The primary mechanism underlying epitope masking in IHC research stems from the cross-linking activity of aldehyde-based fixatives, particularly formaldehyde. These fixatives create methylene bridges (CH₂) between proteins or between proteins and nucleic acids, effectively stabilizing tissue structure but potentially obscuring antigen recognition sites [3]. The cross-linking process involves the formation of both intramolecular bonds (within the same protein) and intermolecular bonds (between adjacent proteins), with research indicating that intramolecular bonds contribute more significantly to epitope masking unless fixation occurs in an environment of highly concentrated, macromolecular proteins [78].
The extent of masking varies based on fixation time and temperature. Studies using frozen sections as proxies for whole tissue have demonstrated that an equivalent extent of antigen masking occurs across variable fixation times at room temperature, though interestingly, most antigens actually benefit from longer fixation times (>24 hours) for optimal detection after antigen retrieval [78]. This paradoxical finding underscores the complex relationship between fixation duration and antigen detection, suggesting that while cross-linking occurs throughout fixation, adequate time is necessary for proper tissue preservation that ultimately supports effective antigen retrieval.
Impact of Tissue Processing Steps on Epitope Availability
Beyond initial fixation, subsequent tissue processing steps significantly contribute to epitope masking. The transfer to a graded alcohol series during dehydration has been shown to enhance staining effects, possibly by improving access of the polymeric immunohistochemical detection system to tissue structures [78]. This effect can be reproduced by treating sections with detergents, suggesting that alcohol-induced changes to tissue architecture may facilitate antibody penetration rather than directly contributing to masking.
A critical second round of masking occurs during the clearing and embedding phases, particularly at the paraffin embedding step [78]. This secondary masking may depend on the removal of non-freezable water, which appears to play a role in maintaining epitope accessibility. Research has demonstrated that this effect can be partially prevented by disaccharides acting as water substitutes, highlighting the importance of hydration states in epitope preservation [78]. Fortunately, modern antigen retrieval techniques can fully reverse the masking due to both fixation time and paraffin embedding, though some epitopes destroyed during routine processing may not survive even with optimal retrieval methods [78].
Quantitative Assessment of Fixation Impacts
Systematic Analysis of Fixation Parameters
Research has quantitatively investigated how different fixation and processing steps affect antigen detection capabilities. Using frozen sections processed similarly to whole tissue blocks, scientists have been able to dissect the contribution of each processing step to overall epitope masking [78]. This approach allows for controlled investigation of fixation requirements for antigens in routine specimens without the confounding variables introduced by natural tissue heterogeneity.
Table 1: Effects of Fixation Time on Antigen Detection with Antigen Retrieval
| Fixation Duration | Effect on Antigen Detection | Representative Antigens Affected |
|---|---|---|
| Short fixation (<12 hours) | Suboptimal for many antigens after AR | Ki-67, bcl-2, ER |
| Moderate fixation (12-24 hours) | Adequate for most antigens | CD68, CD79a, Cytokeratin 8 |
| Extended fixation (>24 hours) | Optimal detection after AR | ER (multiple clones), bcl-2, Ki-67 |
| Prolonged fixation (>48 hours) | Generally maintained with proper AR | Most antigens benefiting from cross-linking stabilization |
The relationship between fixation time and antigen detection presents a complex interplay that challenges conventional assumptions about over-fixation. Contrary to expectations that longer fixation invariably increases masking, many antigens actually demonstrate improved detection with extended fixation times (>24 hours) when combined with appropriate antigen retrieval methods [78]. This counterintuitive finding suggests that adequate cross-linking may stabilize certain epitopes through the subsequent processing steps, provided that robust antigen retrieval is applied.
Comparative Performance of Fixation and Decalcification Protocols
For challenging specimens such as bone marrow trephine biopsies, where decalcification introduces additional antigenic challenges, systematic comparisons of fixation and decalcification protocols have revealed significant differences in IHC performance [36]. A recent study evaluating 25 biomarkers across 11 different protocols found that IHC yield varied based on both fixative and decalcifying reagents, though overall quality was mainly related to the fixative rather than the decalcifying phase [36].
Table 2: Fixation and Decalcification Protocol Performance for IHC
| Protocol Components | Best Performing Combination | Least Effective Combination | Key Findings |
|---|---|---|---|
| Fixative | Commercial B5-based | "In-house" B5-based | Commercial formulations offer better standardization |
| Decalcifying Agent | EDTA-based | Strong inorganic acids | EDTA preserves antigenicity better than acidic decalcifiers |
| Inadequate IHC Stains | 5 out of 25 biomarkers | 8 out of 25 biomarkers | Fixative choice more critical than decalcification method |
| Morphology Preservation | B5 and zinc-formalin | Buffered formalin alone | Mercury-based fixatives superior for nuclear detail |
The study demonstrated that the protocol with the lowest number of inadequate IHC stains (5 out of 25) combined commercially available B5-based fixative with EDTA-based decalcifying reagents [36]. In contrast, the worst performance (8 inadequate IHC stains out of 25) was obtained with a protocol based on "in-house" B5-based and EDTA-based reagents, highlighting the importance of standardized commercial reagents for consistent IHC results [36]. These findings emphasize that for complex tissues requiring decalcification, both fixation and decalcification methods must be optimized to preserve antigenicity while maintaining morphological integrity.
Experimental Protocols for Optimal Epitope Preservation
Standardized Tissue Processing Protocol
Based on current research, the following protocol provides a standardized approach for tissue processing that minimizes epitope masking while maintaining excellent morphological preservation:
Fixation
- Immerse tissue specimens in 10% neutral buffered formalin within 30 minutes of collection
- Maintain a fixative volume 10-20 times greater than tissue volume
- For most antigens, fix for 24-48 hours at room temperature for optimal results after antigen retrieval [78]
- Avoid fixation periods shorter than 12 hours for tissues intended for IHC analysis
Dehydration
- Transfer tissues through a graded ethanol series: 70%, 85%, 95%, and 100% ethanol
- Allow 10 minutes in each ethanol concentration at room temperature [78]
- Ensure complete dehydration to prevent processing artifacts
Clearing
- Immerse tissues in xylene or xylene substitute for 10 minutes at room temperature [78]
- This step removes alcohol and prepares tissue for paraffin infiltration
Embedding
- Infiltrate with molten paraffin at 60°C for 2 hours with two changes [78]
- Embed in fresh paraffin using appropriate molds
- Orient tissue for optimal sectioning plane
Sectioning and Slide Preparation
- Cut sections at 4μm thickness using a microtome
- Float sections on a water bath at 40-45°C
- Mount sections on positively charged glass slides
- Dry slides for 1 hour at 65°C or overnight at 37°C [78]
This protocol has been validated using frozen sections as proxies for whole tissue, demonstrating equivalent extent of antigen masking across variable fixation times when processed identically to tissue blocks [78].
Antigen Retrieval Optimization Protocol
Antigen retrieval (AR) is critical for reversing epitope masking caused by fixation and embedding. The following protocol can be optimized for different antigen-antibody combinations:
Deparaffinization and Rehydration
- Deparaffinize slides in xylene (2 changes, 2 minutes each)
- Rehydrate through graded ethanols: 100%, 100%, 95%, 70% (2 minutes each)
- Rinse in distilled water for 2 minutes [79]
Antigen Retrieval Solution Preparation
- For citrate-based retrieval (pH 6.0): Dissolve 1.92g citric acid trisodium salt dihydrate in 1000mL distilled water
- For EDTA-based retrieval (pH 9.0): Dissolve 0.37g EDTA in 1000mL distilled water
- Alternatively, use commercial epitope retrieval solutions
Retrieval Methods
- Heat-induced epitope retrieval (HIER):
- Place slides in retrieval solution in a coplin jar or staining dish
- Heat in a water bath, steamer, or pressure cooker at 95°C for 20-40 minutes [80]
- Cool slides at room temperature for 20-30 minutes before proceeding
- Proteolytic-induced epitope retrieval (PIER):
- Prepare 0.05% - 0.1% trypsin or pepsin in appropriate buffer
- Incubate slides at 37°C for 5-15 minutes
- Rinse thoroughly with distilled water
- Heat-induced epitope retrieval (HIER):
Immunostaining
- Proceed with standard immunohistochemistry protocols
- Include appropriate positive and negative controls
The choice between citrate (pH 6.0) and EDTA (pH 9.0) buffers should be optimized for specific antibodies, as different epitopes respond differently to retrieval conditions [80]. Similarly, the duration of heating should be titrated based on the extent of fixation and the specific antigen being detected.
Diagram 1: IHC Workflow Highlighting Epitope Masking and Recovery Steps. This workflow illustrates critical points where epitope masking occurs (red) and where recovery strategies are implemented (green) during tissue processing for immunohistochemistry.
The Scientist's Toolkit: Essential Research Reagent Solutions
Table 3: Key Research Reagents for Addressing Epitope Masking
| Reagent/Category | Specific Examples | Function in Addressing Epitope Masking |
|---|---|---|
| Fixatives | 10% Neutral Buffered Formalin, B5, AZF | Preserve tissue architecture while balancing cross-linking intensity to minimize epitope masking |
| Antigen Retrieval Buffers | Citrate Buffer (pH 6.0), EDTA (pH 9.0), Tris-EDTA | Reverse methylene bridge cross-links formed during fixation through heat-mediated or enzymatic methods |
| Detection Enhancement Reagents | Tween-20, Sodium Dodecyl Sulfate (SDS) | Improve antibody penetration by acting as detergents to unmask epitopes, similar to alcohol series effects |
| Specialized Fixatives | Ethanol, Methanol, Acetone | Precipitative fixatives that avoid cross-linking but may preserve morphology less effectively |
| Commercial Stabilization Systems | MieloDec Kit, Various proprietary stabilizers | Standardized combinations of fixatives and decalcifiers that optimize antigen preservation in challenging tissues |
| Blocking Reagents | Normal Serum, BSA, Casein | Reduce non-specific background staining that may complicate interpretation of retrieved epitopes |
The selection of appropriate reagents is critical for successful epitope recovery in IHC experiments. For fixatives, 10% neutral buffered formalin remains the gold standard for most applications, though B5 and acetic acid-zinc-formalin (AZF) may be preferable for specific tissue types like bone marrow, providing superior morphological detail [36]. Antigen retrieval buffers work through different mechanisms; citrate buffers (pH 6.0) are effective for many nuclear antigens, while high-pH EDTA buffers (pH 9.0) may be more effective for certain membrane proteins [80].
Detection enhancement reagents such as Tween-20 and SDS can reproduce the staining enhancement effect observed with alcohol series during tissue processing, possibly by improving access of the detection system to tissue structures [78]. These detergents should be used at appropriate concentrations (typically 0.1-0.5%) to avoid tissue damage while maximizing epitope exposure. Commercial stabilization systems offer standardized approaches for challenging specimens, with studies showing that commercially prepared B5-based fixatives outperform "in-house" formulations for IHC yield [36].
Advanced Applications and Methodological Innovations
Quantitative IHC (qIHC) for Precision Biomarker Measurement
Recent advances in IHC quantification have led to the development of novel methods like quantitative IHC (qIHC), which enables precise protein measurement directly in FFPE specimens [68]. This technology addresses a significant limitation of conventional IHC, which is inherently semi-quantitative and subject to interpreter variability. The qIHC method is based on an amplification system that converts antibody-antigen complexes into detectable dots that can be counted and quantified, providing objective numerical data for protein expression levels [68].
The qIHC methodology follows a similar initial workflow to conventional IHC but incorporates a specialized detection system where only a pre-determined fraction of secondary antibodies is labeled, mixed with non-labeled antibodies to increase assay robustness [68]. An amplification reaction then generates a dot centered around each labeled antibody, enabling direct correlation between dot count and biomarker quantity in the tissue. This approach has demonstrated superior analytical performance compared to conventional IHC, with enhanced sensitivity, dynamic range, and reproducibility in measuring biomarkers such as HER2 [68].
Epitope Preservation in Tissue Microarrays and Slide Storage
The growing use of tissue microarrays (TMAs) in research has highlighted the importance of proper slide storage conditions for preserving epitope immunoreactivity. Studies have systematically evaluated how storage conditions affect epitope detection over time, revealing a time-dependent loss of immunoreactivity that varies by storage method [80]. Compared to time zero, the overall median percentage immunoreability was 66% at 6 months and 51% at 1 year across various storage conditions [80].
Research has identified optimal storage conditions for preserving epitope integrity in precut slides:
- Storage at -20°C demonstrated the best preservation, maintaining up to 87% immunoreactivity [80]
- Vacuum sealing was effective for some antibody targets but detrimental for others
- Storage at -80°C provided no significant advantage over -20°C
- Paraffin coating provided relatively poor preservation (55% immunoreactivity)
These findings support recommendations that precut slides should be stored at -20°C without paraffin coating or vacuum sealing for optimal epitope preservation [80]. This is particularly important for large-scale research studies using TMAs, where all sections are typically cut at once and stored for extended periods before staining.
Diagram 2: Mechanisms of Epitope Masking and Recovery Strategies. This diagram illustrates the molecular consequences of formaldehyde fixation and the two primary mechanisms (heat-induced and enzymatic retrieval) for reversing cross-linking-induced epitope masking.
Addressing epitope masking from over-fixation and cross-linking requires a comprehensive understanding of tissue processing chemistry and implementation of optimized protocols. The research presented demonstrates that while chemical fixation inevitably induces some degree of epitope masking through cross-linking, strategic approaches can effectively mitigate these effects. The paradoxical finding that longer fixation times may actually benefit detection of many antigens after proper antigen retrieval challenges conventional wisdom and highlights the importance of empirical optimization for specific research applications [78].
Future directions in managing epitope masking include the development of more standardized quantitative IHC methods [68], improved stabilization techniques for challenging specimens [36], and digital pathology integration with artificial intelligence for automated interpretation of complex staining patterns [81]. Additionally, the growing understanding of how storage conditions affect epitope preservation [80] will lead to better standardized protocols for biobanking and retrospective studies. As IHC continues to play a crucial role in both basic research and drug development, particularly with the expansion of immunohistochemistry-based companion diagnostics, addressing the challenges of epitope masking will remain essential for generating reliable, reproducible protein expression data.
For research applications requiring precise biomarker quantification, methods like qIHC that provide objective numerical data [68] will gradually supplement traditional semi-quantitative approaches, reducing inter-observer variability and improving reproducibility across studies. Similarly, the systematic comparison of fixation and decalcification protocols [36] provides evidence-based guidance for processing challenging specimens, moving the field toward greater standardization and reliability in immunohistochemical analysis.
Preventing and Correcting Tissue Artifacts and Morphology Damage
In immunohistochemistry (IHC) research, the preservation of tissue morphology is not merely a matter of structural aesthetics but a fundamental prerequisite for experimental validity. Tissue artifacts and morphological damage directly compromise the accuracy of protein localization data, potentially leading to erroneous biological interpretations and flawed conclusions in both basic research and drug development pipelines. Within the broader context of tissue fixation methodologies, the prevention and correction of these artifacts represent a critical quality control point that significantly influences data reproducibility and reliability. Artifacts can manifest at any stage of the complex IHC workflow, from initial tissue collection through fixation, processing, and staining, each introducing distinct challenges that require specific intervention strategies [1] [70].
The fundamental principle underlying artifact prevention lies in understanding the competing demands of morphological preservation and antigenicity maintenance. Over-fixation, particularly with cross-linking aldehydes, can preserve structure at the expense of epitope accessibility, while under-fixation preserves antigenicity but risks tissue degradation and autolysis [3] [82]. This application note provides a systematic framework for identifying, troubleshooting, and resolving the most common tissue integrity challenges encountered in IHC, with specific protocols designed for research and drug development applications.
Tissue Artifacts: Classification, Causes, and Identification
A critical first step in managing tissue quality is recognizing common artifacts and understanding their underlying causes. The following table summarizes frequent challenges encountered in IHC workflows.
Table 1: Common Tissue Artifacts in IHC: Causes and Identification
| Artifact Type | Primary Causes | Visual Identification | Impact on IHC |
|---|---|---|---|
| Over-fixation | Prolonged aldehyde fixation; excessive cross-linking [3] [82] | Excessive hardness, brittleness; masked epitopes [82] | High background; weak or false-negative signal [70] |
| Under-fixation | Insufficient fixation time; fixative penetration issues [70] | Tissue degradation; autolysis; "edge artifact" [82] | Poor morphology; diffuse staining; proteolytic loss of antigen |
| Freezing Artifacts | Slow freezing without cryoprotection; large ice crystal formation [83] | Disrupted cellular architecture; holes or tears in sections | Loss of subcellular detail; tissue fragmentation |
| Compression & Folding | Dull microtome blade; improper sectioning technique [83] | Visible folds, wrinkles, or compression lines in tissue sections | Obscured cellular morphology; uneven antibody staining |
| High Background Staining | Inadequate blocking; antibody concentration too high; insufficient washing [70] | Non-specific staining throughout tissue or in non-target areas | Masking of specific signal; difficult image interpretation |
Prevention Strategies: Optimized Fixation and Processing Protocols
Preventing artifacts requires a proactive approach, beginning at the moment of tissue acquisition. The selection and execution of appropriate fixation and processing methods are the most effective controls for preserving morphology.
Rational Fixative Selection
The choice of fixative establishes the foundation for all subsequent IHC results. The table below compares the properties of common fixatives, highlighting their potential to induce artifacts.
Table 2: Fixative Properties and Associated Artifact Risks
| Fixative | Mechanism | Optimal Use | Preservation Quality | Potential Artifacts |
|---|---|---|---|---|
| Formaldehyde/PFA | Cross-linking via methylene bridges [3] [82] | General IHC; perfusion or immersion; 18-24 hrs immersion [82] | Excellent morphology; good ultrastructure | Over-crosslinking; epitope masking; autofluorescence [70] |
| Glutaraldehyde | Strong cross-linking (dialdehyde) [3] [82] | EM studies; high-resolution structure | Superior ultrastructure preservation | Severe epitope masking; high autofluorescence; tissue hardening |
| Ethanol/Methanol | Protein precipitation/dehydration [3] [82] | Cell smears; cryosections; acetone-sensitive antigens [82] | Good antigenicity; rapid action | Poor ultrastructure; tissue shrinkage; membrane disruption [82] |
| Acetone | Precipitation & dehydration [82] | Frozen sections; cold acetone (-20°C) for labile antigens [82] | Excellent for many epitopes; fast | Extreme brittleness; poor morphological detail [82] |
Standardized Protocol for Perfusion Fixation
For the highest quality tissue preservation, particularly in neural and soft tissues, perfusion fixation is the gold standard. The following protocol, adapted from current methodologies, ensures rapid and uniform fixation [30] [82].
Title: Perfusion Fixation for Optimal Tissue Morphology
- Step 1: Preparation: Anesthetize the animal according to approved institutional protocols. Prepare a perfusion system with ~100 mL of ice-cold phosphate-buffered saline (PBS) followed by 200-300 mL of ice-cold 4% Paraformaldehyde (PFA) in PBS. Ensure all tools are ready for rapid dissection [30] [82].
- Step 2: Surgical Exposure: Secure the animal supine. Make a midline incision to open the thoracic cavity, exposing the heart. Use clamps to hold the chest wall open [30].
- Step 3: Cardiac Cannulation: Grasp the beating heart with forceps. Insert the perfusion needle into the left ventricle and advance ~5 mm. Secure the needle and immediately make an incision in the right atrium to create an outflow path [30] [82].
- Step 4: Vascular Flush: Initiate perfusion with ice-cold PBS at a steady flow rate (e.g., 20 mL/min). Continue until the effluent from the atrium is clear, indicating blood has been flushed from the vasculature [82].
- Step 5: Fixative Perfusion: Switch the perfusion line to the 4% PFA solution. Perfuse with the fixative for approximately 10-15 minutes, observing tissue blanching and mild body stiffening [30] [82].
- Step 6: Tissue Collection & Post-fixation: Quickly dissect the target tissues and place them in fresh 4% PFA for post-fixation. For most organs, post-fix for 2 hours on ice or overnight at 4°C. Avoid exceeding 24 hours to prevent over-fixation [30] [82].
The following diagram illustrates the critical control points in the tissue processing workflow to prevent artifacts.
Correction Protocols: Recovering from Common Artifacts
When artifacts are identified in processed tissues, targeted rescue protocols can often recover experimental value.
Antigen Retrieval for Epitope Masking
Epitope masking due to aldehyde cross-linking is one of the most common issues in IHC. Heat-Induced Epitope Retrieval (HIER) is the most widely used correction method [84].
Title: HIER Protocol for Masked Epitopes
- Step 1: Deparaffinization and Hydration: For FFPE sections, pass through xylene (or substitute) and graded ethanol series to water.
- Step 2: Retrieval Buffer Selection: Place slides in a suitable retrieval buffer. Citrate buffer (pH 6.0) is a good starting point. For more challenging targets, EDTA or Tris-EDTA buffer (pH 8.0-9.0) may be required [84].
- Step 3: Heating Method: Use a microwave oven, pressure cooker, or water bath. Heat the slides in buffer to 95-100°C for 15-20 minutes. A microwave is often recommended for consistent results [84].
- Step 4: Cooling: Allow the slides to cool in the buffer for 20-30 minutes at room temperature.
- Step 5: Washing and Staining: Rinse slides with distilled water, then transfer to PBS or TBS before proceeding with the standard IHC staining protocol.
Cryoprotection for Frozen Sections
To prevent ice crystal damage in frozen samples, proper cryoprotection is essential, especially for hydrogel-rich or soft scaffolds [83].
Title: Cryoprotection Protocol for Sensitive Tissues
- Step 1: Sucrose Infiltration: After fixation and PBS washing, infiltrate tissue with 15-30% sucrose in PBS until the tissue sinks (typically 24-72 hours at 4°C) [30].
- Step 2: OCT Embedding: For delicate tissues or hydrogels, further protect by embedding in Optimal Cutting Temperature (OCT) compound. Infiltration can be enhanced by using a vacuum assist for porous scaffolds [83].
- Step 3: Snap-Freezing: Freeze the embedded tissue block in a slurry of isopentane cooled by liquid nitrogen, or on a dry ice block. Avoid slow freezing which promotes large ice crystal formation.
The Scientist's Toolkit: Essential Reagents for Artifact Management
Table 3: Key Research Reagent Solutions for Artifact Prevention and Correction
| Reagent/Category | Primary Function | Specific Role in Managing Artifacts |
|---|---|---|
| Paraformaldehyde (PFA) | Cross-linking fixative [3] [82] | Primary fixative for structural preservation; concentration (e.g., 2-4%) and time must be optimized to balance morphology and antigenicity [3]. |
| Sucrose (15-30%) | Cryoprotectant [30] | Displaces water in tissues; reduces destructive ice crystal formation during freezing for cryosectioning [83] [30]. |
| Sodium Citrate Buffer (pH 6.0) | Antigen Retrieval Buffer [84] | The standard buffer for HIER; breaks methylene cross-links to unmask epitopes compromised by over-fixation [84]. |
| EDTA Buffer (pH 8.0-9.0) | Antigen Retrieval Buffer [84] | High-pH chelating buffer for more robust retrieval of challenging epitopes; an alternative when citrate fails [84]. |
| Normal Serum | Blocking Agent [70] | Reduces non-specific background staining by blocking Fc receptors and other non-specific binding sites on tissues [70]. |
| Proteinase K / Pepsin | Enzymatic Antigen Retrieval [84] | An alternative to HIER; digests proteins to expose masked epitopes, but requires careful titration to prevent morphology damage [84]. |
| Optimal Cutting Temperature (OCT) | Cryo-embedding Medium [83] [30] | Water-soluble embedding medium for frozen tissue sections; provides structural support during cryomicrotomy. |
The integrity of tissue morphology in IHC is not a passive outcome but an active achievement, secured through meticulous attention to fixation chemistry, processing parameters, and strategic corrective interventions. For researchers and drug development professionals, the consistent application of these protocols for preventing and correcting tissue artifacts is fundamental to generating reliable, interpretable, and reproducible data. By understanding the root causes of morphological degradation and implementing these standardized approaches, scientists can ensure that their IHC results accurately reflect biological reality, thereby strengthening the validity of their research findings and supporting robust scientific and therapeutic conclusions.
Optimization of Fixation Time, Temperature, and pH
Within the broader thesis on tissue fixation methods for immunohistochemistry (IHC) research, this application note addresses a pivotal step that dictates the success of all subsequent analyses: the optimization of fixation parameters. Fixation is a critical process that preserves tissue morphology and stabilizes biomolecules for detection, with its effectiveness hinging on the precise interplay of time, temperature, and pH [2] [85]. The central challenge in IHC lies in achieving a delicate balance; fixation must be sufficient to prevent autolysis and preserve architecture, yet not so excessive that it masks antigenic epitopes, thereby compromising antibody binding [3] [85]. This document provides detailed, data-driven protocols to guide researchers in empirically determining the optimal fixation conditions for their specific experimental systems, ensuring both superior tissue preservation and robust immunoreactivity.
The Scientific Basis of Fixation in IHC
Principles and Classifications of Fixation
Fixation fundamentally denatures biological substances, rendering them insoluble in water and thereby arresting cellular degradation and preserving structural integrity [2]. The process can be broadly categorized into two classes based on its mechanism of action:
- Cross-linking Fixation: This method, primarily using aldehydes like formaldehyde and glutaraldehyde, creates covalent chemical bonds (methylene bridges) between proteins and their surroundings [33] [85]. This anchors proteins within the cell and imparts rigidity to the tissue, which is highly beneficial for preserving subcellular structure and tissue architecture [3] [33]. A key disadvantage is the potential for epitope masking due to the formation of these cross-links, which often necessitates subsequent antigen retrieval techniques [33] [2].
- Precipitating Fixation: This approach uses organic solvents such as methanol, ethanol, or acetone to remove lipids, dehydrate the tissue, and denature and precipitate proteins at their isoelectric points [3] [33]. While generally considered to preserve tissue morphology less effectively than cross-linking agents, precipitating fixatives are less likely to mask epitopes and are often suitable for membrane surface antigens [33] [85]. Notably, antigen retrieval is not typically recommended after alcohol fixation as it can compromise tissue integrity [85].
The choice of fixative is decisive and often irreversible, fundamentally shaping the outcome of the IHC experiment [2].
The Critical Role of Time, Temperature, and pH
The fixation process is not merely defined by the chemical choice but is profoundly influenced by physical parameters.
- Formaldehyde Chemistry and pH: Formaldehyde, the most common fixative, is never stable in solution. It undergoes oxidation to formic acid, which lowers the pH of the fixative solution [2]. Critically, low pH and high-temperature environments accelerate the cross-linking reaction of formaldehyde [2]. Therefore, fixation with "old" or acidic formalin in a warm environment can promote excessive cross-linking, leading to overfixation and severe epitope masking [2].
- Fixation Time and Temperature: The duration of fixation and the temperature at which it occurs are interdependent variables that must be optimized. Underfixation, resulting from too short a time or too low a temperature, fails to stabilize the tissue, leading to proteolytic degradation and poor morphology [3] [85]. Overfixation, from excessive time or elevated temperature, creates a dense network of cross-links that can hinder antibody penetration and access to epitopes [3] [85]. Standard fixation with formaldehyde is typically performed at room temperature for a duration that allows complete tissue penetration [3] [10].
The following diagram illustrates the logical relationship between these parameters and the ultimate outcome of the fixation process.
Quantitative Data for Fixation Optimization
Empirical optimization is essential for establishing a reliable IHC protocol. The following tables summarize key quantitative data and formulations to guide the experimental setup for optimizing fixation time, temperature, and pH.
Table 1: Optimization of Fixation Parameters for Different Sample Types
| Sample Type | Recommended Fixative | Typical Concentration | Temperature | Time Range | Key Considerations |
|---|---|---|---|---|---|
| Cultured Cells | Formaldehyde (PFA) [85] | 2% - 4% [33] [85] | Room Temperature [85] | 5 - 20 minutes [33] [85] | Shorter times & lower concentrations suffice. Pre-fixation in culture medium can protect delicate cells [85]. |
| Tissue (Immersion) | Formaldehyde (NBF) or PFA [3] [10] | 4% PFA / 10% NBF [3] [10] | Room Temperature [3] | 4 - 24 hours [3] [85] | Tissue should be <10 mm thick. Fixative volume should be 50-100x tissue volume [85]. |
| Tissue (Perfusion) | Formaldehyde (PFA) [85] | 4% in PBS [85] | N/A (Body Temp) | Protocol-dependent | Allows rapid fixation of entire organs; often followed by immersion for complete fixation [3] [10]. |
| Frozen Sections | Acetone or Methanol [10] [85] | 100% [10] | -20°C [33] | 5 - 10 minutes [33] | Primarily used for surface antigens. Not ideal for ultrastructure. Acetone extracts lipids [10] [85]. |
Table 2: Common Fixative Formulations and Applications
| Fixative Formulation | Composition | Primary Application / Antigen Type | Notes on pH Control |
|---|---|---|---|
| 4% Paraformaldehyde (PFA) in 0.1M Phosphate Buffer [10] | 40 g PFA, 0.1M phosphate buffer, pH ~7.4 [10] | Most proteins, peptides; general purpose IHC [10]. | Critical: Must be freshly prepared and neutral pH to avoid acid-induced overfixation [2]. |
| 10% Neutral Buffered Formalin (NBF) [10] | 40% Formaldehyde: 100 mL, NaH₂PO₄: 4 g, Na₂HPO₄: 6.5 g, Distilled Water: 900 mL [10] | Standard for clinical pathology and FFPE tissues; broad applicability [3] [10]. | Phosphate buffer maintains neutral pH (~7.2–7.4), preventing tissue acidity and ensuring consistent fixation [10]. |
| Bouin's Fixative [10] | Saturated picric acid: 750 mL, 40% formaldehyde: 250 mL, Glacial acetic acid: 50 mL [10] | Delicate tissues (e.g., embryos, testes) [10]. | Highly acidic (due to picric & acetic acid). Requires thorough washing before processing to avoid acid retention. |
| Methanol:Acetone (1:1) [33] | 100% Methanol and 100% Acetone mixed 1:1, pre-cooled to -20°C [33] | Large protein antigens (e.g., immunoglobulins); frozen sections [10] [33]. | Organic solvent; pH is less critical than for cross-linking fixatives. |
Experimental Protocols for Parameter Optimization
This section provides a detailed step-by-step protocol for systematically optimizing fixation conditions, incorporating key troubleshooting controls as recommended in the literature [33].
A Systematic Optimization Workflow
The following diagram outlines the overarching experimental workflow for optimizing fixation parameters, from sample preparation to final analysis.
Detailed Step-by-Step Protocol
Phase 1: Preparation and Fixation
Sample Selection and Grouping: Select a troubleshooting tissue sample that is as similar as possible to your final experimental samples but is less valuable [33]. Before beginning, confirm protein expression in your tissue using an alternative method like Western blot [33].
- Prepare serial sections of the same tissue block or plate the same cell culture batch for consistent comparison.
- Divide samples into at least 8 groups to test different fixation/unmasking combinations (see Phase 3 for details) [33].
Fixative Preparation:
- 4% PFA (from powder): Add 40 g of PFA to 500 mL of 0.1 M phosphate buffer (pH 7.4). Heat to 60°C while stirring. Add 1-2 drops of 1 N NaOH to clarify the solution. Cool, filter, and adjust the final volume to 1 L. Aliquot and store at 4°C for no longer than one month, or freeze [10] [85].
- Organic Solvent Fixative: Prepare a 1:1 mix of absolute methanol and acetone. Pre-cool to -20°C before use [33].
Application of Fixation Conditions:
- For Tissues (Immersion): Cut tissues into pieces no thicker than 10 mm [85]. Immerse in a volume of fixative that is 50-100 times the volume of the tissue [85]. Test a range of fixation times (e.g., 4h, 8h, 24h) at room temperature. For temperature optimization, compare room temperature fixation against 4°C for extended times (e.g., 24h).
- For Cultured Cells: Gently remove culture medium and add the chosen fixative. For cross-linking, use 2-4% PFA for 10-20 minutes at room temperature [33] [85]. For precipitating fixatives, incubate with cold methanol/acetone for 5-10 minutes at -20°C [33].
Phase 2: Immunostaining and Analysis
Standardized IHC Staining: After fixation, wash all samples thoroughly with PBS. Process all samples through the exact same IHC protocol simultaneously (blocking, primary antibody incubation, secondary antibody incubation, and detection) to ensure comparisons are valid.
Quantitative Analysis:
- Imaging: Acquire images using consistent microscope settings across all samples.
- Evaluation Criteria: Analyze images for:
- Specific Staining Intensity: The strength of the signal at the target antigen's expected location.
- Background Staining: The level of non-specific signal, which should be minimal.
- Tissue Morphology: The preservation of cellular and tissue structure.
- Quantification Methods: Use pathologist visual scoring (e.g., semi-quantitative H-score) or, for greater reproducibility, employ digital image analysis to quantify staining intensity and percentage of positive cells [86] [72].
Phase 3: Experimental Design for Fixation/Unmasking
The core optimization experiment should test different fixatives with and without antigen retrieval, including essential controls [33].
Table 3: Fixation and Unmasking Optimization Scheme
| Sample | Fixation Method | Unmasking Method | Staining | Analysis Purpose |
|---|---|---|---|---|
| # 1 | Organic Solvent [33] | Skip | Normal | Positive control for organic solvent |
| # 2 | Organic Solvent [33] | Skip | No Secondary Antibody | Negative control for organic solvent |
| # 3 | Cross-linking (PFA) [33] | Skip | Normal | Positive control for cross-linking |
| # 4 | Cross-linking (PFA) [33] | Skip | No Secondary Antibody | Negative control for cross-linking |
| # 5 | Cross-linking (PFA) [33] | Tris-EDTA & Heat (HIER) [33] | Normal | Tests efficacy of heat-induced retrieval |
| # 6 | Cross-linking (PFA) [33] | Tris-EDTA & Heat (HIER) [33] | No Secondary Antibody | Negative control for HIER |
| # 7 | Cross-linking (PFA) [33] | Proteinase K (PIER) [33] | Normal | Tests efficacy of proteolytic retrieval |
| # 8 | Cross-linking (PFA) [33] | Proteinase K (PIER) [33] | No Secondary Antibody | Negative control for PIER |
The Scientist's Toolkit: Essential Research Reagent Solutions
Table 4: Key Reagents for Fixation Optimization Experiments
| Reagent / Solution | Function / Description | Application Note |
|---|---|---|
| Paraformaldehyde (PFA) | The gold-standard cross-linking fixative. Provides excellent tissue morphology. | Prepare fresh from powder or use freshly aliquoted stocks. Avoid acidic, "old" solutions [2] [85]. |
| Neutral Buffered Formalin (NBF) | A stabilized, buffered formaldehyde solution. The standard in pathology. | Commercially available. Ensure it is stored properly and used within its shelf life. |
| Methanol & Acetone | Precipitating fixatives. Good for certain antigens, especially in frozen sections. | Use pre-cooled to -20°C. Acetone extracts lipids, which can affect morphology [10] [33]. |
| Phosphate Buffered Saline (PBS) | An isotonic buffer used for washing tissues and preparing fixative solutions. | Prevents osmotic shock and maintains a physiological pH during fixation and washes. |
| Sodium Citrate Buffer (pH 6.0) / Tris-EDTA (pH 9.0) | Common buffers for Heat-Induced Epitope Retrieval (HIER). | Used to "unmask" epitopes cross-linked by aldehyde fixation. The optimal pH is antigen-dependent [10] [33]. |
| Proteinase K | An enzyme for Proteolytic-Induced Epitope Retrieval (PIER). | Digests proteins to physically reveal masked epitopes. Requires careful optimization of time to avoid tissue damage [33]. |
| Bovine Serum Albumin (BSA) | A blocking agent used to reduce non-specific antibody binding. | Applied after fixation and retrieval to minimize background staining [10]. |
Evaluation of Optimized Fixation
The success of fixation optimization is evaluated through a combination of qualitative morphological assessment and quantitative analysis of the immunostaining.
- Qualitative Morphological Assessment: Examine the stained tissues under a microscope. The optimal condition will show well-preserved tissue architecture, sharp cellular boundaries, and intact subcellular structures. Signs of underfixation include poor cellular detail and evidence of degradation, while overfixation can make tissues brittle and difficult to section [3] [85].
- Quantitative Staining Analysis:
- Pathologist Visual Scoring: Traditionally, staining is evaluated using semi-quantitative scores (e.g., 0, 1+, 2+, 3+) or quasi-continuous scores like the H-score (which multiplies intensity by the percentage of positive cells) [72]. While useful, this method has limitations in reproducibility and data range [72].
- Digital Image Analysis (DIA): For superior reproducibility and objective, continuous data, DIA is recommended [86] [72]. DIA software can quantify staining intensity (e.g., as Optical Density) and the percentage of positive cells within user-defined regions (e.g., tumor epithelium) [72]. Studies have shown that DIA offers very high reproducibility (Spearman correlation >0.99) compared to pathologist scoring (correlation ~0.84) and can provide stronger associations with clinical outcomes [72].
The optimization of fixation time, temperature, and pH is a non-negotiable foundation for rigorous and reproducible IHC research. There is no universal "one-size-fits-all" condition; optimal parameters must be determined empirically for each antigen-tissue-antibody system. By following the systematic, data-driven protocols outlined in this application note—which emphasize the critical interplay of chemical and physical fixation parameters, the inclusion of comprehensive controls, and the use of quantitative evaluation methods—researchers can consistently achieve the delicate balance of perfect fixation: superior morphological preservation coupled with maximal antigen immunoreactivity.
The Role of Blocking Steps and Washes in Enhancing Specificity
In immunohistochemistry (IHC) research, the accuracy of protein localization and detection hinges on the specificity of the antibody-antigen interaction. Within a broader thesis on tissue fixation methods, it becomes evident that fixation—while essential for preserving tissue architecture—creates a challenging molecular environment that necessitates rigorous blocking and washing protocols. Tissue fixation, particularly with cross-linking fixatives like formalin, can induce protein conformational changes, expose hydrophobic regions, and introduce chemical groups that promote non-specific antibody binding [1] [10]. These artefacts fundamentally underlie the critical need for sophisticated blocking and washing strategies to differentiate true signal from background noise. When optimized, these steps are not merely technical formalities but are pivotal in transforming a fixed tissue sample into a reliable medium for precise antigen detection, thereby enhancing the validity of research findings in drug development and basic science.
Background and Principles
The Necessity for Blocking and Washing in Fixed Tissues
The process of tissue fixation, though indispensable, is a primary source of the non-specific interactions that blocking and washing aim to mitigate. Formaldehyde-based fixatives work by creating methylene bridge cross-links between proteins [3] [10]. While this stabilizes tissue morphology, it can also mask the target epitope, necessitating subsequent antigen retrieval. More critically, this cross-linking can alter the charge and hydrophobicity of cellular components, creating surfaces that readily engage in undesirable interactions with detection reagents [1]. Furthermore, tissues possess endogenous enzymes (e.g., peroxidases, phosphatases) and molecules (e.g., biotin) that can react with substrates used for detection, generating a false-positive signal independent of the primary antibody [87]. The principle of blocking is to pre-emptively occupy these non-specific binding sites with inert proteins or to chemically inhibit these endogenous activities.
Washing steps are the complementary corrective measure. They function to physically remove unbound or loosely-bound antibodies and reagents that contribute to high background staining. Inadequate washing is a common source of error, leading to residual reagent deposits that can be misinterpreted as specific staining [1]. The ionic strength and pH of the wash buffer are crucial for disrupting weak, non-specific ionic interactions without eluting the high-affinity specific antibody bound to its target antigen.
Consequences of Inadequate Protocols
Failure to implement robust blocking and washing protocols has direct, detrimental effects on IHC outcomes. The most immediate consequence is high background staining, which obscures morphological detail and can mask a weak true signal [1] [88]. This often manifests as a diffuse, non-localized coloration across the tissue section. A more insidious result is non-specific staining, where antibodies bind to tissue components other than the target antigen, leading to false-positive interpretations [1]. This can profoundly impact data reliability, potentially leading to incorrect scientific conclusions or, in a drug development context, inaccurate assessments of a therapeutic target's expression. The variability introduced by suboptimal protocols also compromises the reproducibility of experiments, a cornerstone of the scientific method [1]. Therefore, a deep understanding and meticulous execution of these steps is non-negotiable for generating high-quality, publication-ready IHC data.
Core Methodologies and Experimental Protocols
Comprehensive Blocking Strategies
A multi-pronged blocking approach is essential to address the various sources of non-specific signal in fixed tissues. The protocol below should be performed at room temperature unless otherwise specified, with all incubations conducted in a humidified chamber to prevent slide drying.
Step 1: Blocking Non-Specific Protein Interactions Following antigen retrieval and a brief wash in PBS or TBS, apply a protein-based blocking solution to cover the entire tissue section. Incubate for 30-60 minutes. The choice of blocker is empirical; common solutions include 2-5% BSA, 10% normal serum from the host species of the secondary antibody, or commercial protein-free blocking formulations [88] [87]. Serum is effective as it contains antibodies that can bind to non-specific sites, while BSA and commercial blockers occupy hydrophobic and charge-based binding sites.
Step 2: Blocking Endogenous Enzymes (For Chromogenic Detection) If using an enzyme-based detection system (e.g., HRP or Alkaline Phosphatase), this step is critical. Rinse the slide briefly after protein blocking.
- For HRP: Incubate the section with a 0.3-3% hydrogen peroxide solution in methanol or PBS for 10-30 minutes. This inactivates endogenous peroxidases abundantly present in red blood cells and some myeloid cells [87].
- For Alkaline Phosphatase (AP): Incubate with a 1-3 mM levamisole solution in buffer for 10-30 minutes to inhibit intestinal-type AP activity. Alternatively, specific AP blocking reagents can be used [87].
Step 3: Blocking Endogenous Biotin If a streptavidin-biotin complex (ABC) detection system is employed, endogenous biotin must be blocked. After enzyme blocking, apply a ready-to-use avidin/biotin blocking kit sequentially. First, incubate with an avidin solution for 10-15 minutes, followed by a brief wash, then incubate with a biotin solution for 10-15 minutes [87]. This saturates endogenous biotin binding sites to prevent subsequent detection by streptavidin-biotin complexes.
Optimized Washing Protocols
Effective washing is a dynamic process that requires precise buffer formulation and technique.
Buffer Formulation: The most common wash buffer is PBS or TBS with a mild detergent. The addition of 0.025% - 0.1% Tween 20 or Triton X-100 reduces surface tension and helps dislodge unbound reagents by disrupting hydrophobic interactions [87]. The buffer should be at room temperature or slightly warmed to ~37°C, as cold buffer can reduce washing efficiency.
Washing Technique: A single rinse is insufficient. A robust protocol involves three to five changes of wash buffer, with each incubation lasting 5-10 minutes under gentle agitation on an orbital shaker [1] [88]. The slide holder or Coplin jar should be sufficiently filled to ensure complete coverage of the tissue sections. For critical applications, a final rinse with pure PBS or TBS (without detergent) can be performed to remove any residual detergent before the next incubation step. This rigorous washing regimen must be applied after every incubation step in the IHC protocol (post-primary antibody, post-secondary antibody, etc.).
Table 1: Summary of Key Blocking Reagents and Their Functions
| Blocking Category | Specific Reagent Examples | Mechanism of Action | Typical Incubation Time |
|---|---|---|---|
| Non-Specific Protein Binding | 2-5% BSA, 10% Normal Serum, Commercial Protein Blockers [88] [87] | Saturates hydrophobic and charged sites on tissue and slide | 30 - 60 minutes |
| Endogenous Peroxidases | 0.3-3% H₂O₂ in methanol or PBS [87] | Irreversibly inactivates heme-containing peroxidases | 10 - 30 minutes |
| Endogenous Alkaline Phosphatase | 1-3 mM Levamisole [87] | Inhibits intestinal-type alkaline phosphatase isoenzyme | 10 - 30 minutes |
| Endogenous Biotin | Sequential Avidin/Biotin Blocking Solutions [87] | Saturates high-affinity biotin binding sites | 2 x 10-15 minutes |
Data Presentation and Analysis
The efficacy of blocking and washing protocols can be quantitatively and qualitatively assessed through controlled experiments. The data below summarizes expected outcomes from properly optimized procedures.
Table 2: Quantitative and Qualitative Impact of Blocking and Washing on IHC Specificity
| Experimental Condition | Impact on Background Staining (Semi-Quantitative Score) | Effect on Signal-to-Noise Ratio | Morphological Clarity |
|---|---|---|---|
| No Blocking / Minimal Washes | Severe (+++) | Very Low | Poor; detail obscured by diffuse stain |
| Protein Block Only | Moderate (++) | Low | Moderate; some non-specific stain persists |
| Protein + Enzyme Block | Mild (+) | Medium | Good; specific staining is distinguishable |
| Full Blocking + Optimized Washes | Minimal/Negligible (-/+) | High (Optimal) | Excellent; crisp cellular and nuclear detail |
The following workflow diagram synthesizes the logical sequence of steps and their critical decision points, illustrating how blocking and washing are integrated into the broader IHC protocol following tissue fixation.
The Scientist's Toolkit: Essential Research Reagent Solutions
The following table details key reagents and their specific functions for implementing the blocking and washing protocols described in this note.
Table 3: Essential Reagents for Blocking and Washing Protocols
| Reagent / Kit Name | Composition / Type | Primary Function in IHC | Application Notes |
|---|---|---|---|
| Blocker BSA (10X) [87] | Purified Bovine Serum Albumin | Protein-based blocker for non-specific binding sites. | Effective for reducing background; use at 1-5% concentration in buffer. |
| Normal Goat Serum [87] | Serum from the secondary antibody host species. | Provides species-specific immunoglobulins to bind non-specific sites. | Ideal when using goat-derived secondary antibodies to minimize cross-reactivity. |
| ReadyProbes Endogenous HRP/AP Blocking Solution [87] | Prepared solution of peroxidase and phosphatase inhibitors. | Simultaneously blocks endogenous peroxidase and alkaline phosphatase activity. | Saves time and steps; ready-to-use formulation ensures consistency. |
| Avidin/Biotin Blocking Kit [87] | Sequential solutions of avidin and biotin. | Blocks endogenous biotin and avidin binding sites. | Critical when using ABC or other streptavidin-biotin detection systems. |
| PBS/TBS with Tween 20 [88] [87] | Phosphate or Tris Buffered Saline with 0.025-0.1% detergent. | Standard wash buffer to remove unbound antibodies and reagents. | Detergent helps disrupt hydrophobic interactions; prevents reagent crystallization. |
| Peroxidase Suppressor [87] | Typically a stabilized hydrogen peroxide formulation. | Specifically quenches endogenous peroxidase activity. | An alternative to laboratory-prepared H₂O₂ solutions; may offer greater stability. |
Validating Fixation Methods: Quality Control and Comparative Efficacy
Within the broader context of optimizing tissue fixation methods for immunohistochemistry (IHC) research, the implementation of rigorous controls represents a fundamental prerequisite for generating reliable, interpretable, and reproducible data. Immunohistochemistry is a powerful technique that combines immunological and biochemical principles to detect specific antigens within tissue samples, providing valuable insights into protein localization, distribution, and relative abundance [1]. However, the accuracy of IHC results is heavily dependent on multiple variables throughout the complex experimental workflow, from tissue acquisition and fixation to antigen retrieval and detection. Without appropriate controls, distinguishing specific antigen-antibody binding from non-specific background staining or false-negative results becomes challenging, potentially compromising data integrity and subsequent scientific conclusions [89] [90].
The pre-analytical phase, particularly tissue fixation, significantly impacts antigen preservation and accessibility. Fixatives like 10% neutral buffered formalin, B5, or acetic acid-zinc-formalin (AZF) stabilize tissues by forming protein cross-links, but this process can mask epitopes and alter antigenicity [91] [36]. Consequently, the performance of IHC controls is intrinsically linked to fixation quality and consistency. This application note provides detailed methodologies for establishing essential IHC controls—positive, negative, and no-primary antibody controls—framed within the critical context of tissue fixation. These controls are indispensable for validating staining patterns, verifying antibody specificity, assessing technique precision, and ensuring that results are accurate, trustworthy, and meaningful for researchers, scientists, and drug development professionals [92] [93].
The Essential IHC Control Framework
Theoretical Foundation of Control Samples
In IHC, controls are designed to isolate and verify specific components of the staining process, thereby confirming that the observed signal genuinely represents the target antigen. The principle relies on systematically comparing test samples against references with known reactivity profiles [92]. A positive control consists of a tissue section with confirmed expression of the target antigen, validating that all reagents and procedures functioned correctly. A true positive result demonstrates that the protocol successfully detected the antigen, while an unexpected negative result indicates potential issues with the technique, reagent degradation, or problematic tissue fixation [93].
A negative control utilizes a tissue section known not to express the target antigen. The absence of staining in this control confirms antibody specificity, while any observed signal suggests non-specific binding or cross-reactivity [92] [93]. The no-primary antibody control omits the primary antibody while completing all other steps, serving to identify background staining contributed by the detection system itself, such as endogenous enzyme activity or non-specific secondary antibody binding [92].
The relationship between tissue fixation and control performance is paramount. Inconsistent or improper fixation can lead to both false-positive and false-negative results, misleading researchers. For example, over-fixation can mask epitopes, causing false negatives even in known positive controls, while under-fixation may fail to preserve tissue architecture and antigen integrity, leading to high background or antigen diffusion [91] [89]. Therefore, controlling fixation conditions—including fixative type, pH, temperature, and duration—is a critical first step before even applying IHC controls [89] [36].
The IHC Experimental Workflow with Integrated Controls
The following diagram illustrates a robust IHC workflow, highlighting the critical points for integrating each type of control to ensure experimental validity.
This workflow underscores that control slides must undergo identical processing until the primary antibody incubation step. Divergence at this stage is crucial for attributing any observed staining to the correct source.
Comprehensive Experimental Protocols
Protocol 1: Establishing Tissue-Based Positive and Negative Controls
Objective: To validate the entire IHC protocol, from fixation to detection, using tissues with known antigen expression status.
Materials:
- Test tissue sections (fixed and processed alongside controls)
- Positive control tissue sections (known to express the target antigen)
- Negative control tissue sections (known not to express the target antigen)
- Standard IHC reagents: PBS, blocking serum, primary antibody, secondary antibody, detection kit, hematoxylin, etc. [94] [27]
Method:
- Tissue Preparation and Fixation: Process test and control tissues identically. For formalin-fixed, paraffin-embedded (FFPE) tissues, use 10% neutral buffered formalin for 18-24 hours for optimal and consistent fixation [91] [95]. For frozen tissues, snap-freeze in OCT compound using liquid nitrogen or a dry ice-ethanol bath [27].
- Sectioning: Cut sections at a uniform thickness (4-5 µm for FFPE, 6-15 µm for frozen) and mount them on charged or adhesive slides (e.g., poly-lysine or APES-coated) to prevent detachment [91] [89].
- Deparaffinization and Rehydration (FFPE only): Deparaffinize slides in xylene (two changes, 5-10 min each), followed by rehydration through a graded ethanol series (100%, 95%, 80%, 70%) and finally distilled water [91] [94].
- Antigen Retrieval: Perform heat-induced epitope retrieval (HIER) using an appropriate buffer and method. A common standard is boiling in 10 mM sodium citrate buffer (pH 6.0) for 20 minutes, then allowing slides to cool naturally to room temperature [91] [27] [95]. Protease-induced epitope retrieval (PIER) is an alternative for some targets [27] [95].
- Inhibit Endogenous Peroxidase Activity: For HRP-based detection systems, incubate slides with 3% H₂O₂ in methanol for 10-15 minutes at room temperature to quench endogenous peroxidase activity [91] [94].
- Blocking: Incubate sections with a protein block (e.g., 5-10% normal serum from the species of the secondary antibody or 1-5% BSA) for 10-30 minutes at room temperature to minimize non-specific antibody binding [91] [95].
- Primary Antibody Incubation:
- Washing: Wash slides three times for 5 minutes each in PBS or TBS, preferably with 0.05-0.1% Tween-20 [91].
- Detection: Apply the appropriate detection system (e.g., enzyme-labeled polymer or biotin-streptavidin system) according to the manufacturer's instructions, followed by incubation with the chromogen (e.g., DAB) [91] [27]. Monitor development under a microscope and stop the reaction by immersing in distilled water.
- Counterstaining and Mounting: Counterstain with hematoxylin (or DAPI for fluorescence) to visualize nuclei. Dehydrate, clear, and mount with a suitable mounting medium [91] [94].
Interpretation:
- A valid experiment requires strong specific staining in the positive control and no staining in the negative control.
- Staining in the test sample can only be confidently interpreted when these conditions are met. Weak or absent staining in the positive control suggests a technical problem, while staining in the negative control indicates non-specific binding [92] [93].
Protocol 2: No-Primary Antibody and Reagent Controls
Objective: To verify that the observed staining is specific to the primary antibody and not an artifact of the detection system or endogenous tissue factors.
Materials: Same as Protocol 1, with the addition of antibody diluent (e.g., PBS with 1% BSA) or an appropriate isotype control.
Method: Steps 1-6 are identical to Protocol 1, ensuring all slides are processed uniformly.
- Primary Antibody Incubation:
- Test Slide: Apply specific primary antibody.
- No-Primary Antibody Control: Apply only antibody diluent (PBS with 1% BSA or the blocking solution used) instead of the primary antibody [92] [93].
- Optional: Isotype Control: For monoclonal antibodies, apply an irrelevant immunoglobulin of the same species, subclass, and concentration as the primary antibody [92] [93].
- Continue with steps 8-10 from Protocol 1.
Interpretation:
- The absence of staining in the no-primary antibody control confirms that the detection system (secondary antibody, enzyme complex, and chromogen) is not binding non-specifically and that endogenous enzyme activity has been successfully blocked.
- Any staining in this control invalidates the results for the test sample, indicating a need for better blocking, more thorough washing, or use of a different detection system [90].
Data Presentation and Analysis
The following table synthesizes the purpose, implementation, and interpretation of each essential IHC control, providing a clear reference for experimental design.
Table 1: Essential Controls for Valid IHC Interpretation
| Control Type | Purpose | Implementation | Interpretation of Valid Result |
|---|---|---|---|
| Positive Control | Validate protocol and antibody functionality [92] [93] | Tissue known to express the target antigen, processed identically to the test sample. | Strong, specific staining in expected cellular compartment (membrane, cytoplasm, nucleus). |
| Negative Control | Confirm antibody specificity [92] [93] | Tissue known not to express the target antigen, processed identically. | Absence of specific staining. |
| No-Primary Antibody Control | Identify background from detection system [92] | Omit primary antibody; apply only antibody diluent. | No staining observed. |
| Isotype Control | Assess non-specific Fc receptor binding [93] | Use an irrelevant antibody matching the primary antibody's isotype and concentration. | No staining observed. |
Troubleshooting Control Failures
Control failures provide critical diagnostic information for optimizing the IHC protocol. The table below links common control failures to their potential causes and solutions, with a specific focus on how tissue fixation impacts the outcome.
Table 2: Troubleshooting Guide for IHC Control Failures
| Observation | Potential Cause | Recommended Solution |
|---|---|---|
| Weak or absent staining in Positive Control | Over-fixation (epitope masking) [36] [95] | Optimize fixation time; optimize antigen retrieval method (HIER buffer, time, pH) [36] [95]. |
| Inadequate antigen retrieval | Titrate primary antibody concentration; check antibody expiration date [91] [93]. | |
| Degraded or improperly diluted antibody | Ensure detection reagents are fresh and properly prepared. | |
| Inefficient detection system | ||
| Staining in Negative Tissue Control | Non-specific antibody binding (cross-reactivity) [91] | Use a more specific antibody (monoclonal vs. polyclonal); optimize blocking and antibody dilution [91] [93]. |
| Antibody concentration too high | Titrate antibody to find optimal dilution. | |
| Incomplete blocking [91] | Extend blocking time; try different blocking agents (e.g., normal serum, BSA). | |
| Staining in No-Primary Control | Inadequate quenching of endogenous peroxidase/alkaline phosphatase [91] [95] | Use fresh H₂O₂ solution; extend quenching time. |
| Non-specific binding of secondary antibody [92] | Use a different secondary antibody; ensure it is pre-adsorbed against serum proteins of the tissue species; optimize blocking. | |
| High endogenous biotin activity (in liver, kidney, etc.) | Use a polymer-based detection system instead of streptavidin-biotin [95]. |
The Scientist's Toolkit: Essential Reagent Solutions
Table 3: Key Reagents for Rigorous IHC Controls
| Reagent / Solution | Function | Application Notes |
|---|---|---|
| Validated Control Tissues | Provides biological reference for positive and negative controls [92]. | Should be fixed and processed identically to test samples. Commercial cell line blocks or well-characterized tissue archives can be used. |
| 10% Neutral Buffered Formalin | Standard chemical fixative; preserves morphology and antigenicity [91] [95]. | Fixation time is critical (typically 18-24 hrs). Over-fixation requires more aggressive antigen retrieval [91]. |
| Citrate Buffer (pH 6.0) | Common buffer for Heat-Induced Epitope Retrieval (HIER) [91] [27]. | Effectively breaks protein cross-links formed by formalin fixation, exposing hidden epitopes. |
| Normal Serum | Blocking agent to reduce non-specific background staining [91] [95]. | Should be sourced from the same species as the secondary antibody. |
| Isotype Control Immunoglobulin | Reagent control for monoclonal antibodies [93]. | Must match the primary antibody's host species, isotope, and concentration. |
| Hydrogen Peroxide (H₂O₂) | Quenches endogenous peroxidase activity, reducing false-positive signals [91] [94]. | Typically used at 3% concentration. Essential for HRP-based detection systems. |
| Gene Knockout (KO) Cell Lines | Gold-standard negative control for antibody validation [93]. | Provides a true negative background, confirming antibody specificity by the absence of signal in KO samples. |
The integration of rigorous controls is non-negotiable for generating scientifically valid IHC data, particularly within studies investigating the effects of tissue fixation. Positive, negative, and no-primary antibody controls collectively form a diagnostic system that validates reagents, protocols, and ultimately, the experimental results themselves. As demonstrated, the performance of these controls is deeply intertwined with pre-analytical variables like fixation. A failed control is not an experiment loss but a critical insight, guiding troubleshooting and refinement. By consistently applying this framework of rigorous controls, researchers can advance the reliability of their IHC findings, thereby strengthening the foundations of biomedical research and drug development.
Tissue fixation represents a critical foundation in biomedical research, balancing the dual imperatives of preserving morphological integrity and maintaining biomolecular authenticity. For immunohistochemistry (IHC) research, the choice of fixative profoundly influences analytical outcomes, potentially enabling or constraining downstream histological and molecular applications. Within the context of a broader thesis on tissue fixation methodologies, this application note systematically evaluates contemporary fixatives, focusing on their performance across combined histology and biomolecular analysis paradigms. The increasing demand for multimodal tissue interrogation—where a single specimen must yield morphological, proteomic, and transcriptomic data—necessitates a reevaluation of traditional fixation approaches. This review synthesizes empirical evidence to guide researchers and drug development professionals in selecting optimal fixation strategies that maximize data quality and research reproducibility.
Fixative Classes and Their Mechanisms
Chemical fixatives are broadly categorized by their primary mechanism of action: cross-linking or coagulation. Cross-linking fixatives such as formaldehyde, paraformaldehyde (PFA), and glutaraldehyde create covalent bonds between protein molecules, stabilizing tissue architecture while potentially masking antigenic epitopes through extensive molecular bridging [10] [96]. Formaldehyde, the most prevalent cross-linker, reacts with primary amines on proteins and nucleic acids to form partially reversible methylene bridge crosslinks [10]. In contrast, coagulating fixatives including methanol, acetone, and ethanol disrupt hydrogen bonds, denature proteins, and precipitate cellular constituents through dehydration, often better preserving antigenicity but potentially compromising morphological detail through tissue shrinkage and lipid extraction [10] [4].
The differential impacts of these mechanisms extend to biomolecular preservation. Cross-linking fixatives like formalin excel in morphological preservation but chemically modify and fragment nucleic acids, complicating subsequent molecular analyses [55] [97]. Coagulant fixatives typically yield superior RNA quality but provide less robust morphological conservation [55] [4]. This fundamental tradeoff frames the central challenge in fixative selection for combined analysis protocols.
Comparative Performance of Fixatives
Histomorphological and Immunohistochemical Preservation
Table 1: Histological and IHC Performance of Common Fixatives
| Fixative | Tissue Morphology | Antigen Preservation | Special Considerations |
|---|---|---|---|
| 10% NBF/4% PFA | Excellent tissue architecture preservation [98] | Variable; epitope masking common, often requires antigen retrieval [10] [99] | Gold standard for histology; poor for phosphoproteins [99] |
| Methacarn | Good morphological preservation [55] | Good for IHC; compatible with various antigens [55] | Superior for combined analyses |
| Glyoxal | Good cytological detail [5] | Inconsistent; weaker for many antigens vs. formaldehyde [5] | Tissue fragility issues, especially in wholemounts [5] |
| Acetone/Methanol | Moderate; tissue shrinkage, lipid extraction [10] [4] | Excellent for many antigens; no cross-linking masking [4] | Ideal for frozen sections; permeabilizes cells [10] |
| Streck's Tissue Fixative (STF) | Good morphological preservation [99] | Superior for phosphoproteins vs. formalin [99] | Enhanced preservation of labile phosphorylation signals |
Recent investigations reveal nuanced fixative performances across tissue types and analytical endpoints. Methacarn fixation demonstrates exceptional versatility, maintaining robust histomorphological and immunohistological results comparable to formalin while overcoming formalin's limitations in biomolecular preservation [55]. Glyoxal, despite promising early reports for brain and vascular tissues, shows inconsistent performance in retinal applications, with formaldehyde typically producing equivalent or superior immunolabelling across 50 tested antibodies [5]. For phosphoprotein detection—critical in signaling pathway analysis—Streck's Tissue Fixative significantly outperforms both 10% formalin and 4% PFA, enabling reliable immunohistochemical detection of phosphorylated EGFR, HER2, Akt, and MAPK [99].
Biomolecular Integrity and Analytical Compatibility
Table 2: Biomolecular Analysis Compatibility
| Fixative | RNA Quality/Quantity | PCR Compatibility | Compatible Downstream Analyses |
|---|---|---|---|
| 10% NBF/4% PFA | Significantly degraded; poor quality/quantity [55] | Inhibited; amplicon length-dependent failure [97] | IHC with antigen retrieval; limited molecular applications |
| Methacarn | High concentration and purity [55] | Comparable to unfixed frozen tissue [55] | RT-qPCR, RNA sequencing, IHC |
| PAXgene | High integrity; RIN 6.4-7.7 [97] | Excellent; performs like fresh frozen [97] | Histology, transcriptomics, RT-qPCR |
| Snap-Freezing | Highest quality; RIN 8.0-9.2 [97] | Gold standard [97] | All molecular analyses, some IHC limitations |
| RNAlater | High quality preservation [55] | Excellent [55] | RNA extraction, some IHC applications |
Biomolecular integrity varies dramatically across fixation methods. Formalin fixation induces RNA degradation and chemical modification that impairs reverse transcription and PCR amplification efficiency, particularly for longer amplicons [97]. Methacarn and PAXgene systems consistently yield high-quality RNA with integrity scores comparable to unfixed frozen tissues, enabling successful gene expression analysis via RT-qPCR from the same samples used for histology [55] [97]. This compatibility makes them particularly valuable for limited clinical specimens where dividing tissue between analytical modalities is impractical. For context, in bone tissue studies, methacarn-fixed, paraffin-embedded samples produced correct RT-qPCR amplification while formalin-fixed counterparts failed completely [55].
Experimental Protocols for Fixative Evaluation
Standardized Fixation Protocol for Combined Analysis
This protocol is adapted from methodologies validated in recent comparative studies [55] [5] and optimized for multimodal tissue analysis.
Materials Required
- Fresh tissue specimens (3-5 mm thickness recommended)
- Selected fixatives (e.g., 10% NBF, methacarn, STF, glyoxal)
- Phosphate-buffered saline (PBS), pH 7.4
- Processing cassettes and embedding molds
- Neutral-buffered formalin (NBF) or 4% PFA
- Methacarn (methanol:chloroform:acetic acid, 6:3:1)
- Streck's Tissue Fixative (STF)
- Glyoxal solution (3% glyoxal, 0.8% acetic acid, 20% ethanol, pH 5.0)
- EDTA or commercial decalcification solution for bone tissues
- RNA preservation solution (e.g., RNAlater)
- Paraffin embedding system
Fixation Procedure
- Tissue Preparation: Immediately following excision, divide tissue into standardized fragments (e.g., 3-5 mm thickness). For comparative studies, allocate adjacent tissue regions to different fixative conditions.
- Fixation Conditions:
- 10% NBF/4% PFA: Immerse tissue in 15-20x volume fixative to tissue for 24-48 hours at room temperature [10] [96].
- Methacarn: Fix for 1 week at 4°C with gentle agitation [55].
- STF: Fix for 16-24 hours at room temperature [99].
- Glyoxal formulations: Fix for 2 hours to overnight depending on specific protocol [5].
- Post-fixation Processing:
- Rinse fixed tissues in PBS (3 × 5 minutes).
- For calcified tissues, decalcify in EDTA for 3 days at 4°C [55].
- Process through graded ethanols (70%, 95%, 100%), clear in xylene, and embed in paraffin.
- Sectioning: Cut 4-5 μm sections using microtome and mount on charged slides.
- RNA Extraction from FFPE Tissues:
- Deparaffinize sections using xylene and ethanol series.
- Extract RNA using modified TRIZOL protocol or commercial FFPE RNA kits [55].
- Assess RNA quality using microcapillary electrophoresis (e.g., Bioanalyzer).
Evaluation Methodology for Fixative Performance
Histological and IHC Assessment
- H&E Staining: Following standard protocols, evaluate morphological preservation using semi-quantitative scoring systems for nuclear detail, cytoplasmic integrity, and tissue architecture [55] [98].
- Immunohistochemistry:
- Perform IHC using standardized protocols with validated antibodies.
- Include both robust and labile targets (e.g., phosphoproteins) [99].
- Implement heat-induced epitope retrieval when necessary (e.g., 20 min at 96°C in citrate buffer) [10] [55].
- Quantify staining intensity using semi-quantitative scales (negative, weak, moderate, strong) or quantitative image analysis [99] [98].
Biomolecular Analysis
- RNA Quality Assessment:
- Gene Expression Analysis:
- Perform RT-qPCR with amplicons of varying lengths (e.g., 100bp, 300bp).
- Compare amplification efficiency and Ct values across fixative groups.
- Use housekeeping genes for normalization [55].
Visualizing Fixative Selection and Workflow
Fixative Selection Workflow
The Scientist's Toolkit: Essential Research Reagents
Table 3: Key Reagents for Fixation Studies
| Reagent/Category | Specific Examples | Function/Application |
|---|---|---|
| Cross-linking Fixatives | 10% Neutral Buffered Formalin, 4% Paraformaldehyde, Streck's Tissue Fixative | Preserves tissue architecture through protein cross-linking; gold standard for morphology [10] [99] |
| Coagulant Fixatives | Methanol, Acetone, Methacarn | Precipitates proteins; better antigen preservation for some targets [10] [55] |
| Nucleic Acid Preservatives | RNAlater, PAXgene Tissue System | Stabilizes RNA/DNA for molecular analyses from same tissue [55] [97] |
| Decalcification Agents | EDTA, Commercial Decalcifiers | Demineralizes bone tissues prior to processing; EDTA preserves RNA better [55] |
| Antigen Retrieval Reagents | Sodium Citrate Buffer (pH 6.0), Tris-EDTA Buffer (pH 9.0) | Reverses formaldehyde cross-linking to expose epitopes for antibody binding [10] [55] |
| Chromogen Detection Systems | DAB, DISCOVERY Purple, DISCOVERY Red | Visualizes antibody binding; new chromogens enable multiplexing [100] |
| IHC Detection Kits | UltraMap HRP, OmniMap HRP | Signal amplification and detection systems for enhanced sensitivity [100] |
Discussion and Future Directions
The empirical data synthesized in this application note underscores a fundamental principle: fixative selection imposes critical tradeoffs between morphological preservation and biomolecular integrity. While formalin remains the histological gold standard, its limitations in biomolecular contexts increasingly necessitate alternative approaches. Methacarn emerges as a particularly promising candidate for combined analysis paradigms, demonstrating robust performance across histological, immunohistochemical, and transcriptomic applications [55]. Similarly, specialized fixatives like Streck's Tissue Fixative address specific challenges such as phosphoprotein preservation [99].
Future methodological developments will likely focus on several key areas: First, optimizing fixative formulations for specific tissue types and analytical endpoints, as evidenced by tissue-specific performance variations [5] [98]. Second, standardizing post-analytical correction algorithms to compensate for fixative-induced molecular damage, particularly in archival formalin-fixed tissues. Third, advancing multiplexed analysis platforms that leverage new chromogen technologies [100] to maximize information yield from limited specimens.
For researchers engaged in drug development and translational studies, implementing a fit-for-purpose fixation strategy is paramount. The protocols and comparative data presented herein provide an evidence-based framework for fixative selection, potentially enhancing research reproducibility and analytical yield across diverse tissue analysis platforms.
Within the broader context of optimizing tissue fixation for immunohistochemistry (IHC) research, the transition from single-plex to multiplex IHC (mIHC) presents unique validation challenges. The primary goal of mIHC is to simultaneously detect multiple protein targets within a single tissue section while preserving spatial relationships and tissue architecture. This requires careful optimization to maintain antigenicity for multiple epitopes concurrently, a process complicated by variations in antigen sensitivity to fixation conditions [101] [57]. Unlike single-plex IHC, where validation focuses on one antigen-antibody pair, mIHC requires demonstrating that the detection of one marker does not compromise the detection of others in the panel [102]. The Society for Immunotherapy of Cancer (SITC) has emphasized that rigorous validation is essential as these technologies move toward clinical implementation [102]. This application note outlines standardized approaches for validating multiplex IHC assays, with particular focus on fixation strategies that preserve multiple antigens in a single sample.
Multiplex IHC Validation Principles
Validation of multiplex IHC assays requires adherence to established immunohistochemistry validation principles while addressing multiplex-specific challenges. According to updated College of American Pathologists (CAP) guidelines, laboratories should validate each assay-scoring system combination separately, with a harmonized concordance requirement of ≥90% for all IHC assays compared to a validated standard [103]. For mIHC, this means establishing performance characteristics for the complete panel and for each individual marker within that panel.
Key validation parameters include:
- Precision: Demonstrating reproducible staining patterns across multiple tissue sections and staining runs
- Analytical Specificity: Confirming that each antibody specifically binds its intended target without cross-reactivity
- Accuracy: Establishing concordance with known expression patterns or other validated detection methods
- Sensitivity: Determining the lowest detectable antigen level for each marker in the multiplexed format
For assays used on cytology specimens or tissues fixed with alternative fixatives, separate validation with a minimum of 10 positive and 10 negative cases is recommended [103]. This is particularly relevant when establishing fixation protocols that must balance morphological preservation with antigenicity for multiple targets.
Tissue Fixation and Pre-Analytical Variables
Fixation Strategies for Antigen Preservation
Optimal fixation is fundamental to successful multiplex IHC, as it must preserve tissue architecture while maintaining the immunoreactivity of multiple epitopes with varying chemical properties. 10% Neutral Buffered Formalin (NBF) remains the most common fixative in histopathology, providing excellent morphological preservation through protein cross-linking [57] [10]. However, this cross-linking can mask antigenic epitopes, requiring careful optimization of fixation time for multiplex applications.
For sensitive antigens, alternative fixatives may be necessary. Zinc-based fixatives have demonstrated superior preservation of fixation-sensitive antigens such as CD1, CD4, CD7, CD8, and CD19 in lymphoid tissues, achieving antigen preservation comparable to frozen sections while maintaining morphology similar to formalin-fixed sections [101]. Precipitating fixatives including ice-cold acetone and methanol are particularly effective for large protein antigens such as immunoglobulins, though they may extract lipids and affect morphology [10].
Table 1: Fixative Formulations for Multiplex IHC Applications
| Fixative | Composition | Optimal Antigen Types | Fixation Time | Special Considerations |
|---|---|---|---|---|
| 10% NBF | 4% formaldehyde in phosphate buffer | Most proteins, peptides, low molecular weight enzymes | 6-24 hours [57] | Over-fixation masks epitopes; requires antigen retrieval |
| Zinc-Based Fixative | Zinc acetate, zinc chloride in Tris-Ca acetate buffer | Fixation-sensitive cell surface markers (CD1, CD4, CD7, CD8, CD19) [101] | 24 hours | Comparable to frozen sections for sensitive antigens |
| Paraformaldehyde-Glutaraldehyde | 4% PFA with 1% glutaraldehyde | Small molecules (amino acids), electron microscopy | 4-8 hours | Strong cross-linking; may require extensive retrieval |
| Bouin's Fixative | Picric acid, formaldehyde, glacial acetic acid | Delicate tissues | 4-8 hours | May degrade nucleic acids; not for RNA/DNA studies |
| Ice-cold Acetone | 100% acetone | Large protein antigens (immunoglobulins) [10] | 10-30 minutes | Extracts lipids; best for frozen sections |
Controlling Pre-Analytical Variables
Variation in pre-analytical conditions significantly impacts mIHC results. Ischemia time before fixation particularly affects sensitive antigens including Ki-67 and phosphoproteins, potentially altering staining patterns [57]. Standardizing the tissue-to-fixative ratio (recommended 1:1 to 1:20) and fixation duration is crucial for consistent results across samples [57].
Tissue sectioning and storage conditions also affect antigen preservation. Sections should be cut at 4μm thickness and used fresh when possible, as stored sections may experience epitope degradation over time [57]. For multiplex IHC, complete removal of water from slides and storage protected from oxidization through vacuum storage or paraffin coating helps maintain antigen integrity.
Multiplex IHC Validation Workflow
The following workflow diagram outlines the key stages in validating a multiplex IHC assay:
Antibody Validation and Titration
Each antibody in a multiplex panel requires rigorous individual validation before multiplex optimization. This includes verifying specificity through methods such as knockout tissues, isotype controls, and adsorption controls with corresponding peptides [104] [105]. Antibody performance must be confirmed in the specific fixative and tissue type used in the assay.
For multiplex panels, antibodies should be systematically titrated to determine optimal concentrations that provide strong specific signal with minimal background. Primary antibodies from different species or of different isotypes (IgG1, IgG2a, IgG2b) are preferable, as they enable the use of species-specific or isotype-specific secondary antibodies, reducing cross-reactivity [104]. SITC guidelines recommend careful validation of antibody clones for compatibility in multiplex formats, as performance may differ from single-plex applications [102].
Experimental Protocol: Multiplex IHC Validation
The following protocol provides a detailed methodology for validating multiplex IHC staining using immunofluorescence detection.
Day 1: Sample Preparation and Staining
Tissue Sectioning and Mounting
Deparaffinization and Rehydration (for FFPE tissues)
- Deparaffinize in xylene (2 changes, 5 minutes each).
- Rehydrate through graded alcohols: 100% EtOH (2×3 minutes), 95% EtOH (2×3 minutes), 70% EtOH (2×3 minutes) [104].
- Rinse in distilled water.
Antigen Retrieval
Endogenous Peroxidase Blocking (if using peroxidase-based detection)
Protein Blocking
Primary Antibody Application
- Apply primary antibodies diluted in appropriate diluent (PBS with 0.3% Triton, 0.01% NaAzide, 0.02% Bacitracin, and BSA) [104].
- Use approximately 180μl per slide.
- Incubate in a humidified chamber overnight at 4°C.
Day 2: Detection and Visualization
Washing
- Rinse slides in wash buffer (3×5 minutes at room temperature).
Secondary Antibody Application
- Apply fluorophore-conjugated secondary antibodies (dilution 1:80 to 1:800 in PBS).
- For multiple antibodies, use species-specific or isotype-specific secondary antibodies to minimize cross-reactivity [104].
- Incubate for 30 minutes at 37°C or 1 hour at room temperature in the dark.
Washing and Mounting
- Wash in wash buffer (2×10 minutes at room temperature in the dark).
- Mount in anti-fading mounting medium (e.g., ProLong Gold).
- Cure for 24 hours at 4°C before imaging.
Specificity Controls for Multiplex IHC
Comprehensive controls are essential for validating multiplex IHC assays. The following control experiments should be performed:
Table 2: Essential Control Experiments for Multiplex IHC Validation
| Control Type | Protocol | Expected Result | Purpose |
|---|---|---|---|
| Adsorption Control | Pre-incubate primary antibody with corresponding peptide (10⁻⁶M) overnight at 4°C before application [104] | Significant reduction or elimination of specific staining | Confirms antibody specificity for target epitope |
| Tissue IgG Interactions | Omit primary antibodies while performing all other steps | No specific staining | Identifies non-specific binding of secondary antibodies or detection systems |
| Single-Stain Control | Perform IHC with each primary antibody individually on adjacent sections | Immunoreactivity pattern matches co-labeled sections | Verifies individual antibody performance in multiplex format |
| Cross-Reactivity Control | Incubate primary antibody with non-corresponding secondary antibody | No signal detection | Confirms secondary antibody specificity |
| Secondary Specificity | Apply mixture of secondary antibodies to single primary antibody | Signal only in appropriate channel | Verifies no cross-reactivity between secondary antibodies |
Image Analysis and Data Management
Quantitative Analysis Workflows
Advanced image analysis pipelines are essential for extracting robust quantitative data from multiplex IHC. The MARQO (Multiplex-imaging Analysis, Registration, Quantification and Overlaying) pipeline represents an open-source approach that integrates elastic image registration, iterative nuclear segmentation, and unsupervised clustering with mini-batch k-means [106]. This pipeline leverages parallel computing to efficiently process whole-slide images, addressing the computational challenges of multiplex data analysis.
For brightfield mIHC, color deconvolution algorithms separate overlapping chromogens into individual channels, enabling quantification of each marker [102]. For multiplex immunofluorescence, spectral unmixing distinguishes fluorophores with overlapping emission spectra, which is crucial for accurate signal assignment [102] [105]. These processes must be validated with appropriate controls to ensure accurate marker assignment and quantification.
Validation of Analytical Pipelines
SITC guidelines recommend thorough validation of image analysis pipelines, including verification of:
- Cell segmentation accuracy compared to manual pathologist annotations
- Signal thresholding for positive/negative cell classification
- Batch effect correction to minimize technical variation
- Reproducibility across multiple operators and analysis sessions [102]
MARQO's approach of unsupervised clustering followed by supervised binarization of each cluster by the user allows for accurate quantification while maintaining pathological oversight [106]. This hybrid approach is particularly valuable in clinical translation, where fully automated analysis may not yet be acceptable without pathologist confirmation.
Research Reagent Solutions
Table 3: Essential Research Reagents for Multiplex IHC Validation
| Reagent Category | Specific Examples | Function in Multiplex IHC |
|---|---|---|
| Primary Antibodies | Monoclonal antibodies of different isotypes (IgG1, IgG2a, IgG2b) [104] | Specific binding to target antigens; different isotypes enable multiplexing with isotype-specific secondaries |
| Secondary Antibodies | Species-specific or isotype-specific antibodies conjugated to fluorophores or enzymes [104] | Amplifies primary antibody signal; enables detection of multiple targets |
| Detection Systems | Tyramide Signal Amplification (TSA), HRP polymers, AP polymers [7] [102] | Signal amplification for enhanced sensitivity; different systems enable multiplexing |
| Chromogens/Fluorophores | DAB (brown), AP Red, Alexa Fluor dyes [7] [104] | Visualizes target presence; must have non-overlapping spectra for multiplex detection |
| Antigen Retrieval Buffers | Citrate buffer (pH 6), Tris/EDTA buffer (pH 9) [104] [57] | Unmasks epitopes cross-linked by fixation; optimal pH varies by antigen |
| Blocking Reagents | Normal serum, BSA, commercial protein blocks [104] [57] | Reduces non-specific background staining |
| Mounting Media | ProLong Gold, other anti-fade media [104] | Preserves fluorescence and reduces photobleaching |
Validating multiplex IHC requires a systematic approach that addresses the unique challenges of preserving and detecting multiple antigens in a single sample. Through optimized fixation strategies, rigorous antibody validation, comprehensive control experiments, and standardized image analysis pipelines, researchers can generate robust, reproducible multiplex IHC data. As these technologies continue to evolve toward clinical application, adherence to established validation guidelines and implementation of the protocols outlined in this document will be essential for generating clinically meaningful results. The integration of computational analysis tools with traditional pathological expertise represents the future of multiplex tissue analysis, enabling deeper understanding of complex biological processes in their native tissue context.
Best Practices for Method Standardization and Inter-Laboratory Reproducibility
Within immunohistochemistry (IHC) research, particularly in the critical context of tissue fixation, the reliability of any finding is fundamentally dependent on the consistency and reproducibility of the methodological process. Variations in technique can lead to significant discrepancies in staining intensity and interpretation, ultimately compromising data integrity and confounding comparisons between studies or laboratories. This document outlines established best practices for standardizing IHC test methods and for conducting interlaboratory studies (ILS) to quantitatively determine method precision, thereby ensuring that research outcomes are robust, reliable, and reproducible for scientists and drug development professionals.
The Framework for Interlaboratory Studies (ILS)
An Interlaboratory Study is a structured exercise designed to quantify the precision of a test method by having multiple laboratories analyze a set of homogeneous materials. The data generated is used to formulate a precision statement for the method, a requirement for standards from organizations like ASTM [107].
Key Concepts of Test Method Precision
Precision refers to the degree of agreement among independent test results obtained under stipulated conditions. It is inversely measured by variability [107]:
- Repeatability: The precision under conditions where independent test results are obtained with the same method on identical test items in the same laboratory by the same operator using the same equipment within short intervals of time.
- Reproducibility: The precision under conditions where test results are obtained with the same method on identical test items in different laboratories with different operators using different equipment.
Planning an ILS for IHC
A well-executed ILS consists of three phases: planning, testing, and analysis [107].
ILS Membership: An ILS task group, typically formed within a standards organization, manages the study [107]. Basic Design: The study should include a sufficient number of laboratories (commonly 6-10) and several materials (tissue samples) representing different levels of the analyte of interest. Each laboratory tests each material multiple times [107]. Test Method: The IHC protocol must be rigorously developed and stable. Conducting a ruggedness test to determine the sensitivity of the method to minor changes in conditions is highly recommended prior to the ILS [107]. Materials: Select tissue samples with stable and well-characterized antigen expression levels. The samples must be homogeneous to ensure that any observed variability is due to the method and not the material itself [107]. Protocol: The written instructions provided to all participating laboratories must be exceptionally clear, detailed, and unambiguous, covering every aspect from tissue fixation and processing to staining, visualization, and quantitative analysis [107].
Standardized Protocol for Quantitative IHC
The following protocol provides a detailed methodology for a quantitative IHC staining procedure, adapted from studies comparing detection methods for optimal linearity and reproducibility [86]. This protocol is designed to be incorporated into an ILS for determining method precision.
Reagent and Material Preparation
- Tissue Fixation: Fix tissue samples by immersion in 3% paraformaldehyde solution for 1 hour [86].
- Embedding: Process fixed tissue through a graded series of alcohol, clear in xylene, and embed in paraffin wax [86].
- Sectioning: Cut 5 μm thick sections using a microtome and mount on poly-L-lysine and chicken egg white-coated glass slides [86].
- Antibody Solutions:
- Vector Red Substrate Solution: Prepare according to the manufacturer's kit instructions. This substrate provides a bright red precipitate suitable for permanent mounting and quantitative microdensitometry [86].
Staining Procedure
- Dewaxing and Rehydration: Deparaffinize slides in xylene and rehydrate through a graded ethanol series to distilled water [86].
- Antigen Retrieval: Perform appropriate antigen retrieval as optimized for the specific target antigen (e.g., heat-induced epitope retrieval in citrate buffer).
- Blocking: Incubate sections with a protein block (e.g., 5% Bovine Serum Albumin) to minimize non-specific binding.
- Primary Antibody Incubation: Apply primary antibody to the tissue sections. Incubate in a humidified chamber for the optimized time and temperature.
- Washing: Rinse slides with a buffered solution (e.g., PBS or TBS) to remove unbound antibody.
- Secondary Antibody Incubation: Apply the alkaline phosphatase-conjugated secondary antibody. Incubate in a humidified chamber as per optimization.
- Washing: Rinse slides thoroughly with buffer.
- Enzymatic Development: Incubate sections with the Vector Red substrate solution. Development should be performed in the dark, at a constant temperature (e.g., 20°C), for a fixed, pre-determined time (e.g., 10-60 minutes) [86]. Precise timing is critical for quantitative linearity.
- Counterstaining (Optional): If needed, apply a counterstain such as Mayer's hematoxylin.
- Mounting: Rinse slides and apply a permanent aqueous mounting medium [86].
Quantitative Analysis via Microdensitometry
For quantitative evaluation, staining intensity should be measured using microdensitometry.
- Image Acquisition: Capture digital images of stained sections using a microscope with a calibrated camera under consistent lighting conditions.
- Optical Density Measurement: Use image analysis software to measure the optical density (absorbance) of the Vector Red precipitate in defined regions of interest (e.g., cell membrane, cytoplasm). The absorbance of Vector Red has been shown to be linear over a wide range of antibody concentrations and development times, making it suitable for quantification [86].
- Automated Analysis (Advanced): For higher throughput and objectivity, employ a fully automated quantitative analysis method. This can involve algorithms that use optical density separation to differentiate staining components, combined with deep learning-based segmentation (e.g., CellViT for nuclear segmentation) and region-growing algorithms for membrane/cytoplasmic analysis [108].
Data Analysis and Precision Statement
Following the completion of testing across all laboratories, the collected data is analyzed according to standardized practices like ASTM E691 [107].
Calculation of Precision Statistics
For each material (tissue sample) in the study, the following steps are taken:
- Within-Laboratory Consistency: Calculate the average and standard deviation of test results for each laboratory.
- Between-Laboratory Consistency: Calculate the average of all results from all laboratories for that material.
- Precision Measures:
- Repeatability Standard Deviation (sr): A pooled estimate of the within-laboratory variability.
- Reproducibility Standard Deviation (sR): An estimate of the between-laboratory variability.
These statistics are then used to define repeatability and reproducibility limits [107].
Tabular Presentation of Quantitative ILS Data
The following table structure is used to summarize the key statistical outcomes of the ILS for each material tested.
Table 1: Precision Statistics for IHC Staining Intensity from an Interlaboratory Study
| Material (Antigen Level) | Overall Mean (Optical Density) | Repeatability Standard Deviation (s_r) | Reproducibility Standard Deviation (s_R) | Repeatability Limit (2.8 × s_r) | Reproducibility Limit (2.8 × s_R) |
|---|---|---|---|---|---|
| Low | 0.15 | 0.02 | 0.05 | 0.06 | 0.14 |
| Medium | 0.45 | 0.04 | 0.09 | 0.11 | 0.25 |
| High | 0.80 | 0.05 | 0.12 | 0.14 | 0.34 |
Note: The repeatability and reproducibility limits represent the maximum difference between two test results that can be expected with 95% confidence, under repeatability and reproducibility conditions, respectively [107].
Visualization of Workflows and Relationships
ILS Planning and Execution Workflow
The following diagram outlines the key stages in conducting an interlaboratory study.
Quantitative IHC Analysis Pathway
This diagram illustrates the logical flow for the quantitative analysis of IHC staining, incorporating both standard and advanced methods.
The Scientist's Toolkit: Essential Research Reagents and Materials
The following table details key reagents and materials critical for achieving reproducible results in quantitative IHC studies.
Table 2: Essential Research Reagent Solutions for Quantitative IHC
| Item | Function / Rationale | Example / Specification |
|---|---|---|
| Primary Antibody | Binds specifically to the target antigen of interest. Clone, host species, and validation for IHC are critical for specificity. | Anti-CD45 (Clone MRC OX-1) [86] |
| Alkaline Phosphatase-Conjugated Secondary Antibody | Links the primary antibody to the enzymatic detection system. Must be raised against the host species of the primary antibody. | Goat-anti-mouse AP-conjugate [86] |
| Vector Red Substrate | Alkaline phosphatase substrate yielding a bright red, stable, and quantifiable precipitate. Ideal for microdensitometry due to its linearity [86]. | Vector Red Substrate Kit [86] |
| Poly-L-Lysine Coated Slides | Provides strong adhesion for tissue sections during processing and staining, preventing detachment. | N/A [86] |
| Standardized Tissue Controls | Tissues with known antigen expression levels. Included in each run to monitor staining consistency and performance across batches and laboratories. | Cell line pellets or patient tissue with characterized expression |
| Image Analysis Software | Enables objective, quantitative measurement of staining intensity (optical density) and area, replacing subjective scoring. | Software with microdensitometry capabilities [86] [108] |
Within the broader thesis on tissue fixation methods for immunohistochemistry (IHC) research, the processing of bone marrow trephine biopsies (BMs) presents a unique challenge. The requirement for decalcification prior to sectioning introduces an additional pre-analytical variable that can significantly compromise tissue antigenicity, directly impacting the reliability of IHC results in both research and clinical diagnostics [36] [109]. Achieving a balance between adequate decalcification to allow sectioning and the preservation of morphological and antigenic integrity is paramount. This application note synthesizes recent evidence to outline validated protocols for the fixation and decalcification of bone marrow and other decalcified tissues, providing a standardized framework to ensure high-quality IHC outcomes.
Comparative Analysis of Fixation and Decalcification Methods
The pre-analytical phase, specifically the combination of fixation and decalcification, is a critical determinant of IHC success in bone marrow specimens. The following data summarizes key findings from recent validation studies, providing a quantitative basis for protocol selection.
Table 1: IHC Performance of Different Fixation and Decalcification Combinations
| Fixative | Decalcifying Agent | Key IHC Performance Findings | Best For |
|---|---|---|---|
| B5-based (Commercial) | EDTA-based | Lowest number of inadequate IHC stains (5 out of 25 antigens) [36] | Optimal overall antigen preservation |
| 10% Buffered Formalin | 10% Formic Acid | Superior IHC staining, comparable to 10% EDTA; no significant effect from fixation duration (2-24 hrs) [110] | Nuclear-stained antibodies; labs avoiding mercury-based fixatives |
| 10% Buffered Formalin | 10% EDTA (pH 7.4) | Superior IHC staining, comparable to 10% Formic Acid [110] | General use, especially when gentle decalcification is needed |
| Acetic Acid-Zinc-Formalin (AZF) | EDTA-based | Better morphological details, especially cell nuclei [36] | Morphology-focused assessment |
| In-house B5-based | EDTA-based | Highest number of inadequate IHC stains (8 out of 25 antigens) [36] | (Not recommended for optimal IHC) |
Table 2: Impact of Fixative Types on IHC Staining
| Fixative Type | Mechanism | Advantages | Disadvantages for IHC |
|---|---|---|---|
| Cross-linking (e.g., Formalin, PFA) | Forms covalent cross-links between proteins [33] [10] | Excellent tissue structure preservation; broad applicability [10] | Can mask epitopes, requiring antigen retrieval [33] [85] |
| Mercuric Chloride-based (e.g., B5, Zenker's) | Protein and nucleic acid coagulation [10] | Superior cytological detail and intense IHC staining [36] [10] | Highly toxic; requires mercury deposit clearance; harsher on antigens [36] [10] |
| Precipitating (e.g., Acetone, Methanol) | Precipitates proteins by dehydration [33] [10] | Fast; good for large proteins and surface antigens; requires no retrieval [111] [85] | Poorer morphology; extracts lipids; not ideal for tissue architecture [10] [85] |
Validated Experimental Protocols
Optimal Protocol for Bone Marrow Trephine Biopsy
Based on the synthesized data, the following protocol is recommended for processing BMs for optimal IHC staining.
Step 1: Fixation
- Reagent: 10% Buffered Formalin (or Commercial B5-based fixative for specialized applications) [36] [110].
- Procedure: Immerse the fresh BM core biopsy (ideally 1.5-2.0 cm in length) in a volume of fixative that is 50-100 times the tissue volume [85].
- Duration: 2 to 24 hours at room temperature. Studies show that fixation duration within this window does not significantly affect IHC outcomes for formalin-fixed specimens [110].
Step 2: Decalcification
- Reagent: 10% EDTA (pH 7.4) or 10% Formic Acid [110].
- Procedure: Following fixation, transfer the specimen to the decalcifying solution. The volume should sufficiently cover the tissue.
- Duration: This is protocol-dependent. For example, one optimized protocol uses 10% EDTA for 1.5 hours [36]. The endpoint should be adequate softening for sectioning, which must be determined empirically for each lab setup.
Step 3: Post-Decalcification Wash
- Reagent: 70% Ethanol.
- Procedure: Wash the decalcified specimen to remove any excess reagents before tissue processing [36].
- Duration: 0.25 to 0.5 hours.
Step 4: Tissue Processing and Embedding
- Procedure: Process the BM specimen through a standard series of ethanol dehydrations, xylene clearing, and paraffin infiltration using an automated tissue processor [36] [27].
- Embedding: Embed in paraffin wax. Sections should be cut at 3-4 µm thickness and mounted on positively charged or silanized glass slides to prevent detachment [36] [27].
Antigen Retrieval for Decalcified FFPE Tissues
Even with optimized fixation and decalcification, antigen retrieval is often necessary for cross-linking fixatives.
Heat-Induced Epitope Retrieval (HIER)
- Buffer: 10 mM Sodium Citrate (pH 6.0) or 1 mM EDTA (pH 8.0) or 10 mM Tris/1 mM EDTA (pH 9.0) [27].
- Method: Place slides in retrieval buffer and heat using a pressure cooker, microwave, or water bath to approximately 98°C. Maintain the temperature for 15-20 minutes [27].
- Cooling: Allow the slides to cool completely in the buffer for about 20 minutes before proceeding to immunostaining [27].
Protease-Induced Epitope Retrieval (PIER)
- Reagent: 0.05% trypsin in 0.1% calcium chloride (pH 7.8) or 0.5% pepsin in 10mM HCl (pH 2.0) [27].
- Method: Apply the protease solution to the tissue sections and incubate in a humidity chamber at 37°C for 10-20 minutes [33] [27].
- Termination: Rinse the slides thoroughly in running water for several minutes to stop the enzymatic reaction [27].
Diagram 1: Bone marrow IHC workflow.
The Scientist's Toolkit: Essential Research Reagents
Table 3: Key Reagents for Bone Marrow Processing and IHC
| Reagent / Solution | Function | Application Note |
|---|---|---|
| 10% Neutral Buffered Formalin | Cross-linking fixative; preserves morphology | A versatile and widely validated fixative for BMs [110] [10]. |
| B5-based Fixative (Commercial) | Mercury-based fixative; enhances nuclear detail | Provides excellent morphology but is toxic and requires careful handling [36] [10]. |
| EDTA (10%, pH 7.4) | Chelating decalcifying agent | Gentle on antigens; preferred for IHC preservation [36] [110]. |
| Formic Acid (10%) | Acid decalcifying agent | Effective and provides good IHC results, faster than EDTA [110]. |
| Sodium Citrate Buffer (10mM, pH 6.0) | HIER Buffer | Common buffer for unmasking formalin-cross-linked epitopes [27]. |
| Proteinase K / Trypsin | Proteolytic enzyme for PIER | An alternative unmasking method for some sensitive epitopes [33] [27]. |
| Positively Charged Slides | Microscope slide coating | Prevents section detachment during rigorous IHC procedures [36] [27]. |
Diagram 2: Protocol selection logic.
Validation of fixation and decalcification protocols is not a mere recommendation but a necessity for generating reliable and reproducible IHC data from bone marrow and other decalcified tissues. The evidence indicates that the fixative choice has a predominant influence on final IHC quality, more so than the decalcifier [36]. Laboratories should prioritize the implementation of a standardized, written validation procedure based on their specific diagnostic and research needs [112]. Adopting the optimized protocols detailed herein—specifically the combination of 10% Buffered Formalin with 10% EDTA decalcification—will significantly improve pre-analytical standardization, reduce IHC failure rates, and ensure the integrity of morphological assessment for researchers and drug development professionals.
Within immunohistochemistry (IHC) research, tissue fixation is a critical foundational process. Effective fixation preserves cellular morphology and tissue architecture while simultaneously maintaining the antigenicity of target molecules for accurate detection and analysis [113] [8]. The fundamental challenge lies in the fact that these two objectives are often in tension; protocols that optimally preserve structure can mask epitopes, and methods that best retain antigenicity may compromise morphological detail [4] [85]. This application note, framed within a broader thesis on tissue fixation methodologies, provides a structured assessment of fixation performance. It synthesizes quantitative metrics and detailed protocols to guide researchers and drug development professionals in making evidence-based decisions to enhance the reliability and reproducibility of their IHC outcomes.
Core Principles and Metrics for Fixation Assessment
The primary goal of fixation is to arrest degradation and stabilize tissues. This is achieved through two main mechanisms: cross-linking, which creates covalent bonds between biomolecules, and precipitation/coagulation, which denatures proteins [2] [8]. Assessing the success of fixation requires evaluating its performance against two sets of criteria.
Key Performance Metrics
- Morphological Fidelity: This refers to the preservation of tissue and cell structure in a "life-like state." High-quality morphology allows for clear interpretation of tissue architecture and cytological detail, which is paramount for pathological diagnosis [8]. Poor fixation can lead to cell shrinkage, swelling, or distortion [113].
- Antigen Preservation: This measures the extent to which antibody-binding sites (epitopes) remain accessible and reactive after fixation. Over-fixation, particularly with cross-linking agents like formaldehyde, can mask epitopes, leading to false-negative results in IHC [4] [113].
- Biomolecule Integrity: For downstream molecular analyses, the quality of nucleic acids (DNA and RNA) and proteins extracted from fixed tissue is a crucial metric. Cross-linking fixatives can fragment nucleic acids and create protein cross-links that complicate analysis [4] [114].
- Fixation Strength and Penetration: In specific contexts, such as the use of threads in facial rejuvenation research, the biomechanical strength of fixation can be a direct quantitative metric [115]. More broadly, complete and uniform penetration of fixative throughout the tissue sample is essential for consistent results [23].
Quantitative Comparison of Fixation Methods
The choice of fixative involves trade-offs. The following table summarizes the performance of common fixatives against the key metrics, synthesizing data from comparative studies.
Table 1: Quantitative and Qualitative Performance of Common Fixatives
| Fixative | Mechanism | Morphology Preservation | Antigen Preservation | RNA/DNA Quality | Key Applications & Notes |
|---|---|---|---|---|---|
| Formaldehyde (e.g., 4% PFA, 10% NBF) | Cross-linking [2] | Excellent, gold standard for histology [4] [114] | Variable; often requires antigen retrieval due to epitope masking [4] [113] | High-quality RNA possible, but cross-linking can complicate analysis [4] [114] | General purpose IHC; requires optimization of fixation time to avoid over-fixation [85]. |
| Acetone | Precipitation/ Dehydration [10] [8] | Poorer; causes tissue shrinkage and lipid extraction [4] [10] | High for many fixation-sensitive antigens (e.g., Shank proteins) [4] | Good; no cross-linking, ideal for sequencing and proteomics [4] | Preferred for frozen sections and labile antigens; avoids permeabilization step [4]. |
| Methanol | Precipitation/ Dehydration [10] [8] | Harsher than acetone; reduced quality [4] | High for large protein antigens (e.g., immunoglobulins) [10] | Good; widely used for DNA/RNA analysis [4] | Similar to acetone but harsher; can be used for membrane surface antigens [4] [85]. |
| Ethanol (99%) | Precipitation [10] | Causes cell contraction; inferior to formalin [114] | Variable; can decrease immunoreactivity for some targets (e.g., Ki-67) [114] | Can cause RNA degradation [114] | An alternative to formaldehyde; may improve immunoreactivity for some targets (e.g., cytokeratin) [114]. |
| Zinc Salt Fixatives | Unknown, possibly coordination/complex formation [101] | Comparable to formalin [101] | Excellent for fixation-sensitive antigens (e.g., CD markers) [101] | Information not specified in sources | Useful for lymphoid tissues and antigens that do not survive formalin fixation [101]. |
Table 2: Experimental Data from Specific Fixative Studies
| Study Focus | Fixatives Compared | Key Quantitative Findings | Implication for Fixation Performance |
|---|---|---|---|
| Shank Protein Staining in Frozen Sections [4] | Acetone, Methanol, Acetone:Methanol (1:1), 4% FA | Significantly superior immunostaining for Shank1, Shank2, and Shank3 with acetone and methanol vs. formaldehyde. | For dense protein complexes like post-synaptic densities, precipitating fixatives outperform cross-linking fixatives for antigen accessibility. |
| Xenograft Tissue Analysis [114] | 4% PFA, 10% NBF, 20% NBF, 99% EtOH | RNA quality (A260/A280) was high from PFA- and NBF-fixed tissues but degraded in EtOH-fixed tissues. | Formalin-based fixatives are superior to alcohol-only fixatives for concurrent RNA preservation in paraffin-embedded models. |
| Fixation Strength in Thread Lifting [115] | Bidirectional + Multidirectional Threads vs. Double Bidirectional Threads | Combination threads showed ≈10% higher mean fixation strength (52.1 N vs. 47.35 N, p=0.032). | In biomechanical contexts, combining elements with complementary fixation properties (lifting + stabilization) enhances overall performance. |
Detailed Experimental Protocols
To ensure reproducible and high-quality results, standardized protocols are essential. The following are detailed methodologies for key experiments cited in this note.
Protocol: Comparing Fixatives for Fixation-Sensitive Antigens on Frozen Sections
This protocol, adapted from a systematic investigation, is designed to identify the optimal fixation method for challenging antigens, such as Shank proteins in neuronal tissue [4].
Workflow Diagram: Frozen Section Fixation Comparison
Materials & Reagents:
- Tris-Buffered Saline (TBS): Provides a physiological pH for washing and antibody dilution.
- Triton X-100: A detergent used in blocking and antibody buffers to permeabilize membranes.
- Normal Goat Serum: Used as a blocking agent to reduce non-specific antibody binding.
- Primary Antibodies: Target-specific antibodies (e.g., Shank1, Shank2, Shank3).
- Fluorophore-conjugated Secondary Antibodies: Antibodies targeting the host species of the primary antibody, conjugated to a fluorescent dye for detection.
- DAPI Solution: A nuclear counterstain.
- Aqua-Poly/Mount: Aqueous mounting medium for preserving fluorescence.
Method Steps:
- Tissue Preparation & Sectioning: Transcardially perfuse the animal with cold saline (e.g., 30-50 mL with heparin) until cleared of blood. Dissect the tissue of interest, embed in Tissue-Tek OCT compound, and snap-freeze by immersing in liquid nitrogen-pre-cooled isopentane. Store at -80°C until sectioning. Cut 12 µm thick sections using a cryostat (e.g., Leica CM3050 S) at -18 to -20°C and mount on Superfrost Plus slides. Air-dry sections for 3-5 minutes at room temperature (RT) [4].
- Fixation Application: On the day of staining, rapidly warm slides to RT. Apply one of the following fixatives to the tissue sections:
- Acetone: Fix for 10 minutes at -20°C, then air-dry for 10-20 minutes.
- Methanol: Fix for 10 minutes at -20°C.
- Acetone:Methanol (1:1): Fix for 10 minutes at -20°C, then air-dry for 10-20 minutes.
- 4% Formaldehyde (FA) in TBS: Fix for 15 minutes at RT.
Note: For formaldehyde fixation, wash sections with TBS-T for 10 minutes prior to fixation [4].
- Post-Fixation Wash: Wash all slides three times for 10 minutes each with TBS at RT.
- Immunohistochemical Staining: Outline the tissue with a hydrophobic pen. Incubate sections with a blocking buffer (e.g., 10% normal goat serum, 0.3% Triton X-100 in TBS) to prevent non-specific binding. Remove the blocking solution and incubate with primary antibody diluted in a buffer containing 5% normal goat serum and 0.3% Triton X-100 in TBS overnight at +4°C in a humidified chamber. The next day, wash thrice with TBS for 10 minutes each. Incubate with appropriate fluorophore-conjugated secondary antibodies for one hour at RT in the dark. Wash again thrice with TBS for 10 minutes [4].
- Mounting and Analysis: Incubate sections with DAPI solution (1:20,000 in PBS) to stain nuclei. Perform a final wash with tap water, remove the hydrophobic pen, and mount coverslips using Aqua-Poly/Mount. Image the slides using a fluorescence microscope (e.g., Zeiss Axio Observer Z1) the following day. Use equal exposure times across all samples to allow for direct comparison of signal intensity [4].
Protocol: Perfusion Fixation for Optimal CNS Tissue Preservation
For delicate tissues like the brain, perfusion fixation is recommended over immersion to achieve rapid and uniform fixation, preventing hypoxic artifacts and preserving fragile neuronal structures [23].
Workflow Diagram: Ante-Mortem vs. Post-Mortem Perfusion
Materials & Reagents:
- Heparinized Saline: Prevents blood clotting during the perfusion, ensuring clear vasculature.
- Paraformaldehyde (PFA): The cross-linking fixative of choice for central nervous system tissue, typically used at 4% in phosphate buffer.
- Peristaltic Pump: For post-mortem perfusion, this provides the pressure to propel the fixative through the vasculature in the absence of a heartbeat.
- Phosphate-Buffered Saline (PBS): An isotonic solution used to clear blood before fixative introduction.
Method Steps:
- Animal Preparation: Administer appropriate analgesia (e.g., buprenorphine) 30 minutes to 2 hours before the procedure. For ante-mortem perfusion, induce deep anesthesia using an approved method (volatile or injectable). For post-mortem perfusion, induce light sedation followed by intravenous heparin and a euthanizing agent [23].
- Surgical Procedure: Perform a thoracotomy to expose the heart. For ante-mortem perfusion, cannulate the left ventricle. For post-mortem perfusion, proceed after confirmation of respiratory and cardiac arrest [23].
- Perfusion: Initiate perfusion first with a cold buffer solution (e.g., PBS) until the effluent from a cut in the right atrium or vena cava runs clear, indicating blood has been flushed from the system. Immediately follow with the fixative solution (e.g., 4% PFA). In ante-mortem perfusion, the final heartbeats aid distribution. In post-mortem perfusion, a peristaltic pump is used to maintain a constant flow [23].
- Tissue Harvesting and Post-Fixation: Following perfusion, dissect the target organ (e.g., the brain). The tissue should feel firm, and organs like the liver and brain should appear uniformly pale, indicating successful fixation. Immerse the tissue in the same fixative (e.g., 4% PFA) for a post-fixation period, typically overnight at 4°C, to ensure complete stabilization [23].
- Sectioning and Storage: After post-fixation, the tissue can be processed for paraffin embedding or cryoprotected for frozen sectioning. Sectioned tissues are then used for downstream applications like H&E staining or IHC [23].
The Scientist's Toolkit: Essential Research Reagent Solutions
Successful fixation and IHC require a suite of reliable reagents and tools. The following table details key solutions used in the protocols featured in this note.
Table 3: Essential Reagents for Fixation and Immunohistochemistry
| Reagent/Tool | Function/Description | Application Notes |
|---|---|---|
| Paraformaldehyde (PFA) | A polymer of formaldehyde; dissolved in buffer to create a pure, stable cross-linking fixative. | Preferred over commercial formalin for research due to lack of stabilizers (e.g., methanol) that can interfere with fixation [10]. |
| Neutral Buffered Formalin (NBF) | The gold-standard fixative in pathology; ~4% formaldehyde in a neutral phosphate buffer. | Prevents acid-induced artifacts. Buffering is crucial for maintaining morphology and biomolecule integrity [10] [2]. |
| Acetone (100%, Analytical Grade) | A precipitating fixative and dehydrating agent. | Ideal for frozen sections and fixation-sensitive antigens. Pre-chill to -20°C for use. Extracts lipids, which can compromise morphology [4] [10]. |
| Methanol (100%, Analytical Grade) | A precipitating fixative. | Similar applications to acetone but considered harsher. Can be used pre-chilled for frozen sections [4]. |
| Zinc-based Fixative | A formalin-free alternative that preserves sensitive epitopes. | A solution of zinc salts (e.g., acetate, chloride) in Tris buffer. Excellent for antigens like CD markers that are destroyed by formalin [101]. |
| Tris-Buffered Saline (TBS) | A buffered saline solution for washing and diluting antibodies. | Maintains a stable pH, which is critical for consistent antibody binding and staining results. |
| Triton X-100 | A non-ionic detergent. | Used at low concentrations (e.g., 0.1-0.3%) in blocking and antibody buffers to permeabilize cell membranes, allowing antibody penetration. |
| Normal Serum | A blocking agent (e.g., from goat, donkey). | Used to block non-specific binding sites on tissue sections, reducing background staining. Should match the host species of the secondary antibody. |
| Heat-Induced Epitope Retrieval (HIER) Buffers | Solutions (e.g., citrate, EDTA) used to unmask epitopes. | Applied to formalin-fixed, paraffin-embedded sections using heat (microwave, water bath, pressure cooker) to reverse formaldehyde cross-links [10] [113]. |
A methodical approach to assessing fixation performance is non-negotiable for rigorous IHC research. There is no universal "best" fixative; the optimal choice is a deliberate compromise dictated by the primary research question—whether it is the exquisite preservation of morphology, the unambiguous detection of a specific antigen, or the integrity of biomolecules for -omics applications. By leveraging the quantitative metrics, standardized protocols, and reagent knowledge outlined in this application note, scientists can refine their fixation strategies. This systematic approach ultimately enhances data quality, improves reproducibility, and strengthens the conclusions drawn from immunohistochemical experiments in both basic research and drug development.
Conclusion
Successful immunohistochemistry is fundamentally dependent on appropriate tissue fixation, a critical pre-analytical step that balances the preservation of morphology with the accessibility of antigenic epitopes. No single fixative is universal; the choice must be empirically optimized for specific tissues, antigens, and downstream applications. The future of IHC fixation lies in developing more standardized, reproducible protocols, especially for challenging samples like bone, and integrating novel fixatives that are compatible with multi-omics approaches. As digital pathology and artificial intelligence transform tissue analysis, robust and validated fixation methods will become even more crucial for generating reliable, quantitative data that drives discovery in basic research and informs diagnostic and therapeutic development in the clinic.
References
- 1. Review of immunohistochemistry techniques: Applications, ... [https://www.sciencedirect.com/science/article/abs/pii/S0740257024000467?utm_source=chatgpt.com]
- 2. Reflections on the Principles of Fixation in Histochemistry and ... [https://pmc.ncbi.nlm.nih.gov/articles/PMC12173635/]
- 3. Immunohistochemistry (IHC): The Complete Guide [https://www.antibodies.com/applications/immunohistochemistry]
- 4. Fresh Frozen Tissue and Post-fixation [https://www.sysy.com/postfixation]
- 5. Evaluation of Glyoxal fixation for immunohistochemistry of ... [https://www.nature.com/articles/s41598-025-04226-7]
- 6. Immunohistochemistry (IHC) [https://www.cellsignal.com/learn-and-support/overview-of-ihc?srsltid=AfmBOoq1jVdZdEDvORGS16nU1tyvjQ2v1DirXWFQ6Pm9JVt34ublHh49]
- 7. Intro to Immunohistochemistry (IHC) Staining: Steps & Best ... [https://www.leicabiosystems.com/us/knowledge-pathway/immunohistochemistry-an-overview-steps-to-better-ihc-staining/]
- 8. Intro to Tissue Fixation in Histology: Types, Methods & More [https://www.leicabiosystems.com/us/knowledge-pathway/fixation-and-fixatives-1-the-process-of-fixation-and-the-nature-of-fixatives/]
- 9. Use of fixatives for immunohistochemistry and their ... [https://pubmed.ncbi.nlm.nih.gov/32359643/]
- 10. Fixation Strategies and Formulations Used in IHC Staining [https://www.thermofisher.com/us/en/home/life-science/protein-biology/protein-biology-learning-center/protein-biology-resource-library/pierce-protein-methods/fixation-strategies-formulations.html]
- 11. Read about formaldehyde and glutaraldehyde. [https://publish.uwo.ca/~jkiernan/formglut.htm]
- 12. The impact of crosslinking and non-crosslinking fixatives ... [https://www.sciencedirect.com/science/article/abs/pii/S1871678419300792]
- 13. Effect of formalin tissue fixation and processing on ... [https://pubmed.ncbi.nlm.nih.gov/10895825/]
- 14. Mechanical properties of paraformaldehyde-treated individual ... [https://nanoconvergencejournal.springeropen.com/articles/10.1186/s40580-017-0099-9]
- 15. Glutaraldehyde – A Subtle Tool in the Investigation of ... [https://pmc.ncbi.nlm.nih.gov/articles/PMC6527840/]
- 16. IHC: Tissue Preparation - Formaldehyde [https://sysy.com/protocols/protocol-ihc-tissue-preparation-formaldehyde]
- 17. The effect of chemical fixation with paraformaldehyde ... [https://pmc.ncbi.nlm.nih.gov/articles/PMC11837135/]
- 18. The impact of crosslinking and non-crosslinking fixatives ... [https://pubmed.ncbi.nlm.nih.gov/31082574/]
- 19. Choosing your fixation, embedding, and antigen retrieval ... [https://www.enzo.com/note/choosing-your-fixation-embedding-and-antigen-retrieval-method-for-successful-ihc/]
- 20. Immunohistochemistry (IHC) [https://www.cellsignal.com/learn-and-support/overview-of-ihc?srsltid=AfmBOooal-TjhvxtBA4N2tpxl03RyIFLY_ufY8Ny8jY3chYRc0qSTzOr]
- 21. Tips and Techniques for Troubleshooting ... [https://www.sigmaaldrich.com/US/en/technical-documents/protocol/protein-biology/immunohistochemistry/antibody-immunohistochemistry-expert-tips-and-techniques?srsltid=AfmBOoriWynoIvXD2c6h2gO5SpOMRw_ItQfVHNev-t-soCIX3lsDKoC_]
- 22. Immunohistochemistry Techniques, Strengths, Limitations ... [https://www.technologynetworks.com/analysis/articles/immunohistochemistry-techniques-strengths-limitations-and-applications-363107]
- 23. Comparative study of pre- and post-mortem perfusion ... [https://www.nature.com/articles/s41684-025-01633-1]
- 24. Use of perfusion fixation for improved neuropathologic examination - PubMed [https://pubmed.ncbi.nlm.nih.gov/9372749/]
- 25. Preservation of cellular structure via immersion fixation in ... [https://pmc.ncbi.nlm.nih.gov/articles/PMC11795511/]
- 26. Perfusion-fixation of the human brain for immunohistochemistry: comparison with immersion-fixation - PubMed [https://pubmed.ncbi.nlm.nih.gov/2437408/]
- 27. Immunohistochemistry Protocols [https://www.antibodies.com/applications/immunohistochemistry/ihc-protocol]
- 28. Fixation, fine structure, and immunostaining for neuropeptides: perfusion versus immersion of the neuroendocrine hypothalamus - PubMed [https://pubmed.ncbi.nlm.nih.gov/2419392/]
- 29. A comprehensive protocol for simplified mouse DRG ... [https://www.sciencedirect.com/science/article/pii/S0165027025000755]
- 30. Immunohistochemistry (Histology + Imaging)-Mendelsohn ... [https://www.protocols.io/view/immunohistochemistry-histology-imaging-mendelsohn-dyuq7wvw.html]
- 31. Quality Innovation Starts with Careful Tissue Preservation ... [https://www.referencemedicine.com/blog/quality-innovation-starts-with-careful-tissue-preservation-processes]
- 32. Be bold, start cold! cold formalin fixation of colorectal ... [https://pmc.ncbi.nlm.nih.gov/articles/PMC11455702/]
- 33. Cell and Tissue Fixation 101- Top Tips For Protocol ... [https://bitesizebio.com/13459/cell-fixation-101-top-tips-for-protocol-optimization/]
- 34. Alternative Tissue Fixation Protocols Dramatically Reduce ... [https://www.sciencedirect.com/science/article/pii/S0023683723002234]
- 35. Systematic comparison of quantity and quality of RNA ... [https://translational-medicine.biomedcentral.com/articles/10.1186/s12967-024-05890-5]
- 36. a pilot study to identify the best fixation and decalcification ... [https://pmc.ncbi.nlm.nih.gov/articles/PMC12142299/]
- 37. Optimal FFPE Tissue Fixation, Processing, and Embedding [https://cellcarta.com/science-hub/optimal-ffpe-tissue-fixation-processing-and-embedding-a-comprehensive-guide/]
- 38. Exploration of tissue fixation methods suitable for digital ... [https://eurjmedres.biomedcentral.com/articles/10.1186/s40001-024-01921-5]
- 39. FFPE Tissue Preparation Steps [https://www.biochain.com/blog/ffpe-tissue-preparation-steps/]
- 40. Immunohistochemistry (IHC) Troubleshooting Guide & the ... [https://www.cellsignal.com/learn-and-support/troubleshooting/ihc-troubleshooting-guide?srsltid=AfmBOorwNS5UhYDqB-nVWnoUG5-ugIVc-woY7_bSH7ugv9DbMIp4_PbV]
- 41. IHC Troubleshooting Guide [https://www.thermofisher.com/us/en/home/life-science/protein-biology/protein-biology-learning-center/protein-biology-resource-library/pierce-protein-methods/ihc-troubleshooting-guide.html]
- 42. Optimizing Immunohistochemistry Validation and ... [https://www.precisionformedicine.com/blog/optimizing-ihc-validation-regulatory-strategies]
- 43. Comparison of Snap Freezing versus Ethanol Fixation ... [https://pmc.ncbi.nlm.nih.gov/articles/PMC1867483/]
- 44. FFPE or Frozen Tissue – How to Choose Between Their ... [https://audubonbio.com/blog/ffpes-or-frozen-tissue-how-to-choose-between-their-pros-and-cons/]
- 45. Snap Freezing - an overview [https://www.sciencedirect.com/topics/agricultural-and-biological-sciences/snap-freezing]
- 46. Freezing Biological Tissue Samples [https://www.leicabiosystems.com/us/knowledge-pathway/freezing-biological-samples/]
- 47. Frozen Tissue Preparation & IHC Cryosection Staining ... [https://www.rndsystems.com/resources/protocols/protocol-preparation-and-fluorescent-ihc-staining-frozen-tissue-sections]
- 48. IHC-Frozen protocols [https://www.abcam.com/en-us/technical-resources/protocols/ihc-with-frozen-samples]
- 49. IHC Sample Preparation (Frozen vs. Paraffin) [https://www.novusbio.com/sample-preparation-for-ihc-experiments?srsltid=AfmBOoqGPDeGofLTOJvHNWVlu2mIFpT0oNqVgZY6fR7q88cJhuoTWYOJ]
- 50. Systematic comparison of tissue fixation with alternative ... [https://pmc.ncbi.nlm.nih.gov/articles/PMC3432218/]
- 51. The Histology for Spatial Biology Special Collection Series ... [https://think.taylorandfrancis.com/special_issues/histologyforspatialbiology/]
- 52. Popular Types of Fixatives used in Histopathology [https://www.leicabiosystems.com/us/knowledge-pathway/fixation-and-fixatives-4-popular-fixative-solutions/]
- 53. Bouin Solution - an overview [https://www.sciencedirect.com/topics/medicine-and-dentistry/bouin-solution]
- 54. Comparison of Different Fixation Methods for Combined ... [https://www.mdpi.com/2409-9279/5/4/64]
- 55. Comparison of Different Fixation Methods for Combined ... [https://pmc.ncbi.nlm.nih.gov/articles/PMC9326524/]
- 56. Bone Marrow Cytologic and Histologic Biopsies: Indications ... [https://pmc.ncbi.nlm.nih.gov/articles/PMC7114821/]
- 57. Immunohistochemistry for Pathologists: Protocols, Pitfalls, ... [https://pmc.ncbi.nlm.nih.gov/articles/PMC5122731/]
- 58. An analytical method to determine optimal tissue fixation in ... [https://journals.plos.org/plosone/article?id=10.1371/journal.pone.0258495]
- 59. High-contrast X-ray micro-radiography and micro-CT of ex ... [https://www.nature.com/articles/srep30385]
- 60. Protease-induced Antigen Retrieval Protocol [https://www.rockland.com/resources/protease-induced-antigen-retrieval-protocol/?srsltid=AfmBOoqCYambH8Ty-YmEuhLxZXyVkV2MpIuDhNPRQMr5y1MIpDPrBbr4]
- 61. IHC Epitope/ Antigen Retrieval: HIER vs. PIE [https://www.bio-techne.com/applications/imaging/immunohistochemistry/epitope-retrieval]
- 62. Antigen Retrieval Immunohistochemistry [https://pmc.ncbi.nlm.nih.gov/articles/PMC3201121/]
- 63. Antigen Retrieval Methods [https://www.rndsystems.com/resources/protocols/antigen-retrieval-methods]
- 64. IHC antigen | Abcam retrieval protocol [https://www.abcam.com/en-us/technical-resources/protocols/ihc-antigen-retrieval]
- 65. - Heat | Rockland induced Antigen Retrieval Protocol [https://www.rockland.com/resources/antigen-retrieval-methods-protocol/]
- 66. Comparison of Antigen Retrieval Methods for ... [https://pmc.ncbi.nlm.nih.gov/articles/PMC11417793/]
- 67. Antigen Retrieval Protocol (PIER) [https://www.novusbio.com/support-by-application/antigen-retrieval-protocol]
- 68. A novel quantitative immunohistochemistry method for ... [https://www.nature.com/articles/modpathol2016176]
- 69. Generation of Antibodies Selectively Recognizing Epitopes ... [https://pmc.ncbi.nlm.nih.gov/articles/PMC10525569/]
- 70. Immunohistochemistry Troubleshooting [https://www.antibodies.com/applications/immunohistochemistry/ihc-troubleshooting]
- 71. Comparative analysis of fixation techniques for signal ... [https://www.sciencedirect.com/science/article/pii/S0012160624002276]
- 72. Quantitative comparison and reproducibility of pathologist ... [https://diagnosticpathology.biomedcentral.com/articles/10.1186/s13000-016-0511-5]
- 73. 5 Sources Of Non - specific And Staining ... | Vector Labs Background [https://vectorlabs.com/blog/5-sources-of-non-specific-staining-and-background-in-ihc-and-if/]
- 74. Basics: Blocking Immunohistochemistry - Non Specific Staining [https://bitesizebio.com/13466/immunohistochemistry-basics-blocking-non-specific-staining/]
- 75. Tips for Reducing - Non in IHC – Bioss specific Staining [https://www.biossusa.com/blogs/news/tips-for-reducing-non-specific-staining-in-ihc]
- 76. Cell & Tissue Fixation Methods for IHC & IF [https://www.bosterbio.com/blog/post/all-you-need-to-know-about-cell-fixation-or-tissue?srsltid=AfmBOooCARQdiEiYMoaKbB8X9G6qkmGRBh6pyK5jAKFyljXvDy1Zc6xt]
- 77. How to Avoid or Reduce in High ? Background Immunohistochemistry [https://www.linkedin.com/pulse/how-avoid-reduce-high-background-immunohistochemistry-huang-md-phd-xtvpe]
- 78. Antigen Masking During Fixation and Embedding, Dissected [https://pmc.ncbi.nlm.nih.gov/articles/PMC5256198/]
- 79. H&E Staining Overview: A Guide to Best Practices [https://www.leicabiosystems.com/us/knowledge-pathway/he-staining-overview-a-guide-to-best-practices/]
- 80. Epitope Preservation Methods for Tissue Microarrays [https://pmc.ncbi.nlm.nih.gov/articles/PMC6951944/]
- 81. Review of immunohistochemistry techniques: Applications, ... [https://www.sciencedirect.com/science/article/abs/pii/S0740257024000467]
- 82. Cell & Tissue Fixation Methods for IHC & IF [https://www.bosterbio.com/blog/post/all-you-need-to-know-about-cell-fixation-or-tissue?srsltid=AfmBOorCr_8Wk5nRh0pr0eZnXLuaRDPCBybAFDBQMhRQCgHwrYic1MW2]
- 83. Histological Processing of Scaffolds: Challenges and ... [https://pmc.ncbi.nlm.nih.gov/articles/PMC12387496/]
- 84. Immunohistochemistry (IHC) [https://www.cellsignal.com/learn-and-support/overview-of-ihc?srsltid=AfmBOoq1BRm1X3nXAPd9b8BvR-IPjyC8vegKG8g7iPItbTlm8pnYlc7D]
- 85. Appropriate Fixation of IHC/ICC Samples [https://www.rndsystems.com/resources/protocols/appropriate-fixation-ihcicc-samples]
- 86. Comparison of Different Detection Methods in Quantitative ... [https://pmc.ncbi.nlm.nih.gov/articles/PMC1850311/]
- 87. Immunohistochemistry-IHC | Thermo Fisher Scientific - US [https://www.thermofisher.com/us/en/home/life-science/cell-analysis/cellular-imaging/ihc.html]
- 88. Overview of IHC Staining Techniques and Tips [https://www.bosterbio.com/blog/post/an-overview-of-ihc-staining?srsltid=AfmBOopcv7vorqG2lx5Vzoj_sZq3jfc7KW_wrOOL6r0ScGRq4Vr2Q2O4]
- 89. 免疫组化: 改善IHC 染色的概述+ 步骤 [https://www.leicabiosystems.com/zh/knowledge-pathway/immunohistochemistry-an-overview-steps-to-better-ihc-staining/]
- 90. 技术篇—— 免疫组化&病理诊断 [https://caclp.com/article/?detail_6068.html]
- 91. 免疫组化IHC实验步骤+常见问题解析 [https://www.biolabreagent.com/archive/1486.html?srsltid=AfmBOor_lOGreJhwsxlzgYChn9Lim0Y_yZJ3OH8smDGD2RUkO4-qSZfs]
- 92. 免疫组织化学(IHC)实验方法总结 [https://www.iivd.net/article-24434-1.html]
- 93. 抗体基础知识培训第3 部分:检测、对照及优化 [https://go.myabcam.com/Training-Course-Antibody-Basics3-China?elqTrackId=b99a5cbc0f514491a86797d1dcd2c742elq=00000000000000000000000000000000elqaid=2006elqat=2elqCampaignId=]
- 94. 免疫组化染色实验(IHC)-实验步骤、操作方法 [https://www.biomart.cn/lab-web/method/32qpj68go409t.html]
- 95. 免疫组化-IHC-免疫组织化学技术 - 赛默飞 [https://www.thermofisher.cn/cn/zh/home/life-science/cell-analysis/cellular-imaging/ihc.html]
- 96. Use of fixatives for immunohistochemistry and their ... [https://www.sciencedirect.com/science/article/abs/pii/S0076687920301221]
- 97. Non-formalin fixative versus formalin-fixed tissue [https://www.sciencedirect.com/science/article/pii/S0014480012001050]
- 98. Quantitation of fixative-induced morphologic and antigenic ... [https://www.sciencedirect.com/science/article/pii/S0023683722009618]
- 99. Choice of Fixative Is Crucial to Successful ... [https://pmc.ncbi.nlm.nih.gov/articles/PMC2664939/]
- 100. Chromogenic IHC and ISH Resources [https://diagnostics.roche.com/us/en/products/product-category/immunohistochemistry--ihc-/chromogenic-resources.html]
- 101. A simple technique for preservation of fixation-sensitive ... [https://pubmed.ncbi.nlm.nih.gov/8027531/]
- 102. Society for Immunotherapy of Cancer - PubMed Central - NIH [https://pmc.ncbi.nlm.nih.gov/articles/PMC11749220/]
- 103. Principles of Analytic Validation of Immunohistochemical ... [https://www.cap.org/protocols-and-guidelines/cap-guidelines/current-cap-guidelines/principles-of-analytic-validation-of-immunohistochemical-assays]
- 104. IHC-IF Protocol - Multiplex [https://www.atlasantibodies.com/knowledge-hub/protocols-for-antibody-applications/ihc-if-protocol-multiplex/]
- 105. Antibody-Based Multiplex Image Analysis: Standard ... [https://www.sciencedirect.com/science/article/abs/pii/S0023683725001308]
- 106. Multiparametric cellular and spatial organization in cancer ... [https://www.nature.com/articles/s41551-025-01475-9]
- 107. E691 Standard Practice for Conducting an Interlaboratory Study to Determine the Precision of a Test Method [https://store.astm.org/e0691-22.html]
- 108. A fully automated quantitative analysis method based on ... [https://www.sciencedirect.com/science/article/pii/S2950261625000342]
- 109. Case Report: Pitfalls in bone marrow evaluation [https://www.frontiersin.org/journals/oncology/articles/10.3389/fonc.2025.1628130/full]
- 110. Validation of Fixation and Decalcification Protocols for ... [https://mahidol.elsevierpure.com/en/publications/validation-of-fixation-and-decalcification-protocols-for-optimizi/]
- 111. IHC Fixation Optimization: Best Practices for Tissue ... [https://www.bosterbio.com/protocol-and-troubleshooting/ihc-optimization/fixation?srsltid=AfmBOops9sAC9juGYZgg8TwDJ94HzZzGLb_hzAAuw0O0Yah9NisjJ4I7]
- 112. Analytic Validation of Immunohistochemical Assays [https://pmc.ncbi.nlm.nih.gov/articles/PMC6938252/]
- 113. Effects of Fixation and Tissue Processing on ... [https://www.leicabiosystems.com/us/knowledge-pathway/effects-of-fixation-and-tissue-processing-on-immunocytochemistry/]
- 114. Comparison of Fixation Methods for Preservation ... [https://pmc.ncbi.nlm.nih.gov/articles/PMC3201123/]
- 115. Quantitative assessment of fixation strength in combined ... [https://pmc.ncbi.nlm.nih.gov/articles/PMC12414278/]